
 It's Wednesday and since it's Wednesday, it's time for relaxing break!
Luckily for us, escapers, Neat Escape is very fertile last months! In this remake of their older game you wake up in a depot, in empty coach obviously designated for escape. After train escape Selfdefiant entices you into dark asylum (the bait is your girlfriend), shuts the door behind you and doesn't let you out until you exorcise it. With Funkyland you visit much friendlier place - nice cafe with top notch interior design and beautiful inner garden.
Have a good time and enjoy!

Maybe you fall asleep in the train and missed the terminal, maybe Neat Escape deliberately locked you up - whatever the reason, the fact remains that you are in empty train coach, alone, and without a key. The coach is very clean and polished, seems brand new - and after quick survey you notice differencies between this one and others - like the tiny railroad down there! Several boxes are lying around, all coded - maybe some hints can be found around too? Can you set yourself free?
The cursor is not changing, save button, one ending.
The game is available for Android too.
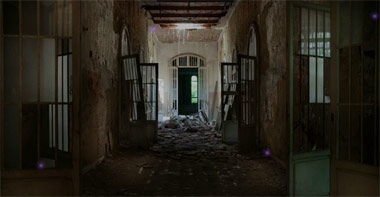
With Selfdefiant you wander to another abandoned asylum, spooky and haunted, and to escape it, you need to get rid of some evil spirits, find seven red gems and place them. Your first task is to find green bottle for collecting glowing orbs (hover over them only, no need to click them), as for orbs you can buy some important items in special shop. Look for hints, solve puzzles, open few doors and keep counting gems you find - when is the last one found, sockets show up and you can place gems. Exit door open by itself then - you fulfilled your mission, the asylum is still abandoned, true, but the dark forces are gone!
The cursor is changing, autosave, one ending.
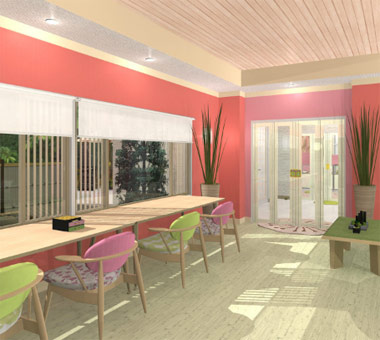
This time Funkyland wants you to find five charm straps before you can leave Japanese cafe (seeming like a tea room) - where you'd like to stay longer, because it's such a relaxing place, and the japanese garden outside seems marvellous! But this isn't quick escape; before you find all the straps, you'll get a chance to explore the cafe. Ms Frog isn't missing, she awaits you in a small shop and expects you to give her something...will you find out what is it?
The cursor is not changing, save button, one ending.
The game is available for Android too.
We love escape games, and our readers love talking about them and sharing hints! How about you? Let us know what you think, ask for clues, or help out other players in the comments below.


This game is nice and short, but finding all the things you need is a real challenge.
Escape from the Train
Since this is a remake of two older flash games, we can look them up for the story: you fell asleep on a train and now it's at the depot and the doors are locked. Thankfully, Neat Escape has replaced the intense blockbuster music from the originals with some inspiring relaxational piano.
Exploration
Note: you can keep track of where you are along the train car by counting the seats in front of you.
Let's start on the left side. The seat immediately in front of you has a four-color box, and a metal part on the left window catches your eye.
Click the seat on the left to lift it up and find some kind of rock in it.
On the seat in front of that, the safe has four buttons with shapes on them.
Before you move on, notice the ceiling panel which is out of reach.
For the next seat, you can only look at the left half. What's that about?
Click the floor to the left of the seat to find a panel that hides a switch.
For the next seat, you can't even examine the seat, only the side of it! There are two colored round indentations and a button above a slot. You can also examine the poster above the seat which seeks participants in a sports meet with nine activities.
The door at the end of the train is locked, and you can look at the clock above it. Wow, it's late.
On to the right side! The seat to the right of the door has a locked compartment above it.
And you can click the seat itself to remove it. Inside, there's a metal bar fastened down by bolts.
The next two seats seem to have nothing interesting near it.
So back out to the starting view. The seat on the right has a four-digit box on it, but more interesting is the tiny rail track on the floor that passes into the side of the seat, with an equally small metal box on the wall next to it.
You can look at the other side to find where the track ends.
Turn on
Flip the switch you found on the left side, and nothing appears to happen.
But now you can open the seat up to find some (replicas of) sports equipment.
Diverse
Use the clue from the sports equipment to unlock the four-color box.
The items match those on the poster in the icons for baseball, weightlifting, high jump, curling.
The corresponding icons are green, blue, red, yellow, so click the buttons on the box 1, 3, 2, 4 times, then open it to find a spanner.
Tool
Use the spanner to remove the metal stick in the last seat.
Then use the stick to open the ceiling panel. Now you can just reach your arm up to take the blue ball that was in it.
Four digits
Use the clue from the clock to unlock the four-digit box.
The time is 9:25, but since you know it's nighttime, it would be 21:25 in the 24-hour format.
So enter 2125 in the box, and open it to find a red ball.
Pair
Place both balls in the indentations on the last left seat, and push the button to receive a hammer.
Pulverize
Use the hammer to smash the rock on the first seat, and pick up the red key from it.
Unlock
Use the red key to unlock the compartment at the end of the train, then pick up the toy train from it.
Four shapes
Use the clue from the toy train to unlock the four-shape box.
The shapes on the top of the toy train are diamond, circle, triangle, star.
So click the buttons 5, 3, 2, 4 times, then open the box to find a red GO button.
Rolling
Zoom in on the tiny track. After you place the train down, you can open the box and place the button.
You can also push the button to send the train moving, and it comes out the other side unchanged.
Instead, attach the metal part to the front of the train before you place it on the track.
When the train emerges, it pushes a blue key out!
So use that key to unlock the door and leave.
Distorted Asylum
Your favorite asylum has become twisted, and now you have to rescue your girlfriend from it!
Getting the jar
After the previous games, you know that the forces of darkness are best countered with the help of these purple orbs trapped in a sacred jar. So let's skip the whole part where you bump into walls, and go directly to it. For traveling between screens, I'll refer to directions as they would appear on a compass, with north being up.
The room you start in is filled with darkness, and the exit door behind you has been magically sealed. Thankfully, you can just click the up arrow to move north to a corridor with four possible paths.
Now move east, north, and north up the stairs, and north again. There's the jar resting on the wheelchair! You can now pick up 4 orbs by moving your mouse over them. Notice the crack in the wall on the left.
Exploration: to the shop
As before, orbs that I've found on each screen will be indicated in parentheses.
The door to the east is locked and has a silver keyhole.
Go south (3), and pick up the hammer from the window.
Take a detour to the east (4), where you find an unlit candle and some shapes on the wall that look like a sixteen-segment LCD display.
Then go west and south (4). Notice that the colored globes beside the stairs light up when you click them.
Go south (3) again. The east door has a green keyhole.
Go west (4), then north (4). The north door has a gold keyhole.
Then go west (4). We've arrived with a total of 30 orbs! Click on the hooded figure to open up the orb shop, and buy the map on the left for 10 orbs and the crystal ball on the right for 20 orbs.
Now you can open the map and takes notes in it, and the crystal ball lets you teleport anywhere you've previously visited just by clicking that spot on the map.
Exploration: the west half
Teleport back to F, and then go west to E(3). There's another display on the left window, a weird machine with a scale and a wall panel that's screwed shut.
Go west to D(3), where a wall panel has three lights and buttons shaped like the displays you've seen. The west door has a purple keyhole.
Go north to K(3), and pick up the old book on the ground. It has a four-letter lock on it. The north door has a blue keyhole.
Go west to J(4). Examine the bear closely, then rip out its remaining eye to find a purple key.
Unlock: Purple
Bring the purple key to D and use it to open the west door.
At C(2) you find a chest with a lock on it, with a grid of flowery arrow shapes in colored circles.
Go west once more to B(0). That's right, there are no orbs here. Instead, there are some large pots which are empty except for the second one, which has a reddish blob with a green key in.
Unlock: Green
Bring the green key to G and use it to open the east door.
Of course there's a church at H(3). Darkness seems to emanate from the purple eye floating near the ceiling.
Go east to I(3), where you can remove the poster from the wall to reveal a hidden compartment with a blue key.
Unlock: Blue
Bring the blue key to K and use it to open the north door.
An evil spirit floats around at P(3).
And playing around with the chairs, you find that the third one on the bottom row hides some batteries.
Move north to U(1), where you can dig around in the sink to find a screwdriver.
Go south and west to O(3), where you find a whole bunch of empty lockers and cupboards. But are they really all empty?
One of them is not like the others.
Hint:
It's one of the closed lockers.
Solution:
Exactly one of the lockers is missing a handle, as far as we can see.
It's in the fifth column from the right and second from the bottom!
So click there to find a silver key.
Unlock: Silver
Bring the silver key to W, and use it to open the east door.
At X(4), you find another one of those displays on the wall. Looking in the switchbox next to it, you find a lighter.
Unscrew
Use the screwdriver to remove the panel at E and find lighter fluid.
Lamp
Fill the lighter with the lighter fluid, then bring it to T and light the candle to reveal the gold key next to it.
Unlock: Gold
Bring the gold key to M, and use it to open the north door.
At R(4), you find a glowing pair of green-lensed glasses on the table.
Go north to V(3), and click the drawers between the beds to find a flashlight in them.
Go south and west to Q(3), which is way too dark to see anything.
Beam
Place the batteries in the flashlight, and use it to light up the room at Q.
There's nothing else of interest there except for a red gem.
Exorcism
Go back to the orb shop at L, and buy up the sacred dagger and light bow and arrow.
Use the dagger to defeat the spirit at P to get a red gem, and the bow and arrow to defeat the eye at H, which also drops a red gem.
Filter 1
Use the glasses on each of the displays at E, T, and X, which makes some symbols appear in green.
Then use that clue to unlock the device at D.
You can input the symbols in any order. Click the switch after each one to light up the corresponding lamp.
I (at E): Connect the horizontal lines across the top and bottom, and the vertical line across the middle.
II (at T): Connect the two diagonal lines through the middle, then the vertical line segments forming the bottom half of the left side and the top half of the right side.
III (at X): Connect the vertical line across the middle and the diagonal line from bottom left to top right, then the half-length line segments in the horizontal directions meeting the top-left and bottom-right corners.
After all three codes are input correctly, the device opens up so you can take a red gem.
Flipped
Use the clue from the scale at E to unlock the book.
The text painted on the front reads PAIN backwards.
So enter PAIN in the book, and click the clasp to unlock it. As you flip the pages, you find a "normal" diary entry followed by a grid of colored circles, then several short pages of nonsense words, and at the end there's a red gem.
Switched
Use a clue from the book to activate the globes beside the stairs at N.
The sequence of words in the book has the initials B B B B R R B.
So click the Blue (left) and Red (right) globes in that order, and a red gem appears beside the red globe.
Smash
Use the hammer on the cracked wall at W to get the last red gem.
Appearance
Collecting all 7 gems from D, H, N, P, Q, W and the book has caused hexagonal receptacles to appear on some of the walls. Seek them out!
Or you could just read the next spoiler.
The gem slots appear at C, F, I, M, T, U, V.
So place the 7 gems there.
Returning back to A, you find that the exit is now unlocked and you can end the game. But where's your girlfriend?
Filter 2
Use the glasses on the second page of the book to reveal an arrow passing through the circles.
Then use that clue to unlock the chest at C.
Notice that while the pattern of colors on the buttons is rotated 90° clockwise from that on the book.
So the arrow needs to pass through the buttons on the chest in the order
4 2 1

3 5 8

6 7 9
going towards the lower left after 9.
Which means that the arrows on the chest need to point in the
↘ ↙ ←

↑ ↙ ↓

→ ↗ ↙
Set them accordingly, and you get a magic wand.
Powerful
Use the magic wand to clear out the darkness at A.
You find your phone, which has a message from your girlfriend saying she wasn't coming.
Now you can leave with some peace of mind!
Escape a Japanese Cafe
After your short trip to the beauty salons, it's time to have a Japanese snack break. Today, the five things you need to collect are charm straps.
Exploration 1
You start off facing an empty table. On the wall behind, there are two doors you can't open: the left has its handle tied with a rope wedged in the frame, and the right has its access keypad shut off by a plastic panel secured with screws. The cafe's counter is on the right, decorated with four simple pictures on the wall above, and you can pick up the menu from the counter to find a password card inside. The door on the right wall is blocked off by a giant plant pot whose lock has four picture buttons.
Turn left to find two double doors with a row of six lights above the two arrow buttons on its lock, and a long table facing the window which has a small box with two drawers and square compartments on top.
Turn left. The table here has a cup of matcha and a green heart chocolate laid out.
Turn left. The table here has a plastic card with a picture of dango on a skewer. There's also another table on the left with some greenish plant arrangements, and you can click the middle one to lift it and find a chidori (plover) charm strap.
Imagery
Use the clue from the hanging pictures to solve the lock on the pot.
The green dot above the left button matches the color on the right picture.
So you need to input the pictures from right to left: gourd, fish, mountain, cat.
Click the buttons 1, 6, 4, 5 times and then push OK. The pot sprouts wheels and now you can push it aside to access the door to the next room.
Exploration 2
The two doors in front of you open into two toilets.
The left one has a clue with dice above the toilet bowl, and a gourd charm strap beside.
The right one has a clue with fish above the toilet bowl, and a key handle beside.
Side to side
Use the clues in the toilets to unlock the double doors.
The fish in the positions marked by the dice face the left, right, left, left, left, right directions.
So push the LRLLLR buttons on the doors to unlock them.
You enter a room with two locked doors at the front and left, and find a key tip in the left corner.
Unlock / Exploration 3
Attach the handle to the key tip, and use the assembled key to unlock the sliding doors.
It's a sweet shop! You can browse the displays on the left which contain confectionery at different prices and a box of different-shaped matcha chocolates. Looking in the wooden box on the right display, you find a triangle chocolate. At the back, Ms Frog sits in front of a tiny dessert spoon, and is surrounded by more boxes of confectionery. On the right wall, a box has four slots with skewers in them, and the downward arrow buttons above and below the skewers add and remove different-colored balls to them.
Chained
Use the clue from the picture of dango to unlock the skewer box.
The green, brown, pink, white balls are in the 1st, 3rd, 4th, 2nd positions from the base of the skewer.
So click the top buttons to place that many balls on the skewers (from left to right), then push the OK button, which pops open to reveal a star chocolate.
Green
Use the clue from the chocolate box to unlock the box with two drawers.
Ignoring the square chocolates, the box on display holds triangle, star and heart chocolates, but they seem to be sideways.
So rotate the whole clue to make the triangle face up, and you find that the heart goes in the top middle square, the triangle in the bottom-left and the star in the middle.
So place the chocolates from your inventory accordingly, and push the OK button to unlock both drawers. You find a screwdriver in the top one and a maple charm strap in the bottom one.
Unscrew
Use the screwdriver to remove the cover on the keypad.
Numeric
Use the clue from your password card to unlock the door with the keypad.
The items on the card have prices of 540, 130, 460, 788 yen.
The colored circles beneath the pictures tell you to take the 2nd, 1st, 2nd, 3rd digits from the prices.
Those digits are 4, 1, 6, 8, so enter 4168 to unlock the door.
Exploration 4
The kitchen shelves are uninteresting except for a pair of scissors on the left shelf. Beneath that, there's a tray with clamps and a bowl and instructions for serving. On the right side of the wall, a box with a frog picture has square buttons that get increasingly subdivided when clicked. The cupboard beneath that is locked and has a card slot.
Snip
Use the scissors to cut the rope holding the other door shut.
You can now access the small garden with a butterfly charm strap on the nearest bamboo stem.
Boxy
Use the clue from the Ms Frog display to unlock the box with square buttons.
The boxes on the top row above Ms Frog have 5, 2, 4 packages of sweets, and those on the bottom row have 3 and 6.
So click the buttons until they match, and then the OK button. The box dispenses a keycard.
So use that card to open the cupboard and find a neatly wrapped package.
Unwrap that package to find two smaller dessert containers.
Serve
Use the dessert on the tray, and then the spoon.
Now you can pick up the small tray of dessert.
Set the tray down in front of Ms Frog, who gives you the sakura charm strap.
All five charm straps combine to form the door key, which you can use to unlock the remaining double doors and escape!
Update