
 Hello! The new Weekday Escape has just arrived! Aries Escape takes you to a karaoke room - not to test your singing skills and voice, but to prove your escaping ability. In case you pass the test (you will, I'm sure) tomoLaSiDo locks you in another room - a familiar tune plays in the background, and you need to find six balls (to get out) and eleven kettles (if you wish). Neat Escape wants you to escape from beautiful castle by the sea and your final escape is spectacular!
Have a good time and enjoy!
This isn't the first karaoke room by Aries Escape (or Libertechno); few years ago we were escaping from another one in Aries Escape No.18. The new room is quite similar to previous and very pink too; the only big change is beer price, which has been remarkably raised according to the posters! Oh well. You should find something else to drink.
Notice the woman torso in the lower right corner - is Yumi - if you click at her, she may help you. Can you escape before the repetitive music gets under your skin?
The cursor is not changing, save button, two endings. The game loads very slowly, give it some time.
The game is available for Android and iPhone.
Big round window is back in tomoLaSiDo's latest game; and outside you see peaceful green field under the blue sky...nice. Beside the window stands a coat stand with six kettles hanging down from it. Does someone store kettles this way and if so, why so many? Is it a modern sculpture? Are they here simply because of game's name? Side quest of this game is to collect eleven kettles, maybe some connection? So many questions without satysfying answers...you'd rather see for yourself, go and play!
The cursor is changing, no save button, one ending.
It's time for romantic trip to medieval castle! At the beginning, Neat Escape locks you inside the oldest part, where the walls remember Templar Knights and/or the Crusades...or maybe not, who knows...whatever, it is an ancient castle, but with every opened gate or door you get further to newer and newer parts, almost homey at the end of your tour. You aren't here for sightseeing though; there is some work to be done! Doors don't open by itself and many puzzles are waiting for you! During playing the game changes, so if stuck, you may wish to revisit locations already explored. You don't need to know anything about chess to solve chess themed puzzles.
The cursor is not changing, save button, one ending.
The game is avalable for Android too.
We love escape games, and our readers love talking about them and sharing hints! How about you? Let us know what you think, ask for clues, or help out other players in the comments below.


If you don't like the music, look for the menu on the top right banner at the top of the game.
Click on the 3 line menu.
Click on Sound and remove the dot next to BGM.
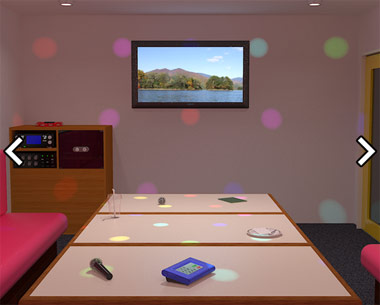
Karaoke Room
Aries Escape sure knows how to throw a party.
Interface help
This game has a brand new interface where you can drag the options menu from the left edge of the screen (in addition to the usual method of clicking its menu icon). You can turn off the sound or music from there, but the options also include a Beginner level which highlights every hotspot, so try that out if you get stuck.
Don't forget that you can drag the inventory to scroll through it. As in the previous game, you can leave the saving on Automatic, as the game won't lock you out of either ending.
Exploration
Before you even start looking around the room, check your torso in the lower-right corner to find that you brought a smiley badge pin and your trusty smartphone.
The table in front of you has two microphones, as well as an empty glass, a blank menu with empty pockets, a remote with a folded piece of paper that hides a coin, and a remote control with buttons marked with digits and a hyphen. On the far wall, there's a screen which shows a landscape photo. At the lower left of the wall, there's a cabinet with a tambourine on it that you can turn over to find a barcode. The cabinet also has a pair of glass doors with handles marked with L and R.
The arrow that appears on the right while looking at the screen hints that you can look at its right edge to find six digits marked there.
Similarly, the arrow that appears on the left while looking at the remote control hints that you can look at the left edge to find a hidden compartment with a coin.
Turn right to face the door. Instead of a keyhole, it has a light and a logo that matches your phone. You can also look up at the pegs attached to the wall, which have different colors.
Shift right. It seems that you're looking at a blank section of wall, but clicking on the sofa lets you take a closer look at the cushions, which you can click to lift up. You can also zoom in on the balloons in the corner, which you can't do anything with yet.
Turn right. There's a large picture on the wall with letters on stripes, and clicking the edges of the frame shifts it in those directions.
Click the seat beneath to open it up and find a golden plate with three slots for crosses and a circular marking.
Turn right. There's more balloons, and different posters on the wall that you can click to lift up. The left poster with musical instruments and notes and the middle poster with food prices both hide nothing, but the right poster with stars hides a purple plate fastened down by screws. You can also lift the couch cushions here. The left one hides a five-letter safe and the right one hides a four-color safe.
You can move right once more, but there's nothing else to look at on this screen.
Five letters
Use the clue from the large picture to unlock the five-letter safe.
(Make sure you've zoomed all the way in on the picture or it won't count.)
Click the buttons and select M, U, S, I, C from the menus that appear to input the word.
Then open the safe to get a silver cross.
Four colors
Use the clue from the pegs beside the door to unlock the four-color safe.
The red, blue, green, black colors are the 6th, 3rd, 5th, 8th from the top (the first being white), so select them from the menu and unlock the safe to get another cross.
Musical Chairs
Use the clue from the screen to find a secret in the couch cushions.
The digits on the side of the screen read 413132, so raise the 4th, 1st, 3rd, 1st, 3rd, 2nd cushion from the left on the screen without the posters.
With a loud click, a wall panel opens up and you can see a four-digit safe with food clues and another safe which has musical notes on its buttons.
Feast
Use the clue from the food poster to unlock the four-digit safe.
The total price of all the food items shown on the safe is 1865 yen.
So enter 1865 in the safe to unlock it, and take the cross inside.
Three crosses
Place all three crosses in the panel under the seat below the striped picture frame.
The circular cover opens up so you can take… a canned drink!
Hydrate
Open the canned drink and pour it into the empty glass. Some arrows become visible on it.
Tilty
Use the clue from the filled glass to unlock the striped picture.
From left to right, the arrows point in the ↑→→←↓ directions, so click the top, right, right, left, bottom edges of the picture to unlock it.
Behind, you find a safe with four shape buttons.
Pop
Turn the badge over to find its sharp point.
Then apply it to all the balloons in the room.
You find a coin that drops from the balloons from the left, and a folded note from the balloons on the right.
Control
Use the clue from the note to cue up some music.
Enter
47-926in the remote, and push the Start button.Turn around to face the screen, which now shows some musical notes over a photo of flowers.
Five notes
Use the clues from the screen and the left poster to unlock the cabinet.
The notes on the screen match those marked RLLRL on the poster.
So press the corresponding handles on the cabinet to open it.
Inside, there's a "Security System" box with a coin slot and a numeric keypad, and three lights in between labeled Func1 to Func3. Pick up the green pencil beneath the box.
Lead
Use the pencil on the left side of the menu to reveal four shapes.
Four shapes
Use the clue from the shaded menu to unlock the safe behind the striped picture.
The shapes that appear after you shade the menu are Circle, Upward Triangle, Square, Circle.
So input the corresponding shapes in the safe, and open it to find a red magnetic card.
Rhythm
Use the phone to scan the barcode on the tambourine, and it shows some musical notes.
So use that clue to unlock the safe with four musical note buttons.
The barred notes represent a sequence of four notes with varying lengths: dotted quaver, semiquaver, quaver, quaver.
So select the 6th, 7th, 5th, 5th notes from the top of each menus to put them on the buttons.
Then unlock the safe to find a screwdriver.
Unscrew
Use the screwdriver to remove the plate behind the Aries poster, revealing a safe with four sliders.
Three coins
Place all three coins in the security system box, and its display changes to give you another code.
Control 2
So enter the code (
92-681) from the security box into the remote control to play another song.The screen displays another flower image, this time with whole notes on a musical staff.
Pitches
Use the clue from the screen to unlock the safe behind the Aries poster.
The notes on screen indicate that the sliders should be in the 1st, 4th, 2nd, 3rd positions from the top.
So set them accordingly and open the safe to find a blue magnetic card.
Data
Place both magnetic cards in the pockets of the menu to make another barcode appear.
Then use the phone to scan this new barcode, and it shows an unlock icon.
Normal Ending
Use the phone on the door to unlock it and leave.
Happy Ending
Open the door but don't leave. Instead, look around the room for something different.
A spotlight appears on one of the cushions beneath the striped picture.
So click it to find a nine-button safe. Where's the clue?
Check the screen again. A pattern of stars appears on it.
So click the stars in the
S--

-SS

S-S
positions to light them up, and open the safe to find a ring.
Leave with the ring for the happy ending.
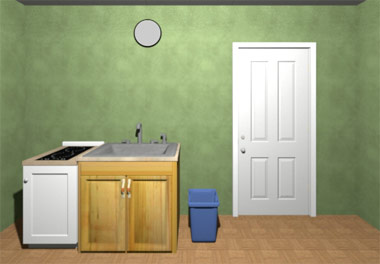
Escape Challenge 57: Room with Kettles
The round window is back!
Exploration
The table in front of you has something blurry on it. On closer look, it's a timer with a cup that has an exact timing of 3 minutes, even though the bubble on the left says it's actually about 7 seconds. A chain of kettles hangs off a rack, the hook stuck to it by a blob of glue. And the potted plant as a single kettle hanging from it.
Turn left to face a large rectangular machine with three drawings on matching colored backgrounds. A sphere and cube are placed upon the tall table to the left, the sphere having a face on it and the red-and-white striped cube having a rectangular display in the front.
Look under the table to find a key piece.
Turn left to face the locked door. A kettle-themed clock hangs over a sink and stove, and the blue bin next to the door contains a key piece.
Turn left. A picture on the wall asks you to choose between cold and hot, and the locked box attached to the wall on the right of it has two square buttons. The cupboard beneath the picture has three locked drawers, the top with three digit buttons, the middle with three color buttons with clouds of steam drawn above them, and the bottom also with three color buttons but its clue has two vertical lines in an oval.
Click the left side of the screen to enter the corridor, then the open door to enter the toilet. Pick up the kettle there. As usual, you can sit down, look right, look up and then look left to find a drawing of some muscly kettle handling.
Left and Right
Use the clue from the hanging kettles beside the table to unlock the box mounted on the wall.
The spouts of the kettles are on the left, right, right, right, right, left sides. So push the LRRRRL buttons, and open the box to find a kettle (item).
Boil
Fill the kettle in the sink, and use it on the stove to boil the water. If you change your mind, you can refill it with cold water in the sink.
Pour the water (hot or cold) over the ball with a face, and three digits appear in the display below.
Pour cold water on the each of the drawings to transform them. Afterwards, you can pour hot water to turn them back.
Pour hot water on the glue to collect the chain of 6 kettles.
Three digits
Use the clue from the ball to unlock the top drawer.
The digits that flash on the display read 104, so enter that in the drawer, then open it to get a kettle and key piece.
Three colors
Use the clue from the drawings to open the other two drawers.
The steam markings on the middle drawer indicate that you should pour hot water on the drawings. Since this puts them in their original state, the colors needed are cyan, yellow, green. So click the buttons 1, 2, 3 times, then open the drawer to find a key piece.
The clue on the bottom drawer matches the pig's snout which appears when you pour cold water over the middle drawing.
How do you get three different colors out of that?
The left button cycles through the three original colors (cyan, yellow, green), and the middle drawing was originally yellow.
The middle button cycles through the colors on the Cold Or Hot picture (red, blue), and cold water is represented by blue.
This means the remaining color is the new color of the middle drawing: black, or dark gray.
So click the buttons 2, 2, 3 times, then open the drawer to find a kettle.
The bottom of the drawer also has a pattern of shaded triangles pointing to the left.
So click the left side of that drawer to look around the cupboard and find a key piece.
Timing
Pour the hot water into the cup, starting the timer.
Now, you don't want to wait too long or the cup will just throw up a blue and white blob onto the table. Just hit Stop when the timer is exactly on 3:00… oh no, did you miss it?
You can back out and try again (and it is possible), but there's got to be a better way!
You may have noticed that the timer jumps to 3:00 when you tap the display. So if you miss the timing, just tap on the display!
The cup spits out the last key piece.
Escape
Now that you have the whole key (and all the kettles), you can click on the door to leave!
Item guide
6 key pieces:
Top left: in top drawer
Top middle: in middle drawer
Top right: to left of bottom drawer
Bottom left: in bin
Bottom middle: in cup
Bottom right: under small table
11 kettles:
1 (item) in two-button box
1 on potted plant
1 in toilet
1 in top drawer
1 in bottom drawer
6 hanging from rack
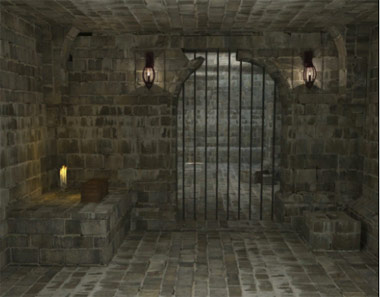
Escape from the Castle
Your castle visit has turned into an escape game! Gather your wits before the gloomy music gets you down!
(Even though there's only one ending, the game is rather long so remember to save it from the menu.)
Exploration
Iron bars block your way forward, and though it's difficult to see, the stone block on the right has a nearly cut hole on top. On the left, three candles provide just enough light for you to examine the three-digit box.
Turn around to face a window with some stones piled in it. The filled basin on the right is helpfully labeled "oil".
Click the left side of the screen to head up the stairs. But wait, did you see that?
Pick up the cloth from the lower-left corner as you face the stairs.
At the top of the stairs, a wall has crumbled and light filters in from above and through the window. Peeking through another window reveals a rooftop just out of arm's reach. Your eye is drawn to a pile of stones in the corner, and you look closer to find a stick hidden beneath them.
Click the doorway to enter a room with too little light to do anything.
Light
Wrap the cloth around the stick, dip it into the oil and light it on the candles.
Now you can see into the room, which contains more iron bars and a lever in the corner.
So pull the lever, which… lowers window blinds made of stone? Why is this a thing?
Figure
Use the clues from the shaded window to unlock the three-digit box.
Zooming in on the shadow on the ground, you read LIL.
That's 717 upside-down, so enter 717 in the box to unlock it and get a stick with a carved end.
So place it in the stone block on the first screen and pull to open the bars.
Exploration 2
Walk forward to find a corridor leading both ways.
Turn right first (by clicking the right side of the screen). In the left corner, there's a stone platform with four small holes circled in white on the corner nearest to you. In the right corner, there's a bunch of wooden planks, and you can click one of them to move it off the plank beneath and reveal a bolt with a metal ring handle.
Back out and go left. Your path is blocked by two walls, one of stone and one of wood. The wooden pillar has a circle in the bottom which marks a small hole.
But wait, there's more! As you walk back to the starting screen you notice that the candles have gone out and you can see their colored wax centers.
Climb back up the stairs to the dark room, which you have to light up with your torch again. The bars here have opened too, and on the stone shelf at the back you find a winch held down by bolts and a safe with three color buttons.
Three colors
Use the clue from the candles to unlock the three-color safe upstairs.
The centers of the candles are red, yellow, aqua, so click the buttons 5, 4, 1 times to open the safe and get a spanner.
Relocate
Use the spanner to remove the winch.
Then carry it downstairs and place it on the marked platform, fastening its bolts into the circled holes.
Then turn the handle a bit to expose the end of the rope, which you click to run the rope over to the base of the wooden pillar.
Zoom in at the base of the wooden pillar and attach the bolt from your inventory to it.
Then tie the rope around the ring.
Then crank the handle on the winch again to drag the pillar again. Now you have access… to the locked door behind the pillar.
Dead End
It seems that you're stuck with nowhere left to go. Maybe if you look around a bit more…
The pillar you moved is now positioned right outside the window upstairs.
So cross over it to find a dead end with a wooden box containing a key.
Use the key to open the doors downstairs.
Exploration 3
You enter a room with identical locked double doors on each side of a pool with water flowing in from the end, where a wind vane is drawn on the wall. On the front (near), left and right sides of the pool, you find square plates with flowery etchings. The floor of the pool seems to be divided in half, but you can't do anything with that.
But you can also click the plate on the right side to remove it and find two bolts beneath.
Valve
Use the spanner to remove the bolts beneath the plate on the right side of the pool.
Now you can lift up the cover to find a red valve handle. Turning the handle shuts off the water flow at the end.
With the water off, you can now view the last plate and the box next to it with patterned buttons labeled NEWS.
Directional
Use the clues around the room to unlock the safe.
The letters on the box refer to the directions North, East, West, South.
The vane tells you that North is to the left, so you need to input the patterns from the left, top (far), bottom (near), right sides of the pool. (A quick check of the buttons will also confirm that no rotation is necessary.)
So push the buttons 5, 1, 4, 2 times, then open the safe to find another key.
Use this key to unlock the left door.
Exploration 4
After passing through the door, you can pick up the wooden log on the right side.
Walk forward to find a solid stone block in the right corner, and (back out) and go left to find a barrel and a window too high to reach.
Climb
Place the barrel under the window. Now you can climb up to find a saw.
There's also something attached to the second window bar from the left: a golden key on a chain. Unfortunately, your saw is not strong enough to cut it free.
Shift
Use the saw to cut the log into shorter lengths.
Then place the short logs under the giant stone block, and slide it away from the corner.
You find a secret compartment with a lever! Pulling it doesn't seem to do anything yet.
Container
Pick up the barrel again, and use the saw to cut a hole in it. Take a locked box from inside.
Then place the barrel back under the window, climb up and use the box on the key chained to the bars.
This unlocks the box, and you find yet another key inside.
So bring this key to the other double door and use it there.
Exploration 5
You find yourself in a fancy dining room with not even a single stone in sight. The table is set for seven people, and you can zoom in on each place setting. Looking along the left wall of the room, you find a box with knife and fork buttons, and an unusual hole next to it on the right. Searching the right wall, you find a single panel with two handles at the bottom tied together by wire.
Jagged
Place the box from your inventory into the hole along the left wall.
Clicking on it again peels off the top to reveal an arrow that connects each of the triangular protrusions on the box.
Utensils
Use the clue from the arrow marking to unlock the knife and fork box.
Notice that the box/hole has three triangles on the left, four on the right and one on the bottom, while the table has three seats on the right, four on the left and one on the top.
So you need to read the clue upside-down: the arrow starts from the furthest seat on the left of the table and ends at the nearest one on the right.
Each of those seats only has a single utensil: fork, knife, knife, knife, knife, fork.
So push the RLLLLR buttons on the box to open it and find a pair of pliers.
Snip
Use the pliers to cut the wire joining the two handles on the right wall. Now you can slide the panel upwards to reveal a lever.
Pull that lever. Since you've already pulled the lever in the left room, this activates a set of stairs leading up through the fountain.
Exploration 6
The stairs lead you up and through a pair of double doors into an even grander ballroom. Six suits of armor hold pictures of chess pieces. Examine the closest one on the left to find a letter clue, then walk past all of them to the back, where you find two lavish seats among three wooden boxes. There's a chess piece next to the left four-letter box, while the middle box has two deep circular holes and the right box has a small checkerboard of twelve buttons with B&R written above.
ID
Find the clues for the left box.
The chess piece beside the box is a pawn (as shown on the middle-right picture), so enter PAWN in the box to unlock it.
Take the queen piece from inside.
Initial
Place the queen in the middle box, where it fits in the hole marked Q. Push the OK button, and the Pawn picture slides down to reveal another clue.
Dual
Use the new clue to unlock the right box.
Checking the colors on the squares, you find that once again the picture needs to be rotated.
The letters B and R refer to the bishop and rook pieces, and there are a total of four such pieces on the picture.
So push the third buttons on the first and third rows, and the first and last buttons on the second row, then open the box to find the king piece.
Mate
Place the king in the middle box, where it fits in the hole marked K. Push the OK button again, and a drawer springs open with a large red PUSH button inside.
So push that button, and the picture of the room slides up to reveal the exit.
Exploration 7
You walk through a doorway and across a bridge to find another door. Thankfully, it's already unlocked and you can enter to find… what exactly is this? There's some sort of metal frame suspended from above and held down to the floor by chains, and there seems to be a metal cage filled with firewood in the middle of it.
Unfetter
Zoom in on the metal block closest to you, and you find that the chain is attached to it by a bolt.
So use the spanner to remove the bolt and chain.
Complete
The circular shape of the metal frame seems to exactly fit an item that you saw earlier.
It's the barrel from earlier! (Pick it up again if you left it under the window in the other room.)
Place the barrel in the frame.
Launch
Climb into the barrel. Now you're looking at the wood in the metal cage.
Light the wood on fire with your torch, and you float out of the castle on the hot-air balloon!
Yay for text walkthroughs!
Thanks for the work in figuring out those and typing them up, kktkkr.
Update