
 Another week is over...really...but that means that another Weekday Escape is here!
You wake up locked in a hospital room without pain or any injury...having amnesia - this could be a start of dark thriller, but Neat Escape decided otherwise, and a good escape game was created! Relaxing Den of the Kamo is soft and tender, with plenty of books and clever puzzles - retro Hottategoya's game just thematically fits with all the books.
Your collegues are hiding somewhere around your work place in No1game's game...you know them, green sneaky guys, they are able to hide anywhere, even change their size and looks...will you find them and will you capture them?
Have a good time and enjoy!
You woke up at hospital bed not knowing why you are here and not remembering anything, but apparently feeling no pain. You decide to leave immediately. No wonder, there isn't any reason to stay - but your exit may not be as quick as you thought! Doors around the room are locked, however, overcoming them is only the first step of escaping the newest Neat Escape's game. Traditionally, one key may open two locks, but can be used only once...for direct escape or more complicated one with extra puzzle.
The cursor is not changing, save button, two endings.
The game is available for Android too.
Big dressed mouse stands by the door of sweet and cute Den of the Kamo's (Kamotokamotokamo) room and as windows shape suggests, it's probably mouse's room. Whether books in bookshelves are mouse's too we don't know and we won't know; his concern is purely material right now, not spiritual. And very stereotypical - he wants cheese! Can you get some cheese for the mouse?
The cursor is not changing, save button, one ending.
The game is available for Android too.
This isn't Hottategoya's revival, regrettably, it's their old game - I just couldn't resist its name resemblance with previous game. They simply asked to be posted together. Game's name is fitting indeed - bookcases full of books from floor to ceiling are all around the small room, and an armchair is missing - not much to do here. Look at the books - yes, they are red, blue and green (surprisingly, books in mouse's room are the same colors), but maybe there is more...can you find anything interesting there and get out eventually?
The cursor is not changing, no save button, one ending.
P.S. Here are sequels: Escape from the Room Surrounded by Bookshelves 2 and Escape from the Room Surrounded by Bookshelves 3 (WE N°68)
Three weeks ago we had No1game's green special (WE-RE N°12) - and now we get a new game by the same designer, sequel to Find the Escape-Men 105: Freshmen from WE N°28. Another day at your new job begins quite unexpectedly - your boss wants you to find ten collegues who quit the very same day! Naturally, he isn't happy about it and you neither, as you mustn't leave before you find all of them...seems like a long work day! Can you catch them? Will you find out why they run away from here (or tried to)? Will you stay with this company?
The cursor is not changing, no save button, one ending.
We love escape games, and our readers love talking about them and sharing hints! How about you? Let us know what you think, ask for clues, or help out other players in the comments below.


I'm stuck on Freshmen 2 -- I have 9 escape men, but the last one has me truly stumped. I have 5 items in my inventory, all of which have been used and greyed out:
a fire extinguisher, a stamp and ink pad, a business card case, and a slip of paper with a code on it
I don't have any unsolved puzzles left that I can think of, and I got
the guy pushing the vacuum cleaner.
Can anyone help so that my brain can stop hurting? :-)
Billy-o did you use the business card case twice? You must have done iff it's greyed out I think.
Good question -- yes, I used it twice.
Found the missing one! It was
above the door leading to the roof, in an exit sign that you can't see from the "normal" view
Now I can have my life back. :-)
It's time for more walkthroughs!
Escape From the Hospital - Remake
Waking up in a hospital room with no memory of why or how you got there… it could be the plot for a dramatic movie, or just an escape game!
Exploration
You start off facing a comfortably-made hospital bed. You've learned from countless escapes to look under the pillow, and find that the drip tube ends in a needle hidden beneath. In the corner of the room, there's a television set, but the box next to the screen has a red button that doesn't do anything, and an empty card slot. Beneath the TV, there's a locked box with four yellow digits.
Click the left of the screen to zoom in on the couch, which has a bowl of fruit that you can't do anything with. The table on the right of it has a sunflower in a narrow vase.
You can look behind the couch (by clicking its left edge) to find something hidden in the darkness, out of reach.
Back out twice to face the locked door to the room. On the left wall, there's a device to dispense prepaid cards for the TV, and there's another door with a three-digit lock. It looks like you don't have enough clues for the lock, but maybe if you look harder…
Three digits
Messing around with the three-digit door lock, you find another clue that helps you unlock it.
Instead of going from 0 to 9, each digit changes to a picture of a fruit after 8.
Since there's one pineapple, six bananas and three apples in the fruit basket, enter 163 in the door to unlock it.
Exploration 2
The three-digit door opens into a corridor with two doors.
The door straight ahead opens into a room with a shower. Instead of turning, the hot and cold water knobs can be pressed instead! Above them, the shower head is pointed at a white splatter on the wall.
The door to the left opens into the toilet. There's an empty narrow vase in the left corner, and the toilet paper holder seems to be tied shut with wire. You can lift up the floor mat here to find a stick hidden beneath.
Plant
Place the flower in the vase in the toilet to get a small lever handle.
Length
Use the stick to retrieve the coin behind the sofa.
Purchase
Use the lever on the card vending machine, and pull it to open up the coin slot.
Then place the coin in the slot and pull the lever again to make the machine dispense the TV card.
Screen
Place the card in the device beside the TV, and push the red button to turn the TV on. It displays some colored squares and an arrow over static.
So use that clue in the shower room.
The blue, red, red, blue, red, blue squares are on the right, left, left, right, left, right knobs.
So push those knobs to turn on the shower, which reveals a four-digit code on the wall.
Four digits
Enter 4715 (from the bathroom) in the box beneath the TV, then open it to get a pink key.
Unlock 1
Use the key to unlock the room door, and you've escaped the room! There's still more to do, though.
Exploration 3
You find yourself in a long corridor with several other people who are not at all concerned that they're trapped in the same building. Each of the four doors on the side is locked, and a banner at the end reminds you that this is the second floor.
The stairs at the end of the corridor (on the right) lead up to a boring locked door and down to the main entrance, which is also locked. Examining the potted plant downstairs, you find a utility knife hidden in it!
Return to the second floor, and enter the doctor's office to the left of the banner. At the desk, three x-ray scans are mounted on a screen, but the switch beside it is missing. On the left side, there's a cupboard with two shutters. The left one is tied shut, but the right one is not, and opening it reveals a blue balloon trapped behind a pane of glass. That's not all! Pull open the curtains on the right side of the room to find a locked box with a cryptic clue.
No?
Use the clue from the room numbers to unlock the three-digit box in the office.
The label on the box ("no room number") indicates that one of the room numbers is missing. Which one is it?
The room you started in was 201, and the doors to the side of the corridor are numbered 202, 203, 205, 206.
Checking that against the numeric range listed on the banner, you find that the missing number is 204.
So enter 204 in the box, and open it to find a pair of pliers.
Wire Removal
Use the pliers to free the left cupboard door in the office, then open it to find it empty… except for a handle on the right.
So pull that handle, which is attached to a pane of glass.
Then open the other shutter, and now you have access to the balloon.
Just one more step…
Pierce the balloon with the needle, and remove a yellow key from it.
Also go back to your room (201), and use the pliers to remove the wire on the toilet paper holder, then take the toilet paper roll from it.
Unlock 2 / Exploration 4
The number on the door of room 203 is yellow, so use the yellow key to unlock that door.
This room is decorated more simply. The table over the bed has a spill covering some sort of compartment, and the bedside table has a shallow triangular hole and a deeper hexagonal one with something at the bottom.
Soak
Use the toilet paper to soak up the water from the table, and open it to find a red button.
So push that button to open up a compartment in the wall. The five-letter locked box asks for a "name".
Displace
Use the knife to pare your stick down to a triangular tip, and then use that stick on the bedside table. A switch rises from the hexagonal hole.
Identify
Go back to the doctor's office, and place the switch next to the x-rays. Now you can read a number and name on each.
So use that clue to unlock the five-letter box.
That box was in room 203, and the patient there was Ethan.
So enter ETHAN in the box to open it and find a blue key. Save your game.
Normal End
Bring the blue key down to the ground floor and use it to unlock the main entrance.
You enjoy a nice meal of a burger and fries after escaping.
Happy End
Bring the blue key up the stairs and use it to unlock the door to the rooftop.
There's a table and chairs here, and a four-digit box on the table. You can also climb up to the helipad, where a bright orange helicopter is waiting for you.
Now all you need to do is get that box open!
The telephone number on the helicopter is 5432-3221, so subtract 3221 from 5432 to get the code for the box (2211).
Open the box to get a red key, then use it on the helicopter to escape!
As you return home via helicopter, you enjoy a nice view of the countryside.
Escape from a Room With Bookshelves
I think we've reached a sweet spot in the scale of rooms with shaped windows and tables with boxes on.
Exploration
The pink box on the table in front of you has a slot shaped like a rectangle with a corner missing, and some other markings. The table itself also has a clue with three black squares, with a bunny silhouette in white in the leftmost one. Looking past the table, you find six small seals holding boxes with question marks on them. The boxes and question marks have different colors.
Look in between the left two seals to find a battery hidden behind them.
Turn right to find the bookshelves, which hold books whose covers have four different colors. As you look over at the right bookshelf, you find another clue to the right with three black squares and a symbol with a star (in some sort of frame) in the rightmost one.
Turn right to face cupboards in front of more windows. On the cupboards, different-colored stars with different tips colored black are mounted on two minimalist shelves, and the locked box in between them requires a key. The lock on the left cupboard has columns of red and green rectangles, and you can click the red ones to turn them blue. The middle cupboard is unlocked and contains another clue with three black squares and a mushroom silhouette in the middle one, and also a familiar-looking card attached to the bottom shelf by a screw. The right cupboard has your typical three-digit lock on it.
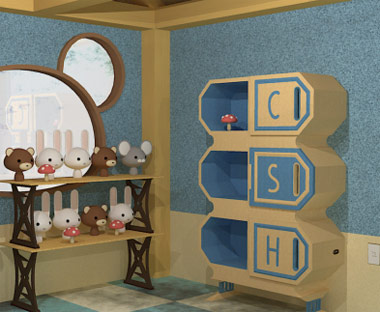
Turn right to find cute bears, rabbits, mushrooms and a mouse on a shelf. To the right of it, there's combined shelf/cabinet storage, where three locked doors have letters on them, and there's a mushroom on the top shelf. Zooming in on the power socket next to it, you find that there's another socket on the cabinet itself.
Turn right to find a mouse who asks you for some cheese. He seems to be covering the exit door. On the right, there's oddly-shaped shelves with ducks holding rectangles marked with glowing symbols, as well as more mushrooms.
RGB
Use the clues from the bookshelves to unlock the left cupboard.
The green rectangles on the lock match the all-green shelves on the center, right, left bookshelves.
The all-blue shelves on those bookshelves are 5th, 1st, 2nd from the top.
So click those three buttons to turn them blue, then open the cupboard to find a clue with a star in a rectangular grid, as well as a screwdriver with a bright green handle.
Unscrew
Use the screwdriver to remove the card from the middle cupboard.
You automatically flip over the card to find some colored outlines on it, and as you put it away you find a clue with colored rectangles where the card was.
Congruence
Place the card in the pink box on the table, and three green digits appear in the colored shapes.
So use the clues from the card and irregular shelves to unlock the box.
Hint: The shapes on the box definitely match those in the shelves, but what are those light squares attached to them?
The light squares attached to each shape indicate bits of frame that connect to the shelves.
So the top shape (red/pink with frame attached to the side) can only be the bottom shelf upside-down. Inverting the green symbol give you the digit 3.
Similarly, the middle and bottom shapes are the top and middle shelves, which hold the digits 0 and 5.
Enter 305 in the box and open it to find a key with a tiny tip.
Unlock
Use the key to unlock the box between the stars.
Inside, you find a cog.
Between
Follow the clue in the bottom shelf of the middle cupboard to find a hidden spot.
The hidden spot is on the rightmost bookshelf, between the two gray books in the third shelf from the top.
Clicking it, you find some clockwork with a cog missing.
So insert the missing cog in the clockwork, and the left bookshelf slides aside to reveal a hidden passage.
The passage ends in a wall with some sort of four-button device that's not working right now. On the right, there's a slot that looks like it would fit batteries, and the black symbols beside it confirm that you need two batteries.
Three squares
Use the clues with black squares to unlock the right cupboard.
The symbols that appear in the left, center, right of those clues are of a bunny, mushroom and star.
Doing a count, you find 5 bunnies and 8 stars on their displays, as well as a total of 6 mushrooms.
So enter 568 in the cupboard to open it and find a battery.
Charge
Place both batteries in the device in the hidden passage.
Now the device is active, it shows four stars, each with a tip colored black.
Stars
Use the star clues to rotate each star into the correct orientation.
The clue in the left cupboard indicates that the (black tip of the) top-left star should point up.
There's only one such star in the display, and the stars to the right, bottom and bottom-right of it have tips that point down-left, left, left.
So click the stars
0 3

4 4
times accordingly, and open the door to find a power cord.
Powered
Connect the cord to the power sockets. Now you can open the doors on the cabinet, or rather, flip them to the other side to reveal 3 letter E's on the back.
What can you do with those doors?
The letters on the front and back of the doors can be rearranged to spell CHEESE.
And the letters have different foreground and background colors…
…which match the boxes that the seals are holding.
So the appropriate letters of CHEESE are on the top, bottom, bottom, top, middle, middle doors.
Click those doors in that order, and a slice of cheese appears!
Give the cheese to the mouse, who steps aside and lets you leave.
Escape from the Room Surrounded by Bookshelves
There are thousands of escape games out there, so it's not very surprising to find yet another one with a focus on bookshelves.
Exploration
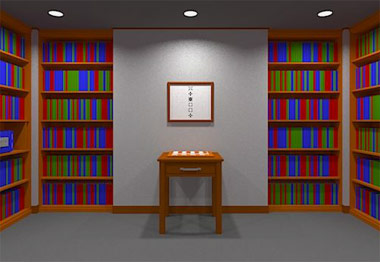
The wall is covered in bookshelves except for the middle, where a framed picture with a pixelated clue hangs over a table with an empty chessboard, which appears to be screwed down. Opening the drawer, you find a clue with a diagram which includes a door and a blue arrow.
Turn right. This wall has a safe with chess pieces marked above its buttons. The bookshelf on the right has no books on the top shelf, and there's a suspicious white rectangle on the ground.
Turn right. As you might have guessed from the diagram, the door is locked.
Turn right. The wall here seems to have a panel controlled by a card slot. The safe on the right has three buttons labeled I, II, III. Looking closer at the bookshelves, you notice a book missing in the lower-left corner, and instead, there's a folded note with some diagrams of chess pieces.
The shelf that holds the blue safe seems to be partitioned rather unnecessarily, and you find a lit button at the right end, but you can't fit your arm in to turn it off.
Ordered
Use the clue from the table drawer to unlock the three-button safe.
The shelf indicated on the diagram (second-highest to the right of the door) looks just like any other shelf. What are we looking for?
The blue arrow tells you to focus on the blue books on the shelf, which appear in groups of 2, 1, 3, 3, 2, 3.
So push the II I III III II III buttons on the safe to open it and get a piece of paper with colored squares.
Checkered
Use the chess-related clues to unlock the safe with chess piece buttons.
The dark squares on the note indicate the movement ranges of each of the chess pieces, which match the patterns on the picture above the table.
So push the bishop, rook, queen, knight, knight, rook (2 3 4 1 1 3) buttons on the safe to unlock it. Take the stick from inside.
Extended
Use the stick to push the button hidden to the right of the blue safe. A platform rises in the opposite corner of the room, where the white outline was.
So climb up on the platform to reach the top shelf, where you find a small screwdriver and a card with a magnetic stripe.
Unscrew
Use the screwdriver to remove the chessboard from the table. Beneath, there's another piece of paper with colored squares.
Swipe
Insert the card into the card slot, which lowers the panel. There's a safe here with nine buttons which change color when clicked, and a clue with a square divided into two pieces.
Fit
Use the clues from both pieces of paper to unlock the nine-button safe.
If you mentally rotate the pieces to fit the clue on the safe, you find that the colored squares on them end up in the
- - R

R R G

R B B
positions.
So click the buttons
0 0 1

1 1 2

1 3 3
times to unlock the safe, then open it to get a key.
Use the key on the door to escape!
That one spot is definitely too sneaky.
Find the Escape-Men 187: Freshmen 2
(Set the language to English before you start.)
First day of work, and you find that your boss has the worst luck, with ten other freshmen all quitting at once. It's now your job to gather them up in order to leave!
Exploration
Just like in the first game, you start off looking at a floor plan of the office. You can click on the corridor, locker room, office room, or the stairs which are only marked by an arrow.
Let's start in the office room. The desk looks typical, with a computer that you need a password for, a bunch of books on the right that hide an ink pad full of green ink, and a green pad to the left of the keyboard that you can zoom in to for some reason. The top desk drawer is unlocked and holds a business card case, and the bottom drawer has an arrow that passes through eight buttons that change color when clicked. You can look up at the notices pasted on the wall, with text in blue, yellow and brown.
Click the lower-right corner of the green pad to find an Escape-Man.
Click the right edge of the table to look around it and find another notice, in black.
Pull the chair out and look under the table to find yet another notice, in yellow.
Back out and enter the corridor, where a notice in red is pasted on the wall. There doesn't seem to be any- SKREEEEEE!!
That's a really loud vacuum! Follow the wire by clicking it repeatedly until you reach the Escape-Man cleaner.
Back out and enter the locker room. The right two lockers are empty, but the left one is locked.
Back out and go up the stairs by clicking the arrow. Hmm, authorised personnel only? Can't hurt to take a look.
Click above the door to find an exit sign, which of course has an Escape-Man on it.
Mmm, nice to have some fresh air- oh god, what is that? An Escape-Man stands on the edge of the roof, and if you click on him twice, he jumps off! Welp, game over I guess.
Look over the edge. He's gone without a trace, or is he?
As you stare down at the traffic, a platform with an Escape-Man window washer floats over.
Get back off the edge, and click the right side of the roof to look in that direction. There's a fire extinguisher in its case.
Evacuate
Pull the pin on the fire extinguisher, and use it on the left locker.
The Escape-Man hiding inside quickly shows himself.
Contacts
Leaf through the business card case, which has a whole bunch of your namecards.
The fifth namecard has a tiny Escape-Man hanging off its right edge, and there's a blue tag at the bottom of the case with another Escape-Man on it.
Password
That jumble of letters on the tag looks suspiciously like a password, but if you just enter that in the computer, it won't work.
What's missing?
Click the right end of the tag to flip it over and find the word UPPER (or in Japanese, "big") written upside-down on the back.
So the clue you need is
oppxdq, but upside-down (bpxddo) and uppercase.Type BPXDDO into the computer, all caps, and it unlocks to a typical-looking desktop where all you can do is click the Escape-Man icon.
Numbers
Use the clue from the notices pasted around the building to unlock the bottom desk drawer.
Each of the signs has digits on them:
Blue: 7, 4
Yellow: 2, 8
Brown: 6
Black: 3 (side of table)
Green: 5 (under table)
Red: 1 (in corridor)
Putting them in order, you find that the correct order of colors is Red Yellow Black Blue Green Brown Blue Yellow.
So click the drawer buttons 1, 3, 7, 2, 4, 6, 2, 3 times, then open it up to find an Escape-Man and a signature stamp.
(The number puzzle works the same way in the Japanese version, except the notices contain motivational messages with the numbers hidden in them.)
Mark
Use the stamp on the ink pad, and then on the paper to the left of the keyboard.
Is the ink dark enough?
If the marking's too faint, you need to hold it longer.
Re-ink the stamp, back out of the paper screen to tear off that piece, then try again. This time, you need to hold the mouse button down for more than 3 seconds, or until the gray spot starts to shake.
Then release it, and you should have a strongly-inked green circle with an Escape-Man inside!
Freshmen
The chime indicates that you've found all 10 Escape-Men:
Under green pad on office desk
Cleaner in corridor
On hidden exit sign
Off the roof
In left locker
On namecard
On blue tag
Desktop icon
In bottom drawer
Stamped on paper
(Examine them again.) They transform into the ten missing employees, so click them to watch the ending.
I loved Den of the Kamo's game. Don't know why I haven't seen them before. Went back to play older ones and was only able to play this one and the one before it. I checked to make sure that I didn't have ad blocker on and also tried on both Chrome and Safari. Any ideas?
Last two games are using Unity, all previous Flash. I checked them in Chrome and Firefox and I can't play them neither. Links are correct and the games were playable two weeks ago, plus the site is alive, so I hope it's temporary issue. I'll keep trying.
All games by Den of the Kamo and/or Kamotokamotokamo (earlier games)are playable now, they fixed the problem.
Update