
 Wishing you sunny Wednesday, the new Weekday Escape is here!
Flatsan wants us to play a game with one scene only, and in addition, completely grey scene - that doesn't sound very promising, right? Don't let this description discourage you, it's a good game and fun! Escape Game Club's game isn't simple escape game - it is in fact - but technically it's a challenge! Blue-haired Mono-chan has prepared this room by herself and the rules are simple - if you aren't able to escape - you lose. If you escape successfully, Mono-chan would be very frustrated! Her revenge would be another and better escape game...good, I hope you get out of there! Funkyland is still absorbed in beauty business and so they lock you in a nail salon.
Have a good time and enjoy!
At the beginning of Flatsan's game, you would stare cluelessly at a grey wall. After a while, you would start seek for navigation bars or arrows to move around and find some more promising gamescene - and they are none. Yes, there is only this grey wall to explore and that's it...but there is something you can do there and the game is much more interesting than it seems. Each solved puzzle reveals another puzzle, hint or activates some part of the wall, so you get unexpectedly nice and solid escape game with clever puzzles in minimalist design.
The cursor is changing, no save button, one ending.
P.S. Master of one scene games is Robamimi; she started with One Scene, then followed One Scene 2, 3, 4, 5, 6, and 7! All are excellent with very high rating!
This game by Escape Game Club is only their third and I hope very much they will keep on like this! It's charming with strong retro vibe, pleasant music and good puzzles - they take some concentration, but they are not too difficult. Before you click at 'New Game' button at the starting gamescreen, change language unless you can read Japanese, and go!
The cursor is not changing, save button, one ending.

With Funkyland you get to a cosmetic salon (similar in WE N°170), and it's a vast nail studio this time! Marble everywhere, bouquets on almost every horizontal surface, leather armchairs - luxury place indeed. These greyish shapes on the top of game screen are nail charms silhouettes which you must find and which magically transform into ornamental key from exit door at the end. Pink Ms Frog, Funkyland's mascot, is guarding the last charm, as usual.
The cursor is not changing, save button, one ending.
The game is available for Android too,
We love escape games, and our readers love talking about them and sharing hints! How about you? Let us know what you think, ask for clues, or help out other players in the comments below.


The pix for the second and third games seem to be the same, for Mono-chan room, but clicking them seems to lead to the intended sites.
i've gotten thru the first two puzzles & now i'm stuck on the
X (arrow pointing down) and the buttons
i've tried clicking at the end of the ladder game, on the paper, above the ladder game again, using the ladder game as a clue to the buttons (3 2 1 2 3 4), using the heights of the lines on the X paper as clues (both smallest to biggest and matching them up to the topmost rectangles on the ladder game), and clicking on everything with the wheel & stick(?).
any hints or help would be appreciated lol
also AMIDA
rearranges to AMAID w/ the ladder game but idk if that's relevant yet
Krizpy - That's where I was stuck too!
Your thinking helped me figure it out.
Haven't posted in ages, so apologies if my spoiler tags go wrong.
Your ladder idea is almost right, but the numbers are not.
If you need the exact answer:
Start where the x is from the last clue.
Follow the line down until you hit the first branch.
When you follow it sideways, note the column you cross to see which button to push.
So you end up with
(3,2,2,3,4)
ah, yay!! thanks sara :3
... and i'm through!! i might post a AMIDA walkthru later if anyone hasn't yet :)
@Krizpy: I'll take you up on that offer and start from the second one.
Escape from Momo-chan's Room
Momo-chan (probably not her real name) wants to test your escape skills. Let's see how challenging her room is.
(Change the language to English from the menu. This will also affect one of the clues in game.)
Exploration
The first thing you see in the room is a table with a Reversi board on it. One piece is missing. There's a candelabrum in the background, but the red button on it doesn't work. On the right side of the wall, there's dents shaped like puzzle pieces.
Zoom in on the base of the table to find a coin hidden there.
Turn left to face the locked exit door. Three (lowered) flags are attached to the box, and you can click the middle one to find a clue on its back. The box itself has a coin slot, a glass panel and what appears to be another locked compartment. Pick up puzzle piece 1 from the ground.
Turn left to face a wall with a rolled up projector screen (too high to reach) between three-digit safes. The left safe has just a question mark for a clue, but the right one has three shapes.
Turn left to face a wall of numbered lockers. All the lockers except 1, 2, and 5 are unlocked, and they have names of symbols written on the back. Pick up puzzle piece 3 from locker 6.
Coin
Place the coin in the coin slot to raise a flag. A compartment opens up (but not where you might expect) and you can take a yellow key labeled 5 from it.
So use that key to unlock the middle locker, which is empty but has "star" written on its back.
Three shapes
Use the clue from the lockers to unlock the three-digit safe to the right of the rolled screen.
The words "triangle", "star", "circle" are written on the backs of the lockers numbered 9, 5, 7.
So enter 957 into that safe, and a compartment opens beneath the buttons so you can take a coin.
Another coin
Place the second coin in the coin slot. It falls to the right and raises the right flag, opening a compartment that contains puzzle piece 2.
If you click this puzzle piece to flip it over, you'll find a clue written on the back.
Jigsaw
Place all three puzzle pieces in the wall where they fit, releasing a third coin.
Last coin
Place the third coin in the coin slot. It falls in the middle, raises the middle flag, and opens tha large compartment containing a long hook.
Long
Use the hook to pull down the screen, which displays a weird clue with light bulbs and numbers.
Question
Use the clue from the back of puzzle piece 2 to unlock the other three-digit safe.
(If you need to check the clue again, you can pick the piece back up.)
Following the same logic as before, "triangle" is 9, "square" is 6, and "circle" is 7.
The product of those three digits is 378, so enter 378 in the safe to unlock another compartment that holds a yellow key labeled 1.
So use that key to unlock the top-left locker, which holds a book with some strange pictures.
Checker
Use the clue from the middle flag somewhere in the room.
(The game gives you two hints when you click the clue.)
The color scheme on the flag matches the colors of closed and open lockers, and the letters O and C are initials of "open" and "close".
So close all the even-numbered lockers (leaving locker 2 closed) and open all the odd-numbered ones.
Locker 2 springs open to reveal a reversi piece and a button on the back.
Flipped
Place the reversi piece on the board, and it flips two other pieces from black to white.
Lamp
Push the button in locker 2, and then the matching button on the candelabrum.
Two of the candles light up, and a compartment opens up below with a five-digit puzzle
Bulb
Use the remaining clues in the room to solve the five-digit puzzle.
The pictures on the puzzle tell you to look at the flags, three squares on the reversi board, coins, candles and puzzle pieces.
There are three of each, and you need a digit for each.
So you need the clue from the screen, but it only tells you about light bulbs.
So check the book to tell you which objects match which light bulbs.
Using 1 for objects on the right side of the book and 0 for those on the left:
The flags are up, up, up: 111
The reversi pieces are black, white, white: 011
The coins show tails, heads, tails: 010
The candles are lit, unlit, lit: 101
The jigsaw pieces smile, smile, not smile: 110
Looking those sequences up in the chart (or using your knowledge of binary), you find that they correspond to the digits 7, 3, 2, 5, 6. So enter 73256 in the puzzle to solve it and get a golden key.
Use this key to unlock the door and escape!
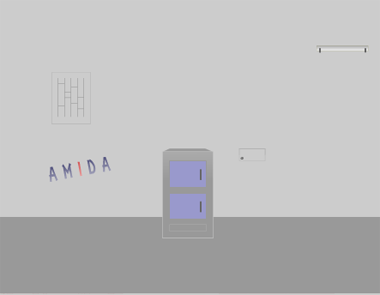
Amida Escape Walkthrough
(Colorblind friendly)
Exploration
There's only one screen in this game.
Right away we know we can click on:
a piece of paper on the left side depicting a LADDER GAME
a LINED PANEL in the middle with four sections. clicking on the sections cycles through different placements and shapes
an EMBEDDED PANEL. it appears to be locked
Other things of note are a shelf in the upper right corner, a panel in the floor, and the letters AMIDA on the wall. The letters are blue, except for the red "I".
Lined Panel
Click to zoom in. Cycle through the shapes for a minute. Do they seem familiar? What in this room could be applied here?
Normally lines are paramount in the LADDER GAME, but in this case we'll be looking at the spaces between them.
Click section 1 six times, section 2 one time, section 3 five times, and section 4 three times. (Image)
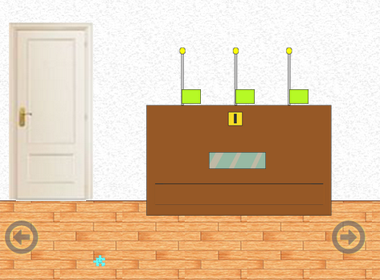
Horray! The panel in the floor slides open and a CABINET pops up.
Click to zoom in. Click the top compartment. Pick up the WHEEL.
Click on the X PAPER to zoom in. Note the pattern depicted.
Open the bottom compartment and get the LEVER.
The HIDDEN COMPARTMENT below is locked.
X Marks the Spot
The X PAPER correlates to the LADDER GAME.
You can see the LADDER GAME while looking at the X PAPER. Compare the lines on the paper to those on the game.
It's the fourth line from the left. Click just above it where the X is marked on the X PAPER.
A LARGE BALL falls on the SHELF, causing something new to lower into reach.
Four Button Combo (Thanks to SaraG for this one!!)
Let's investigate this COMBINATION BOX! Click to zoom in.
Click again to reveal four buttons and a clue, again involving an X.
Since the X is the same color as the one on the X PAPER, and clicking on the paper doesn't do anything, the solution must be again on the LADDER GAME.
What similarities do the LADDER GAME and the COMBO BOX share?
They both have four sections!
On the LADDER GAME, follow the fourth line down, switching lines whenever a new one intersects. Use the horizontal lines you cross to determine the order in which the buttons on the COMBO BOX should be pressed.
3 2 2 3 4
Open the COMBO BOX to get a KEY!
Embedded Panel
Use the KEY to unlock the EMBEDDED PANEL. Get the REMOTE. Note the metal slot at the bottom.
Stick the LEVER in the slot. Pull it.
A STAR BOX appears!
Remote
Zoom in on the STAR BOX. Collect the BATTERY.
Examine the REMOTE more closely with the "about item" button. Flip it over and place the BATTERY inside.
Star Box
Zoom in on the STAR BOX again. Note the button in the center and the clickable corners.
Let's see if there are any new clues...
No, nothing. Maybe an item will help us out?
Use the REMOTE on the LADDER GAME.
It turns sideways and a SMALL NOTE flutters to the ground! It shows us the button on the STAR BOX should be clicked to enter the code.
Zoom back in on the LADDER GAME. There's now a star indicating a new path to follow.
What about this path is similar to the STAR BOX?
The corners.
Click the STAR BOX'S corners in this order: ⸥ ⸢ ⸥ ⸢ ⸣ ⸤. Click the button.
Get the ROD.
Wrecking Ball
The next step is to get the LARGE BALL down.
Examine the ROD. Click until it's fully extended.
Use it to knock the LARGE BALL off the SHELF, which in turn hits the CABINET and exposes several new areas.
Exploration 2
The CABINET is now on its side. Neither compartment opens, and the HIDDEN COMPARTMENT on the far right is still locked.
Zoom in on the HOLE in the center of the floor. Collect the TRANSPARENCY. Click on the ARROW PANEL and cycle through the symbols. Notice there are more than just "V's"!
Finally, click on the LARGE BALL. There is a NUMBER COMBO outlined in colors and a clue below. (The colors, in order, are: blue, red, green.)
Number Combo
The TRANSPARENCY correlates to the NUMBER COMBO.
Use the TRANSPARENCY, the LADDER GAME, and the clue below the NUMBER COMBO to get the code.
For colorblind players: from the top of the LADDER GAME, the second line is blue, the third line is red, and the fourth line is green. Same order as the NUMBER COMBO.
Place the TRANSPARENCY on the LADDER GAME.
You don't follow any paths for this one. The clue doesn't indicate direction, but perhaps value...?
View each colored horizontal line and its attached vertical lines as a separate puzzle.
Any vertical line above the colored line has a value of 2, and any vertical line below the colored line has a value of 1.
Add these values together to get each number for the NUMBER COMBO.
(For example, the blue line has 3 lines above and 2 lines below.
3 x 2 = 6 , 2 x 1 = 2 ; 6 + 2 = 8
The final number is 8.)
Final code: 8 5 4
Open sesame!
Arrow Combo
Place the WHEEL in the new opening in the LARGE BALL.
Turning it reveals a LINE CLUE near the top of the wall. One of the lines is red. Hmm, isn't that familiar...?
The LINE CLUE and AMIDA match up.
Subtracting the LINE CLUE from AMIDA leaves you with ^ v Ↄ ^
Use this code in the ARROW COMBO in the HOLE.
Get the DIAL.
Cabinet
Put the DIAL in the REMOTE. What reacts with this completed REMOTE?
Our trusty LADDER GAME!
It turns again, losing most of its lines and revealing a SMALL PANEL above it. Get the GLASSES from inside the SMALL PANEL.
Zoom in on the LADDER GAME and use the GLASSES.
There are arrows pointing down and a new pattern of lines: L R L L L R R
Use this combination on the compartments of the CABINET.
This opens the HIDDEN COMPARTMENT, which houses a SWITCH!
Hit the SWITCH, click the newly appeared DOOR twice, and...
We're out!
Thanks for reading, guys. :)
Escape a Nail Salon
Funkyland has really nailed it with this one.
Exploration
The salon is painted pink everywhere, which makes the chandeliers look a little out of place. You start off in a nice waiting area in front of a nice TV. There are several nail-related books below it, in a numbered series.
Turn right to face the counter. The display case on the right has sets of colored nails labeled Cute, Sweet and Elegant. Click the counter itself to walk around the back. The desk is tidy and the only notable item is a remote control without batteries.
Turn right to face two locked doors. The left one seems to need a keycard, and the right one seems to lead to the outside.
Turn right to face the chairs where you started. The wall here has a display where a pink frog sits in front of a shelf with three colored platforms. A card on one of the long tables has some silvered panels on it. You can also click the flowers in the back to zoom in on them, then lift them to find a seemingly blank memo.
Turn right to the starting screen, and click the left side to walk to the other half of this room.
Click the right side to walk to the pedicure corner. There's a four-letter safe on the nearby table, and the picture frame on the wall has eight buttons that can be pressed.
Back out and click the left side. Here, there are three chairs behind small tables with screens beside. The middle table has a box lit on the inside with a bluish light. The left chair has a locked compartment above containing three bottles of nail polish. The right table doesn't seem to have anything special, until you bend down to look beneath and find a battery. Above this table, a basket attached to two balloons floats near the ceiling.
Blank
The memo reads "for UV". Who is this UV?
The contents of the memo are readable under ultraviolet light. Place it in the box with blue light, and five digits appear on it.
Serial
Use the clue from the memo to unlock the four-letter safe.
The books labeled 9, 7, 10, 8 (which also have that many letters in their titles) are initialed S, G, N, M.
So enter that in the safe to unlock it. A small compartment opens with a battery inside.
Screens
Place both batteries in the remote and use it on each of the small screens, and then the TV.
The small screens each show collections of identical icons, and the TV shows silhouettes of those same icons with boxes to enter a three-digit code.
So use the clues from the small screens to enter the correct code on the TV.
The screens show 6 lollipops, 7 shoes and 3 crowns.
So enter 673 in the TV, which dispenses a card key.
Then the TV changes to show eight musical symbols.
Unlock 1 / Exploration 2
Use the card key on the matching door lock, and open the door.
It leads to a corridor which ends in a locked door with five nails on the lock. The window on the right has a coin on it.
Open the door on the left, which leads to a pretty bathroom. There's a fancy eight-button panel between the two mirrors, where the buttons cycle through musical symbols. Beneath that on the table is a heart-shaped box with a cross-shaped keyhole. You can open the doors on each side to enter the bathrooms, which are relatively uninteresting except for the panels on their back walls: the left one has a picture with some rectangles in a familiar arrangement, and the right one has a sun picture where the middle circle is a button that displays musical symbols on the triangular tips.
Musical
Use the musical symbol clues to solve the puzzle in the bathroom.
The panel in the left bathroom shows a figure of a TV, so click the buttons
012

1 0

121
times to match the clue on the TV.
The panel in the left bathroom is now open and you can pick up a box of flowery nail charms from it.
The sun panel in the right bathroom shows a quaver note with lit tips on the top and right, a treble clef with lit tips on the left, lower-left and bottom, and beamed semiquavers with lit tips on the upper-left, upper-right and lower-right.
So reset each button on the middle panel to the treble clef 𝄞, then click them
212

0 1

002
times. The panel in the right bathroom is now open and you can pick up a mould from it.
One coin
Use the coin to scratch off the silvered card on the table, revealing a bunch of arrows and the digit 8.
Then use that clue to unlock the eight-button panel above the pedicure chair.
The arrows form a chain ending at the number 8:
2168

3457
Click the buttons in that order, and the picture frame slides down so you can take a resin bottle and a box of cross nail charms. There's also a sign here matching numbers to Sweet, Elegant and Cute.
Cure
Fill the mould with resin, and place it in the UV box to make it set.
Then remove the key parts from the mould and click to assemble them.
Unlock 2
Use the finished key to unlock the box and get another key with a golden tip.
Then use this key to unlock the compartment above the left manicure chair. Now you can pick up 3 nail polish bottles in pink, yellow and red. (They will appear in that order in your inventory.)
Painted
Use the nail polish on the door with five nails to unlock it, with help from the remaining clues.
As the sign above the pedicure chair indicates, the first nail should be elegant (red), the second and fifth sweet (pink), and the third and fourth cute (yellow).
So paint the nails those colors, and open the door to the next room.
Exploration 3
The pink is toned down in this room, which has an entire counter at the back for attaching false nails. Look in the top shelf on the left and pick up the pack of green false nails. In the corner, there's a box with blue light inside and the circular button on its front is divided into four quadrants. The sink on the right has a dart in it.
Pop
Throw the dart at the balloon basket in the first room. With one balloon less, the basket sinks gently onto the table, and you can pick up the box of heart nail charms and the blue false nails from it. There's one more item in the basket: a long card with an arrow clue.
Quarter
Use the clue from the basket to unlock the box in the back room.
The first chevron on the card points right, but it matches the straight edges of the left quadrant. Interpreting the rest of the clue the same way, you end up with LRDDUU.
Click those quadrants on the lock, and open the box to find a box of star nail charms and a pack of purple false nails.
Frog
The pink frog is the last puzzle in this game, and all you need to do is use the remaining items in your inventory.
Place the purple, blue, green false nail boxes in front of the frog, and a compartment opens up containing the box of ribbon nail charms.
All five nail charms combine into a door key! Use it on the main door to leave.
As a reward for escaping, you get a hand massage and some nail art.
I worked out the code for the wrecking ball the same as you did. But I don't come up with the same answer.
I got: 8, 6, 6. how did you get 5? Even using your code, I can't get it to open.
nvermind. I got what I didn't do right.
I didn't "USE" the transparency. I only visualized it.
Not sure what I am doing wrong but...
I cannot get the lever to interact with the remote. The remote just flips over and reveals the back where a small area opens up and then the remote flips back over. I have clicked top to bottom and on the sides and nothing happens except the flipping.
@4red3s: You use the lever
where you found the remote, not on the remote itself.
Update