
 Wednesday is here with three escape games for your fun!
The first in this Weekday Escape is Tototo Room's room, nearly the same as last time (and last last time) - snowmen playing outside are the same too, probably, but puzzles are brand new and fun. Ichima takes you to the mountains in their new game (which is a bit trickier than usual) and let you enjoy the rest of winter. With Selfdefiant you set off for adventure in abandoned asylum and rescue your lost friends from dark powers!
Have a good time and enjoy!
Here is the sequel in Tototo Room's series "Button Escape" which somehow turned into series "Demanding Gingerbread Man". What does he want now? He's sleepy from overeating and wants you to get him a futon. Very special futon...from whipped cream he says...hmmm, how to get it...what a coincidence! They changed sweet potato roasting machine for hand mixer! It now remains to find some cream...
In one puzzle, you have to choose right sequence of Japanese signs - important is the visual aspect of signs, not their meaning.
The cursor is not changing, no save button, one ending.
Ichima locked you in a spacious room with wood paneled walls, burning fireplace and wooden moose's head missing an antler. The place seems like ordinary room in mountain cabin, new or freshly reconstructed, smelling of resin and almost without furniture. Here and there is some hint and puzzle, so you can start the routine. But things are not so simple, there are some questions left like: where is the dog from game's name? what is the rail on ceiling for? why are japanese developers focused on hunting trophies recently? All are answered later (except the one about deers' heads), but to find out, you have to start!
The cursor is not changing, autosave, one ending.
The game is available for Android too.
P.S. Talking about mountain cabins, let me remind you about Avalanche Escape from Aztec Games (WE N°27). Very good game!

Welcome to Selfdefiant's haunted asylum. Your four friends went on paranormal investigation at this old building and haven't returned yet, so you are here from purely altruistic reasons, to find them and see, if they are alright (spoiler: they are fine, only got trapped). The asylum is huge and you have to find many keys to open all doors and rescue your careless friends. After getting a sacred jar (bright green bottle) you can start collecting flowing orbs - you have to, because asylum is haunted indeed and without special sacred items you would be lost! You have to get rid of several ghosts! The sacred items are in hold of...ahem...another ghost (but friendly) and he/she changes them for collected orbs.
The cursor is changing, autosave, one ending.
We love escape games, and our readers love talking about them and sharing hints! How about you? Let us know what you think, ask for clues, or help out other players in the comments below.


For the telephone booth in "Room 22":
Pay very close attention to the markings on the dial.
At this rate, Gingerbread Man is going to become the most well-developed character in an escape game.
Button Escape 46
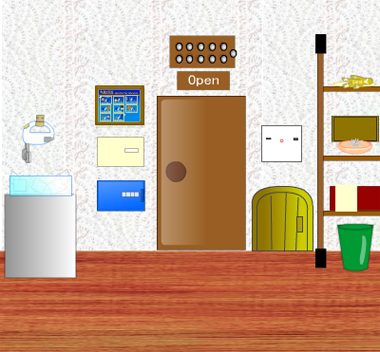
Yes, this is very clearly the same room. And yet, it is very clearly a different game.
Exploration
As in the previous game, you need to turn on 11 silver lights above the door (by finding their buttons) to escape. The picture frame shows a really detailed weather forecast for the next week, and clicking on the forecast picks it up, revealing a blank wall behind. Below that, there's another safe with eight buttons in two rows, but the button panel is divided into four colored quadrants with a hint at the top left. Even further down, there's a plain four-button safe. To the left of all that, there's a hand mixer attached to a four-color panel with digits above the buttons, and it's hanging over an ice-chilled bowl.
To the right of the door, there's a plain white poster with rectangular hooks and a red circle. Beneath that, the pet door is still too small to squeeze through. Further to the right, there's a shelf with various items: a gingerbread man who wants a whipped cream futon, lying on a plate with a button on the left, a bowl holding a spiky button in front of a shut panel with a button hidden in its corner, a box that requires a combination of kanji symbols to open, and a green wastebin that looks empty but, as usual, has a button hidden in its base.
Go right. The clear locked box here needs a key, and you can see some pliers through the glass. Behind it on the wall, you see four gray geometric shapes (that make a sound when you click them). Open the door on the right and click the button there.
Out in the backyard, the snowmen are still partying. Click the button on the one on the left with the black hat. Also click and hold on the table to zoom in on it. It looks like the snowmen are preparing to eat something.
Red circle
Use the clue from the red circle on the white poster to find a button.
The poster hints at the wall where you took the forecast.
So click in between (and slightly below) the hooks there to punch through the wall and find the button.
Big and Small
Use the clue from the forecast to unlock the eight-button safe.
In order of the days on the forecast, the larger icons are (White/Yellow/Blue/Gray) GWBYWYGB, and they appear on the LLLRRLRR sides of each pair.
So push the buttons in the
2 5 6 4

3 8 1 7
order to open the safe. Inside, there's a packet of sweetened fresh cream, and some strawberry-flavored yukimi odaifuku (basically this?).
Party
Yukimi literally means snow viewing, so bring the pink package out to the yard and use it on the table.
"It's frozen too stiff to cut!" "What do we do?"
"That's right!"
"Transform!"
"Now everyone can eat."
As the large snowman munches on the snack, digits appear on its belly.
Click the button under the deck, then head back inside.
Four digits
Use the clue from the large snowman to unlock the blue four-digit safe.
Enter 5482, and open the safe to find a key!
Unlock
Use the key to unlock the glass box and pick up the twisting pliers from inside.
(The pliers are ill-suited for removing the spikes on the button.)
Torque
Use the pliers to remove the four gray shapes on the wall.
They turn out to be screws, and you can look through their holes to see different-colored flags.
Blend
Place the cream in the bowl, and use the clue form the gray shapes to start up the mixer.
The flags behind the shapes with 5, 0, 6, 8 sides are blue, red, yellow+red, yellow+blue.
So turn the buttons blue, red, orange, green by clicking the buttons 2, 1, 5, 4 times.
Now you can click the mixer to whip the cream, and of course, you get the bowl of whipped cream.
Cover
Pour the whipped cream all over the gingerbread man. A button rolls out from him, and the panel on the wall opens up.
So zoom in on the panel to read it, and click the button that appears on the top-left corner of that screen.
Rectangles
The clue seems to contain four sets of filled rectangles. So use that clue to unlock the kanji box.
The rectangles match the negative space in the 皿口虫目 kanji, so click the buttons 2, 5, 4, 6 times to unlock the box.
Inside, you find a pair of snipping pliers, There's also a tiny button in the corner of the box and a larger button at the top.
Snip
Use this second pair of pliers to remove the spikes from the button.
Complete
The Complete message confirms that you have all the buttons:
In the order of this walkthrough, the
09 10 06 11 02 04

08 03 05 07 01
lights on the door are controlled by the following buttons:
Beside gingerbread man
Behind panel on bowl shelf
Under base of waste bin
In sliding door
On left snowman's head
Behind forecast / from poster clue
From gingerbread man
In corner, zooming in on clue behind gingerbread man
Inside kanji box
At top of opened kanji box
Spiky button in bowl
Push the Open button above the door to open it and escape!
Room 22 - A Dog Waiting for Spring
"Waiting for spring" is also part of a name for the twelfth lunar month. The long-awaited spring is about to arrive!
The new feature in this game is hint buttons with hints in Japanese. The hints include screenshots of the relevant clues, so feel free to try them out if you get stuck!
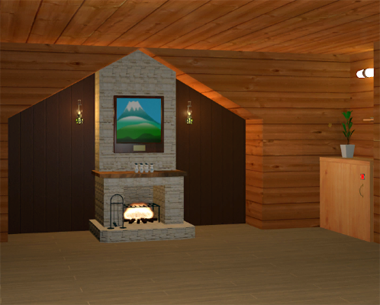
Exploration
You start off in front of a fireplace which has a tray in it. On the mantel, there's 7 snowmen wearing cute blue hats. Above that, there's a mountain picture with a rectangular socket in its frame. On the right side, there's a locked cupboard with only a red light above its handle. Instead, there's a plant pot next to a hook on the wall, and a platform on the right which rises when you move the orange off its plate.
Turn right to face a door you can't open, with a rail passing through the ceiling above it. Next to it is a cutesy moose head trophy on the wall missing a horn, and a hole near the ceiling you can't reach.
Turn right to face double doors whose handles don't work. Beside it, there's a safe panel with a two-button lock.
Turn right to face a table between locked doors, one taller, narrower and lighter than the other. Pick up the purple shovel head beside the table, and examine the table, which has a mandarin orange holding down a clue with digits and letters.
Capped
The hints for the snowman panel read:
Notice the shapes which match the buttons.
Press them according to the sequence SNOWMAN.
The 1st and 3rd snowmen in the front row and the last in the back row wear caps which are rounded.
So push the LRLRRRL buttons to open the panel. Inside, there's a book with a weird title, and what was that sparkle? It's a key that was hidden beneath!
Unlock 1
Use the key to unlock the door to the left of the table. In this storage closet, there's a ladder next to a shelf with an empty kettle and a three-digit safe with the digits arranged vertically.
Three digits
The hints for the three-digit safe read:
The clue is the memo on the table. Solve it!
Refer to the example to identify the numbers that follow the same rule. The rule is… put between.
From the example, Y is the only letter that's placed between two identical ones (C).
There's exactly one such digit in each row: 6 (between two 4s), 2 (between two 8s), 1 (between two 9s).
So enter 621 in the safe to open it. Inside, there's another mandarin orange.
Loaded
Place both oranges from your inventory on the plate next to the other one.
The plate descends all the way to the bottom, unlocking the cupboard. Inside, there's a lit lantern.
Higher
Use the ladder to climb to the hole beside the moose head, and then use the lantern to light up the hole. The only thing here is a book-shaped safe with red shapes on its buttons.
Counter
The hints for the book-shaped safe read:
There are books over there.
Look closely at the five letters. The shapes from the buttons are there.
Click the buttons until their red shapes match the negative spaces in the PBOAR letters (4, 5, 0, 2, 4 times).
Inside the box, there's another key, this one on a keychain!
Unlock 2
Use this key to unlock the door to the right of the table. You've escaped!
Well not really, there's still more to do in this game.
Exploration 2
Piles of snow surround this shed. You can tell how cold it is from the thermometer beside the door and the latch that's frozen over too solid to move.
Walk around the shed by clicking on the red phone booth in the background. There's a thermometer in here beside the red phone, which has a vertical and a horizontal line drawn between its buttons.
Back up and click on the dog in between the booth and the shed. It seems very interested in a wooden safe with three buttons labeled with pairs of pink curves. Backing out, you notice that the dog is now looking at a tree which holds a moose horn in its branches. Backing out again, you notice that the dog is now gone!
As you turn to reenter the house, you find that the door is now blocked by snow that fell from the roof. Beside it, a sign shows a telephone number in an unusual way.
Number
The hints for the phone read:
Going from the top, deduce 5 digits.
Pay attention to the vertical and horizontal lines. For example, both "34" and "43" indicate 6.
Each row on the sign has a pair of digits that indicate a row and column of the keypad.
The digit in the same column as 3 and row as 7 is 9.
Following the same process for each pair, you arrive at the code
9580#.Pushing those buttons on the phone opens up a compartment that holds a shovel handle.
Sweep
Attach the handle to the shovel, and use it to clear out the path to the house.
Fixed
Place the horn on the moose trophy, which doesn't shine lasers out its eyes. Instead, it just glows green for a bit and then opens the door beside.
That's a fancy ski lift, but you don't have the necessary items to start it up.
Thaw
If only there was some way to transfer warmth from the house to the lock on the shed…
Go out again, and fill the kettle in the piles of snow.
Then place it in the fireplace to warm it up. Pick up the hot water kettle.
Then pour it over the lock. Now you have access to the shed, which is empty except for some skis leaning on the walls and a blocked-off panel on the wall next to an IC card slot.
Pairs
The hints on the box in the snow read:
Look for things that look like the shapes above the buttons.
The skis in the storage shed are placed facing 3 different ways. Order is from the left.
The pairs of skis (from left to right as indicated by the pegs) have ends facing left, right, left, both, both, right, right.
So push the RLRCCLL buttons on the box, and open it to find an indoor thermometer.
Indoors
Go back in the house and hang the thermometer on the hook next to the potted plant.
The pot slides aside to reveal a hidden compartment containing an IC card.
So place that card in the card slot in the shed, and now you can access the four-digit panel with semicircular arcs above the buttons.
Dials
The hints for the four-digit panel in the shed read:
There are 3 objects with this marking.
Paying attention to the directions of the marks, line up all the temperatures.
The arcs are in different orientations, matching the dials on the thermometers from the house, phone booth, phone booth, shed door.
Taking note that the subdivisions on the dials represent 2 °C intervals, the temperatures on those dials are 16, 0, 0, −2.
How does that combine to give four digits?
Write the temperatures all together to get 1600−2, which is 1598.
Enter 1598 in the panel, which makes a clicking sound as it ejects your IC card. Hmm, it seems a little different.
Tall
The IC card now has the word "mountain" printed on it, so place it in the mountain picture above the fireplace.
The picture slides up to reveal a four-digit safe with letters above the digits, and names of four mountains appear on the picture together with heights in meters.
Initial
The hints for the four-digit safe in the house read:
These letters are the same as the initials of the mountains.
Combine the digits and input the number.
Each digit in the code is the corresponding digit of its mountain's height, i.e. first/thousands digit of Fuji's 3776, second/hundreds digit of Naeba's 2145 and so on.
Those digits are 3141, so enter that in the safe and open it to find a bright yellow lever handle.
Line
Place the lever in the ski lift— wait, when did that dog get here?
Anyway, there's one final puzzle to solve before the chair can move. Its hints are:
Inserting the lever made something recognizable appear.
The memo on the table is used again at the end! Push them from F to Y, and pull the lever!
Enter the example line from the memo, including the arrow:
FCYCAM→YThen pull the lever to escape for real. Buckle up, doggy!
Asylum 2018
We visited another asylum not too long ago (WE N°164). This time, we have some friends to save from the haunted depths, with the help of a little magic of course.
Exploration: Initial items
The game gives us plenty of faint purple orbs, but we can't collect them just yet. For now, go right from the starting screen and pick up a map in the wall covered with red graffiti. Clicking on the map, you find that only the rooms visited are shown, and doors are not. Take notes as you go along!
Move forward, left and forward twice, and click on Manny to get him out of this bathroom. Then go back to the starting screen (B on the map) and go left. There's a sacred jar here that you would not have been able to get before. Now you can collect orbs!
(Before we move on to the next step, just a small reminder that you can scroll the inventory, and use any non-map item on an empty inventory space to move it there.)
From here on, I'll refer to directions according to the compass on the map. Since I know where the shop is, let's walk there first. Numbers in parentheses shown how many purple orbs you can pick up on each screen.
As the map shows, you're now at A(2).
Go east to B(2). The path to the south leads out, but you've got more friends to save.
Go east to C(3), north to H(3).
From here, go east to I(3) and north to Q(3), which has a weird riddle on the left corridor wall.
Go north to V(3) and then west to U(3).
You now have 23 orbs. The mysterious hooded figure sells several items, but what you want right now is the crystal ball on the right, which lets you click any room on the map to teleport!
Exploration: More rooms
Now that you can teleport, go east from V (whose north door is locked) to W(3), which has a death certificate on the stretcher that you can read. Both of the other doors from here are locked.
Go east from I to J(3). The east door from here is also locked.
Teleport to G(3), whose west door is locked, and retrace your steps northward to O(3) and T(3).
Go east from O to P(3), and pick up the parchment fragments on the floor.
Teleport over to Q, and go east to R. The room is so dark that you can't even reach the orbs. But we can fix that!
(You should now have 21 orbs.)
Illumination
Teleport to the shop at U, and buy the lantern on the left. Now you can use it in R (east of Q) to light up the room. You find 2 orbs and a purple key.
Lexicon
Go west to Q, and use your wits to solve the word puzzle there.
The seven-letter word named in the puzzle literally spells "longer" with all but its third letter.
The only word that fits the Lo_nger pattern is LOUNGER.
So type that word (try it in lowercase if it doesn't work) in the box to solve the puzzle. The whole puzzle is replaced with a red gem that you can pick up.
Unlock (purple)
Teleport to G, and use the purple key to open the west door.
Go west from F(2) to E(2), where Gabby has also been considering taking a bath or something.
Go west again to D(2), which has a knife on the counter at the left.
Go east twice to F and north to N(3), where the papers on the table in front have some magical properties that let you adjust and enter a five-letter code.
Five letters
Examine the parchment in your inventory and piece it together (and maybe take a screenshot afterwards because the parchment reshuffles when you back out).
Then use the clue from the parchment to enter the correct five-letter code in N.
The parchment has an unsettling message, but you notice that five of its letters are in red, and they spell out Perce.
But that's not the code. Think a bit harder.
The five red letters can be arranged to form a word that matches the game's theme: Creep.
Solve the puzzle by entering CREEP, and a blue key magically appears.
Unlock (blue)
Teleport over to J, and use the blue key to unlock the east door to K(3). On the wall, there's a star marking on one of the tiles.
Go east to L(3), where an evil green spirit floats in the hall.
Go east to M(3), which has a magical old book on the left side of the floor.
Go north to S(3), where the red suitcase has a four-digit lock.
Four digits
Use the clue from the death certificate at W to unlock the suitcase at S.
The circled digits read 4471, so enter that in the suitcase to open it!
It's empty. What now?
Slash
Use you knife (from D) on the lid of the suitcase to cut open the back. Inside, there's a green key.
Stab
There's still a green ghost to deal with in L, and you can easily get the necessary item.
Go back to the shop in U, and buy the dagger.
Then use it to vanquish the spirit, who drops a red gem.
Unlock (green)
Teleport to W and use the green key to unlock the door to the east.
Go east again from X(2) to Y(2), and pick up the screwdriver in the corner of that room.
Go north to AF(2), where a badly photoshopped Jackson has been really spooked out.
Unscrew
You now have everything you need to uncover the hidden item at K.
The book gives you steps to find the correct tile (the darkest colored one one row up from the star).
Use the screwdriver to remove it, and pick up the silver key inside.
Unlock (silver)
Teleport to V, and use the silver key to unlock the door to the north.
Go further north from AC(3) to AI(2). Here, there's a table with a peg solitaire board built into it, and unequal numbers of black and white pegs.
Go back to AC and head west to AB(2), where an old sponge rests beside the sink.
Go west to AA(2) and west again to Z(2), where one of the shelves on the right holds a grid of lamps.
Go north from AA to AH(2), where a horrendous smell draws your attention to the clogged toilet.
Go west to AG(2), which has a dirty mirror and a jammed locker.
Scrub
Use the sponge on the dirt mirror at AG to clean it up. Now you can view the clue on it.
Use that clue to unlock the safe at Z.
The yellow symbols on the mirror indicate the lights that should be turned on:
---YY

YYY-Y

-Y---

--YY-

-YY-Y
So click those buttons on the safe, and a red gem appears.
Unstuck
Use the screwdriver to pry open the jammed locker door at AG and take the plunger inside.
Use the plunger to unclog the toilet at AH, and take the gold key that remains.
Unlock (gold)
Teleport to W, and use the gold key to unlock the north door to AD(2), whose east door is locked and decorated with skulls.
Go north to AJ(2), north again to AL(2), and east to AM(2) where a purple evil spirit floats in the bathroom.
Go back to AL, then north to AN(2) where a darker evil things flies around the room over a pentagram on the floor.
Go west from AL to AK(2), which has two skull diagrams posted on the wall.
Black and White
Use the clues from AK to place the solitaire pegs at AI.
The clues combine to form the pattern
--WB--

--BW--

BBWWBB

WBBWBW

--BB--

--BW--
So place the pegs accordingly, and a red gem appears.
Exorcism
Buy up the cross from the shop at U, and use it to remove the spirit at AM, who drops the fifth red gem.
Place all five red gems at the points of the star at AN. The evil is gone, and all that's left is a skull key.
Escape
Use the skull key to open the skull door east of AD.
Of course, AE(2) is the final room, and you can now rescue Alice.
Take a teleport to B, and leave the asylum via the south entrance.
(Item list)
If you have the map but are still missing items, here's where to find them.
Manny: T
Sacred jar: A
Orb Shop (Lantern, Dagger, Cross, Crystal Ball): U
Parchment: P
Purple key: R
Knife: D
Blue key: N puzzle
Book: M
Green key: S puzzle
Screwdriver: Y
Silver key: K
Sponge: AB
Plunger: AG
Gold key: AH
Skull key: AN
Red gems: L, Q, Z, AI, AM
Gabby, Jackson, Alice: E, AF, AE
Update