
 Another week is over and a brand new Weekday Escape is here!
At first there is some work to be done, Maymay traditionally wants you to repair something. After fixing what you can, Masa closes you into a small laboratory - research worker is gone, the door locked and you have to find out the right code to open it. Finally, one of numerous Neat Escape's friends invited you to their villa, but before you get the dinner you are looking forward to, there are some obstacles to overcome! Unexpected obstacles, not broken doorbell or a dog running free...
Have a good time and enjoy!
Such a beautiful day! Blue sky, sparkling snow and the lake is frozen at last - it's time for skating! But where are the skates? They were a bit broken at the end of last winter, right? Well, this is the moment when winter asks what you were doing all summer - to tell the truth, many things, but fixing winter sports equipment was not one of them. Oh well. They are not only broken but Maymay also hid them, so you'd rather start to look for them now if you want to enjoy skating this year, there isn't much winter left!
The cursor is not changing, no save button, one ending.
You can play the game on mobile devices too - there is a button 'mobile' in upper right corner of the site.
Games by Masa are great, but they are not very often, unfortunately. They have their individual style, both visual and auditory; and their puzzles are clever and logic - this game isn't an exception. You are locked in a laboratory (again), a chemical one, and you have to figure out what to do with all the chemicals you find. There isn't any danger of explosion, do whatever you want, game doesn't let you blow up yourself or the place. You are safe. Can you get out?
The cursor is not changing, no save button, one ending.
Again you stand in front of Neat Escape's friend's nice villa, nobody opens and you have to get in on your own, somehow. Picklocks or explosives are not allowed, puzzle solving is the only acceptable way, so look around and start! There are some clues and hints around, and a family of glowering kokeshis is watching you...hurry up, delicious meal is waiting for you!
The cursor is not changing, autosave plus save button, one ending.
Notice, that the game may load very slowly - give it some time.
The game is avalable for Android too.
P.S. If you want to try original My Home from 2014, it's here: https://neat-escape.com/game/894/
We love escape games, and our readers love talking about them and sharing hints! How about you? Let us know what you think, ask for clues, or help out other players in the comments below.


Word of warning on Fix a Pair of Ice Skate:
Once you have the glue, look at it before using it. It disappears once you do!
Can't wait for the walkthroughs :)
Fix a Pair of Ice Skate
Before all the ice melts!
Exploration 1
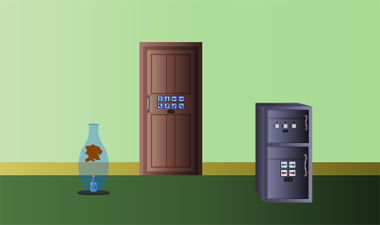
As you've probably noticed, there aren't any ice skates on this screen. Instead, there's a locked door with eight arrow buttons. On the left is a glass vase with a stain on top and a bottle stuck in the bottom. You can't reach it, but you can read a grid of letters from it. On the right, there's two locked safes. The top one has three letter buttons with digit hints, and the bottom one has four arrow buttons in two colored pairs.
Grid
Use the clue from the bottle in the vase to unlock the top safe.
The pairs of digits indicate which row and column to check.
So the first letter is in row 1, column 1, which is W.
The second letter is in row 3, column 2, which is A.
The third letter is in row 1, column 3, which is M.
Enter WAM in the safe, then open it to find a yellow piece of cloth and a row of four blue digits.
Unveil
Use the cloth to clean up the vase. Behind it, there's a blue compass rose made of arrows, each labeled by a digit.
So use that clue (and the other one you just found) to unlock the door.
The blue digits 2581 in the safe label the arrows that point U, DR, L, UL.
So push the ↑↘←↖ arrows on the door to open it.
Exploration 2
This room has more interesting stuff, starting with the lamp on the left with a shoelace hanging around its post. You can turn off the lights to find a digit on each bulb. Next to the lamp, there's a pair of wall cupboards with three-digit and four-letter locks. Beneath them, there's an unlocked cabinet which holds an ice skate, which certainly needs some fixing. The door of this room is locked with four round colored buttons on a right-pointing chevron.
Lights out
Use the clue from the turned-off lamp to unlock the left wall cupboard.
From top to bottom, the digits on the bulbs read 486.
So enter that in the safe, and open it to find a horseshoe magnet.
Reach
Tie the shoelace to the magnet, and use it in the vase.
The magnet attaches to the metal label on the bottle. Removing it, you find that it's a bottle of superglue, which is best used cold for some reason.
Blue
I couldn't reproduce the bug described above in the comments, but perhaps it's best to use the clue first anyway.
Use the clue from the glue bottle to unlock the four-letter safe.
Enter COLD in the safe, and open it to find a handheld skate sharpener(?) with colored dots on its body.
Four colors
Use the clue from the sharpener to unlock the door.
Rotating the clue to match the door, you find that the colors you need are
Yellow(2) Green(3)

Blue(5) Red(1)
Click the buttons that many times to unlock the door.
Exploration 3
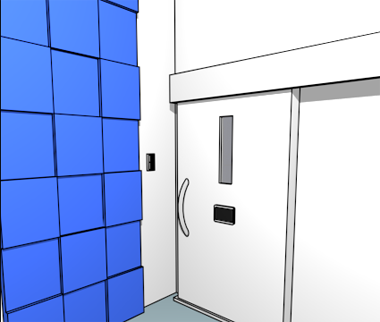
The wallpaper here gets you in the mood for winter. That, as well as the picture of ice skates on the wall. To the right of the picture is a cupboard with two locked doors. The left one needs a three-symbol code, and the right one needs a key. The door to this room needs a three-letter code.
Slide
Use the clue from the ice skate picture to open the remaining safe in the first room.
The skates, from left to right, are
blue, red, blue, blue, redand point in the
right, right, left, right, leftdirections.So click the ⌝⌟ ⌜⌝ ⌞ buttons to unlock the safe, then open it to find another ice skate (yes, it was in this room all along!)
Fixup 1
Now we can get the skates in order. For the right (first) skate, using the glue to reattach its sole.
For the left skate, use the sharpener to remove the rust on its blade, revealing some symbols.
Forecast
Use the symbols from the skate to unlock the left cupboard door in the last room.
The symbols are crescent moon, star and cloud, where only the star has a yellow color.
Click the buttons 2, 1, 5 times to match, then open the door to find a key.
Use the key to unlock the other cupboard and find a shoelace inside.
Lace up
Untie the other shoelace from the magnet, then lace each shoe.
Put the two finished skates together, and the final clue appears.
Escape
The letters ICE appear on the blades.
So enter that in the door to unlock it and leave!
Chemical Room Escape
With a clear rate of only 41%, this is one of the harder games on Masa's site. But persevere through it, and you'll get a Nobel prize. Not really, you'll just feel like a great chemist.
(Make sure you start the game in English. And wear your gloves in the actual lab.)
Exploration
You start off facing a locked door with four numbered card suit buttons. There's a light switch to it, and you hear a whirring sound when you turn the lights off or on.
Turn right to face shelves which hold 2 sets of test tubes which hold clear liquid and a beaker of hardened wax with a key embedded in it. The cupboard under the left shelf is locked, but has some sort of card slot. There are two cupboards under the right shelf, the left one locked (and requiring a key) and the right one unlocked and containing a burner.
Turn right to face the fume hood, where a gas tap and tripod are already set up. Pick up the squirt water bottle.
Turn right to face a computer screen which displays a chemical diagram on the screen along with a cursor that you have no way to move. A wire extends behind the screen and connects to a locked cylindrical container with a red light. Next to the container is a ball-and-stick model. Under the table, there's a chest of drawers. The top one is unlocked and contains a pair of tweezers, and the bottom one is locked and its keypad is missing a battery.
Turn right to face the refrigerator. Both compartments are empty except for a single lemon in the fridge door. Some plants with red leaves hang on the wall, and you can zoom in on them to find a metallic mold.
Forge
Fill the mold with the water from your bottle, then place it in the freezer.
Then pick up the groovy shaped ice block.
Place the ice block in the card slot under the left shelf. Now it's open and you can take the matchbox (with only one match) and battery.
Volatile
Place the beaker on the tripod and the burner beneath, then use the matchbox to light it.
The wax melts, but it's so hot that you need to use the tweezers to pick the key up.
Unlock
Use the key on the locked cupboard beneath the right shelf. Inside, there's a flask of alkaline NaOH (sodium hydroxide), colored red by an indicator.
Wet
You notice a puddle nearby. It's the melted ice from the card slot, which flowed onto the floor and revealed a hidden compartment.
Click the puddle/compartment to open it and find a beaker full of hydrochloric acid.
Neutralize
Pour the hydrochloric acid into the alkaline flask, turning its red solution transparent.
Pick up the flask to read the pink digits on it.
Access
Place the battery in the drawer keypad, and enter the code from the flask.
The pink digits read 4818, so enter that in the keypad to unlock the drawer.
Inside, you find a wireless computer mouse. The floor of the compartment is unusually shallow, because it's a a panel that's fastened with screws.
Interface
The mouse doesn't work on the computer yet, because it's missing its battery too.
So remove the battery from the drawer and put it in the mouse.
Now you can click on the circles in the diagram to change their colors. So use the clue from the chemical model on the table to do so.
Both the diagram and the model represent acetic acid, with the balls in the model colored according to the CPK color scheme. That is to say, the hydrogen atoms (with one bond each) are colored white, the oxygen atoms (with 2 bonds) are colored red, and the carbons (with 4 bonds) are gray/black.
So match those colors on the screen by clicking the circles
-1---

10021

-12--
times.
The screen changes to a different clue, and you realize that your mouse doesn't work anymore. The battery's flat!
You also heard the sound of the cylindrical container unlocking. Inside, you find a screwdriver and two sets of metal plates connected to leads.
Substitute
Push the metal plates into the lemon, and attach it to the battery slot of the keypad.
Then enter the code (4818) again to re-unlock the drawer.
Unscrew
Use the screwdriver to remove the false bottom in the drawer. Underneath, there's a glowstick that you break to activate.
Vision
Turn off the lights, and use the glowstick to light the room up. A compartment to the left of the door has opened up, and you can take a test tube with yellow fluid labeled (B).
Tubes
Add the labeled fluids (the (A) beaker of acid and the (B) test tube) to the test tube sets. Some of the contents remain clear, some turn white, some turn red and some turn yellow.
So use that clue to unlock the door.
Comparison of the tubes with the screen indicates that test tube 1 is Club, 2 is Heart, 3 is Spade and 4 is Diamond.
So click the buttons 3, 1, 0, 2 times to escape!
My Home - Remake
With new technology, new puzzles and a change in language, the improvement in this remake is literally night and day.
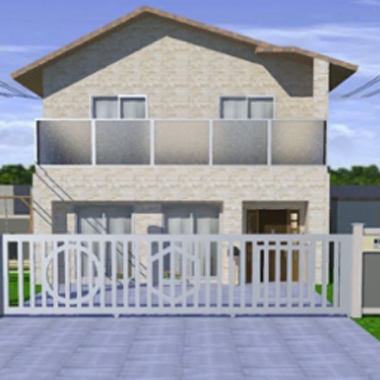
Entrance
The intercom you need to ring is somewhere behind this large metal gate with three shapes hidden in its bars.
So use this clue on the panel to the right of the gate to unlock it.
The shapes in the gate are Circle, Hexagon, Square. So click the buttons 4, 2, 7 times, and push the button which opens the gate.
Exploration
Great, the intercom is right there on the door. All we have to do is press the button. No, it doesn't ring!
Look around the doorway. On the right, a shelf holds three unconventional kokeshi dolls, with room for another one. On the left, a locked mailbox has its flag screwed down. Even further to the left, there are two flower planters, and closely examining them reveals a matchbox behind the right corner of the right one.
Turn right. There's a small pond in which you can vaguely see something submerged. Directly above it on the fence is a device with four black buttons that fill up in blue from the right. Further along, you see a locked tool shed.
Click the left edge of the shed to look around it and find the missing wooden doll in the shadows.
Back out and turn left this time. The box on this side of the fence is screwed shut, and the other box on the pole is locked and needs a key. The swing looks perfectly normal until you flip its seat over to find some blue and white bars painted on it. The picnic table attached to the wall has a metal bowl on its left bench.
Looking more closely at the top of the table, you find a hidden compartment that hides some rope.
Family
Place the missing doll on the shelf, which dispenses a screwdriver.
You can pick up the doll again.
That's because the doll has something hidden inside: a blue comb.
Stripes
Use the clue from the swing to unlock the box above the pond.
The leftmost stripe is furthest from the white one, so it corresponds to the top button.
Click the buttons 4, 1, 3, 2 times to match the lengths of the blue stripes.
Then open the box to find a gas torch.
Unscrew
Use the screwdriver to "unlock" the mailbox and find a grappling hook (head) inside.
Also use the screwdriver to unscrew the box on the fence opposite the picnic table. As you pick up the white mould, you notice a red lamp shining out from the box.
Thermoplastic
Drop the comb into the bowl on the picnic bench.
Light the gas torch with the matches, and use it to melt the comb.
Scoop up the residue in the mould, and remove the finished key from it.
Unlock
Use the blue key to unlock the box on the pole. Inside, there's a single switch set to Off.
So flip the switch, which drains all the water out of the pond, leaving behind a dice cube with symbols instead of pips.
Scale
The red lamp from the box produces a bright red spot on the wall.
So attach the rope to the grappling hook, and use it to climb up over the balcony there.
Upstairs, you only find a single device with symbol buttons over symbol clues.
Dice
Use the clue from the dice you have to unlock the device upstairs.
By rotating the cube in your inventory, you deduce that the symbol opposite the musical note(♪) is the exclamation mark(!).
Similarly, the symbols opposite % and & are ? and #.
Click the buttons 4, 8, 5 times to enter
!?#.After you push the button, you hear something unlock and the small light on the panel turns green.
Exploring the area again, you find that the tool shed is now open!
It's filled with lots of extra rope and a box that controls power to the intercom, with a conspicuous square socket.
Call
You can place the dice in the intercom power box, but it won't work unless you have it just right.
The symbol on top of the intercom is a musical note, so rotate the dice cube in your inventory until ♪ is visible.
Now you can place it in the box, which makes the intercom work! Push the button on the door to end the game.
Nice game!!
Update