
 Ladies and gentlemen, boys and girls! Step right up, come closer, the new Weekday Escape is here!
Juicy Weekday Escape brings lots of fun, three full length games; they're not just pleasant to your eyes, they're good exercise for your brain too. The first Shiesuta's game is classical escape from living room, with nice graphics and quality puzzles, Riddle Escape takes you to beautiful place in fantasy lands and Lutaru didn't let us wait too long, the game promised in August is already here!
Have a good time and enjoy!
Shiesuta has locked you in windowless room with comfortable sofa, big TV and cup of coffee, but didn't give you remote contoller - well, you are not here to chill out! You are here to escape! And that means puzzles and codes and screwdrivers and the wiggling picture, you know the routine. But there is more than you can see at the beginning - you get a chance to play a minigame (it's operated by keyboard) and you can play with colored pencils! Don't hesitate and go!
The cursor is changing, no save button, one ending.
Master of amospheric games, Riddle Escape, did it again! Immediately after start, with a help of music, you are transferred to a magical garden surrounded by a wall with barred windows and lanterns like lights. A footbridge crosses a canal with water flowers reminding of moon daisies and leads to relief decorated door at the other side of the canal. Unicorns and griffins left this place a few moments ago and you are on your own now. Can you escape?
The game is linear, following a scheme "hint - solution - opened door/box-new item - repeat". Sometimes one prefers this style, sometimes one's too tired to think much and these games are like short interactive film, very enjoyable!
The cursor is not changing, autosave, one ending.
The game is avalable for Android too.
In August Lutaru promised next game in their Tsure series - and it's here now! That didn't take very long!
After "desert escape" ( Tsure Game 7 ) and "island escape" ( Tsure game 8 in WE N°152 ) you find yourself in a room, sterile and almost empty, and judging by wind sound (and the ending of previous game) hovering high in the air. So, you are not locked, but without a parachute is only obvious escape way not advisable. Look around and you find soon some hints and buttons to be pushed, and eventually very suprising means of escape (not the parachute)!
Notice, that solutions often require combination of two clues and the game doesn't let you pass without revealing both. Guessing is not allowed. Also notice, that after entering the righ code you have to click the "place" again.
The cursor is not changing, no save button, one ending.
P.S. Talking about waiting for the next part of series - after GUMP's awesome and original games Neptune, Uranus, Saturn and Jupiter...may we get Mars, please? Please? It's more than 5 years now...
We love escape games, and our readers love talking about them and sharing hints! How about you? Let us know what you think, ask for clues, or help out other players in the comments below.


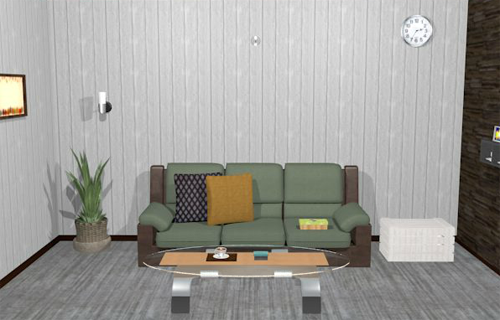
Balloon Room Escape
I know you want your troubles to float away over a nice cup of coffee, but you should really focus on escaping.
Exploration
(As with Shiesuta's other games, you can turn on music by clicking the hedgehog in the lower right.)
You start off facing a coffee table with a nice hot cup of coffee and a three-digit box with symbols on it. The couch next to the table has two cushions, one of which hides an animal note, and also a four-button safe. On the wall, there's a hook that doesn't hold anything yet and a clock which appears to be stopped right in the mid-afternoon. There's also a white crate whose lid is nailed down. Actually, those are screws, not nails.
And there's also a clue scratched on the left edge of the couch, a bunch of lines covered in blue paint with GOAL written below.
Turn left to find a door with a white balloon painted on, next to a light switch which you don't need to touch yet. There's also an almost blank painting on the wall which has tilty corners.
Turn left to a very large cabinet with a television in the middle. Along the left side, there's a pink four-letter box holding a key, an unlocked drawer that holds a rag and a four-letter drawer marked with a snowflake. Look past the display case of shiny apples to the right side of the cabinet that has a four-digit drawer marked 12H in a circle of clock face markings, and a locked drawer that needs a key. There's also three shelves that hold a flowery ball with a golden loop around its middle, as well as a striped box with a screwed-down lid.
Turn left to find a wall with some interesting shelves. From left to right, the shelves hold a bird picture and coffee cups, a wine bottle and wine glasses, a box with four colored buttons, a miniature tree next to an even smaller house, and a bunch of books, one of which has a clue with colored circles and footprints and another clue with a combination of items.
Look in the right wineglass to find an olive-colored paper clip.
Dial
Use the clue from the clock to unlock the four-digit drawer to the right of the TV.
The time on the clock is 2:35 and the clue tells you to keep it in 12-hour format.
So enter 0235 in the drawer, and open it to get a screwdriver.
Unscrew
Use the screwdriver to unlock the box on the shelf to the right of the TV, and open it to get a mathy hint note.
Then go back to the couch screen and use the screwdriver to open the white crate, which contains an autumn scroll.
Silvered
Use the clue from the apples to unlock the four-button safe on the couch.
The leaves on the apples point right, right, up, left, up, right (where up is forward).
So click the RRULUR and open it to get a remote control.
Video
Use the remote on the TV, which lets you play a game of Pizza-Pen with the keyboard!
The snowflakes are harmless if they pass you and instantly fatal if they hit you. So dodge the snow and melt it with glowing pizzas.
Once you reach a score of 100 (10 hits), a clue with card suits shows up on screen. (Write it down, or you'll have to replay the minigame to view it again.)
Night
Use the autumn scroll on the hook above the couch, then turn off the lights, and then turn back to it.
The scroll shows several lines on seven-segment grids above card suits.
(When you're done working things out, turn the lights back on.)
Cold
Use the clue from the scroll and TV to unlock the four-letter drawer to the lower left of the TV.
Superimpose the lines indicated above the card suits in groups to obtain letter shapes. For instance, Heart+Diamond+Club forms three horizontal lines with a vertical line joining their left ends, i.e. a letter E.
The four groups of card suits represent the letters ECHO. So enter that in the drawer, and open it to get a cup of color markers.
Diverse
Use the markers on the animal note to color the animals (clockwise from top left: green, yellow, orange, blue, pink, purple).
Then use that clue to press the appropriate buttons on the four-button box on the shelf. (The button colors are, clockwise from top left: green, yellow, pink, blue.)
The green, yellow, pink, blue animals are pig(?), duck, cat, panda.
Matching the tracks on the note to the animals gives the code PYGPYGBPP.
So click those buttons to open the box and get a LED light from inside.
Platform
Use the clue from the shelves to unlock the three-button safe on the coffee table.
The book, bird and house symbols appear sideways, and the books, bird picture and mini house rest on shelves which read 3, 8, 5 sideways.
So enter 385 in the safe, and open it up to find a plain key.
Unlock
Use your key on the drawer to the lower right of the TV, and open it to find a bottle of soap.
Cleanup
Use the soap on the rag, and then use the soaped rag to wipe up the mess on the left side of the couch.
All that remains is an amidakuji with yellow dots forming a path along the corners of the white lines.
Corners
Use the clue from the side of the couch to unlock the tilty corner picture beside the door.
The amidakuji runs a path starting from the middle end at the top, and passes through all the yellow dots on the way.
The corresponding corners that the path winds past each dot are the ⌞⌞⌝ ⌜⌟⌟ ⌜ corners. So click those corners, and the picture slides to the right, revealing a box cutter and a four-digit safe.
Math
Use the clue from the math note to unlock the four-digit safe behind the picture.
There are 8, 4, 6, 5 squares in each picture, so the formula becomes 8×4×33+6×5.
That's 1086, so enter it in the safe to open it and find a button battery.
Assembly
Use the cutter to open up the flowery ball capsule and get the pink balloon inside.
Now you can follow the instructions on the book.
Use the battery to power the LED, then place the lit diode in the balloon (and then you automatically inflate it).
Seal the balloon using the paper clip.
You're ready to use the balloon, but how?
Luminosity
Use the assembled balloon on the white balloon door, and it rises to the ceiling.
Then turn off the lights and examine the balloon, which lights up a four-letter code on the ceiling.
So enter the four-letter code (RKGS) in the pink box to the upper left of the TV, and open it to get the key with a green heart on its keychain.
Use this key on the door to finally open it and escape!
You get an end screen with a story in Japanese. I'm not going to translate it, but it starts with a glowing balloon and ends in delicious pizza.
I'm still waiting for the bloody escape game that looks like the picture provided.
https://jayisgames.com/images/weekday_escape_banner.png
Unless I've missed it somehow...
Thanks for Balloon Escape KK. can't wait for the others. :)
Long game is long. I had to rearrange the walkthrough a few times while writing, so I hope this order is still logical.
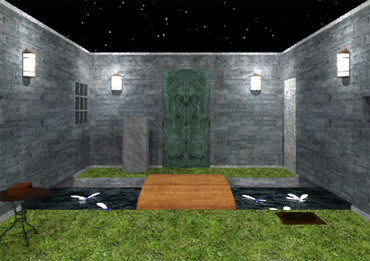
Escape from a Room that sees the Stars
There's no denying that this is a starry view, but I wouldn't exactly describe this as a room.
Exploration
You start off facing locked double doors. A safe on the left has two buttons that flash yellow and blue circles when pressed. On the right, a brick appears to be missing from the wall, but the resulting hole has been blocked off by an iron bar. And then there's something high up on the right wall.
So turn right, and you see that it's way out of reach. Elsewhere on the wall, there's five differently-shaped holes in the wall next to another square hole covered with four bars. The table in front holds a colorful safe with a colorful clue. (Do you see something in a reflection? Be patient, we'll get around to it.)
Turn right, and you see a wooden bridge over a river with white-petaled flowers floating in it. The flowers have blue and yellow middles, and each appears to be missing a different number of petals (out of five). Next to the bridge is a neat square patch of dirt. Across the bridge is a greenish door with some sort of carving next to a shiny pedestal with three moon-shapaed holes. On the left wall is a grid of holes, each holding an unlit candle (that makes a weird sound when clicked), and on the right wall is a set of narrow double doors with handles tied together by a thread.
(Back out and) turn right to a wall with two square holes on the left, with three and two iron bars over them. At the right of this wall is a panel with a four-button lock under it. Each button is in a different relative position, and cycles through different numbers of vertical lines when clicked.
Count up
Use the clues from the barred holes throughout the room to unlock the four-button panel.
The two squares next to each other represent the 3-bar and 2-bar holes. This means that the other two buttons should have, in clockwise order, 1 and 4 bars:
4-3

--2

-1-
So click those buttons 3, 2, 1, 0 times, and the panel opens up to reveal a not-so-yellow vase and a book with some interesting clues.
Split
Use the clue from the flowers in the river to unlock the two-button box on the first screen.
The flowers with 1, 2, 3 petals have blue centers, while those with 4 and 5 petals have yellow centers.
So click the BBBYY (RRRLL) buttons on the box to open it and get a miniature telescope.
Twinkle
The book said to use the telescope on a diamond.
So use it on the diamond-shaped hole to find a flag with red, white and green vertical stripes.
Then use that clue to unlock the colorful box.
The box has stripes of the colors black, green, white, red, yellow, blue.
Remove the colors from the flag, and the remaining colors are black, yellow and blue.
So enter that in the box by clicking the buttons 1, 4, 5 times, and the box opens up so you can take the knife.
Slice
Use the knife to cut the rope across the doors across the bridge (and to the right).
Then back out and open it to find a ladder, a safe with three plant buttons, and a hidden panel on the inside of the left door that contains a pencil.
Shade
Use the knife to sharpen the pencil, and then use the pencil on the right page of the book to reveal a hexagon above the red cross.
That puts the cross beneath the hexagon, so look beneath the hexagon hole to find a hidden panel that contains a shovel.
Depth
Use the shovel on the dirt patch to find a right half-moon piece.
Climb
Use the ladder to reach the alcove above the holes, in which three plant pots filled with soil hide a matchbox and a grid of nine buttons that turn white when clicked.
Light
Use the matches to light the nine candles. Five of them stay lit, and the other four go out almost instantly. (If you click on those four without using the matches, the extinguishing sound will still play.)
So use that clue to unlock the box where you found the matches.
Click the five buttons in the middle row and column, leaving the four corners off.
The box opens so you can take a full moon piece from inside.
Quench
Fill the vase in the river, and then water the three plant pots with the vase.
A flower grows in each pot. So use that clue to unlock the plant box in the "closet" across the bridge.
Click the buttons 2, 0, 1 times to match the heights of the flowers.
The box opens so you can take the crescent piece from inside.
(Now that you're done with the alcove, you can pick up the ladder again.)
Phase
Place all three pieces in the pedestal, and the carved door opens up into another room!
Exploration 2
Directly ahead, you see a locked door and a small shelf next to it with three square holes. On the left side, there's a round table that seems to have some bits sawed off. On the right side, there's a three-button box where the buttons show horizontal stripes, on top of a round table that doesn't seem to be missing any parts.
Turn left to find a tilty picture frame with white and black stars over wooden chairs, the middle one holding a spinner disk that flashes a light in its middle. The round table to the left is also partially sawed off.
Turn left to find the doorway back, with a black splodge of ink next to it. Once again, the table to the left has some bits missing.
Turn left to find a stone panel in the wall with a grid of four circles, three of which are buttons. Below it is a curious pair of L-shaped markings.
Slat
Use the clue from the chairs to unlock the three-button stripe box.
The chairs have 4, 2, 5 beams along their backs.
So click the button 3, 1, 4 times to find a flowery panel.
Sawn
Use the clue from the tables to unlock the circle panel.
Clockwise from the full table, the other tables are missing 2, 1, 2 segments. So click those buttons
20

12
times, and the panel opens up to reveal a towel and a safe with three pairs of buttons, with a moon shape in between each pair.
Cleanse
Dip the towel in the river and use it to clean the ink beside the door.
All that's left is a clue with white and black stars on two sides of an arrow.
Tilty
Use the clue from the stars to unlock the tilty corner picture.
The arrow indicates a sequence of WBBBWW stars (LRRRLL) which are on the UDUDDU sides of the arrow.
So click the ⌜⌟⌝⌟ ⌞⌜ buttons, and the picture comes off to reveal another panel behind with a lit candle on the left and an empty space on the right.
Wax
Go back to the grid of nine candles, four of which are completely burnt out and have colors at the base of their stem.
The middle candle is sill lit, so pick it up.
Then use the candle on the empty space behind the star painting, which hides a clue involving a ladder and a circular box with eight white-and-black buttons.
Carousel
Use the clue from the spinner to unlock the round box.
From top clockwise, each position of the pointer makes the middle turn BWWBBWBW.
So enter that same clue into the box by clicking the 2nd, 3rd, 6th and 8th buttons clockwise from the top.
The box opens so you can take a flowery panel from inside.
Rise
Use the ladder (that you picked back up) on the L-shaped marks on the wall, and click the third space between the rungs (from the top).
In the space, there's a hidden compartment with a book marked with different moon phases (and some blank pages).
Wane
Use the clues from the moon book to unlock the six-button moon safe.
The symbols on the book are: Crescent on left page, Full moon on left page, Full moon on right page, Crescent on right page, Half moon on left page, Half moon on right page.
So click the buttons in the
14

56

23
order, and pick up a flowery panel from inside.
Filled
Place all three panels in the shelf, and the doorway opens up to reveal a box with four colored buttons.
Burnt
Use the clue from the burnt candles to unlock this final box.
The candles show red, green, yellow, blue centers clockwise from top. So enter that in the box by clicking the buttons 0, 3, 2, 1 times.
Inside, there's a shiny golden key!
So use it to unlock the double doors on the first screen, and click them again to end the game.
Thanks again KK. Can't wait for the Tsure walkthrough :) one thing on Stars
one point you said "you can take back the ladder" It wouldn't work, as everytime I tried, it would just make me climb it. I continued to follow the walkthrough until I unlocked the next room. After that I went back and tried one more time on the ladder and it let me take it this time.
Just thought i'd let you know.
Indeed! I got lazy to actually test that it was possible to do that step then. Thanks for spotting that.
Here's the last walkthrough.
Tsure Game 9
The wind noise may be scary, but this level is perfectly safe, as long as you don't let the vertigo get to you.
(Due to font differences, symbols in this walkthrough may look slightly different from in-game.)
Exploration
The title text fades away, leaving you staring at the islands in the distance…
…through a window that you have to step away from, and now you can get a better look at the room you're in, with an alphabet panel on the floor in front of a large chasm in which a chair is floating back and forth.
Turn left back to the window and a basin next to it which doesn't have a faucet. The basin drains into a pipe which you can zoom in on to spot what looks like a metallic ring and a red glow at the bottom.
Turn left to find an empty doorway into the sky, next to a helpful chart of symbols that should look like Greek to you, whether or not you actually know Greek.
As you run your fingers over its surface, you lift the chart away to reveal a hidden compartment with a grappling hook head and some clue about a fence.
Turn left to find a locked doorway, but there's a subtly hidden hexagonal button on the wall that you can press to make several things appear.
The doorway is now open, so go through it to a gangway along the outside of the room leading to an area fenced off by a railing and rope. The railing fence has a lock on it with four buttons labeled
fenc, and the wall has a four-digit lock next to a dark-colored panel.There was something else further along the wall. Zooming in, you see a black-and-white panel with a keyhole.
Back out and click either side of the screen to turn around. Walking to the other end, you find a mirror next to the doorway. After picking it up, a rectangular outline remains with a 〆 mark on its right side.
Reflect
Use the mirror on the window at the position marked (the right side), and you see a (unmirrored) Δ symbol on a grid in the reflection.
Named
Use the clue from the mirror reflection to unlock the alphabet grid.
The symbol shown is Delta, so click the D, E, L, T, A buttons in any order.
Then click the panel again to raise a bridge marked with a Θ. Crossing the bridge, you find a pipe with several punctuation marks and a valve that's too high to reach, as well as a water dispenser that doesn't work yet.
There's also something on the wall beside the bridge, but trying to get a closer look just brings you to the edge of the bridge looking over.
Barrier
Use the punctuation clues to unlock the fence (railing).
The
/::[][]:clue on the pipe translates, via the/:][:clue behind the chart, tofeecncne.So click the 12243432 buttons (from the left) on the railing, and click the panel again to open it up and get a fishing rod.
Grounded
Push the alphabet panel to lower the bridge, and use the fishing rod on the floating chair.
You'll find that you can't get it to hook on.
So attach the grappling hook to the rod, and then try again.
This time, you manage to pick up the chair.
Throne
Raise the bridge again and use the chair below the (left side of the) pipe. Then climb onto it and turn the valve that enables the water dispenser.
Before you get off the chair, click on the discolored section on the left side to find a not-so-sharp key.
Unlock
Use the key to unlock the panel just beyond the rope cordon, and a switch handle pops out from it. So push it to the other end, and the Θ bridge slides over accordingly.
Now you can walk onto the bridge and examine the wall beside it, which has a cylindrical device with Greek symbols and rectangular holes next to a button on the wall which does nothing right now. There's also a note on the left reading Pass, but the A is inverted.
While still on the bridge, turn so you face the pipe, and then turn around by clicking the left edge of the screen.
You find a four-digit clue under where the bridge was.
Clearance
Use your newly-found clues to unlock the four-digit lock outside.
The clues seem to suggest that the "pass" is the four-digit clue 7941, but that's not it.
To get the
PASS, you'll need to invert the second letter. So turn the second digit upside-down.This gives 7641, so enter that in the lock to open up the panel. Now you have access to the other side of the Greek cylinder! Utterly useless.
What's not useless is the four-digit lock panel, which you can click again to lift it up and find a button that rotates the cylinder.
Wheel
Playing around with the cylinder, you find that it doesn't wrap all the way around. The gap must be useful somehow, but you can't seem to do anything with it from here.
So place the gap on the other side of the wall by clicking the button until ϕ is in front.
Going over to the other side, you find a handle behind the gap that you can click to lift up to find nothing behind.
But you can push the button on the side, which slams the shutter down, and then lift it back up to find an empty glass.
And then you can push the button again and raise the shutter to find nothing.
And then you can push the button again and raise the shutter to find some roman numerals.
Transfer
Fill your glass in the dispenser, then pour the water down the basin, pushing a metal washer down onto a red button.
Then the whole basin slides down to reveal a four-(greek-)letter safe behind it.
Omega
You could deduce the final code from what you've seen, but why make it complicated?
Go back to the cylinder (from the inside) and use the button and shutter to find the space where the glass was.
Then go outside, and the roman numerals should now be visible through the windows. So push the outside button to spin the windows around and match the numerals to the letters.
The Ⅰ, Ⅱ, Ⅲ, Ⅳ numerals are visible through the windows under the Ω, Σ, Φ, Ψ.
In lowercase, those letters (omega sigma phi psi) would be ωσϕψ.
So enter that in the panel by clicking the up buttons 1, 7, 4, 2 times.
The bridge falls away and a futuristic airbike floats up in its place. So you get on and ride away to the distant islands!
thanks for the last walkthrough KK. it was pretty cool. Canlt wait for more games soon.
thanks for the walkthrough again kk. looking forward to more games and walkthroughs in the future :)
This is the banner we use for our Weekday Escape series :)
I'm sure Chrpa will find for you the name of the game :)
I think it's a banner only, I don't remember playing this game...but I'd like to, the banner does seem like awesome game! The closest one (with a beach and a crab) I remember is Solitude by 58works: https://jayisgames.com/review/solitude.php.
The link again: https://jayisgames.com/review/solitude.php
Great article post.I appreciate your writing skills.They are excellent.The knowledge of the subject is pretty good.
voyance
Update