
 Hi everybody, this is Halloween Special Weekday Escape!
Some games in this Weekday Escape are old, some games are new. All are good and enjoyable; and all are Halloween themed. The newest game by Ichima takes you to a nice living room room with a bit disturbing atmosphere. Then you have to escape another little scary room in Amajeto's game and after you are out, Funkyland takes you to a candy shop, regrettably not for shopping. Atmospheric Esklavos wants you to fight Evil and finally you have to find many puzzle pieces in cute Yuri's game.
Have a good time and enjoy!
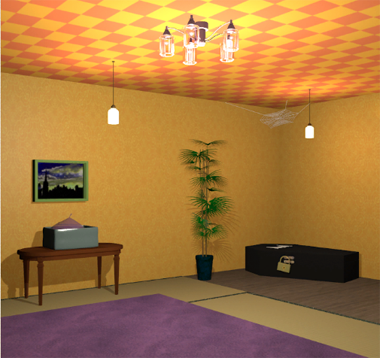
Before you start playing, look carefully at the first screen of Ichima's game and notice important information about gameplay (I didn't and was stuck). You can also switch between English and Japanese there with right lower button ("System"). The room you enter seems tidy and overall pleasant, but vague feeling of "something is not right" is in the air. Why is it so? Is it the coffin rumbling in the corner? The thick cobweb above it? Dirty mirror? I won't tell you...find out by yourself!
The cursor is not changing, autosave, one ending.
The game is available for Android too.
Someone left a skeleton lying in Amajeto's typical living room. The skeleton misses some parts and in it's jaws firmly holds the most important tool of all escapes, a screwdriver. Few blackbirds (imagine rooks or ravens to keep the atmosphere magical) are watching you with their little eyes, the pumpkin on puzzle picture is obviously the worst kind, completely wicked, and the scarecrow is significantly blinking - how is one supposed to focus on puzzles? On the other side, you have to manage somehow if you want to leave...by the way, the blackbirds stay where they are, don't worry.
The cursor is changing (its color), no save button, one ending.
The whole interior of little Funkyland's candy shop is inspired by Halloween, even tiled floor and wall papers are in right colors. Everything is polished, shelves full, piles of candies everywhere, the shop is just before opening (well, in fact it's closed today and staff are busily redecorating the shop to Christmas design, but let's lay it aside) and you are the one who is supposed to let customers in! Mr. Frog is peeping through small window in his coffin, can you help him out and get the key from him? And don't be afraid of his tiny fangs, I'm sure it's Halloween costume...or at least I hope so.
The cursor is not changing, save button, one ending.
Four years ago you had to fight a beautiful but cold and soulless sorceress in Magic Halloween Escape by Esklavos, posted in Link Dump Friday №344 and you did, bravely. But she was tougher than you thought! And she is back! Angry! Ready to attack! Can you get rid of her for good? The main strenght of the game is its atmosphere, dark and magic, fires flickening in the night, glowing wolf eyes and sinister pumpkins sneakily watching you. What you need is good observation, some clues or items are not obvious. But you can do it, evil must be defeated!
The cursor is changing, no save button, one ending.
Small game by Yuri with merry ghost and cute c̶h̶i̶c̶k̶s̶ pumpkins comes to finish the Halloween Special. In upper right corner of the gamescreen is hidden a puzzle with twenty missing pieces and after finding all of them the puzzle reveals final code for exit door. Puzzle pieces are everywhere, some transparent and denying the laws of physics, some are visible only after you zoom the scene. Can you find all of them? Even the last one?
The cursor is not changing, no save button, one ending.
And here are some more from JiG archives: Haunted Halloween Escape by Teralumina, Nightmare Escape (Detarame factory) by Detarame Factory and Aries Escape: Episode No.15 by Aries Escape (or Libertechno). For more try Halloween!
We love escape games, and our readers love talking about them and sharing hints! How about you? Let us know what you think, ask for clues, or help out other players in the comments below.


Retro Halloween was quite straightforward except for
following the hint given by the little ghost.
To open the door that the ghost is demonstrating
click on the door and hold down the mouse button.
I had to find this clue on another site. I never would have thought of that. Part of me is pleased that there is something new in escape-land, and part of me thinks that just having one instance of a new type of interaction in an otherwise normal game isn't good.
can't wait for the 5walkthroughs for these games.
And that's why you read title screens.
Retro Halloween
Ichima has prepared a Halloween-themed room to escape from, a interesting mix of styles that give off a retro feel to the room. As mentioned on the title screen and the description, "There is one place to tap long", so look out for it.
Exploration
You start off a variety of furniture placed around a purple carpet. Examine the armchairs to find that the left one has a lollipop candy on it. The table in between the chairs has a device you can't use yet, and the right chair isn't interesting except for the drawn curtain behind it, which hides an orange silhouette behind the stained glass window. The table on the right under a dirt-covered mirror holds an lamp with colored glass sides, and you can open its lid to find an unlit candle inside.
Turn right to find a painting with a piece of candy hidden in the right side of its frame. On the table below that, there's a tub which doesn't have water, but instead has apples and a water balloon. There's also a potted plant with another piece of candy and a coffin on the floor marked with a bat, whose lid rattles when you look at it. On the ceiling above the coffin, a key hangs in a spider web out of reach.
Turn right to find another nighttime painting with a button next to it behind a locked cover. Opening the two large doors of the cupboard below, you find a colorful striped cup surrounded by reddened eyeballs. To the left of those doors, there's three drawers, with the first two locked by three-digit and four-slider locks. The bottom drawer holds a piece of candy. On the right side, there's a safe with a grid of sixteen buttons. And of course, there's the exit door to this room, needing a key to open.
Turn right. On this wall, there's a pendulum clock that's not running (and needs a winding key), and its time is stuck at midnight. There's also a bookcase with three colored pots (the pink one holding some candy), a safe with eight up-down switches divided in the middle by a black line, a book that has spiders magically descending across its pages, and a photo frame with candy behind it.
(You should now have six lollipops.)
By a thread
Use the clue from the spider book to unlock the middle drawer of the cupboard.
The lowermost spider is the first one, followed by the third, fourth, second.
So click the sliders into the appropriate positions, then open the drawer to find a folded towel.
Squeaky
Use the towel on the mirror to wipe it dry.
In the reflection, you see a ghost turning one of the wall panels.
So zoom in on the bookshelf, and click and hold on the panel next to it, which spins around so you can pick up a broom.
High
Use the broom on the cobweb, pulling it off the ceiling.
Then take the key from it.
Unlock
Use the key to unlock the button panel beside the purple painting, then push the button.
The painting rises up to reveal a pair of axes.
Hack
Draw the window behind the right armchair, then use the ax to smash it.
What horrors lie beyond the glass facade- oh, it's just a stack of three pumpkins.
Carved
Use the clue from the pumpkins to unlock the top drawer of the cupboard.
Looking at the pumpkins sideways, you find that their smiles form the digits 307.
So enter that in the drawer, then open it to find a piece of candy inside.
Puncture
You still have the ax, so use it to pop the water balloon.
The water levels out in the tub, and the apples float around.
Align
Use the clue from the apples to unlock the right safe of the cupboard.
The apples form a pattern in a grid:
-O--

--OO

-OO-

O--O
So click those buttons to turn them red, and open the safe to get a lighter.
Burn
Open up the lamp beneath the mirror, and use the lighter to light the candle inside.
Then click the front of the lamp to find small darkened squares on the red glass panels.
Byte
Use the clue from the lamp to unlock the bookshelf safe.
From left to right, the squares appear on the UDDU DDUD sides.
So click all the buttons except the 1st, 4th and 7th, and open the safe to find another piece of candy.
Octet
You should now have eight lollipops:
On left armchair
In bookshelf pot
On side of blue painting
Behind bookshelf photo
In top drawer
In bottom drawer
In bookshelf safe
In plant pot
Use all eight lollipops on the cup in the middle of the cupboard, and a silver key appears over the cup.
Unlock 2
Use the key to unlock the door.
It opens up into a ladder which ends at a metal grate on the ceiling, which you lift up to enter the next room.
Exploration 2
There's a witch hat here under a spotlight, as well as a window on the left blocked by metal bars. One of the bars is missing, and you can't see through the window.
Turn right. There's a mousehole in the ground, and a pair of eyes glow in the darkness and blink a bunch of times. A panel on the wall has nine buttons labeled with letters suggesting a festive message. In the corner of the room is the trapdoor back, but it slammed shut behind you and won't open anymore.
Looks like you're completely stuck. So look in the window again. You still can't pass through the bars, but a message appears in the gap.
Spell
Use the clue from the window to unlock the nine-letter panel.
Click the H, E, L, P buttons on the panel, and click the OK button.
The trapdoor pops open. (You will have to do this again if you return to the attic.)
Witched
Use the hat on the device in between the two armchairs.
Its cat picture lights up, so use a clue from a cat to unlock it.
The cat (eyes in the mousehole) blinks 1, 3, 2, 3, 1, 2 times.
So click those buttons, and the cat picture pops up so you can take a wind up key.
Wound
Use the key on the clock, and its pendulum flips over so you can take a bat key.
Release
Use this last key on the coffin, which creaks open.
You look into the orange padded interior, which extends to a flight of stairs into a lit doorway.
Click on the doorway to escape. Congratulations!
Oops. Mea culpa.
Repeat 10 times.
I will always read title screens.
...
I will always read title screens.
And not just the title screen. I should also have read the complete game description. Double oops. Mea maxima culpa.
I think we can congratulate Chrpa for this Weekday Escape.
She took time to find and share interesting games for us.
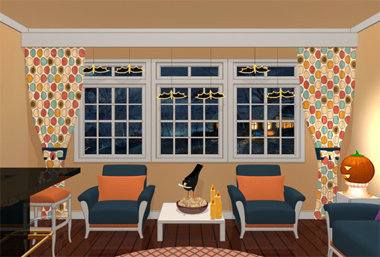
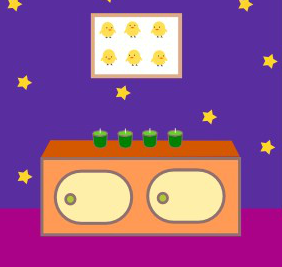
Halloween Jigsaw Escape
The scenery outside is certainly spooky, and you might find some of the same spirit in this cosy room.
Exploration
Once again, you face two chairs and a table. Oddly enough, the table has a bowl of popcorn, and a crow perched on it holds a bony finger in its beak. Bat decorations hang over the windows at different heights.
While zoomed in, you can find a dark blue puzzle piece hidden on the right window.
Turn right to find a sofa with a painting over it, the right section of which is jumbled up. On the sofa are four cushions, and there's a puzzle piece on the orange one. Two pumpkin lamps (more fancy than just lanterns) light up the safes on the left and right of the sofa. The left safe needs a color for each of four Halloween symbols, and the right safe needs a pattern for its grid of sixteen squares.
Turn right to find a television on the wall over a skeleton missing several of its fingers and biting something tightly. Above the television are four empty cupboards that each have a different symbol and corner painted on their back. There are also four locked "drawers" on the left and right of the TV. The left drawer holds a crow with another finger, and has an empty rectangular space for puzzle pieces. The top drawer on the right has two buttons one over the other, the middle drawer has four orange buttons with identical magnifying glass symbols, and the bottom drawer needs a four-letter code to open. And of course, the locked exit door is also on this screen.
Turn right to find a scarecrow at a kitchen counter. Not very effective, seeing as there's a crow on his left arm holding a finger. Pick up the puzzle piece from his hat, and notice the Merry Halloween picture over his other arm which has tilty corners. Looking more closely at the kitchen counter, you find another puzzle piece between the candy and the candles. On the left of the screen are some hanging shelves with cupcakes on them. The cupcakes have different colored paper cups, and all of them have either a witch's hat topping or a witch's hat label. Take the puzzle piece from the middle of the second shelf.
(You should have five puzzle pieces.)
Fix
Unscramble the randomized picture above the sofa (paying close attention to the lower-right pieces).
When you have it correct, a compartment opens up to let you have a puzzle piece.
By A Thread
Use the clue from the bats hanging by the window to unlock the top drawer to the right of the TV.
The 1st, 2nd, 5th bats hang higher than the 3rd, 4th, 6th.
So click the UUDDUD buttons, then open the drawer to get a puzzle piece, a remote and a clue with a yellow pumpkin painted on the back.
Entertainment
Use the remote on the TV (thrice) to view 5 symbols in a row, followed by overlapped red and green grids, followed by ten digits and their English names.
Corner
Use clues from the TV and the cupboards above it to unlock the Merry Halloween picture.
The Skull Bat Skull Ghost Pumpkin symbols occur alongside ⌞⌜⌞⌟⌝ corner marks.
So click those corners of the picture, and it flips over to reveal a puzzle piece screwed to the back and the clue B1 written on the back.
Calciferous
Use all three skeleton fingers on the skeleton, who relaxes his mouth so you can take the screwdriver.
Unscrew
Use the screwdriver to remove the screw and pick up the puzzle piece, which is magically unpunctured when you pick it up.
Initial
Use the clue from the back of the tilty corner picture to unlock the bottom drawer to the right of the TV.
As the TV tells you, 1 is
one, so B1 isBone.Enter BONE into the drawer, and open it to get a puzzle piece and a clue with a blue bat on the back.
Seek
Use the clues from the cupcakes and TV to unlock the middle drawer to the right of the TV.
The magnifying glass icons are actually the shapes of the round witch hat labels.
Following the purple arrows on the side, the labels occur on the 2nd, 3rd, 1st, 4th cupcakes on each shelf.
So click those buttons, and open the drawer to get a puzzle piece and a clue with a green skull on the back.
Double
Use other clues from the cupcakes and TV to unlock the table to the right of the sofa.
The red and green cupcakes occur in the following positions on the shelves:
G--R

RG--

----

-R-G
So click those six buttons to turn them brown, and open the safe to get a puzzle piece and a clue with a red ghost on the back.
Spook
Use the four colored symbols to unlock the table to the left of the sofa.
The pumpkin, bat, skull, ghost symbols are yellow, blue, green, red.
So click the buttons 0, 2, 3, 1 times, and open the safe to get a puzzle piece.
Jigsaw!
You should now have all twelve pieces:
On right window
On sofa cushion
On scarecrow hat
On kitchen counter
On cupcake shelf
From scrambled picture
In top drawer
Behind tilty picture
In bottom drawer
In middle drawer
In right side table
In left side table
So use them on the left drawer and assemble the jigsaw.
Then open the drawer to get a key.
Escape
Use the key on the exit door for a (slightly) screamy ending.
Thanks for the 1st 2 KK. Can't wait for the last 3. By the way the login is goofy. It forgets what my password is everytime it's time to login, and I have to reset it again daily. I know what it is too. Someone might need to look into this. Thanks.
It's been doing that to me too.
I'm having no issues with it here. Anyway, here's Funkyland.
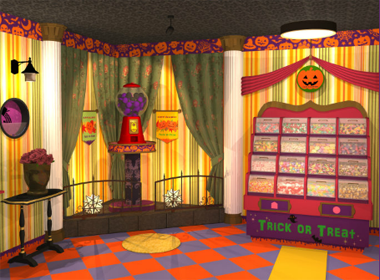
Escape a Halloween Candy Shop
Since this is a Candy Shop game, escaping also means getting the shop ready for a Halloween opening.
Exploration
You start off facing a shelf of candy in sixteen boxes which can be turned dark by clicking on them, with two panels below marked with a pentagon and circle. On the left of that is a capsule machine with purple-and-black capsules, and on the left of that is a circular display on the wall only half-covered by glass. It has four colored bits on its base and a symbol on the back indicating that something has to be poured.
Turn right to find a table covered in boxes of candy, among which is a single Shop Only card which can be flipped between a purple side with a heart and a pink side with a star. In the far end is a coffin with a deformed clover on its front, and two eyes on a green face stare right out at you. The inscription confirms your fears: it's Mr Candy Frog trapped in there! Apparently you can free him with the help of three circular objects. On the right wall, rows of boxes sit on two shelves, spelling out "Trick or _____". The boxes on the lower shelf are empty.
Turn right. Along the wall, you find three pictures in the shape of a pentagon, square and circle. The square one has a clue with an eye looking through a row of dots at a ghost. Under the pictures are five pedestals, and the middle three each have a ghost wearing a different-colored hat. They're facing you cutely, but you can click on them to make them face left or right instead. On the right wall, there are three clear columns filled with candy. The columns are missing placards on their fronts, which you will have to replace to open… something.
Turn right to find the locked exit door next to a shelf of candy and popcorn which has a four-digit safe at the top and a locked drawer at the bottom. Back out and look at the post in the middle of the floor, which has more Halloween goodies on shelves and a hole at its base.
Turn right to find the shop counter with three bags on a shelf in front. Looking in the bags, you find that the one on the right contains a Secret Taste card which can be flipped between a pink side with a creepy pumpkin and a green side with a smiley pumpkin. To the left of the counter is a display case with an empty pedestal.
Lights out
Use the clue from the left and right pictures above the ghost pedestals to unlock the candy shelf on the first screen.
Replicate the patterns from the pictures by clicking the cases corresponding to the dark squares:
X--X

-X--

-XX-

X---
for the left picture, which opens the picture up so you can get a pair of scissors, and
-X-X

XX-X

----

XXX-
for the right picture, which opens it up so you can get a Staff Choice card with an orange heart front and black star back.
Line of sight
Use the clue from the middle picture above the pedestals to unlock the pedestals.
Hint: Yes, pedestals is plural. Each pedestal can be unlocked, one at a time.
Click the left and middle pedestals twice each so that the ghosts face the RRF directions.
The right pedestal opens up to reveal a hidden candy stash marked with Secret Taste and a happy pumpkin.
Now click the middle and right pedestals once each so that the ghosts face the RFL directions.
The middle pedestal opens up to reveal more candy and a pink knob, marked Shop Only with a star.
Finally click the left and middle pedestals once each so that the ghosts face the FLL directions.
The left pedestal opens up to reveal more candy marked Staff Choice with a heart.
Recommended
Use the clues from the ghost pedestals to unlock the candy columns.
The three cards have to be placed on the three columns according to the labels on the pedestals:
Left: Staff Choice Heart (orange front)
Middle: Shop Only Star (pink back)
Right: Secret Taste Smile (green back)
Once all three cards are in place, push the OPEN button, which opens itself up so you can take a crank handle.
Wind down
Assemble the handle by using the knob on it, then use it on the hole at the bottom of the post.
Turn the crank to lower the shelves, and take a can of pumpkin juice from the top shelf and a tub of marshmallow from the middle shelf. Examine the marshmallow tub to find a star key stuck to its base.
Pumped
Click on the juice can twice to open it. You don't feel like drinking, so instead pour it into the wall to the left of the capsule machine.
Balloons on the bottom expand out to form four digits. So use that clue to unlock the safe on top of the candy shelves (next to the door).
Enter 5319, and open the safe up to get a coin.
Unlock
Use the key from the tub to unlock the bottom drawer.
Inside, there's a package wrapped with Halloween tape.
So use the scissors to cut the tape and open the package to find 10 lollipops inside.
Sweet
Go back to the TRICK shelf, and use the lollipops on the boxes on the lower shelf.
Then change the letters on the boxes to spell the correct word.
Spell TREAT by clicking the boxes 3, 2, 1, 0, 3 times.
Then click the OK button, which opens up so you can get another coin.
Sticky
Place the marshmallow tub in the display case next to the counter, and a pole with flags descends from the ceiling. The flags show coffins with different things in them.
Pick up the coin from the bottom of the middle flag.
Gamble
Use all the coins on the capsule machine to exchange them for 3 capsules, which contain 3 tokens with a pumpkin, ghost and bat on them.
Deadly
Use the clue from the flags to unlock the coffin.
Place the bat, pumpkin, ghost tokens in the slots, and click OK to open the coffin.
Candy Frog is free! And he's a vampire!
Best to just take the shop key from him and leave.
Escape
Use the shop key on the exit door to escape.
Which browser?
Now with 100% less spiders!
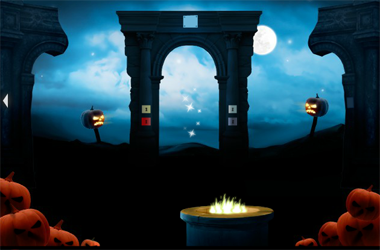
Magic Halloween Escape 2
Once again, you find yourself trapped on a moonlit night in an unfamiliar plain with pumpkins everywhere. Surely it's that witch's revenge!
While you figure out how to defeat this evil again, it would help to remember that many actions are only available with an empty hand, so deselect your item or click on "handle" when you explore.
Exploration
It appears that you're surrounded by wolves, but they're just trying to stop you from getting up the arch-topped towering rock. So all you can do for now is talk to the wolves, read the cross on the small mound and look at that paralysis scepter that's missing its eyes.
Turn/move right to a screen with a magic portal in an arch with four colored locks, with a magical grid safe at the top. The arch is surrounded by a lot of pumpkins: two talking pumpkins on the left and right, and eight pumpkins at the bottom of the screen that are carved but missing lights. There's also a fire pit here providing much-needed warmth.
The right broken archway has a light rectangular puzzle involving colored rocks on a circle with symbols.
Ring
Use the clues given by the wolves and pumpkins to solve the rock puzzle.
The wolf names are Black Bone, White Cross and Blue Skull, and the pumpkins ask about a red moon and a yellow spider.
So place the white, yellow, red, black, blue stones around the circle next to the cross, spider, moon, bone, skull symbols by clicking them to move them clockwise.
A yellow eye appears in the middle of the circle.
Copy
Use the clue from the paralysis scepter to unlock the grid at the top of the portal arch.
The pattern you have to copy is this:
-XX--XX-

-X----X-

-XXXXXX-

--------

--------

-XXXXXX-

-X----X-

XX----XX
Click on those squares to turn them black, and another yellow eye falls from the sky.
Stun
Use both yellow eyes on the scepter, and a yellow key falls out and the wolves fall silent.
Climb
Click on the tall rock to climb it. At the top, you find the witch, who exacts her pumpkiny revenge upon you by banishing you to Pumpkinland.
Exploration 2
It's full of pumpkins, sand, and a guy in a jacket (the huntsman from the first game) who's somehow survived for days and is obsessed with ice eyes. (Maybe he's unsatisfied with his new makeup.) Somewhere among the pumpkins, there's a sand mound next to a skull, and also a shovel handle. You'd think he'd have found the other half after so many days, since the shovel head is just on top of the distant dune on the left.
Click the cloud covering the sun, which floats away leaving the man to sweat under the heat. The sun seems to shine extra-bright beams onto the pumpkins.
Remains
Assemble the shovel (by combining its parts) and use it to dig up the sand mound, unearthing a flask.
Fluid
Use the flask on the guy's forehead to collect his sweat.
Then use his sweat to water all the pumpkins, making bright sunshiny symbols appear over them.
Forecast
Use the clue from the huntsman to solve the pumpkin puzzle.
Turn all the sun symbols into eyes by clicking them six times.
A blue eyeball pops out of the sky, and when you pick it up a glowing, sparkling arch appears.
So click it to get teleported.
Exploration 3
You've returned to the first portal arch. So make your way back up to the witch, who doesn't mind you being there anymore.
She will, however, cast her sweet orange punishment if you touch that key under the gargoyle on the left. So look past that at the candle pedestal with a dirt mound, instructions for conjuring up another ice eye (with a pair of scissors stuck under its corner!), and an ice scepter missing both eyes.
And also look at the rightmost spike in the background, which has a wooden stick protruding out of it.
Dig 2
Use the shovel on the dirt mound to get an old cloth.
Woodwork
Wrap the cloth around the stick (by combining them), and use it on the fire pit (on the portal screen) to get a torch.
Is there anything around here that needs to be lit up?
Use the clue from the grave to light up the dark pumpkins correctly.
The dates on the grave read 1251-1324.
So use the torch on the 1st, 2nd, 5th, 1st, 1st, 3rd, 2nd, 4th pumpkins from the left of the screen.
The pumpkins don't remain lit, but a red key falls from the sky once the sequence is complete.
Reagent
Use the scissors on Black Bone (the wolf) to get some of its fur, and also click on the raven (sitting on a pumpkin) to pluck a feather.
Then burn both in the fire pit, which spits out an ice eye and a white key.
Stare
Place both ice eyes in the ice scepter, and the glow blue and instantly freeze the witch.
Yay! You defeated her with her own magic, and now you can pick up the grayish-blue key from the gargoyle.
Leave
Use all four colored keys to unlock their corresponding locks on the portal arch.
And then you're done! You get an end screen with a wolf and his red-eyed stare.
And here's the last one. Thanks again to chrpa for finding five great Halloween escapes.
Halloween Puzzle Room Escape
(Direct translation: Puzzle Room 9)
The small screen size doesn't fit many puzzles, but it somehow fits 20 slyly hidden puzzle pieces.
Exploration
(Piece numbers here indicate the object/screen they appear at. Pixel-hunt spots are in spoilers.)
You start facing the exit door with a three-digit lock next to it (#8). On the floor is a bat-shaped Halloween rug (#3) and four pumpkins, the right one of which has a horizontal line across its face.
Flip the right edge of the Halloween rug to find a puzzle piece (#15).
Turn left to a screen with a ghost among a lot of pumpkins and a puzzle piece (#19). The wallpaper on this screen is slightly different: it has a crescent moon on it that you can zoom in to find two puzzle pieces (#1, #20).
Lift up the bottom middle pumpkin to find a puzzle piece (#14).
Click the bottom-right of the ghost's cloak to find a puzzle piece (#18).
Turn left to a screen with furniture that looks like halved pumpkins. There are lit candles on the middle table (#4) and a clue with an arrow bent into a rectangular shape. Zoom in on the right chair to find two puzzle pieces (#13, #16).
Still zoomed in on the chair, click the right corner of the carpet to find a puzzle piece (#5) hidden beneath.
There's also something else in this room. Due to a game bug, you might find a pumpkin (large or small) that can be clicked to lift it, or you might find a puzzle piece (#11). When zooming out of the table view, you will always get the puzzle piece. So try switching views until you get it.
Turn left to find a picture of chicks (#6) looking in different directions over a cupboard with four unlit candles (#10) and two locked doors. The left lock has four buttons and the right lock (#9) has four digits.
(At this point, you should have 16 pieces.)
Cutey
Use the clues from the chick picture (and table) to unlock the left cupboard door.
In the order indicated by the arrow, the six chicks are looking towards the URDLRL directions.
So click those buttons to unlock the door, then open it to find an unlit red candle.
Examine the candle to find a puzzle piece (#2).
There's also a puzzle piece (#7) attached to the inside of the door.
Four
Use the unlit candle on the lit ones on the table (to light it), then on each unlit green one.
The green candles, now lit, have digits glowing white on their fronts. So use that code to unlock the right cupboard door.
Enter 3706 to unlock the door, then open it to find a curved knife (or sword?).
Chop
Use the knife on the pumpkin with the line (on the first screen), and click the top to move it.
In the pumpkin, there's a piece of wrapped candy and a puzzle piece (#12).
Treat
Use the candy on the ghost, who holds out the last puzzle piece (#17).
Escape
You should now have all 20 puzzle pieces (if not, see below).
Use the clue from the completed puzzle to unlock the exit door.
The completed puzzle displays the digits 284.
So enter that in the door lock, then unlock the door and leave through it.
You get an END screen with two pumpkins that can be lit or unlit. (As far as I know, they don't do anything else.)
Piece hints
Hints:
#3, 10, 11, 19: In plain sight!
#1, 4, 6, 8, 9, 13, 16, 20: Zoom in on things.
#5, 15, 18: Click edges.
#7, 12, 17: Revisit a solved puzzle.
#14: One of these can be moved.
#2: Check your inventory.
Piece locations
Moon screen, right side
On red candle in examine screen.
On Halloween rug
Table screen with red candles
Chair screen, under carpet corner
Chick screen, top left.
Inside of left cupboard door
Door lock screen, top left
Right cupboard door screen, lower right
Green candle screen, right edge
Left of table (hopefully)
In pumpkin under candy
Chair screen, top right
Under bottom pumpkin
Under Halloween rug right corner
On (right) chair
Given by ghost
Under ghost's cloak
Ghost screen, right side
Moon screen, middle
I won't be available to walkthrough all of the next Weekday Escape, so feel free to fill in by posting them.
Thanks for this hint. I would never have known to hold down the left mouse button.
I went back and looked at the title screen and "tap long" didn't have much meaning to me. So Thanks.
In Halloween Jigsaw Escape, I also found a puzzle piece
in the window
Update