
 It's escape time again! It's Wednesday with a new Weekday Escape!
This week are games vacation themed (again). Game by Funkyland takes us to a beautiful historical city, though all we can see is a hotel room, in fact. But top hotel it is, for sure! Ichima's vacation is a different kind, beach and sea and relaxing sunbathing. The last Riddle Escape's game offers a trip to an unusual place under starry sky with strong magic feeling!
Have a good time and enjoy!
With Funkyland we are travelling zig zag around the globe recently. After Paris, Japan, Northern Europe and New York it is Spain this time, namely Barcelona. You are locked in a superb red painted suite with huge luxury bathroom, surrounded by vigorous guitar music. If the game allowed you to go to the balcony I'm sure there must be iconic Sagrada Família in view. Let's not question why would you possibly want to escape such a fantastic place and look around for items and clues. Carefully, because some sights in the room are not obvious and can be missed! After you open all the locked cupboards, boxes and cases there is a final choice (virtual only, I'm sorry) - dry cured ham or lobster?
The cursor is not changing, save button, two endings.
The game is available for Android too.
 Room 20: Ocean With Ichima it's vacation time again. Turqoise sea, waves softly whispering, dry wooden pier, colourful coctail on small table by deckchair - you know what I mean, we played few games situated in tropical paradises recently. Except for dolphins! Others didn't show us dolphins, only Ichima does!
At the beginning you don't see much from outside world. You are just locked in the room, a bit stuffy, where is a sofa, some tables, few pictures and shelves, and suspiciously green palm trees, probably plastic. And two locked door. Now that's a motivation for an escape! Until you solve some puzzles and get keys from these doors you can't enjoy your vacation!
The cursor is not changing, autosave, one ending.
Note: The game loads very slowly, give it some time. Disable your Adblock for playing.
This game is available for Android too.
In Riddle Escape's another great game you find yourself locked in a strange, atmospheric place. Not a room, ruins of some temple in fantasy land, probably. A roof is missing but all devices are functional, luckily, iron bars are sliding smoothly like well oiled and all niches are opening easily after entering right codes (it hasn't rained for a long time, obviously). Only glitch is gaping hole in the boat, but you can repair it later, don't worry. Just look around and start!
Don't forget to check items in your inventory. Some items are reusable.
The cursor is not changing, autosave (on my PC autosave doesn't work though, neither Firefox nor Chrome), one ending.
This game is available Android too.
We love escape games, and our readers love talking about them and sharing hints! How about you? Let us know what you think, ask for clues, or help out other players in the comments below.


Hint for Escape a Spanish Hotel
Only have 3 olive oil bottles?
You can click on ok when only 3 bottles are placed.
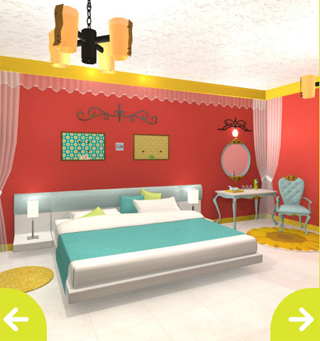
This room is only half painted red, but that's an amazingly bold choice for the bed area.
Escape a Spanish Hotel
After a morning of enjoying the beautiful Spanish architecture and art in Barcelona, you've checked into one of Funkyland's hotels (of course). Before you escape for an afternoon of more touring, you must make one important decision: seafood paella for lunch, or ibérico ham?
Exploration
The bed looks nice and inviting, even in the middle of the day. So you climb on it to find a red bottle/can opener under the right pillow, as well as two picture frames on the wall with wooden pegs sticking out of them, labeled with icons of a pig and a prawn. In between them, a clear display case appears to hold a telephone card, with an orange rectangle and a red fan shown on the glass.
Check out the phone on the bedside table, which has a QR code on the bottom under some glass, and an arrow on the numeric display pointing to a card slot (click the right edge). Next to the telephone, there's also some candles as well as a can of Pr... Patata chips.
Turn right. Your luggage is sitting in the middle of the hallway, but it appears to have a three-digit lock on it with a clue involving some Patata faces. Behind it in the doorway, there's a slipper rack with some alphabetically-labeled slippers. There's two pairs of slippers on the rack, with room on top for another pair.
Under the television, there's a padlocked fridge and a locked cupboard, both of which need keys. Turn right, and on the same wall, there's an empty wardrobe with a shelf on top that's too high to reach, though you can see some objects on it.
Further along the wall, there's a device in the corner with five numbered empty compartments and an OK button, over a round table set with fancy silverware, a cocktail glass filled with macarons, and an unfitting Patata tube.
Turn right. There's a black-and-white partition on the right side composed of nine doughnut-shaped discs on three stands, covered in various patterns. On the left wall, there's a picture frame with a clue involving very similar patterns, but in orange and white. There's also a sofa with a four-digit box sitting on it, the box having different-colored pegs over the digits.
Further along that wall (click to walk over there), there's another device on the wall with four windmills in red boxes, one of which is missing its blades. The windmills are marked with different shapes, and the locked compartments below them are marked with a water drop and a drawing of a toilet. Below that device, there's a shelf with another can of Patatas.
On the opposite wall, a pair of blue double doors is missing its handles. Hope you didn't need to use the bathroom!
Snack Attack
Use the can opener to open each can of Patatas to find a clue under their lids.
Then use that clue to unlock your luggage.
(Pay attention to the eyes on each Patata face.)
The numbers under the Patata lids are 700, 70 and 7, in the order that the faces appear on the luggage. So the formula works out to 700+70-7=763.
So enter that code and open up the luggage to find a rose-patterned dress.
Dressed
You're already dressed in this room (unlike in a certain other escape series), so there's no need to change into the flowery dress.
Find something else to do with it.
Hang the dress on the rail in the cupboard, then tug on it...
...to pull the rail down along with the shelf, which has a safe with nine buttons and a lollipop shape sticking out of the top, as well as a bottle of olive oil.
Nine
Use the clues from the "donuts" and picture frame above the sofa to unlock the lollipop box.
Translating the patterns form the picture frame to buttons on the grid, you need to press the center, top, top-left, top-right buttons... but that doesn't work, because the box needs you to press all nine buttons in order.
What's the best way to complete the sequence?
Consecutive buttons should be next to each other, so press the buttons in the order
329

418

567
The lollipop box opens up to show you six lollipops inside. Pick up the raised one in the middle. It's not a delicious strawberry Candy Candy, it's a lollipop key!
Unlock 1
Use the candy key to unlock the yellow cupboard under the TV. Inside, there's assorted packets of olive oil (they come in packets?) and a pair of door handles.
So pick the handles up and use them on the blue double doors, then (back up and) open the doors to enter the bathroom.
Exploration: Bathroom
On the right, there's a sink with a bottle of olive oil on it, as well as a clue in the counter next to it with raised markings. Above that, there's a QR code reader on the wall.
Move forward by clicking to the left of the sink, beside the toilet bowl with a geometric clue mounted on the wall above it. You can see another clue above the bathtub with four digits, each of which is shown in two colors, and a device to the left of the bathtub with a figure of Candy Frog over a "Picasso" placard, with a black seashell to the left of a white rectangular panel and an empty space to the right.
Colorful
Use the clue above the bathtub to unlock the box on the sofa.
The red, green, blue, yellow portions of the digits 3269 recombine to form the digits 2358.
So enter 2358 into the box and open it to find a pink pair of slippers.
Then use the pink slippers on the slipper rack, and a glimmering blue key pops out of the top.
Unlock 2
Use the blue key to unlock the fridge. It has some food in it, but what you really want is the bottles of mineral water and olive oil.
Olive
Use the clue from the packets of olive oil to unlock the device on the wall above the round table.
Count the packets: there are three of the dark-green label, one of the light-green label and five of the yellow label.
So place the corresponding olive bottles in the compartments labeled 3, 1, 5, then click the OK button, which opens up to give you a windmill blade piece.
Shapes
Use the blades on the windmill that's missing them, then use the clue above the toilet bowl to adjust the windmills.
The light-colored blades on the square-, circle-, triangle- and pentagon-marked windmills should point to the lower-left, upper-left, lower-right, upper-right directions.
So point those blades in the
↙↖

↘↗
directions, and the right compartment opens up so you can take a rectangular tinted filter.
Immersed
Open up the bottle of water (with the same bottle/can opener that you still have), and pour it on the clue next to the sink, which turns blue and yellow.
Use the clue to adjust the windmills again.
As the clue indicates, the light blades on the upper-left, upper-right, lower-right, lower-left windmills should point up, down, left, right.
So point those blades in the
←→

↓↑
directions, and the left compartment opens up so you can take a pair of castanets.
Clack
Place the castanets on the Picasso device, and the number 7 appears in the middle.
The device requires 7 clicks of the castanets, but in what order?
The letters P, I, C, A, S, S, O appear on the left, right, left, left, right, right, right slippers of their respective pairs.
So click the LRLLRRR castanets, and something pops up behind Candy Frog. Take the folding fan.
Treasures
Place the filter on the left picture frame above the bed, and the unfolded fan on the right picture frame.
The case in the middle opens up so you can take the telephone card.
Choice
Insert the phone card on the side of the telephone, then save your game.
Dial the number that appeared on either the filter(
*70#86) or the fan(0#14**), according to whether you prefer ham or prawns.Now that the reservation is made, the panel on the telephone opens up and you can take a QR code card from it.
Use the barcode card on the scanner in the bathroom, and it tells you that a key box has been delivered.
So pick up the key box next to the main door.
Open the key box, and use the key within to unlock the door and leave.
room20 ocean
As warned in the post here and on the game page, the game is large (about twice as large as room19, which was Flash) and the loading will be slow, and you won't see anything happen on screen until it's finished loading. Take the time to get into the tropical vacation mood!
Exploration
You start off facing a wall with various shelves, picture frames and furniture. The picture frames show various leaves, surfboards and fish. The upper shelf has a wooden figure sitting next to a lamp, and the lower shelf has letters that light up, and a tiny button that turns some of its lights off. The left table has a weird teapot on a device with buttons as well as an unlocked drawer with a clue written on its bottom. The right table has a neatly wrapped box that's further wrapped tightly shut by some wire.
Turn left. There's a locked door marked with a tiny dolphin under the doorknob, and a small table beside it with a tray of bananas that also holds a locked box. The lower half of the box opens up to reveal three (hemi)spherical indentations. To the left of this table, a sofa has four palm-tree cushions, the pink one of which hides an jar ornament with pretty seashells.
Turn left to find a locked cupboard marked with a tiny sun. On the left and right sides, you can zoom in on the potted plants to find bird and pineapple ornaments.
Turn left. There's another locked door here, marked with a tiny banana. Next to it, a shelf holds various ornaments similar to the ones you hold, as well as books, acrylic cubes, and a bucket with a numeric clue in its base. A circle is drawn on the base of each compartment with ornaments. There's a panel in the center of the shelf top, but it's currently closed. Above the shelf, there's a picture of flowers. Next to that, there's also a small table with a box connected to a four-letter lock.
Crop
Use the half-lighted letters on the shelf to unlock the four-letter box on the table.
After pressing the button next to the OEHB letters, the remaining lights on the letters spell CLIP.
Enter that in the lock and press the OK button to unlock the box. Take a glass bead from inside.
Ornamental
Use the three ornaments you have on the empty spots on the shelf.
The panel on top slides open, revealing a six-button safe.
So use the clues in the shelf to unlock that safe.
The compartments of the shelf hold 5, 2, 6, 4, 3, 1 items. So, following the note in the bucket that reads 5146231, you should press the UL LR LL UR UC LC LR buttons.
After clicking OK, the safe opens up to let you take another glass bead.
Bifurcate
Use the clue from the drawer and sofa to unlock the two-button lock (on the table on the first screen)
The initials BPOG refer to the colors blue, pink, orange, green, and the palm trees on the corresponding cushions point in the LL RL LR RR directions.
So press those buttons and the OK button to open the pink box, and take a third glass bead from inside.
Potassium
Use all three glass beads on the box on the banana tray, and the top of it opens up. Take a banana key from it.
Then use that key to unlock the banana door to the left of the shelves.
Exploration: Terrace
Fresh air and a sea view! There's nothing to do on this screen (yet), so turn right to find a deckchair next to a table which has a watermelon slice with two bites taken out of it. In the background, a three-digit wooden box sits on a shelf.
Turn right to find a surfboard leaning next to the door. In tiny detail on the lower end, there are three icons: a watermelon, a flower and a pair of eyes.
Digital
Use the numeric clues from the objects indicated on the surfboard to unlock the three-digit box.
Watermelon: the tooth marks form a sideways 3.
Flower: Arranged in the shape of a 6 on the picture.
Eyes: The wooden figure's crossed legs form a 4.
Enter 364 in the box, then open it and take a dolphin key.
Use it to unlock the dolphin door directly opposite the banana door.
Exploration: Pier
Fresh air and a sea view! (And more dolphins than you should feel safe around.) The floating platform in the distance has items on it, but the bridge to it isn't in the right position. Perhaps you could adjust this slider device on the side to fix it?
Patterns
Use the clue from the surfboard picture (on the first screen) to put the bridge back.
The cross, thick stripe, chevron, long stripe patterns occur on the 4th, 1st, 3rd, 2nd surfboards from the bottom of the picture.
So drag the sliders 3, 0, 2, 1 steps upwards, then pull the joystick next to the sliders to align the bridge.
On the other side, there's a book with a location clue and a four-digit locked chest.
Circled
The red circle on the book points to the corner of the balcony, so go through the banana door and click the right edge of the screen.
Click the (top of the) fifth fencepost from the right, pushing it down and opening up a compartment in the floor which contains a pair of pliers.
Use the pliers to cut the wire and open the box on the first screen. Inside, there's an aqua scope.
Binocular
Use the scope on the dolphins next to the bridge (on the left side). A short dive later, you read a four-digit code off a dolphin's body.
It's 1525, so enter that in the chest (after fixing the bridge again!) to open it and get a sun key.
Escape
Use the sun key to unlock the large cupboard, and leave through the trapdoor hidden in its base.
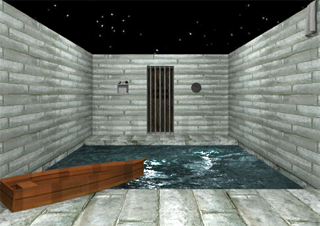
Escape from Ruins
In general, this is a very straightforward escape game. Nearly every code is obvious, both in terms of what the code is and in terms of where to use each code. The only significant potential points of confusion are noticing when object manipulation is relevant.
Exploration
You start facing a barred doorway with a pedestal, a blackened picture, and a discolored brick. The pedestal has the four suits pictured, and a depression that looks like it can hold a spherical object. Zooming in on the brick allows you to open it to reveal a tile. Take it.
Turn right. You see some circular and square holes in the wall near the top, two panels with three-button codes each, and a barred low window. Zooming in on the window you see a discolored bar, which you can take.
Turn right. You see a pool full of water (which you can zoom in on), a boat with a hole in it, and a towel slung over the right wall. Across the pool you see another barred doorway, a panel with a moon-to-sun symbol above it, and a circular hole.
Turn right. You see two panels, the left of which opens with a key and the right of which has a leaf button and a missing second button. In between is a table holding a box that has three square depressions on top, and a drawer that is missing a handle.
Simple codes
The two panels on the wall with the circular and square holes at the top should be extremely straightforward.
All the information you need is on this same wall.
The left one opens using the pattern of bars at the bottom.
I IIII II. This reveals a heart and a drawer handle, which you should take.
The right one opens using the pattern of holes at the top of the wall.
Circle circle/square circle/square square
This opens to show a spade and a crowbar, which you should take.
The drawer
Putting the handle on the drawer lets you open it. You can take from the drawer a note that shows the pattern of holes at the top of the opposite wall, with a red X below them.
Go to that spot and use the crowbar to get a leaf button.
You can put the leaf button under the right-hand pannel on the wall with the table, but you don't know the code yet.
Did you notice?
When you got the loose bar from the window, did you notice that there was a horizontal line across it? Neither did I.
You can pull the bar apart to reveal a key.
The key opens the left-hand panel on the wall with the table. to reveal a diamond and a rod, which you should take.
What to do with the rod?
The rod is longer than the bar was.
In fact it is long enough to reach the cloth draped over the top of the wall.
The cloth seems likely to be used to clean the picture.
But it doesn't work yet.
Wet it in the pool. Cleaning off the picture reveals the leaf code. Note the direction of the arrow.
R L L R R L
This reveals a second tile and the club symbol.
Where is the third tile?
Zooming in on the base of the barred doorway reveals the third tile on the floor, just out of reach.
But you can reach it using the rod.
Putting all three tiles on top of the box opens it to reveal a red sphere, which you can take.
Where does the sphere go?
In the pedestal. This activates the buttons underneath the suits.
The direction the panels open gives the code for the suits.
Top Right Left Top
This opens the gate.
Exploring the new room
You enter to see a double door (locked) and a niche with three stone vases.
Turn right. You see four different height columns, a central panel, and an oar (which you should take).
Turn right. You see the doorway you came through, a closed panel with a sun over it labeled with a 16, and an open panel with a moon over it. In the open panel you see a semicircle, which you can take, and a box with six buttons.
Turn right. You see a locked stone cabinet with a box that has three buttons on top. You see a stone block with four square indentations on top, and above it six recessed squares.
Opening the panel on the column wall
Enter the heights of the columns to open the panel.
Click the second button twice, the third button three times, and the fourth button once. This reveals a series of six tiny hourglasses, two of which have the sand stuck at the top.
Opening the box
The buttons are give silhouettes of the vases.
Just match the pattern from the vases on the wall.
But you have to have zoomed in on the vases first. You get a key, which opens the cabinet below the box. This then gives you a chair and, using the crowbar on the crate, a set of nails and some wood. Inside the crate you see a box with two triangular buttons.
Use the code from the hourglasses.
Top, bottom, bottom, top, bottom, bottom
You get a thick cylinder with a hole in it.
Gaining some perspective
Put the chair on the block so you can see the recesses.
The number of stones gives you the code for the box under the moon symbol.
Open the box to get a rod.
Going boating
Put the wood over the hole in the boat.
Put the nails on the wood. Hmmm. We need a hammer.
Combine the rod and the cylinder to make a hammer.
Hammer in the nails, and you can now row across the pool whenever you wish.
Notice that the recess under the moon-to-sun icons has a depression that it looks like a sphere could fit in.
But we already used our sphere, and don't have another one!
Can we REuse it?
Yes.
Bam! It is now daytime! Cool!
Sunlight!
Going back to the other room, we see that the moon panel has closed (revealing the number 83) and the sun alcove has opened, revealing a box with a four digit code, the first two of which are labeled with the sun icon, and the last two of which are labeled with the moon icon.
Hopefully you remember the code on the sun panel.
16
So the total code is 1683. And this gives you another semicircular piece of stone.
Round
Two semicircles make a full circle.
So put them in the round hole across the pool. This reveals a star whose points flash in a pattern starting at the top, and tracing the lines (moving initially left) until one gets back to the top. And the remaining gate opens. Inside the gate we see five discolored bricks, and they make a sound when pressed.
So, follow the pattern from the star.
Labeling the points:
1
2 3
4 5
Press 1 4 3 2 5 1
You get a key.
Out
Unlock the only remaining door and exit.
Ah, yes, in Spain we always
order our meals on the john
escape from ruins is perhaps too straightforward but the art is beautiful and i enjoyed the element of surprise!
These were all really good this week. I got through the last two with no help (a rarity, for me) but the Funkyland one stumped me in a couple of spots.
in Escape the Spanish Hotel the lollipop 9-square puzzle had me so stumped I feel I must post the solution.
Click centre, top centre, top left, centre left, bottom left, bottom centre, bottom right, centre right, top right.
If the nine squares were numbered:
top row: 1 2 3
centre row: 4 5 6
bottom row: 7 8 9
you'd click 5, 2, 1, 4, 7, 8, 9, 6, 3
Update