

![]() Your horoscope for this week in May: You are characterized by great style and wit, and you show it in everything you do. Unfortunately, you have a tendency to wind up in tricky situations. But, fortunately, you also have the gumption and charm to escape your way out of them. This week is no exception; you'll find yourself being a great help to friends, exceedingly brilliant at solving problems and, when given lemons, you'll smile happily and walk out the door.
Your horoscope for this week in May: You are characterized by great style and wit, and you show it in everything you do. Unfortunately, you have a tendency to wind up in tricky situations. But, fortunately, you also have the gumption and charm to escape your way out of them. This week is no exception; you'll find yourself being a great help to friends, exceedingly brilliant at solving problems and, when given lemons, you'll smile happily and walk out the door.
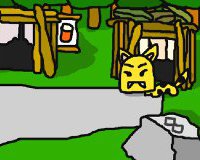 The Adventures of Duck - by Kamokichi, the author of Yana Escape and A Little Slow, is more about getting into rather than escaping from. But never mind that technicality because this little delight shouldn't be missed. Explore the various scenes, helping everyone get what they want so you can find and unlock the hidden vault. While playing, you'll probably think: "This reminds me of a Minoto game." Along those lines is a Monkey GO Happy essence at each playful turn. Comparisons aside, The Adventures of Duck is quite a treasure, unique enough to stand out on its own.
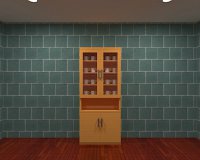 Escape from the Similar Rooms 11 - Hottategoya has found a fascination with sameness, and so have we because it looks a wee bit like a Spot-the-Difference game...only much more escape-y. Among the sparse furnishings and decor of each of these rooms, the clues do tend to stick out. So spotting them isn't the problem. What is the problem is making sense of their abstruse hinting in order to decipher the codes for each of these three doors. This amounts to three coy puzzles with rather twisty logic, one for each room. Sadly, you're out before you're ready to end the fun.
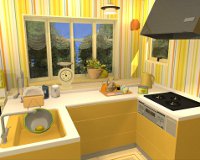 Fruit Kitchens No.4: Lemon Yellow - FunkyLand gives us a bunch of lemons and what are we to make of it? Quick, easy, cheerful fun! No use being a sourpuss and complaining it's too simple or too yellow. Just keep your eyes peeled for 7 oblong zesty citrons and, when you've collected them all, they magically turn into the door key. The item hide-and-seek is a bit more of a pixel hunt this time around so, if you do get stumped, it's probably because you missed a tool that would help out in a pinch.
We love escape games, and our readers love talking about them and sharing hints! How about you? Let us know what you think, ask for clues, or help out other players in the comments below.


Walkthrough Guide
(Please allow page to fully load for spoiler tags to be functional.)
Escape From Similar Rooms 11 Walkthrough:
Room 1:
First looks around the room. We see:
4 buttons on the door
a three door cabinet
a wall with a picture on it
a cabinet with coffee mugs inside it
Look at the first door, four shapes to keep track of (star, moon, circle, X)
Go to the next wall to your right, look in the bottom cabinet to get a note
Nothing else in here :3 look again at the wall to your right.
There's a picture on this wall. look at it.
I wonder if those shapes have anything to do with the combination
Alright, let's check out the last wall. A cabinet with mugs inside the top. Nothing special in here
All we have now is the note and the picture to derive our combo from.
HINT 1:
Judging how the numbers range from 1-6, it's probably a six digit combination
HINT 2:
Maybe the orientation of the numbers can help us
SOLUTION:
match each set of numbers to the picture (three 1s straight across, find three shapes straight across in the picture (there should only be one). Do this for all the numbers...
X, Star, Circle, Star, Moon, Circle
Room 2:
Setup for the door:
Five digit code with two options for each. An arrow going down.
Go right. The only thing in this cabinet is an arrow pointing right.
Go right again, the only thing here is a blank picture frame and a door that leads back to where we came from.
Go right again. Let's have a look at the coffee mug cabinet.
HINT 1:
I wonder if the fact that there's five mugs in each row has to do with our combination
HINT 2:
Notice how some of the handles are facing different ways?
SOLUTION:
the ones with handles that are facing right are the black switches (just like the arrow). Make necessaryy changes for each row starting from the top.
5
1
4
5
Voila! You're outta this room
Room 3:
The combination is a four digit code (from top to bottom)
Go right, have a look in the cabinet. There's a bunch of numbers in the top cabinet.
I wonder if this has to do with our four digit code
Go right again, nothing to see here
Let's check out the mug cabinet. There's gotta be a clue here.
There's a note on the bottom row of the mugs
HINT 1:
So, we have a note with four lines and letters, and four lines of numbers in the cabinet as well as the combo
HINT 2:
I wonder if the numbers tell us to look for something in the letter
SOLUTION:
The numbers point to positions on the letter you're supposed to look for. (3 on first row = I, so 333 = III). These are Roman Numerals
3, 5, 8, 4
You're out!
Posted by: jake.gibel |
May 7, 2014 1:41 AM
|
May 7, 2014 1:41 AM
Fruit Kitchens 4 - Lemon Yellow Walkthrough
On one of the chairs
Get the can opener from the table (above the cutting board). Open the can on the counter next to the stove.
Get the stick that's leaning against the table. Use it to open the hatch on the ceiling.
Get the button from on top of the picture or plant or whatever that is to the right of the door.
Get the butter from the middle shelf of the fridge.
Put the butter on the scale (in the window) and figure out what it weighs in grams.
Note that the scale is not zeroed — it's at -50 grams. So you need to add 50 grams to whatever the scale says when you put the butter on it.
Go to the device with number buttons between the fridge and the counter. Put the "g" button in place.
Enter the weight you found for the butter, and press the "g" button.
In the pot in the sink
Next to the plant in the window
Top shelf of the fridge
Posted by: Reka |
May 7, 2014 12:25 PM
|
May 7, 2014 12:25 PM
Adventures of Duck Walkthrough
Click the green-haired creature in front of you to find out what it wants.
It wants water.
Also, make a note of the the symbol on the rock.
Go right. Notice the sign with a worm on it.
Go right to the lake. Click the fisherman to find out what he wants.
He wants a worm.
You know where to get one, but not how.
Also, make a note of the symbol on the rock.
Go left, then upward (click the end of the road - there's no upward arrow). Get the watering can from the right of the hut.
Go inside the hut and click the king (the guy wearing a crown on the left) to find out what he wants.
He wants a pill for his sick friend.
Go back outside, then go right. The kitty-cat obviously wants something, but it's not telling you what. However, you can make a note of the symbol on the rock.
Go inside the house. Click the old guy (the pharmacist) to find out what he wants.
He wants a flower.
Go out, then left twice. There's nobody here, but there's a stone door that needs a key. Make a note of the symbol on the rock.
Go to the lake and fill the watering can.
Go to the green-haired creature, and water it with the watering can. Get the shovel.
There's the flower the pharmacist wants, but the green-haired critter won't let you take it.
Go use the shovel to dig up a worm, then give it to the fisherman. Get the fish.
Give the fish to the kitty-cat. Go inside the hut she was guarding and get the radio. Also note the colorful diamond on the rock.
Fish End
Give the radio to the fisherman.
Leave the lake, then come back.
Click the big fish in the lake.
Treasure End
Go give the radio to the green-haired creature so it will let you take the flower.
Once you get the flower, take the radio back.
Give the flower to the pharmacist and get the pill.
Give the pill to the king and take the key.
Give the king the radio and note the code on the rock behind him.
Use the key to open the stone doors.
Go inside the doors. Get the flower wand. Note the symbol on the door. Look at the stone panel on the right and note the symbol sequence.
Notice the arrow, too.
Go visit the symbols in the order given and click them with the wand.
Green-haired guy, lake, cat, lake, stone doors, inside stone doors.
Go inside the room that opens. Open the treasure chest.
The code has two parts: the colorful diamond on the rock the cat was guarding, and the drawing on the rock behind the king.
The drawing had triangles in specific orientations. The diamond was made up of triangles. Find the correspondences.
The code is blue, white, red.
Colorblind help:
The buttons start out black, then cycle through white, blue, red, yellow, green, and back to black.
Posted by: Reka |
May 9, 2014 1:20 AM
|
May 9, 2014 1:20 AM
Similar Rooms 11
(Shapes)
The number code has the numbers 1 through 6, and we need a six-digit code. So look at all the digits in order, and notice what patterns they make.
1 1 122 2
33 3
4 44
5 55
66
6
Now look at the shapes on the wall, and find a set of shapes that matches each pattern. There will only be one such set.
1 = X's starting 3rd row, 2nd column2 = stars starting 1st row, last column
3 = circles starting 5th row, 5th column
4 = stars starting 4th row, 1st column
5 = crescents starting 2nd row, 1st column
6 = circles starting 4th row, 3rd column
(Mugs)
First of all, there's another part of the code that the walkthrough doesn't mention: remember that arrow pointing to the right? Click on the right side of the vertical cabinet, where the arrow is pointing, to see a picture of a red and black mug. Notice the position of the handles: this is how you know which mug is what color in the glass-door cabinet.
So, adding that clue to the mugs, we have:
bbbbrrbbbr
rbbrr
rbbrb
Notice how in each row, exactly one mug is different than in the row above? Those are our switches. So, if we're starting with the all-black row of buttons on the door, we need to switch (otherwise known as click) the following buttons:
....XX....
...X.
....X
In other words, click the last button, then the first button, then the fourth button, then the last button again.
(Letters)
The walkthrough is pretty clear on this one. Each row of numbers corresponds to a row of letters, and the numbers tell you the position of the letters you want.
The third letter in the first row is an I. Put three I's together to get III = roman numeral 3.
The seventh letter in the second row is a V, which is roman numeral 5.
The fourth letter in the third row is a V, and the seventh letter is an I. VIII = roman numeral 8.
The ninth letter in the fourth row is an I, and the third letter is a V. IV = roman numeral 4.
Thus, the code is 3584.
Posted by: Reka |
May 9, 2014 3:08 AM
|
May 9, 2014 3:08 AM