
 Hi! It's retro time again, have fun!
Short Primera's game offers good puzzles for a start - then you get into Sanpoman's tiny room with giant stag beetle (luckily, mechanical) which hides your ticket to freedom - the key. First you need to find out how to operate the beetle, of course. Gotmail's game seems dangerous - you're caught in an apartment with ticking time bomb - but isn't. You have enough time to properly explore the apartment. Maybe the bomb will explode next year or something. Barking Games want you to get from locked basement - and also make some small repairs there.
Have a good time and enjoy!
Primera''s room (by Suzu) is quite small, two screens only, but full of nice and satisfying puzzles. Your goal is to find a cellphone and charge it, and so get a password for opening the exit door. Can you?
The cursor isn't changing, no save button, one ending.
Sanpoman's games are always cute and sweet and so is this one. On the starting screen with a stag beetle click the left button under it and you are in the room. In the corner you find a huge beetle placed on a stump, which gives you the key from exit door at the end of the game. You need a card to activate it and to get it, you need to open some drawers, find few items and use them at right places and solve some puzzles. As usual.
The cursor is changing, no save button, one ending.
To start this Gotmail's old game you need to enable Flash Player first. Choose the language you prefere, and you get right into the middle of a spy game or another thrilling adventure. You're imprisoned in an apartment where is a time bomb behind the locked door but don't worry, there isn't any time limit. All you know is that you need to find an exit, your bomb dismantling skills aren't tested this time...
The cursor isn't changing, save button, one ending.
P.S. If you still wish to dismantle a bomb, here is Dismantlement: Earth (the bomb is inside) by Gamebbjp, or check Neat Escape's game in WE N°204.
Before you start, notice that it's possible to enlarge the game screen. Above the upper right corner of the screen you find + and - buttons for zooming, and make it as big as possible, believe me, it makes playing much more comfortable.
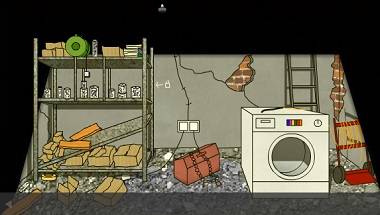
The Barking Games's room which you're supposed to escape is dark, full of rubbish and broken appliances, and probably smells moldy - just a regular basement...if there weren't those coded locks. Will you break free?
The cursor isn't changing, autosave, one ending. Don't forget to enlarge the game screen!
P.S. Here is The Great Basement Escape by Pastel Games. It's fun.
We love escape games, and our readers love talking about them and sharing hints! How about you? Let us know what you think, ask for clues, or help out other players in the comments below.


I'm so close on Rescue Operation! I have just two unused inventory items left:
A remote control and a key
Can't firgure out where to use either one -- I thought they'd get me out of the exit!
looking forward to these.
mirror, mirror, on the wall...
hope they come soon.
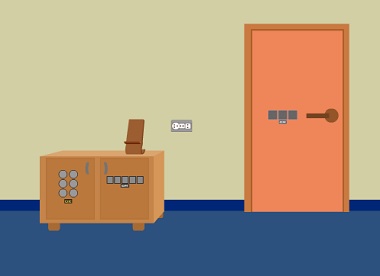
CELLPHONE
It seems this is the only game this week that doesn't require Flash. You might even be able to play it on your cellphone.
Exploration
You start off facing the exit door with a three-letter lock. On the left, there's a set of different power sockets next to a wooden phone charging stand. The left door of the cupboard has a grid of six color buttons, while the right has five letter buttons.
Turn around (right or left). A potted plant on the left has three large yellow flowers. The framed picture on the right has four colored butterflies. And the cupboard has four different locks:
Top left: a column of three digit buttons
Top right: three buttons with groups of rectangles and circles
Bottom left: three buttons with combinations of symbols and pictures
Bottom right: three buttons with different sizes of red circles
Left
Let's start with the left cupboard door on the first screen, whose clue is
the framed butterfly picture.
Solution:
If you mentally combine the butterflies, you'll notice that each black dot appears in a different position. There's left and right, and there's high (antenna), middle (upper wing) and low (lower wing).
Altogether, there are six combinations, and they appear on the
R(3) R(3)

Y(1) G(5)

G(5) B(4)
butterflies, so push the buttons that many times.
Inside, you find a plug (power adaptor) with an unusual label.
Top left / Bottom left
For the top left cupboard on the second screen, the clue is:
the potted plant
and its solution:
The flowers, from highest to lowest, have 4, 5, 3 petals.
Inside, you find a phone battery, which hides a clue:
Examine the battery and turn it over to find disposal instructions.
This lets you open the bottom-left cupboard:
Reproduce the disposal icons on the buttons by clicking them 1, 5, 3 times.
Inside, you find a smartphone, which hides a clue of its own:
Flip the phone over to find a barcode with letters.
Right / Top right / Bottom right
For the right cupboard on the first screen, you'll need the clues
from the back of the smartphone, as well as the plug.
Solution:
The numbers on the plug are connected by black bars to the letters
JAPAN
Carefully enter that into the door and open it to find a socket cover.
This lets you unlock the top-right cupboard on the second screen by
making shapes on the buttons that match the slots on the cover.
Click the buttons 5, 4, 2 times.
Inside, you find a rolled note with a sequence of red digits.
Now you can unlock the bottom-right cupboard on the second screen using the clues
from the note and potted plant.
Solution:
The flowers with 3, 4, 5 petals have red centers that are small, medium, large, which appear on the left, center, right buttons.
Following the clue on the note, you need to click the LRCRLCL buttons.
Inside, you find a charging cable.
Charging
Combine the
plug and cable, and also combine the battery and phone (click near the top of the phone to open the battery compartment)
and then place the
phone on the stand and the cover on the outlet.
Finally,
connect the plug to the outlet, then back out, turn around, and turn back.
The phone isn't fully charged yet, but you can still use it to unlock the door
by entering
LOW.Open it and leave!
I won't be covering The Lost Rooms: Basement because they have a text walkthrough linked from the game page. Some comments for it:
The game is very particular about where you can click, almost to the point of being pixel-hunty. Try slightly adjusting where you click.
The zoom buttons are very helpful here, as well as the ability to use the keyboard to change screens.
For me, the brick code is different in the walkthrough. Just make sure to follow what's in the game.
Thanks kk. You were right on the Basement wlkthrough. the answer seems to be randomized. Thanks for the heads up. Looking forward to the others.
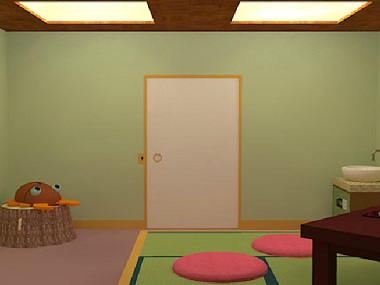
Kuwagata Room
After loading, the right button gets you to the usual story about how this Kuwagata-kun is so cute. Use the left button to start the game.
Exploration
You start off facing the locked door. A huge stag beetle sits on the log on the left, which has a card slot on the side.
Turn right. On the left, there's a sink but its tap is missing a handle. The cupboard under it has a lock with six card suit buttons. There's also a beetle-shaped shoji window.
If you look very closely, the area under the window looks slightly different. There's a hidden compartment in the wall there, but the tiny crack is not enough to open it by hand.
Part of the room is raised and covered in tatami. Click it to take a closer look.
The table in the back has a cup, a teapot and a sweet on a tray that you can lift but not eat. Each of these things has a card suit marked on them. Next to it, there are four cushions, and you find that the fourth one hides a note that appears to be blank.
After lifting the second cushion, click just under it to flip it over and find a white heart marking.
This raised area also has two drawers on the left that contain an enamel pot and a cute patchwork box tied with rope, while the right drawer can't be pulled out and on closer look you find
two screws holding it shut.
Back out and turn right twice. The last thing in the room is a shelf, which (from top down) has a box with a can of tea on top you can't reach, a mysterious box with four weird shape buttons, an angry-looking mini stag beetle that does something scary with its… mandibles (they use those for eating?), and a compact stove that won't turn on unless you place something on it.
Sharp stuff
The patchwork box needs something sharp to cut its rope, so you
hold the box while triggering the mini beetle on the shelf
and then open the box to find a screwdriver.
This lets you unscrew
the right drawer near the cushions, which is solid and forms a bridge to the bottom shelf.
While it's open, the game asks you to close it (by clicking the bridge) before doing anything else…
but the open bridge is enough to make you reach the tea can on the top shelf.
You still have the screwdriver, which means there's somewhere else to use it.
Use it to pry open the hidden compartment under the shoji window, by clicking the tiny gap.
This reveals a big red button you can push.
A clue appears on the window.
Circles
The clue for the mysterious four-button box is
the cushions next to the table.
A suitably mysterious hint is that
it all fits but you won't see all of it.
Solution:
Each cushion is placed on or near a certain number of darker lines. Due to how the mat is placed, each line will be diagonal.
Click the buttons 2, 6, 4, 1 times.
Inside, you find a tap handle. Attach it to the tap, where you notice (if you haven't already) that it has a diamond suit marking.
Let's brew some tea!
(As you look at the empty teacup, the game tells you that you have sweets and you need tea.)
Click the tap to turn it on, then fill the enamel (blue) pot in it.
Then put it on the stove (on the bottom shelf) and push the red button to boil. The game makes you wait a short while for it.
Once the light on the stove is green, pick up the blue pot full of hot water.
(The game tells you you don't need to use the stove anymore.)
Open the tea can and take some tea leaves, then place them in the green teapot and add the hot water from the blue pot.
And finally, pour the tea out of the green pot into the teacup.
Warm
You just made a nice hot cup of tea, with steam coming out of it.
And there's only one item you haven't used yet:
the blank paper note
that when combined with the teacup
makes some pictures appear (wait for the animation to finish!).
Use that clue to unlock the cupboard under the sink:
Examining the teacup, (inside of the) tea can, dessert tray, teapot, second cushion, tap handle, you find the card suits:
H(1) S(0) C(3)

C(3) H(1) D(2)
so click the buttons that many times.
Inside, you find a Kuwagata card.
Beetle
Use the card on the tree stump to activate the large beetle, who extends its legs when you click them.
The only clue left is
on the window, after you opened the secret compartment earlier
and you use it by
noticing that the window appears upside-down compared to the beetle, so you need to click in the directions opposite the ones shown:
left, bottom-right, left, right, bottom-right, top-left, top-right.
Take the key, use it to open the door, and enjoy the ending screen.
Thanks again KK. looking forward to the last one.
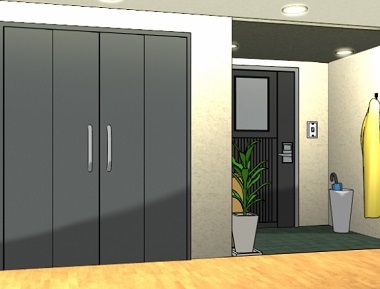
The Rescue Operation
You know you've gone retro when Gotmail offers you translations. And they're decently accurate translations too! And even if you don't care for multilingualism, each language gets its own save slot! Absolutely amazing.
Exploration
The bottom area of the screen would be covered in an ad but Gotmail no longer runs those, so just click the floating X button to banish it.
Beside the locked exit door, there's a shoe cabinet which won't open (looks like you need a key for it). As for the closet on the first screen, you can walk in but there's nothing interesting except for
the extra column on the right, where a pipe acts as extra hanger space.
Between the shoe cabinet and the wall, there's something you can't reach.
Back out and turn right (the edge of the screen turns very slightly white when you hover it). The only thing you can zoom in on on this screen is the set of storage drawers which all seem to be empty, except for the top drawer which is locked. But this has its own tricks:
Clicking above the drawers, you find that the board on top won't open.
Clicking to the right of the drawers, you find a clue with lines and numbers.
Turn right. Beside the window are two display shelves, and you see two locked boxes. The left one has four card-suit shaped pieces that spin around. The right one has a star shape and four colored buttons that stay down until you click them again, or until all four have been pressed.
Turn right to find another locked door, this one having a red light near the handle. On the right above the table, a picture frame has several gears but one appears to be missing.
Boxes / Unlock 1 / Thin
For the grid of drawers, the clue you need is
on its right side
and you interpret it as
a diagonal path followed by another diagonal path that skips the center.
In other words, top-left, middle, bottom-right, top-right, bottom-left.
The top panel opens to give you a key, which you immediately use to unlock the
top drawer
and get a weird device that the game identifies as a tube cutter.
Use the tube cutter to get the pipe:
at the right side of the closet, by clicking it.
Then use the pipe
on the gap between the shoe cabinet and wall
to get the metal spatula.
Window / Unlock 2
You need the clue from the
spatula.
For the left box beside the window:
The card suits match in order so you can ignore them. Based on the idea that each of the pieces begins in the upright position, you need to rotate them 1, 0, 2, 1 times.
(The game will also accept 1, 0, 2, 3.)
Inside, you find a steel ball with a clue.
That lets you unlock the right box
by pushing the Blue, Yellow, Red, Green buttons, which are the 4th, 2nd, 3rd, 1st from the left.
Inside, you find a key with a round tip. Unlock and examine the
shoe cabinet, where you can only move the black shoes in the top right
to find a picture covered in dirt as well as a gear.
Pictures
You need the
gear and spatula.
For the picture in the shoe cabinet:
Use the spatula to scrape the dirt off.
That gets you a clue.
For the framed photo above the table:
insert the gear in the frame, and then use the previous clue.
(If you think you messed up the code, you can reset it by backing out and clicking the photo again.)
All that the cleaned picture tells you is that you need to rotate the middle two gears clockwise ("to the right"), three times each.
(Surprisingly, you don't need to do this in any order! As long as you've clicked the right half of each gear a total of three times, it doesn't matter what else you've done to the gears.)
The photo comes off and you can take a blue card key.
Exploration 2
After using the key to unlock the door near the window, you enter and the game immediately shifts your viewpoint slightly to something more aesthetic. Hopefully that's not too disorienting.
A stopped wall clock hasn't been set, and it's mounted above a short table that's just for decoration. What you really want is the metal desk beside it. After moving the chair away, you can access the long drawer, where a piece of paper has a clue printed on it. As for the side drawers, the top one has four digit knobs, and the other two are just locked.
The bookshelf on the right is covered in lots of covered books you can't read. On the second shelf, there's two stands lined up with a hole. On the third, a book has some complicated-looking picture instructions. And in the corner, there's a wall outlet but no cable in sight.
Turn right. A huge mirror built into the wall has a red dot in its lower right corner that the game tells you is a sensor. The bed has a mysterious black box with a slot in its top, but clicking on the right side of the box clears up the mystery: it's a time bomb permanently stuck at 30 seconds, which makes it too dangerous to mess with. Built into the headboard is a locked drawer with a narrow slot
Turn right to face a wooden table with four drawers. The top right is locked and the bottom right is empty, while the top left has a clue with numbers and the bottom left has a bottle with yellow powder. On the right, you can examine the potted plant pot and dig up the earth (by hand!) to find a roughly cylindrical piece of charcoal. There's also a wall compartment that you have no way to open.
Click the top of the wooden table to open it! This also functions as a mirror, but you see a printed clue with colored letters inside.
Clock and desk drawers
You'll need
two clues from the wooden table and one from the metal desk.
For the clock, one hint is
that there are twelve letters on the note.
Solution:
On the note in the top of the wooden table, each letter represents a number from 1 to 12. In fact, the letters are just the initials of the numbers one to twelve.
The red and cyan letters are fifth and seventh, so click the hour hand five times and the minute hand seven times.
Inside, you find a key.
For the top desk drawer,
You can solve the other puzzle in the wooden table by working from right to left.
Snail: 8 − 6 = 2
Cat: 68 − 82 = − 100 + 86
Rabbit: 968 −586 = 382
Fish: 1586 + 382 = 1968
Based on the order of animals in the metal desk clue, the code is 1328.
Inside, there's a red book with an unusual black-and-white picture. After explaining its significance, the game lets you flip the page and find a card key that looks like a bookmark.
This also lets you open the other desk drawers, where you find a mortar for grinding inside the bottom one.
Bed / Unlock 3
Unlock the drawer on the bed by
inserting the key card
to get a key, which unlocks the
top-right drawer of the wooden desk,
which contains a power cord.
Reaction / Escape
Follow the instructions from
the X book on the bookshelf.
To do that:
Grind the charcoal using the mortar, and add the yellow powder.
Put that into the pipe and add the steel ball.
Connect the power cord to the pipe and place it on the stand.
And finally, plug the other end of the cord into the outlet.
At the end of all that, you can finally open the
wall compartment above the potted plant
which contains a remote control.
Use the remote control on
the red sensor of the mirror
to remove it and reveal a locked door.
Then use your remaining key there to open it and escape!
Clicking on the end screen gets you to a final survey. I strongly doubt that it still does anything.
Update