
 Back to the past, it's Retro Weekday Escape!
So, we're going retro again (not very fruitful week behind). The first comes Vitamin Hana, with lovely and colorful room, who wants you to show some cooking skills. In Tototo Room you need to perform combination skills and attentiveness to escape, and the same can be said about Puxupo's attic. With Flash 512 your situation turns serious. You're in a dungeon! Can you escape?
Have a good time and enjoy!
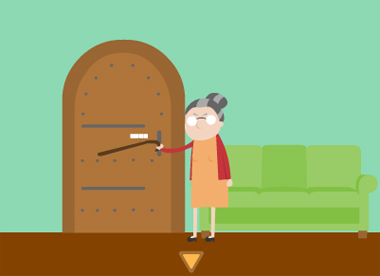
You want to go out - no own yard isn't interesting enough - but mama doesn't let you go. There are some chores to be done first, Vitamin Hana's mama wants a nutritious soup and it's doesn't cook itself! The instructions are next to the cooker, but where are the ingrediences? Well that's the part of it...you have to go and gather some vegetables, clean it, cut it, and make the soup. What do you think, will mama allow you out then?
The cursor isn't changing, no save button, one ending.
P.S. The sequel is here: WE N°131. You can also do some rice with Primera there.
Tototo Room's one scene game brings more fun than one would think. The goal is simple, you need to find eleven greyish blobs which turn into orange smiley faces after you click them. There are just eight cabinets' doors to open and some even aren't coded, but puzzles are clever and demanding, blobs well hidden and can be overlooked. Some already opened cabinets worth reexploring. Don't forget to properly examine found items too.
The cursor isn't changing, no save button, one ending.
Puxupo locked you in the attic. The trapdoor is hopelessly shut, your cat is mewing downstairs and only chance to get out of here is to discover the four digit code. Before you can do it you need to gather some items, use them at the right places, and also figure the other code - can you escape?
The cursor is changing, no save button, one ending.
You aren't just trapped this time; Flash 512 imprisoned you in a wet dungeon and escape is a matter of life and death - what happens if you don't succeed is obvious. But don't panic. There must be a way. Look around - you can see at the first sight that the dungeon is special (yes much cleaner than one would expect but that's not it) and crammed with very unusual devices. Notice the clues around the room and places where to use items, and concentrate - you'll be out in no time!
The cursor isn't changing, no save button, one ending. You'll need a pen and a piece of paper for this one.
P.S. Here is 3 Cryptic Rooms Escape by the same devs which I intended to post originally. It's a pleasant and relaxing game; consists of three separate rooms to be unlocked one by one. In the third room found a bug though - the game allows to skip one puzzle (but it's playable).
We love escape games, and our readers love talking about them and sharing hints! How about you? Let us know what you think, ask for clues, or help out other players in the comments below.


can't wait for these.
Give Mama Wants
Exploration
An old lady blocks the door, and (because of the title I'll refer to her as Mama) asks for a bowl of soup.
(Click the arrow at the bottom of the screen to) turn around and face the kitchen area. There are three cupboard compartments on top, which have three digit buttons, three orange shape buttons, and four buttons marked with arrows.
Beneath that, there's a working sink and stove on top of two more cupboard doors, which have three colored digit buttons and six letter buttons in a grid. On the wall to the right, a picture tells you how to make stew.
Click the right doorway to enter the garden. From the carrot patch you can pull out the front three carrots, leaving the remaining colorful ones alone. The bush next to it has two bright red peppers infested with worms. And there's a cupboard with two more doors, the left having three buttons that cycle through different shapes and dot patterns, and the right having three color-changing buttons.
Copy
Enter the code (327) from the poster into the top-left kitchen cupboard, then open it to find a bottle of spice.
Also enter the colors (green pink red) of the remaining carrots into the right garden cupboard by clicking its buttons 4, 2, 5 times, then open it to find a dirty knife.
Wash
Look at the sink and, while holding the knife, click the tap twice to clean off the dirt.
Click the clue near the handle to zoom in on it.
Then enter that clue into the left garden cupboard by clicking its buttons 4, 1, 2 times.
Inside, you find a spray can with a worm shown on its label.
Pest
Use the spray can on the red peppers. Of course, it doesn't take effect immediately.
Back out to the kitchen and then reenter the garden. Now the peppers are safe!
…but the colorful carrots are covered in the worms, which gives you an idea.
Counting the worms, you find that the pink, red, green carrots have 1, 4, 3 worms.
Enter that into the bottom-left kitchen cupboard (under the stove) and open it to find a sack of potatoes, from which you take some.
Spell
The packaging helpfully tells you how to spell POTATOES, so push the buttons on the bottom-right kitchen cupboard in that order and then open the door to find a stainless steel pot.
Cook
You should have everything shown on the poster.
Place the carrots on the chopping board and use the knife to chop them up, then repeat for the potatoes and peppers.
Fill the pot in the sink and place all the chopped vegetables and spice into it.
Then place the pot on the stove and turn the (right) knob to turn it on.
Back out of the kitchen and reenter, and the soup is now a bright red stew which you can click to zoom in on.
Use the clue from that to unlock the top middle cupboard.
Three carrot slices float on top of the stew, of which the visible parts are the whole, top half and top quarter.
Click the buttons 2, 4, 6 times and open the cupboard to find a bowl and cup.
Serve
Use the bowl on the pot to fill it up, and give it to Mama who is now patiently waiting on the couch.
This means you can now access the door, which has four ingredient buttons.
After you back out and turn back to the couch, Mama has finished her soup and now asks (when you click her) for a cup of coffee.
Stain
You haven't seen any coffee around, and all you have is stew- wait, what's this?
Collecting the soup has revealed some of its residue on the pot. Use that clue to unlock the top right kitchen cupboard.
The arrows numbered 1, 2, 3, 4, 5 point ←→↑↓←.
Push the buttons on the lock in clockwise order, starting and ending at the bottom right, then open the cupboard to find a coffee machine with a coffee pot already half-filled.
Give
Use the pot on the cup to pour the coffee out, then give it to Mama.
Back out and revisit her, then click on her to retrieve the empty cup.
Click the cup again to look inside and find another clue.
Exit
Use the remaining clues from the game to unlock the door.
The arrows in the cup are the same color as those on the poster, and the clue in the cup tells you to pay attention to their lengths.
The ingredient with the shortest arrow is the spice, followed by the potato, pepper, carrot.
Enter those ingredients into the door lock, then open it and leave!
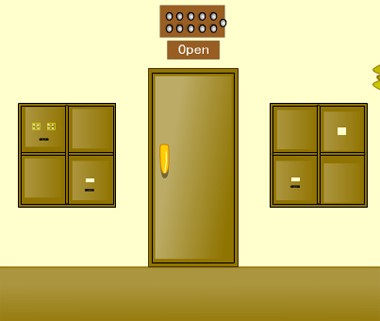
Button Escape 38
Like the rest of this series, the goal is to find (silver) round buttons and press them to get smiley faces, merry jingles, and eventually you'll get to escape.
But unlike the other games, this one (and the next) features almost nothing but locked cupboards.
Exploration
In the middle of the screen is a locked door under an Open button under a panel of eleven lights.
To its left, a cupboard is divided into four compartments, which have:
Upper left: a row of red/blue lights, two small diagrams and an Open button.
Upper right: the door has 5 printed on its inside. While this compartment seems empty, clicking it will zoom in until you find a hole in the bottom. (Click the bottom of the screen to back out.)
Lower left (6): the compartment has another hole in its back. When zoomed in, you find a button at the corner.
Lower right: The door has four buttons with bent lines on them.
On the right side we have:
Upper left (7): a piggy bank inside has a button on its chin.
Upper right: eight blue buttons in a circle connected to the center.
Lower left: a four-digit lock
Lower right (8): a cylinder telling you to "pull" a weight inside, and a button.
Clicking the golden thing along the right edge, you find that it's some kind of fish-shaped gong hanging above a sign telling you to "please hit the doorbell". (Indeed, the door of the tiny house to the right is locked.) One corner of the sign has a crease mark, and you can fold it down to find a button.
Squares
If you examine the top-left cupboard (on the left side), you might find that the pattern of lights is different from before.
Why is that so, and how do you complete the puzzle?
Opening the cupboard doors has caused those lights to change, so the clue on the top-left cupboard indicates which doors to open.
Comparing the diagrams with the locked doors, you find that the black dots must indicate the position of shut doors. This means you have to close the one numbered 6 and leave the remaining three open.
Once done, push the Open button on the cupboard door to open it and find a flashlight and another button.
Light
You can now use the flashlight on the hole in cupboard 5 to reveal four horned guys and a button.
Lines
Use the clue you just saw to unlock the cupboard door beneath cupboard 5.
Enter the shapes of the horns onto the buttons by clicking them 5, 3, 4, 1 times, then open the cupboard.
The inside of this cupboard looks like the pipes under a sink, but even after taking a hammer and clicking the button the two levers on the side don't seem to do anything.
Swing
You can't bear to use the hammer on the pig, but you can use it on the fish instead.
Hitting the "doorbell" makes the tiny door beside open up.
Looking through that door, you find an even tinier button surrounded by eight circles.
There's also a yellow button hidden on the right side that makes numbers appear on those circles.
Cycle
Use the clue from the tiny house to unlock the top-right cupboard door.
Following the sequence of numbers, click the top, bottom, right, left, top-right, bottom-left, bottom-right, top-left buttons.
The cupboard opens up and you find a bottle of pepper, and you can click the blurry thing in the top left to take a closer look at its clue, which also has a button hidden at its top left.
Clicking the back of the cupboard, you find a hole in the bottom.
More squares
Use the clue you just saw (in cupboard 3) to unlock the remaining cupboard door.
Hint: pay careful attention to the positions of the squares.
Each diagram in that cupboard represents one of the doors you've opened. For example, the left one (black square attached to the top edge of the upper-left square of a grid) represents 7, which is an upper-left cupboard that opens upwards.
Following that logic, you get the code 7812. Enter that into the cupboard and open it to find a picture of a basin. (Or is it two faces?)
Dark
Examine the flashlight closely, and click the panel on its side to reveal a switch.
Clicking the blue side of the switch turns the light blue.
Now use the blue light on the hole in cupboard 5 to reveal a new button.
Also use the blue light on the picture in cupboard 4 to reveal some numbers.
Basin
Use the clue you just saw to do something in cupboard 2.
Some of the blue numbers are rotated, but you can still figure out that 1 and 2 are near the left dot, 3 and 4 are near the right dot, and 5 is squeezed into the base.
So click the left lever twice, the right lever twice, and then the base, which contains a short string.
Powder
Use the pepper on the piggy bank, which sneezes out a small coin.
Hook
The only puzzle left is the glass cylinder in cupboard 8. You can't break the cylinder, so how do you get inside to pull the weight up?
You can't get into the cylinder normally, but the top of the cylinder is connected to the cupboard above, as you can confirm by the light that comes through the hole when cupboard 8 is opened.
Examine the coin and attach the string to it, then use it on the hole in cupboard 3.
You need cupboard 8 to be open (otherwise nothing happens) to maneuver the coin onto the hook.
The resulting animation is short and quick, but you may recognize that it caused a change in cupboard 6.
Socket
The toothed inside of the hole in cupboard 6 is now a perfect fit for the grooved handle of the hammer.
Place the hammer in the hole and click it to turn it.
The whole right cabinet slides down and a huge button bounces out!
Complete
The Complete message confirms that you've activated all eleven buttons:
Following the order of this walkthrough, the
01 03 11 08 04 10

09 05 07 06 02
lights on the door are controlled by the following buttons:
In cupboard 6 (left side, lower left)
In cupboard 7 (right side, upper left)
In cupboard 8 (right side, lower right)
Behind corner of sign
In cupboard 1 (left side, upper left)
In cupboard 5 (left side, upper right)
In cupboard 2 (left side, lower right)
In tiny house
In cupboard 3 (right side, upper right)
In cupboard 5 again
Behind right cupboard(s)
Click the Open button to open the door and leave.
Attic Escape
Perhaps we could just sit on the title screen a while longer, enjoying the time you aren't locked in the attic. What, you've already started the game? Okay then.
Exploration
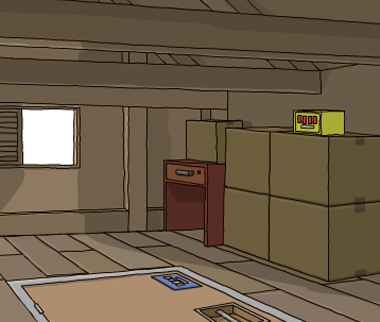
One conspicuous feature of this side of the attic is the U-shaped clear plastic tube on the left which seems to have a crumpled paper ball at the bottom. You can close the window next to it, but it quickly gets too dark to see or do anything. On the right, a red desk has a locked drawer and there are cardboard boxes on and beside it. A bright yellow box on the right stack has four colored buttons.
The exit to the attic is the trapdoor on the floor, but it has a four-digit lock. And just in case you get the temptation: no, you can't guess the number.
Turn around (left or right) to face another window with a green padlock holding it shut. There are more boxes here, as well as lots of books. The books in the shelf are colored and numbered an you can move them aside to find a drawer key. On top of the shelf, one stack of books is tied together. What's so special about it?
Unlock (red)
Use the key to unlock the drawer, which contains a box cutter.
Cut
Examine the cutter and click it to extend the blade.
Then use it on the tied stack of books (on the bookshelf) to cut the string off.
Click that stack of books twice to retrieve the green notebook from the middle.
Examine the notebook and click it, opening it up to reveal a clue inside.
Encoded
The code from the book doesn't work on the trapdoor lock. Where and how do you enter it?
Checking the books in the bookshelf, you find that the ones numbered 4, 7, 9, 2 are blue, green, yellow, red.
Click the buttons on the yellow box 1, 3, 2, 0 times and open it to find a window key and a bottle of oil.
Unlock (green)
Use the key to unlock the window, then open it to find a pair of rusty lineman's pliers.
Bent
Uncap the oil bottle and apply it to the pliers to make them smooth again.
Next, you need to find something to use the pliers on. There aren't any exposed wires around though.
Use the pliers on the notebook to remove the wire from its spiral binding.
Reach
Use the wire on the glass tube to pull the crumpled handkerchief out.
Unfold the handkerchief to find numbers and lines on it.
Blink
Close the window near the glass tube. Since you left the other window open, the room doesn't darken, so you can read the clue that was behind the window.
The text above the drawings says "the door number is", so use that clue to unlock the trapdoor.
The cross marks on the clue match the cross in the middle of the handkerchief, so the corner marks must represent the corners.
The relative positions of the circles to those markings indicate positions on the handkerchief that are occupied by the digits 4816.
Enter that in the trapdoor and open it to end the game! The culprit who locked you in is not impressed.
Stone Dungeon Escape
The outlook may be gloomy but your fate isn't set in stone.
Exploration
The bed hangs from the wall and you can zoom in and move the blanket to find a set of weird symbols. Similarly, the pillow hides a set of golf balls in round holes. Above that, a framed picture has nine tiles that you can flip over briefly. On the right, a skeleton sits among some sparklingly white pots, one of which contains a round valve handle. The window above is blocked by bent iron bars, but the second from the left has been cut and wiggles when you click it. Hmm, maybe if you push on it a bit more… and then pull… the iron bar comes loose!
Look under the bed to find a polished rounded cubical stone that looks like deodorant for some reason.
Turn right to face the locked exit door (and a round thing above it), which is surrounded by two tall pillars. The right one has something extra on top, and hidden behind it on the wall is another locked compartment.
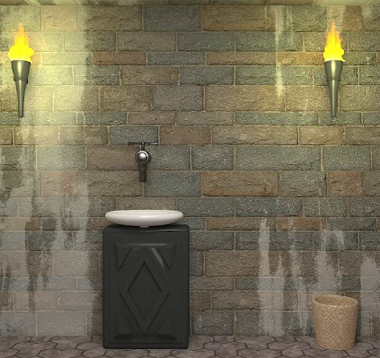
Turn right. In between two lit torches, a sink is built on top of a metal box, but the tap doesn't work. On the right, a basket is filled with black stuff.
Click the left side of the metal box to find a bolt attached to it.
Turn right. A brown box has a symbol panel on the top, and the metallic wall panel has a diamond-shaped hole in its middle. There's also a trapdoor in the floor that you can't lift.
Lever
Use the iron bar to lift the trapdoor. The thing beneath looks like a bottle opener, but on closer look you realize that it's a spanner.
Torque
Use the spanner on the side of the metal box (under the sink) to open its front. It looks like there are only two pipes here…
But the green one on the right has a small protrusion.
Place the round handle on it and turn. Now the sink works!
Climb
Place the stone in front of the right pillar and climb up. Next to the floral-decorated ball, there's a smaller ball hidden on the side.
Place the ball in the empty slot under the pillow. You can now click the balls to make them glow different colors.
Five
Use the clue from the picture above the bed to unlock the panel under the pillow.
Flipping the tiles, you get a view of five colored numbers (under the corners and center).
The numbers 1 to 5 are red, blue, green, pink, yellow.
Since the balls (from left to right) glow blue, yellow, red, pink, green, you need to click the 3rd, 1st, 5th, 4th, 2nd balls from the left.
Do so and the panel opens up so you can take a curved piece of rusty metal.
Black
The rusty piece of metal is actually a pair of tongs, so use it on the basket to pull out a black key.
That key is still too dirty to handle, so wash it in the sink before using it to unlock the wall compartment behind the right pillar.
Inside, you find a polyhedral ball with floral patterns.
Mirror
Pick up the stone and place it at the base of the left pillar, then climb up and place the floral ball on top.
When you back out you find a stone tablet on the floor!
Gray
Place the tablet in the metal panel and push it to reveal a set of skulls.
The bottom-left skull is a different color, and clicking it makes the eye sockets of seven other skulls glow rapidly.
Symbols
Use the clues from the skulls and bed to unlock the large brown box.
Hint: memorize the symbols on the box first.
The arrangement of the skulls matches that of the bed symbols, so the ones which glow indicate seven symbols (backwards 4, 9 with extra hook, single bent stroke, two crossing wedges, symbol beside a dot, symbol around a dot, symbol with a spiral).
Click the symbols in the
-5-6-

2_7_3

_4_1_
positions on the panel, which opens it up so you can find a key.
Use that key to unlock the door and escape!
Update