
 Hello! This week we are going retro again, it's Retro Weekday Escape time!
The first game by Karabina-7 takes you on a journey around strange poetic world with the best postal services ever. Then you stay locked in typical tomoLaSiDo's room for a while, and then you set out for exciting adventure with Nifty - to the ancient temple consecrated to old forgotten gods. One more ancient temple hiding mysteries awaits you at the end of this WE!
Have a good time and enjoy!
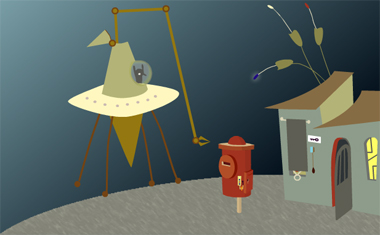
The hero of Karabina-7's game is a postman who needs your help in his quest. He must deliver a letter, and fulfill few tasks and solve some puzzles on his journey through dream land - not an easy thing to do, as obstacles are various and unexpected. His professionality is on stake but determination firm so he will finish the delivery at any price!
The cursor is changing, no save button, one ending.
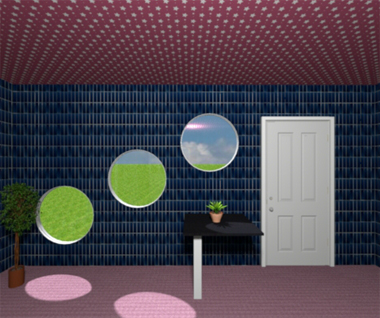
Only standard escape this week is tomoLaSiDo's room with three round windows (nice), fully tiled walls (strange), and their usual pot plant and graffiti. Apart from six capsules containing key parts you need to collect two grapes for the perfect end; but there is more, of course. Codes to be cracked, the cupboard to be opened, the fridge as well - can you escape?
The cursor is changing, no save button, one ending.
P.S. More grapes (by FunkyLand) can be found in WE N°36 (purple), or in WE N°53 (green). Very nice game by Otousan, Bird Escape, has one grape puzzle too, but you may need to allow your browser to open it. Their site isn't secured.
At the beginning of Nifty's game click the left button, and then skip the intro in Japanese (unless you understand Japanese). Now look around - you are in the ruins of an ancient temple! Soon you find out that the platform where you materialised is quite safe at the moment, but if the restless aliens overcome the stream, not so much. There's something unpleasant about this place, and the gods being worshipped here look hostile and bloodthirsty...but don't despair, there are ways how to escape, and even three!
The cursor is not changing, save button, three endings (airplane, sacrifice and green gem).
The second Nifty's temple game is different - shorter, more atmospheric and magical - and also more lethal, as clues are vague or missing, and the trial and error method may lead to the total collaps of the building on player's head.The game has only three beautifully drawn scenes, but notice, that once you leave the scene, there's no way back. The save button comes really handy - for saving, click the active button in lower right corner of the gamescreen, and then the left one. For loading saved game click the middle button on the starting screen; the left one starts new game.
The cursor is not changing, save button, three good endings (so far, could be more), many bad ones.
P.S. Here is one special bonus game for experienced and brave players - DeadEnd's Hotel. It's unusual combination of an escape and Doom-like game, but only in French. Dark and heavy atmosphere, awesome art.
We love escape games, and our readers love talking about them and sharing hints! How about you? Let us know what you think, ask for clues, or help out other players in the comments below.


Hmm, I got the airplane and green gem endings for The Hell City of Yore, but I couldn't find the sacrifice ending.
Was there something I could do with the gloves and the gem necklace?
Sacrifice ending
is the bad one.
You can get the sacrifice ending by
clicking the boss instead of killing it.
I'm more confused about the endings for the last game, since judging by the cutscenes you just get one good and two bad endings:
Destroying the ruins isn't supposed to be a good ending!
A Good? Ending for Dora Escape
First Room
Pick up the key in the bottom left. Turn right. Pick up the stone fragment (1/8) on the floor. Use the key on the panel and collect the orbs. Back up and turn right again. Pick up the stone fragment (2/8) in front of the door. Turn right once more. Pick up the stone fragment (3/8) by the dragon's tail. Put the Yellow Orb in the dragon's claw. Enter the door that opens.
Second Room
Pick up the stone fragment (4/8) on the bottom left. Turn right and grab the stone fragment (5/8) hiding to the right of the rocks. Click the dial. Click it 3 times so it looks like \. Back up. Turn left twice. Click the stone fragment (6/8) on the upper left of the arch. Click the alcove and pick up the grail. Back up and turn right. Click the grail and then the water to fill it. Turn left and place the grail back in the alcove. Turn right and grab the gem. Turn left and retrieve the grail. Turn left again and pick up the stone fragment (7/8) on the bottom left. Click the dark spot on the wall 4 times and then put the grail inside it.
Third Room
Turn left. Pick up the stone fragment (8/8) from the pedestal. Turn right. Click the panel on the right. Open it and insert all stone fragments. Back up. Click the panel on the left. Open it and insert the gem. Back up. Click the statue. Insert the Black Orb. Back up. Turn right. Take the Gold Mask.
at this point you can either turn right and exit the middle staircase to get a good? ending or put the mask on the statue to do...something. I haven't gotten that far.
Another good ending for Dora escape
don't take the red ball in the first room
follow Akarroa's instructions
in the third room, put the golden mask on the statue
wait
still wait - the mask slowly gets redder and redder
after almost two minutes the mask turns black
take the black mask and leave through the middle door
Now I'm not sure about the third ending. Played the game long time ago and I think that
you can leave without the mask somehow
but it's possible that my memory tricks me. Sorry for confusion.
In the first room
you can also use blue ball with the dragon
a chest appears
but whatever I try leads to bad end - except ignoring the chest, using yellow ball (the blue one turned into water) and go on as if nothing happened
Enjoyed PostMan quite a bit, reminded me a bit of a shorter version of old school point and click games like Samorost (not quite so trippy!).
Let's start with the "easy" ones then.
Postman
It's kind of a cliché that a simple delivery turns into a complicated quest, but that's the nature of point-and-click.
Interface help
You don't get any inventory other than for the most important item. Everything else has to be clicked and (then) dragged to be used.
Several areas and objects have examine screens, and the close button on those screens is the tall crossed rectangle on their right.
Exploration
You're the postman! After the short intro, you walk out of your house next to the postbox, which has a complicated lock system that you've somehow forgot how to operate. The house also has three colored plants on its roof, a shutter on the window that you can't use yet, and some sort of rope next to that window.
Click the blue (leftmost) plant to make it drop a black key.
Unlock?
Place the black key into the postbox. It doesn't really work, as the key appears next to the box when you zoom in.
However, you can open the shutter to find three colored buttons.
Color code
Use the clue from the postbox to activate the mechanism in the window.
From top to bottom, the colored circles are white, blue, red, blue.
So push the center, top, bottom, top buttons and then pull the rope on the right to light up the key symbol.
Unlock!
Looking at the postbox again, you find that the key has turned a bright shade of gold.
Now you can use it in the keyhole to open it and retrieve the envelope.
Now that you've picked up the mail, just click the postman to continue.
Exploration 2
A bird flies around behind some gates and disappears. The gates belong to a tall tower, and rail tracks lead away from it. There's a gong on the left and a mallet on the right hanging on a warning signboard. Triangular warning marks are drawn on the floor, and you see some kind of hat on the right? No, that's too big to be a hat, so it must be a lid.
The tower has a single window with a hook directly above it. The hook is empty, but several red lanterns are hanging elsewhere on the tower. In particular, you can click the leftmost lantern to drop it on the floor, and then move it.
Knock
Let's get the postman on screen. Click the mallet to make him pick it up and walk over to the gong.
You can now sound the gong to make a dragon come out and breathe fire. Wow, that's hot!
The dragon looks through the window before it comes out. What if you could prevent that?
Pick up the leftmost lantern and hang it on the hook, perfectly blocking out the window.
Now sound the gong again. Sensing no threat, the dragon opens the gate, releasing the bird and allowing you to examine his stash. There's the cart and flag from the signboard, as well as a lever frozen in an ice block.
Heat
This time, you really want the dragon to come out.
Grab the ice block and place it on the track, and grab the lantern and place it in its original position (on the tower, not the ground).
Then sound the gong again. The fire easily melts the ice, releasing the lever.
Shift
Attach the lever to the cart and move it to reveal an urn with a picture of the dragon on its label.
Fill
Move the urn onto the warning triangle on the right, and then sound the gong once more.
The dragon comes out and gets captured in the urn.
Cover the urn with the lid and load it into the cart, then click it to move on!
Exploration 3
The postman has come to a stop where the rail ends in a small zigzag, controlled by a lever beside. The bird from before lands on top of a weird archway with pulleys all over, next to a piece of cheese. That rope extends to a tunnel in the background, carrying some sort of harness on it and connected to a wheel on the right. There's also a well with a hook over its pulley. Something is hiding in the well, but stare closely enough and you'll realize it's not dangerous.
When you click the cheese, the bird brings it over to the well.
You can click the bird to spin it, but it won't go back.
Attach
Click the lever once and then the wheel on the arch twice to attach the cart to the wire.
Bait
Pick the cheese up and put it on the hook.
Once everything is set up correctly, click the cheese to start the chain reaction.
The mouse grabs the cheese, pulling on the rope, causing the cart to slide over!
Exploration 4
There's a lot to take in here, but you recognize the tower from the front of the envelope, and there's a conspicuous red mailbox floating in the background.
From right to left, you see a noticeboard with various green squares, a cannon with a red circle drawn at its base (and a nice crank handle that adjusts it), a weird device and button that are both inactive, a set of clear pipes and an air pump you can drag around.
Zoom in on the pipes to take a closer look. There are four red spots with white circles above them, a reddish ball, and three holes in the glass, two of which are covered with tape. You can pick up the tape over the middle hole and move it to the right hole (and even move it back later).
Matchup
The squares on the noticeboard show different icons when clicked. This looks like a classic minigame!
Memorize each pair of matching icons and click them pair by pair:
1 2 3
2 1 3
Each icon transforms into a different image.
These images are hints for what to do and when to do them.
(This step is actually optional, since you can figure out what to do on your own.)
Blow
The red spot on the pump matches the red spots on the pipes.
Indeed, if you place the pump so that the end of the tube (the arrow) is on a red spot, the pump will glow yellow. Zooming in on the pipes confirms that it is connected to the hole there.
Now you need to pass the ball over each of the four white disks:
Connect the pump to the left spot, then (zoom in and) push it.
Now that the ball is over the top spot, reconnect the pump there and push it again.
The ball lands in the bottom chamber, so reconnect the pump on the bottom spot and push it again.
For the last step, the hole in the pipe means you can't raise the ball beyond that point.
So take the tape from the middle and place it over the hole. After reconnecting the pump and pushing it again, the ball falls out of the right pipe.
Fill
Click the ball to split it in half, then click the postman to get the envelope out, drag it into the ball and close it again.
Fuel
Remove the urn from the cart, move it onto the dotted circle, and remove the lid.
The dragon breathes out enough fire to light the fuse.
Boom
As you adjust the cannon up and down with the crank, the flag below it shifts between the images shown on the noticeboard.
In its original position (black) you should be able to load the cannonball into the front of the cannon.
After shifting it up to white, you can click the open urn to light the fuse.
Once both of those are done, adjust the cannon until the flag is red.
Click the button beside the flag to deliver the mail! Enjoy the ending.
Escape Challenge 14: Grapes Room Escape
The early games in the series are familiar yet different. The worst thing about this early game design: you have to close all cupboard doors before you can do anything else.
Exploration
Three round tables and a chair are placed in the middle of the room. You see a flat landscape through the glass doors, and can click the potted plant to find a bunch of grapes. Examining the table, you find a capsule with a key piece on the chair.
Look under the tables (click the bottom edge of the nearest one) to find different colors.
Turn right to face the locked exit door. Sunlight shines through the three round windows and illuminates the small table with potted plant. Taking a closer look at the door, you find another key piece on the table.
Turn right. This kitchen area has a clock that runs out of control, a fridge with three-slider and three-digit locks, a sink with a key piece inside, and a picture frame showing three brightly-colored circles.
Turn right. This cupboard has empty shelves and three locked doors, one with three color-changing buttons under a rectangular shape, one with three digit buttons in a circle and one with three circular digit buttons overlapping each other. The blue bin beside is empty.
Enter the corridor to the toilet, where you can sit down, look right, look up and look left to find some helpful drawings.
Cycle
Use the clue from the clock and picture frame to unlock the bottom-right cupboard door.
At the exact moment that the grapes at the middle form a triangular pattern, the cyan, orange, green circles on the clock land on the numbers 6, 2, 3.
Enter that in the door and open it to find a key piece.
Triangle
Use the clue from the round tables to unlock the top-right cupboard door.
The shape on top of the lock matches that of the chair, which means the layout of the lock is a top-down view of the round tables.
Since the furthest (blue) table goes at the bottom, you find that the colors are:
Red (2) Yellow (3)
Blue (4)
Click the buttons that many times and open the door to find a conical cocktail glass.
Heights
Use the clue from the round window to unlock the freezer compartment of the fridge.
From left to right, the windows are low, middle, high.
Set the sliders accordingly, then open the door. It's empty!
Combination
Following the instructions on the toilet wall, place the grapes into the glass and then the glass into the fridge.
Your inventory icons update to indicate that you're now collecting individual grapes, and all that's left of the bunch is a yellow skewer from which you can take 2 grapes.
Close the freezer door, open it again, and examine the glass of grapes to find that something's changed.
String
Use the clue from the skewer to unlock the (bottom) fridge door.
Enter 734, open the door and take the key piece.
Enclosed
Use the clue from the frozen grapes to unlock the bottom-left cupboard door.
Enter 212, open the door and take the key piece.
Finish
Now that you have all the key pieces, you can open the door and leave!
(At the end, your "souvenir" is however many grapes you pulled off the skewer.)
Item list
6 key pieces:
Top left: In bottom-left cupboard door
Top middle: In sink
Top right: On chair
Bottom left: In fridge
Bottom middle: In bottom-right cupboard door
Bottom right: On table beside door
2 grapes:
Bunch on potted plant (item),
then 2 on the skewer from it.
One other item:
Wineglass, in cabinet
There's no actual restart function within both Nifty games. Even returning to the title screen from the How To Play guide triggers a reload, so be prepared to do a lot of page loading to see all the endings.
The Hell City of Yore Escape
"You've come to investigate some ruins but have been trapped underground! And there are monsters never before seen, so find a way to leave, or else!"
The title screen buttons are "Start", "Load" and "How To Play".
The options menu buttons are "Save" (you have to confirm it), "Hint" (just a list of items), and "Return".
Exploration
You find yourself in a giant underground dome, and on the left side of the background some black and white windows(?) catch your attention. Everything seems to be built out of marble, except for a green box labeled 1 which you open (click its front) to find nothing. Who would just leave empty supply boxes in the ruins? Anyway, you're facing a circular platform with four tiny holes around a larger square hole, and one of the small triangle tiles in front is gray with an octopus drawing. On the left, part of the marble is worn away to reveal some markings, and a hole at the edge of this platform is surrounded by two tiny pillars with faces.
Click the large triangle tile nearest to the circular platform to remove it.
Turn left. There's a creature trapped behind a clear dark barrier, and it seems to be inactive right now. Some figures are drawn on the archway, and there's a triangular hole on the left. From right to left across the foreground, there's a ball in a frozen container, a black tetrahedron on the ground, a gas burner, an icy pyramid with something trapped inside, and another supply box labeled 2. This time, the box contains some sturdy-looking rope.
Turn left to find a narrow brook separating you from some floating eye balls blocking the exit. (Honestly, the tiny eyes and mouths on their tentacles are really cute.) On your side, supply box 3 contains an oil can, and there's some neat drawings in front of the broken bridge.
Pick up the only intact large triangle tile.
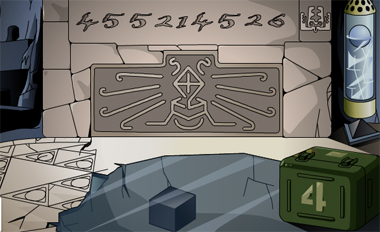
Turn left to find a wall with numbers (next to an interesting figure) and a drawing of a gemstone releasing power. A hole in the floor is filled with ice, and there appears to be a cube trapped beneath. Inside supply box 4, you find a pair of gloves. There's another ice column and black tetrahedron on the right, as well as a narrow hole in the wall with a section of pipe that you can just take.
To the left of the ice, you find another large triangle tile.
Descend / Exploration 2
Tie the rope to the pipe, and use it on the gap in the first screen to brace the pipe against the small columns.
Now you can climb down.
There's a circle with five black pillars rising from it, and it also has a pentagonal center as well as mysterious writing around the outside (I can't read it either). Two huge slabs on the left and right are divided into 6 and 3 parts, with each slab having a different figure on top and a giant hole at the bottom.
The only intact triangular tile is on the right, but this time you pick up the triangular base beneath it instead.
As for the other triangular tiles on the left, those cracks seem too straight to be natural. Click around to remove a parallelogram-shaped section and find a narrow stone plank with holes.
Turn around to face the way back up. A huge drawing on the wall details some painful consequences of awakening the monster, and you spot a handle in the floor that you can lift and turn to find a compartment with a stone slab, which has some interesting numbers on it.
Heat
Before we get ahead of ourselves, let's settle the unfinished business upstairs.
Fill the gas burner with the oil. Now you can use it to melt the ice floor to get the black hexahedron/cube, and melt the ice pyramid to get the blue dodecahedron (you actually need gloves to take it, though just picking them up earlier was enough).
Also use the burner to heat up each black tetrahedron. As you saw from the drawings, the ice melts and the ball in each column sinks to push the button at its bottom.
The button beside the monster opens the wall with numbers, revealing a gray octahedron between two diagrams.
The button beside that wall raises the octopus tile on the first screen, and pushing it back into the ground makes the pyramid in the background light up in yellow.
If the dome now looks brighter, that's not an illusion: climb down and you'll see that the five black pillars are now glowing white, and you can turn them back off by clicking.
Hieroglyph
Use the clue from the left side of the first screen to unlock the left puzzle downstairs.
The entire clue has to be turned upside-down to match the figure on the slab and the symbols available in the squares.
So click the squares
1 3 5
2 4 6
times, which makes a blue Sealing Book appear under a spotlight.
Opening the book, you find that it only contains two pieces of parchment, and they're slightly torn up!
Floaters
Use the Sealing Book to defeat the floating balls.
Clicking them with the book selected makes them glow, so look in the book to find the correct order. Since the numbers 2 to 6 are already written there, you can deduce where 1 should be.
The number 1 would be in the torn spot just over 6, which means the numbers 1 to 6 are in the 3rd, 1st, 2nd, 4th, 2nd, 3rd columns from the left.
Click the monsters accordingly, and they all deflate and vanish into the ground at once.
Ending 1
Save your game from the menu, making sure to confirm with the left button.
Then use the blue dodecahedron on the stream to freeze it, restoring the bridge.
Now that you can reach the exit, click it (and confirm) to leave.
"I boarded the plane and barely escaped with my life.
After that, the ruins were never found again."
(Once you're done, return to the title screen and click the middle button to load your game.)
Assembly
Clicking each triangular piece, you find that they have convex/concave parts along their edges that match those on the base.
So use all three pieces on the base to complete a tetrahedron, which immediately glows yellow.
Release
Place the tetrahedron in the hole next to the huge monster.
Oh no, it's awoken and angry. (Maybe you shouldn't have taken its fancy dice.) Thankfully, it's held back by a barrier of four squares.
Numeric
Hold the stone plank (the one with holes) up to the wall with numbers, covering all but three of them.
Then use that clue and the stone slab with numbers to unlock the right puzzle downstairs.
The numbered slab tells you that 1 should become 2. By similar reasoning, the numbers 4, 5, 2 that you saw upstairs should each increase by 1, forming the code 563.
Click the buttons that many times, and a red Cursing Book appears under another spotlight.
As you might expect, the book only contains two pieces of parchment with four symbols drawn on them.
But the book has the power to make the barrier of squares flash when clicked.
Summon
Use the clue from the windows in the dome to unlock the pillars around the circle downstairs.
Since the 1st and 4th windows are black, click the 1st and 4th pillars to turn them dark.
A royal-looking blue guy floats up from the depths, but it seems you can't understand anything he has to say. If only you had an amulet to translate ghostspeak…
Flip the stone slab over and open it up to find a beautiful pendant with a pink gem.
Now you can talk to the ghost, who tells you a list of symbols.
Dissolve
Use the clue that you just heard and the Cursing Book to release the huge monster.
The symbols appear in the 3rd, 1st, 4th, 2nd, 4th, 3rd positions. (So close to the other code, but different.)
So click the buttons on the seal accordingly. The monster is now free but not attacking for some reason, and a pedestal rises from the pit in front.
Ending 2
Save your game again, and now it's time for a fist fight against the monster! Click him to start the beatdown.
swipe!
"Aargh!
I was unable to leave…"
Powerup
Fit the cube into the square hole on the first screen, which makes the holes around it glow and connect with red lines.
Then place the gray octahedron in the middle of those lines. It's now orange and spinning rapidly, so pick it back up.
Ending 3
Click the pedestal to place the powerful octahedron there. Just as the wall says, the gem unleashes its power to banish the monster!
Walk through the now-cleared passage to end the game.
"I got out safely. And then…
found a glittering second ruin!"
For the next game, we suspect there are more endings, so feel free to put them below if you spot them! Because the walkthrough may not be complete, I'm translating a few more lines than normal.
Dora Escape
As the How To Play page explains, "Can you get the legendary treasure and become the king?"
(This time, hints (lists of items) are available below the game, and they're much more helpful.)
Exploration
(There are technically no pixel-hunts and thus no extra spoilers in this section, but some items are really well-hidden. You might want to try collecting all the items from the hint before you read.)
You begin in a small cave of hard rock, with the ceiling dripping cold water on you. On the left, you see a key ("What kind of key is this?") next to a circle connected to four holes on the wall. The right half of the wall contains a picture ("Is this a hint?") of some animal being hunted by people carrying a sword, shield, bow and fire/torch.
Turn right to face a flat wall with a stone piece on the ground. The wall itself has drawings of a dragon descending from the clouds and a man kneeling in front of a tombstone, as well as a slightly-hidden locked panel in between.
Turn right to face the doorway you entered from, which isn't well lit. Touching the fires on the wall makes them go out at the same time, briefly plunging the room into darkness. There's a small rock on the left you don't need, but also a stone piece in the doorway. You can also see bits of the drawing on the left wall and the rough parts on the right wall.
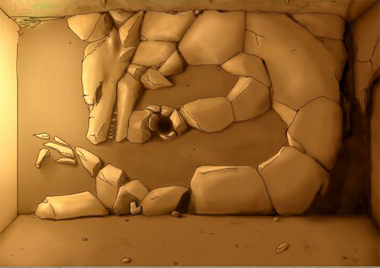
Turn right to face a scary dragon skeleton carved into the wall. It has a round hole in its hand/paw/claw, and its stare is frightening. Near its tail, you pick up a stone piece from the floor.
Now, let's read those stone pieces.
In the order of the hints list:
Top left corner: "The door opens with a yellow power."
T shape: "The dragon holds the power of fire."
Bottom left corner: "Don't touch the treasure!"
Unlock
Use the key to unlock the compartment in the wall, and get four orbs of different colors: three pretty blue, red and yellow orbs, and one dull black orb.
But wait just a moment…
Following the instructions on the stone piece, leave the red orb (fire) and don't pick it up.
(You don't miss anything this way because the red orb has no interactions. I'll mention this step again near the end.)
Bad Endings (Orb)
Save your game (with the button next to the logo), and then place the black orb into the dragon. The walls start shaking!
"It's dangerous! Get out, quickly!"
Failing to do so is a Game Over.
But leaving through the door is also a bad outcome — the entire ruin collapses behind you.
"You got out unscathed, but… the castle has collapsed."
Bad Endings (Treasure)
(If you still haven't saved your game, do so.)
Maybe you read the painting and noticed that blue is fire. So place the blue orb into the dragon instead, and after the walls shake a bit, water flows through the wall channels and raises a treasure chest from the ground.
Ignoring the warning on the stone piece, click the treasure.
Once again, the walls shake and you have to leave or stay, with the same bad results as before.
Power
Proceed by placing the yellow orb in the dragon. (You can do this after the blue orb, which just makes the treasure vanish without any further punishment.)
The door opens to the next room! Once you go through, there's no coming back.
Exploration 2
The solid rock becomes soft dirt, and a beautiful lake separates you from the tree opposite. Bright light shines from a hole in the cave ceiling onto something at the bottom of the tree, which reflects it right into your face. The game warns you against approaching the lake with any object, lest you drop it. Take the stone piece from the left.
Turn right to find some tree roots around a weird stone device with a horizontal handle in the middle of some circular scratches. Looking closely among the rocks, you find a stone piece where the archway meets the ground.
Turn right. This seemingly blank wall has a darker patch in the middle, and clicking it reveals an irregular-shaped hole. There's a boring rock on the right and a more interesting stone piece on the left.
Turn right to find what appears to be an ice door with a circle around it on the ground. There's also a rock too heavy to lift in front of it and some weeds growing down from the ceiling. Examine the arch closely to find a fourth stone piece slightly to the left of its top.
Let's read the stones.
Top right corner: "Light melts the ice."
T shape right: "Just having all the stones is useless."
T shape up: "Get the crystal."
T shape left: "Offer the water."
Melt
Turning the handle on the wall adjusts the reflector on the opposite platform. In particular, having it in the clockwise position makes the light reflect onto the ice door.
After a short wait, the ice crumbles away. Look inside to find a pedestal with a cup ("I wonder if this holds water?") on a groove. Tiny wording on the pedestal reminds you to offer water.
Offer
Use the cup in the lake and place it back on the pedestal. You can immediately pick the full cup back up.
A purple crystal has appeared on the tree opposite (which also makes sense if you consider that the cup has a crystal-shaped engraving on it).
Fit
Make sure you're ready to leave the room.
Place the full cup in the wall (an empty cup is "not enough"), and it slides upwards to put you in the next room.
Exploration 3
This temple has a polished marble floor and neatly carved stone arches above. In front of you, there's a statue of a goddess with four hands, "just a face", and a circular hole in her chest. The left panel covers some soft red fabric with a hole in it, while the right panel covers a stone panel with eight missing pieces. Looking at the walls around it, you get a horrible feeling.
Turn right. A large rectangular panel on the wall has a mysterious drawing on it, and it looks like the panel can move. It's surrounded by two small blue fires on the wall, which are painfully hot when touched.
Turn right. There are three identical locked doors here, although the middle one seems to have more space around it.
Turn right. There are more fires on the wall and a slightly cracked pedestal ("This doesn't look like it moves") with the last stone piece on it.
The last stone piece is the most cryptic:
"The dragon is a god. Evil takes the form of a goddess."
Bad Ending (key)
Save your game once more.
Use the key to unlock the left door, and leave (you need to confirm). Once you do so, the castle collapses.
Bad Ending (piece)
(Also save your game if you haven't already.)
Place the bottom right corner piece (that you just picked up) into the stone panel. This opens the right door.
Once you leave through that door, the castle collapses.
Quartet
You should have everything you need to activate the four hands of the goddess statue.
Hint: Read the rectangular panel again.
Place the crystal in the left panel. This lights up the hand in the top left in blue flames.
Place the black orb in the statue's chest. This lights up the top right hand.
Place the stone pieces into the right panel. After six of them, the bottom-right hand lights up, and after all eight the bottom-left hand lights up too. ("It's a pretty fire.")
Each flame lifts the middle door more, but it's too dangerous to leave until it's fully open.
The rectangular panel slides down to reveal the legendary golden mask. Unfortunately, this also leaves the middle door fully shut.
Good Ending 1
Save your game one last time.
Taking the mask opens up the middle door. Leave through it to end the game.
"You're now the king of this place! Congratulations!"
Good Ending 2
You need to have left the red orb behind for this to work.
Place the mask on the statue (this re-locks the door).
Don't look away, and the mask will slowly glow red for about 110 seconds, and then suddenly turn black.
Once you take the legendary black mask, you can leave through the door again.
"You're now the king of this place! Congratulations!"
confused on Dora
I filled the cup i the lake, placed it on the pedestal where i found it, but the pedestal never moved. doing something wrong?
No, nothing's wrong there.
Placing the full cup back doesn't change the pedestal, but it makes the crystal appear on the tree.
The part that slides up is the wall opposite the lake, and you have to click the center to reveal the hole in it first.
Update