
 Hi! It's time to travel to the past - the Retro Weekday Escape has arrived!
Weekday Escape starts slowly with simple Jan's Room's room, and after the successful escape you get trapped in another room of theirs. Well ballanced puzzles and eye-pleasing graphics guarantee good playability in both. Masa then locks you in botanical garden in tropical plants greenhouse. The gardener left in the middle of replanting succulents and the firm door slam shut behind him...and all you can find are small wooden blocks. What they are for isn't clear...will you figure out? The last pinkish, soft and fluffy game by Usawanhouse is truly relaxing.
Have a good time and enjoy!
The first game by Jan's Room is quite short - just for getting familiarized with the devs' style (or recalling it). You are locked in a small room dominated by interesting light installation which seems like a hint - but the color puzzle isn't that straightforward. Before those glowing orbs turn into a valid clue you need to solve other puzzles. Can you escape?
The cursor is not changing, no save button, one ending.
The second game by Jan's Room takes you to a pleasant and completely empty pub in Japanese style. You know what to expect already - good loooking game with puzzles which aren't hard but require some thinking as their solutions are never the simpliest ones. Don't give up too early - sometimes is the solution right in front of your eyes! And if you can't input any code it's because you don't have the clue yet...
The cursor is not changing, no save button, one ending.
Masa let you alone in a glasshouse without the key from exit door or any instructions. You need to find your way out by yourself. Texts and descriptions of items are in Japanese only but you don't need to understand - important is to find items and tools, figure out where and how to use them, and a bit of skillfulness. Click everywhere - the glasshouse isn't big, luckily - as some active locations aren't noticeable. If frustrated, mildly destructive behaviour is allowed. Later in the game you'll get a hammer.
The cursor is not changing, no save button, one ending.
If you feel a bit disturbed after exhausting escape from the botanical garden, now you may calm down. Relaxing and lovely Usawanhouse's game takes place in a peaceful kid's room (without any kid). Owner of the room is obviously very fond of bears and you can see them patiently and orderly waiting for their return. Almost all puzzles are bear themed. Can you escape before the ringing bedtime melody makes you fall asleep?
The cursor is not changing, save button, one ending.
P.S. Talking about bears...try Ninja Bear and Purple Teddy or Warbears for more excitement! And Warbears: Mission 2.
We love escape games, and our readers love talking about them and sharing hints! How about you? Let us know what you think, ask for clues, or help out other players in the comments below.


In Jan's Room, I had no idea that I had solved the first puzzle until I walked around the room and came back and could not bring up the puzzle again.
Escape from the Room with Big Clock
This game was actually made after the other one, and was intended to be the first of a "simple escape game" series, but apparently no sequels were made.
Take note that the game page has hints in Japanese (hidden text) near the bottom.
Exploration
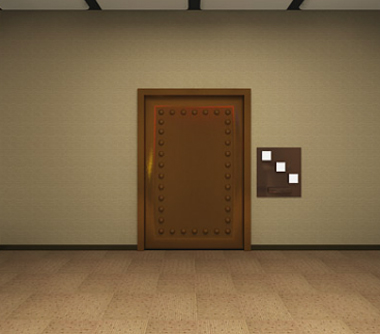
The entire game is played in a fancy wooden frame with "clock" written at the top.
On the first screen, you see a bronze door also with decorative dots (I really have no idea what the dots are called), and a panel beside with three colored square buttons arranged diagonally.
Turn left to face a large grandfather clock which has stopped. On the right, there's a wall panel with four golden circular arc buttons around a small red reset button.
Turn left. Three glowing colored balls are placed on poles of different heights.
Turn left to face three pictures with titles in both Japanese and English, as well as a pedestal with a briefcase on it, having a lock with buttons that cycle through different vehicles.
Travel
Author hint: "By association from the photos."
Use the clue from the framed photographs to unlock the briefcase underneath.
The vehicles that match the sea, road and sky are the boat, car and plane.
Click the buttons 3, 1, 2 times to enter those symbols and then unlock the case to find a folded note and a red plate (as the game calls it, but it's just a flat metal piece).
Divided
Author hint: "Pay attention to the dial on the big clock, and combine it with the hint on the memo."
Use the clues from the note and clock to unlock the four-button panel to the right of the clock.
The outside edge of the clock face has been divided into four quadrants, matching the design on the note and panel.
Since the letters on the note are the initials of Second, Minute, Hour, you find that the hands on the note point towards the
⌞⌟ ⌞⌟ ⌝ ⌞⌝ quadrants, so click the corresponding buttons on the panel.
You hear something shift (and the note vanishes from your inventory), which helps you find the hidden compartment beside the clock. At the back of that compartment, there's a round metal object with a hole in the middle.
Piece
Place the red plate in the back of the compartment, and you hear something shift again (with a rattling noise this time).
Looking at the glowing balls, you see that they're no longer neatly arranged.
Order
Use the clue from the colored balls to unlock the panel beside the door.
From highest to lowest, the balls are yellow, blue, red, so push the buttons 2, 1, 3 times, and then push the big button to open the door.
Click the open doorway to escape!
Escape from the Pub
As far as I can tell, the original hints seem to be out of order. To compound the confusion, it's possible to solve one of the puzzles with the wrong reasoning!
Exploration
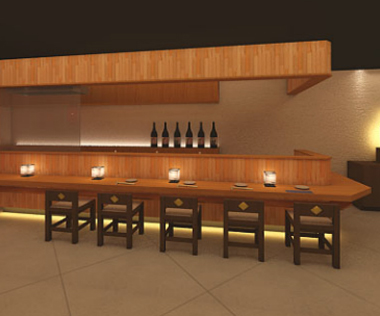
As you see immediately upon entering the game, the Japanese title of the game uses the term "Izakaya".
You start off facing a bar, and you can click twice to sit at the rightmost chair. This seat is special as the chopsticks are missing and the plate has some unusual symbols.
Turn left to face the sliding door which has a four-button lock (you can't use because the game tells you to "look for a clue"), three red lanterns and a four-letter box under it, and some poles against the back wall fastened by screws at each end.
Check the right side of the box to find an unusual clue.
Turn left to face an area with tatami mats. The back wall has some nice horizontal lights, and you can click the ceiling to look at the two rolled-up bamboo screens hanging there. The left table has a variety of cushions and a case of chopsticks, while the right one has more boring cushions and a folded note with lines and an arrow. On the right wall, you see a painting of a mountain, and you can take it off to find a hidden panel with a keyhole, and you can turn the painting over to find a four-symbol lock.
Turn left to face a display with four brightly lit bamboo plants and a wall panel with a grid of four symbol buttons (that you need a clue for). On the left, there's a metal device with a three-digit lock and three uneven wooden rods extending vertically up out of it.
Plank
(Hint: "The password matches something in the room.")
Use a clue from the tatami area to unlock the three-digit device to the left of the bamboo.
The back wall has lights covered with a total of 4 medium, 2 long and 7 short planks.
So enter 427 and push the button. The soft thud you hear is the cover of the device opening up to reveal a key.
Unlock
So use that key to unlock the compartment behind the painting. You find another folded note and a red button.
Push the red button, and (the game tells you) you hear a sound from behind. As it turns out, the bamboo screens in the ceiling have partially dropped but are currently stuck.
Anyway, don't forget to read that note.
After you view the clue on the front of the note, click it to turn it over and see another clue.
Symbolic
"4 button* password 2 (wooden box):
Hint 1 matches something in the game
Hint 2 is like on the memo
Hints 1 and 2 give the password."
(* The word 桁 usually translates as "digit" or "place (digit position)", but I guess in its other meaning of "column" it could figuratively apply to any combination lock.)
Use the clue on the side of the wooden box (beside the door) to unlock it.
Notice that hint 1 says "game" and not "room".
That's because the drawing on the side of the box represents the frame around the game screen, and the shaded region is just the word at the top: IZAKAYA.
Follow both clues on the matching note by removing the letter A (all of them) and then reading from right to left, and you get the password YKZI. Enter that in the box to open it and find yet another folded note, this one with a bamboo drawing, as well as a screwdriver.
Unscrew
Use the screwdriver on the rightmost pole to remove it.
Long
Use the pole to release the ceiling screens. Now you can read the clues on them.
(It's possible to partially retract the screens later, in which case the game will give you back the pole.)
Cross
"4 button password 1:
Hint 1 matches something in the room
Hint 2 is written on the ___ (as in the picture)
Hints 1 and 2 give the password."
Use the clues around the room to unlock the back of the painting.
The bamboo screens tell you to look at one of the tables, and in particular to view its cushions in a certain order.
The only table for which this makes sense is the left one, and the cushions in that order have repeating patterns of filled diamonds, filled circles, double circles and double squares.
Push the buttons on the back of the painting 1, 3, 0, 2 times, and push the big button. You should hear a click, and a small compartment opens up in the back of the painting so you can take a chopstick stand.
Replace
Combine the chopsticks and stand, then turn back to the bar and place them on the outlined spot.
Some symbols appear on the plate!
Corners
("Meaning of the plate pictures: they match something in the room.")
Use the clue from the plate to unlock the wall safe beside the bamboo.
Looking around for the items matching the pictures, you find 6 bottles, 5 chairs, 3 lanterns and 4 lamps (on the bar counter).
The new symbols on the plate tell you to put those numbers in descending order. The most numerous item is bottles, followed by chairs, lamps, lanterns.
So push the top-right, bottom-left, top-left, bottom-right buttons, then open the compartment to find a big red button.
Push the button and back up. The lights above the bamboo are now colored!
Palette
"Last door password: combine the memo/picture of __ with the color of the ___."
You can now use the lock beside the main door! Its four buttons change colors when clicked, so use the remaining clues in the room to find the code.
Paying attention to the leaves, you find that the bamboo stems shown in the picture appear below the yellow, blue, red, green lights.
Click the buttons 3, 1, 2, 4 times and push the big button to unlock the door.
Leave through the door to end the game!
(In addition to the "Escape success" curtains, the end screen also has a piece of paper that just says "Room4 releasing soon". Indeed, it released that month.)
A bit unrelated, but has anyone tried to replay the Kotorinosu games lately? For some reason when I try to play them, I just get a blank, black screen. Has anyone else encountered this issue before?
Stuck in Botanical Garden. Trowel; used I think. Paper with numbers; Cleaning cloth; used; One nail; Red octogon/jewel?; Four wood blocks; Rod, wire or string?
Bliznik, are you on Wondows 10? i had problems with some games not loading and asked that on here several games ago and it turns out if you go to the left side of the address bar at the top, you'll see a padlock icon. click that and at the bottom, you'll see a flash sectopn that allows you to get permission to load flash. set the permission to on for Adobe Fash and the games should start loading again.
@Bliznik: That's weird. I just tested it and got what you said (game black after Flash loader), then it suddenly worked again in the middle of troubleshooting. For Unity/WebGL the games simply doesn't load, which I suspect is due to the site not being available in HTTPS. I got those to load using the Wayback Machine, but it feels weird to have to do that.
kk, unity doesnlt load for Windows 8 on Internet Explorer. seems like there were a few games in here i had to skip when i was on IE because it required Unity. but it is compatible with Edge as IE is no longer supported starting with 10.
Oh wow, using wayback to trigger an https. That is NOT something I thought of! Thanks kktkkr!
@BillyT: "paper with numbers" is what you need to use next. Look for another clue that matches it.
(Walkthrough soon; I'm typing the last two games together.)
Botanical Gardens Escape
Are you scared of enclosed spaces? Paranoid of being suffocated at night by respiring plants? Don't panic, just look at all the green and relax.
Exploration
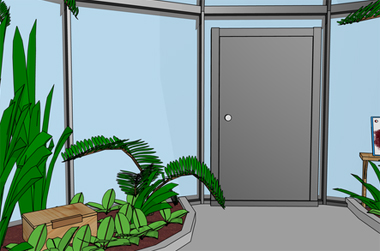
You start off facing a door that won't budge, and there's a wooden box on the left with its lid taped shut. You also see something on the right: a framed mirror (?) covered with some smudges, with a red dot left untouched in the top left. Clicking it, you find that the dot is actually a red magnet. Also lift the mirror (by clicking its lower left side) to find a wood block.
Turn right. Now you see a small hole in the ground with a nail in it, but your hand is too big to fit. On the right, you see a piece of cloth behind a tree. Click the tree to look up, and you see a nail in its trunk, high out of your reach.
Turn right to find what appears to be an empty pool/tub with a pipe leading to a patch of dirt on the left. That patch also seems to have turned light green in some places, though the game will tell you that it has dried up and hardened.
Turn right to face the other end of the pool and a shelf with some cactus pots on top. The left pot hides a wood block and a nail that has started to fall out. There's also a larger wooden flower box with a smaller cracked white pot half-buried in the soil. Lifting the wooden box, you see a needle underneath and notice that the box rests on four more wooden blocks. Speaking of which, there's one wood block to the right of the box.
Turn right. Among all the vegetation, you spot a metal box on the left with a grid of nine unlabeled buttons. There's also a shovel on the right.
The ground in the middle hides a pressure plate. Shortly after stepping on it, you feel hot and steamy.
(Check that you have three wood blocks.)
Clean
You can use the cloth on the painting, but the stains just refuse to come off.
But the humidity you experienced earlier caused condensation on the glass just behind the mirror.
So use the cloth to soak up the water, and then wipe up the stain to reveal a clue with a grid of squares.
Pattern
Use the clue from the mirror to unlock the nine-button safe.
Since the safe resets after you push four buttons, the correct code is represented by the four black squares:
--B

-B-

-BB
Push those buttons in any order to open the safe. You hear water flowing somewhere and you can pick up a large stopper.
Spill
The pool is now full with water and there's a wood block floating on it, but you can place the stopper in the drain to make the pool overflow.
The water doesn't go everywhere, but it flows through the pipe and onto the soil beside.
Soft
The water has softened the soil and also revealed a clue at the top right.
Use the shovel to dig into the soil and find a safe with a note on top. The note has a clock face with the wrong numbers on.
Digital
Use the clues near the safe to unlock it.
There's only space for four digits on the safe, which suggests that the four numbers next to it each correspond to one digit.
You can find digits on the clock face shown on the note, and the digits in the 1, 3, 12, 7 o'clock positions form the code 3024.
Enter that in the safe and open it to find a hammer. (The safe will not open again after you leave the screen, so make sure you take it!)
Hazard
Use the hammer to smash the cracked pot beneath the cacti, and you automatically pick up some sharp fragments.
Use those fragments to cut the tape off the box, then open it to find a crowbar.
Pry
Use the crowbar to pry off the loose nail under the left cactus pot.
Also use it to pry the 4 wood blocks with nails off the wooden planter box.
You should now have eight blocks, four with nails and four without.
Blank
Beneath the cacti, the spot beside the wooden box looks suspiciously empty.
So despite the game telling you there's nothing in particular there, use the shovel to dig up the soil and find another nail.
Attraction
The nail in the drain just needs a little pull, like the magnet can provide, but you can't get the magnet close enough with just your hand.
Attach the needle to the magnet to magnetize it.
Then use the (magnet and) needle to pick up the nail.
Enough
You have seven nails and eight blocks, so it seems like all you need is that last nail at the top of the tree.
Use the wooden blocks with nails on the tree. You only need four to climb up to the nail, and the game has some helpful text to give you:
Default/wrong item: "A tall tree."
Upper section default: "You can't reach any higher."
Top section default: "The very top is just a bit further."
Using the hammer on the bottom section: "What are you attaching with a hammer?"
Using the nail without having a hammer: "You can't knock it in by hand."
Using a nail: "Using just the nail as a foothold would bend it."
Using a normal block when you have nails: "Try inserting the nail before hammering the block to the tree."
Using a nailed block while the nail is still in: "You can't hammer because the nail is in the way."
With the game's guidance you manage to pull out the nail with the crowbar, combine the remaining four nails and blocks, attach them to the tree, and climb to the top.
Take the key hanging at the top of the tree, then climb down and use it on the door to end the game!
Escape from the Bears' Room
On the game page, Usawan talks about her love of bears and her struggle to make the teddy bears fluffy in the game. Really, they're so fluffy!
Exploration
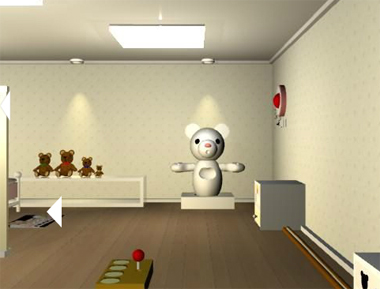
The starting screen is rather complicated, having two left arrows and one right. Check out the joystick device on the floor which has four bear-shaped symbol buttons, the white bear in the background with holes in several places, and the shelf of different-sized bears wearing different-colored bowties, and then the right wall which has an unusual puzzle with a three-digit lock under a red heart, as well as a small chest of drawers with only one drawer, having a four-letter lock and a picture of a jar of honey, and what looks like two pipes that extend from it to the bottom right.
Turn right. The other end is clamped and secured with screws and leads into an almost-identical chest of drawers which has four color buttons under a clue with bear silhouettes. There's another silhouette on the wall above of a bear celebrating something.
Turn right to find a locked door which has a keypad that's not enabled. Looking closer at the mousehole, you see a straight line leading out of it. This view also gets you a closer look at the plant pot so you can take the trumpet behind it. (It looks more like a party horn but makes a completely different sound when you examine and click it.)
Turn right to face a window you can't do anything with, and a table with a jar of honey painted on it. From here, you can click the shelves on the left to find a small three-digit box and a larger box with three bear-shaped holes. Also click the painting of the bear to find that it swivels off the wall and has a clue with shapes on the back. Back out and click to the right of the window to look at a dividing wall with labeled holes.
Click the left side of the table to find something unusual about its construction.
Turn right to return to the first view, then click the other left arrow to look at the bed. At the head of the bed there's a wall panel with a familiar arrangement of buttons and symbols, and you can also pull back the blanket to find a screwdriver. You can also look at the wall on the left, but there's nothing new there. There's something at the end of the shelves, so click the lamp to look closer — it's instructions for turning on the lamp!
Unscrew
Use the screwdriver to unclamp the pipes between the drawers, and then you find that they're actually connected rods… it's a screen you can unroll!
Holes
Looking at the wall with holes, you see that the side with the letters also has pegs protruding from the top corners.
So place the screen onto the wall to cover it. (This covers up the letters, but the game lets you pull the screen down to view that clue again.)
Over on the bed side, you see some digits through the holes.
So use that clue to unlock the wall panel over the bed.
The markings on the panel indicate that the buttons represent the holes as viewed from the table side of the wall.
The numbers viewed from the bed side increase in clockwise order from top left, thus their corresponding holes in increasing order run counterclockwise from top right.
Push the top-right, top middle, top-left, bottom-left, bottom-right buttons on the panel. After a short pause, the lamp turns on.
Backlit
Enter the code from the lamp (115) into the smaller box by the table, and open it to find a wooden bear piece.
Lettering
Use the clue from the table to unlock the left drawer.
The left side of the table spells KUMA upside-down, so enter that into the lock (you'll hear a chime) and open the drawer to find another bear piece.
(As you may have guessed, Kuma means Bear.)
Coloring
Use the clue from the shelf of bears to unlock the right drawer.
The largest bear on the shelf wears a red bowtie, the next largest wears green, then blue, then yellow.
So click the buttons 1, 5, 2, 3 times, then push OK and open the drawer to find a third bear piece.
Collection
Place all three bear pieces in the larger box beside the table. Now you can lift the lid to find a bell.
(You can examine the bell and ring it.)
Clocks
Use the clue next to the red heart (above the white bear) to solve its puzzle.
(Hint: pay attention to the colors to avoid mistakes.)
The first row that shows analog clocks at 2 and 3 o'clock suggests that the number 60 is just the interval between the times in minutes.
Applying that logic, you find that the second row (12:00→4:00) is an interval of 240 minutes, and the third row (1:00→2:50) is an interval of 110 minutes.
The final code is the sum of those two numbers: 240+110=350. Enter that in the lock and click the heart to take it.
Faces
Use the clue from the back of the painting to operate the controller on the floor.
Each face on the controller has parts that can be assembled to form a shape from the clue. This is most obvious with the third face where two circular quadrant eyes and one semicircular mouth can combine into a full circle.
Similarly:
The first face forms a triangle: flip the mouth vertically, place it under the nose and move the eyes into the nostrils.
The second face forms a four-pointed star: the nose and eyes all fit in the same shape as the mouth, and then you can flip the mouth vertically to form the bottom half of the star.
The fourth face forms a five-pointed star: the eyes fit in the mouth and the eyebrows fit (after flipping/rotating) below it.
Since the circle, five-pointed star, four-pointed star, triangle from the painting clue match the third, fourth, second, first faces available on the buttons, you need to click the buttons (from top to bottom) 2, 3, 1, 0 times.
Flip the joystick to summon a toy train from the mousehole. It drops off a toy which rolls away, and then goes back.
Pick up the green maraca beside the table. (You can play it too.)
Party
Use the clue from the wall silhouette to cheer up the white bear.
The game will only let you place the bell, maracas, horn and heart on the bear in the correct spots, as indicated on the picture. Do so, and then push the heart.
You see and hear the keypad activate, and then the bear does a cheer. Use that clue to unlock the door.
You can repeat the cheer by pushing the heart again. For the musically inclined, it may be easier to solve this puzzle with your eyes closed.
Since the bear does a total of 5 horn toots, 3 bell rings and 6 maraca shakes, enter 536 in the keypad and push Enter to unlock the door.
Finally, click the door to end the game!
For the Garden game, I've got a possible correction to the walkthrough
I couldn't dig up anything near the cactus shelf
and didn't need to do that to finish.
You must have done it without noticing because
You need all of the nails to finish all 8 rungs before you can reach the key
Update