
 Hello! The second Weekday Escape Retro is here, bringing fun and relaxation! For some players, memories too...
And if you don´t get enough, there is always the JIG archive, where you can find much more!
The first game is from Hottategoya and you are escaping from one of their brutal concrete constructions, followed by escape from Nekonote (suprisingly without any dwarfs or chickens). The last game is by Leonard 2:50, and it´s a long one, and definitely not easy!
Have a good time and enjoy!
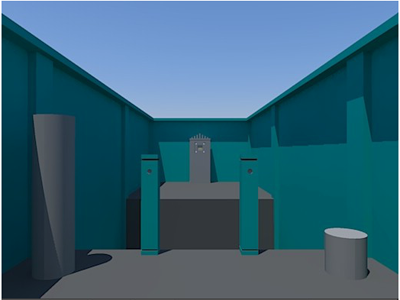
Hottategoya´s Blue Temple is a magic place in Ancient Greece style. The setting is minimalist, with nice and clean gameplay and only four items to be found. No music, no changing cursor, only you, surrounded by beatiful architecture, and puzzles in lazy sunny day uder the blue sky.
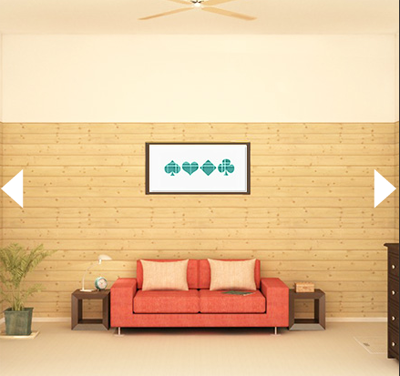
The game from Nekonote (available also for Android ) differs from their usual gamestyle. No return to childhood this time, the room you have to find your way out is a regular escape room with a couch, a pot plant and a chest of drawers. No surprise. "Only" very good variation on a theme of escaping with few interesting twists.
The cursor is changing, save button.

This game reminds a lot of Gatamari, both art and puzzles style. Also, strange devices everywhere. Solutions require out of the box thinking....and not only once, though puzzles are not extra difficult, just different. There is not lack of clues, more important is to find how and where to use them and good observation certainly helps! Can you escape?
The cursor is changing, save button, two endings.
We love escape games, and our readers love talking about them and sharing hints! How about you? Let us know what you think, ask for clues, or help out other players in the comments below.


Escape from the Blue Temple
Leaving your electronics exposed to the elements? That's a bold architectural move.
Exploration: Starting area
You start out facing a bunch of pillars and a chasm. There are two plain white pillars, one very tall and one very short, and there are two blue pillars in between them, with a hexagonal and octagonal hole respectively.
Turn left. There's a locked door, and a not-so-tall pillar to its left. Turn left again to find another locked door, and a not-so-short pillar to its left. Zoom in on that pillar, which has eight buttons in a row and a display below that with the number 0. Clicking on the buttons to toggle them up and down changes the number on the display, from 0 all the way up to 255.
Turn left again. There's an entryway to the next room.
Exploration: Room with paths
There's a bunch of paths drawn on the walls, with an arrow at the top of each wall. Zoom in on the pedestal in front, which has a grid of 16 buttons to be pressed in the correct order.
Turn right from the pedestal and look at the floor right under the arrow. There's a silver key in a hole. Turn right again and look through the door to find a yellow crescent painted on the floor.
Hmm... each of these paths could be a solution, but perhaps one of them is different enough to be obviously the solution.
Grid puzzle
Look around the room. One of the grids is an odd one out.
The grid immediately to the left of the door has an arrowhead on the right side. So put that in the pedestal.
01 02 03 0408 07 06 05
09 12 13 16
10 11 14 15
The pedestal opens up and you can take an octagonal blue gem.
Leave the room, unlock the door directly opposite (with handle on the left), and go through.
Exploration: Room with lines
This room has lines on the walls, and a pedestal in front with a keypad. Despite how the keypad looks, you can only enter a three-digit code. The line on the right wall is slightly different, having a series of kinks in the middle of the line.
Number puzzle
Convert the stairsteps in the line to a sequence of ups and downs, then use that to unlock the keypad.
From left to right, the line goes down, up, down, up, down, down, up, up.
What else is down or up?
The eight buttons on the pillar outside can be toggled down or up.
If you do that (or if you just convert 10101100 to binary), you get 172 from the display, which is the code for the keypad.
The pedestal opens up, and you can take a hexagonal red gem.
Bridging
Use the red and blue gems on the slots in the blue pillars. A bridge extends, and you can walk across.
Exploration: The other side
Straight ahead, there's a metal box. A panel on the front shows a yellow crescent surrounded by four buttons, one on each corner. The box also has a row of seven small cylindrical columns sticking out of the top, getting taller and shorter to form a triangle shape.
There's nothing on either the left or right wall, but as you turn around you notice (once again) the yellow crescent painted in the middle of the four pillars across the bridge.
Four buttons
Mentally rotate the scene so that the crescent is facing left. Which pillar is shortest? Tallest?
The upper-right pillar is shortest and each pillar is slightly longer as you go clockwise.
So press the buttons in the order UR LR LL UL LL LR UR, or
⌝⌟ ⌞⌜⌞⌟⌝.The box opens up. Take the gold key.
Escape
Turn around, cross the bridge and use the key to open the door directly opposite. Congratulations!
cool on the walkthrough. Can't wait for the other 2
i think you used the wrong image for mystery room escape!
GG Krizpy, it was to see if People have enough attention :)
It's fixed now!
Really amazing game by Nekonote. Some really unusual puzzles and surprises in here. Very tough but never frustrating. Everything was logical and realistic but there is still an element of magic to this room. I missed this game when it came out and am so glad to have played it now.
I noticed there was no walkthrough or hints so I thought I would write it up. Good excuse to replay the game too!
LOCKED ROOM 2 INVISICLUES
Notice that inventory items in this game DISAPPEAR when you no longer need them. Therefore, if it is still in your inventory, you can still find a use for it! Most objects can be used more than once. So keep experimenting even after you get stuck.
You can start out by looking at everything in the room, of course. You need something to put in the holes in the pole; the three shelves are full of clues and screws; You'll need combinations for the chest of drawers, keys for doors and floors.
FOUR COLOR DRAWER
Find the four colors (red, yellow, blue, green) on a set of objects in the room.
The ducks on the shelf have the colors and vary in size. Find the key to the size order.
The picture on the top shelf shows the order of the ducks.
Solution to four color drawer:
BRYG. Click the drawer to open it. You receive an A tile.
UNDER THE COUCH
It's too dark to see, so you need a light source.
You need to find the matches.
They are in the three digit drawer.
You will receive a K tile when you use the matches under the couch.
THREE DIGIT DRAWER
Carefully examine the top shelf on the wall of shelves.
You will discover a pencil behind the birdhouse.
Examine the book on the couch.
The second page has three shapes. Maybe you've seen them in the room before.
The last page has been torn out, but the numbers were written with a pencil.
Solution to torn notebook page:
Use your pencil to make a rubbing of the impression on the page beneath.
You receive a set of digits. The digits ought to remind you of something.
They appear to be a time. Go take a look at the clock.
Notice the shape of the hands.
Rotate the hands in your mind to the time indicated in the notebook.
Match each hand shape to the number on the clock face.
Now put the numbers in the order indicated in the notebook (TRI-CIR-SQU)
Solution to three digit drawer:
961 You will receive a box of matches.
Hey while you're down here, notice the lines on the floor? Looks like two trapdoors, one gold and one silver.
SILVER TRAPDOOR
You have probably read the origami book by now and learned how to make a paper airplane.
You must find a piece of paper.
It is behind the couch cushion. Now you can fold it up into a plane.
Try throwing it everywhere in the room.
You can throw it up into the hole in the ceiling. It knocks down a key!
Now go look for that key. It's on the floor somewhere.
Look behind everything.
It's behind the pole.
You get some wood! It's tied up though.
I STILL HAVE A PENCIL
That means you can still use it. Either you didn't open the three-digit drawer yet, or...
You need to find somewhere to put your pencil.
Look for things pencil-sized.
It's a tiny hole.
Next to the lamp on the endtable. Now look in the table. You get a Q.
LOCATIONS OF TILES
On bookshelf, behind a plant, next to origami book.
Under the couch.
In the four color drawer.
Inside the endtable with the lamp.
FOUR TILE BOX
Now you should have all four tiles. If not, see above.
What does it spell? JAKQ? QAJK? JQKA?
That last one looks familiar.
They must stand for playing cards. Jack Queen King Ace. Now find the order.
They must go in the order of the suits in the picture. Now you must deduce which card matches which suit.
Oh yeah, there was that piece of paper in the chest of drawers with two equations on it. It said: D+H=S ; C-S=D. Or you could say, C-(D+H)=D
Fortunately, you have one of the values already. It's hidden in the room somewhere.
On the bookshelf there is a picture showing that Diamond=1. So put that value in your equation and the rest comes out.
Aces are low it seems. Obviously C must be the highest value, so it must be the King (13.) That makes the Spade the Queen (12) and the Heart the Jack (11.)
Now just put them in the order in the picture: S H D C
Solution to four tile box:
Q J A K
THE SCREWDRIVER
If you have your nippers handy
Open up your bundle of wood and use it to climb the pole. Lighting the candle should reveal a key and a lightswitch.
Looking around the room reveals a drawer, a weird contraption on the floor, and a rain barrel. There are also some little marks on the wall.
You can open the drawer enough to read the note inside. There's also a drawing on the top. Related?
If you look closely at the drawer knob, it is the elusive screwdriver. You can turn the knob right and left.
Going in the order indicated in the drawing (W or Cassiopoea shape) we see "gree let tell right leg" and at the bottom -8.
There are two ways to approach this. Since you want a Left Right code, just look for the letters r or l in the words. Or you can remove the letteris "e i g h t" from all of the words.
Solution to R/L Drawer:
Either way, you get: R L L L R L and finally a screwdriver.
Now go about the room looking for things to unscrew. You've probably already seen a few places.
One is in the attic.
You can unscrew the top of the contraption on the floor.
The other two places to use the driver are in the main room
Remember the birdhouse? Unscrew it to get a cup.
The other is near the couch, accessible yet concealed.
Check the tile box. Notice the top of the box shows a mirror image of the interior. Unscrew the top of the box to get the mirror.
THE CONTRAPTION
To solve this puzzle you must already have the driver.
You have probably already opened the front door with your key. But the door does not open all the way.
You need to see what is beyond the door somehow. (If you still have the screwdriver in your inventory, you may not have the necessary item yet.)
Use the mirror to see what is outside the door. Get the magnet.
You need to find a place to stick your magnet. Somewhere magnet shaped.
The strange marks on the wall behind the drawer in the attic are shaped like the end of the magnet. Stick the magnet on it and use it to open a hatch in the wall. Get the hammer.
Find something to smash.
Since you need water, smash the rainbarrel. Use your cup to get the water.
If you need to find a place to use your water
Check the main room.
Pour it in the plant to get the marble.
Now you can use the marble in the contraption to get the gold key.
ESCAPE!
Use the gold key (from the contraption) on the gold trapdoor (next to the chest of drawers) to escape!
Many thanks to andr01d and kktkkr for providing awesome walkthroughs!
I just happened to finish up my walkthrough, so I might as well post. It's much less hint-y though.
Locked Room 2
Yes, it's a locked room... but how many locks are there?
Exploration
You start off facing a locked red door, with a plant pot to the right. There's a ladder to the left missing all its rungs, with something glimmering right at the top, and you can zoom in on the ground next to the ladder to check that there's nothing there.
Turn left. The upper shelf on this screen has a red birdhouse screwed to the shelf with a pencil hidden behind it, as well as two framed pictures, one with four different-sized squares and one with the number 1 in a diamond. The lower shelf below that has four different-sized bird cutouts sitting on different-colored bases. (The bases are proportionately sized, which is a nice touch.)
Under both shelves, there is a display case, and in it there's a round plant pot with something sticking out of it. It's a letter J tile. There's also a book on origami, which has a bookmark on the page teaching you to fold a paper plane.
Turn left. There's a chest of drawers here. The top one is locked and takes a four-color code, and the second one is unlocked and empty. The third one is unlocked and contains a folded note telling you that Diamond + Heart = Spade and Club - Spade = Diamond, whatever that means. The bottom drawer is locked and needs a three-digit code.
On both sides of this chest of drawers, there are hidden trapdoors in the floor. The one on the left has a silver lock and the one on the right has a golden lock.
Turn left. Above the sofa, there's a picture with a spade, heart, diamond and club, all in teal plaid on a white background. The sofa itself has a book on it with three pages. The first page has a squiggle on it, the second has a solid black triangle, circle and square in the middle, and the third page has a numeric code saying 1 3 ` and the rest of the page is torn out.
Check the cushions. Under the left cushion, there's a blank piece of paper, but somehow you can tell by feeling it that it's a perfect square. Check under the sofa for a... it's pitch black down there, you're going to need to come back with some lighting.
To the right of the sofa, there's a locked box on a side table, missing all four of its buttons, except for the long rectangular button of course. To the left of the sofa, there's a similar side table. On it, there's an alarm clock with a glowing blue square, circle and triangle on its hour, minute and second hands. It's next to the base of a lamp, which is next to a hole in the tabletop. You can also look under the stand, but there's nothing there.
It's a hole
Use the pencil on the hole in the side table, and then check below. A Q tile has dropped out.
Shady
Use the pencil on the last page of the book, shading onto the page behind it. The rest of the digits appear, forming a code:
13:30:45.A matter of time
Use the codes from the book with the design of the clock to unlock the bottom drawer.
Triangle Square Circle = Second Minute Hour
For the time 13:30:45, those hands will point at (or rather, clockwise from) 9, 6, and 1.
Enter 961 into the drawer, and open it to get a box of matches.
Size issues
Use the clue from the center picture frame on the upper shelf with the cutouts on the lower shelf to unlock the top drawer.
Arranging the cutouts in order of size:
1, 4, 3, 2 = Blue, Red, Yellow, Green
Enter the code (3, 0, 1, 2) clicks and take the A tile from inside.
Light up
Look under the sofa and use the matches. Take the K tile hidden in the back.
Four tiles
Use the tiles on the box to the right of the sofa, in the order given by the clues with card suits on them.
Hint: For the picture cards Jack, Queen, King, Ace, the Ace usually has a value of 1.
Diamond = 1
Diamond + Heart = Spade and Club - Spade = Diamond mean that Heart, Spade, Club are in increasing order, and so they are J, Q, K respectively.
Spade Heart Diamond Club = Q J A K.
Place the tiles accordingly, and press the button to open the box. There's a pair of pliers in the box, reflected in a mirror attached to the top, which is also attached to the bottom of the box by two pairs of screws.
Upwards
Examine the piece of paper from the left sofa cushion. Since you've read the origami book, you're able to expertly fold it into a paper plane just by clicking it thrice.
Use the paper plane on the top of the ladder, dropping a silver key onto the ground below. Take the key.
Trapdoor Number 1
Use the key to open the trapdoor to the left of the drawers and take a bundle of sticks, tied together with wire.
Snip
Use the pliers on the sticks to untie them...
... and use the sticks on the ladder to form rungs. Climb up the completed ladder.
Darkness
At the top of the ladder, it's too dark to move around, but just bright enough that you can see a candle stand in the left corner behind the ladder. Light the candle with your matches, and it throws some light on a square key behind it.
Back out, and you'll find that the room is still dark.
But now it's just bright enough that you can also see a light switch next to the candle. Turn the lights on, and you can now move and look around the room.
Exploration: Upstairs
Start by turning to the right. Ignore the clutter and look at the small desk in the middle of the room. Instead of a locked drawer, it has a half-open drawer, probably stuck. There's a jagged arrow drawn in chalk on the top, and a note in the drawer with five "words":
gree, tell, legon the top row andlet, righton the bottom row, and the number-8below that. The handle of the drawer extends way too far through the wood, and you can see that it ends in a screwdriver head. Zooming in on the front shows that it can be turned left and right in 45-degree intervals.The back pillar has two metal contacts on it, which is surprising for a pillar otherwise completely made out of wood.
Turn right. There's a white object on the left, which turns out to be a decorated box with screws on the top. In the simplistic diorama on the bottom, the door of the house opens into the box, but you can't do anything with that yet. Opposite from the box, there's a large barrel connected to the wall. You can tap on the top surface, but you'll need special tools to get through to whatever's inside.
Non-words
Use the clues on and within the desk to unlock the drawer handle.
Remove the letters eight from the "words", leaving only L and R. Reading them in that zigzag order, they form the sequence RLLLRL.
So turn the handle right, left, left, left, right and left, and it loosens from the table and you can take the screwdriver.
Unscrew
Unscrew the top of the white box, revealing a series of wooden slopes with holes cut out for a ball to roll through.
Unscrew the birdhouse from the top shelf downstairs. There's an empty glass inside which you can pick up.
Unscrew the top of the box to the right of the sofa, and you can take it to use as a mirror.
Unlock
Use the square key to open the main door, and you're o...nly half way out the door, because it's jammed.
Reach
Poke the mirror out of the gap of the main door, and you can see a horseshoe magnet reflected in it. Click the reflection to take the magnet.
Hidden
Use the magnet on the pillar upstairs. The magnet attaches to the pillar and forms a handle which pulls down to open a hidden compartment. Take the hammer from inside.
Smash and grab
Use the hammer on the barrel, and fill your cup with plain water.
Grow
Pour the water on the potted plant next to the main door. It doesn't instantly grow, but some of the water flows out of the bottom, taking a blue marble with it.
Roll
Use the marble on the slopes of the white box. After a bit of stop-motion rolling, a gold key falls out of the bottom.
Breakout
Use the gold key on the trapdoor to the right of the drawers. It opens up into a ladder, which you can climb down to escape!
i just now finished Locked Room 2 KK as someone already wrote a walkthrough on here. I admit I got confused a few times but I did figure it out. can't wait for the Mystery Room Escape walkthrough :)
walkthrough ready yet on the last one?
There's no way I could proofread this completely, so do tell me if I made any typos.
mystery_room
I hope whatever sequence of events brought you here also gave you superhuman memory, or at least some pen and paper to work with. You're going to need it multiple times!
A note on sound effects:
This game has a clicky sound effect for "nothing happens", which basically means you're clicking on the wrong part of the puzzle. You can safely ignore this particular sound and focus on the buttons that make more interesting sounds.
Exploration
You start out facing a TV in the wall. Well, it isn't quite a TV, but it has a screen and a big button, which opens and closes a compartment under the button. To the left of it is a sign with instructions on how to use it to activate capsules. To the right is another sign with green squares marked out of a 4x4 grid. In addition to the usual triangular indentations on the sides of its outline, this blue sign also has an extra indentation in the top-left. Everything in here seems to be signed by some GORWP guy with a liking for corner arrows, so I'm going to skip describing that every time.
In the left and right corner, there are devices overhead that seem like they are supposed to display four of something vertically, but they're powered off.
Turn left. In between the two faintly flickering lamps, there's a locked door. The panel to the right of the locked door is powered off, The panel to the left has three holes, three buttons, and a display showing the word CLOSE. The holes are in the shape of a four-pointed star, pentagon, and some sort of squarish diamond with triangles poking out, which I'm going to call a pointy house shape.
Turn left. There's a chest of drawers on the left and a bunch of paintings on the wall which are obviously not paintings. Start with the drawers. The top drawer is locked and the middle drawer is stuck, which leaves the bottom drawer. Open it and take the capsule, revealing a phoenix outline etched on the bottom of the drawer.
The left painting is of a dashed red arrow weaving in between bunch of green lights. The frame has blue dots around the outside, and the left one is highlighted in yellow. The next painting is of a rainbow, but it has six colors almost all of which are wrong. Along the bottom end of the rainbow, there's a diamond at the edge of each stripe. There's also a button at the top, and groups of dice faces on the corners of the frame, which make the frame move when pressed.
The painting to the right and up is of a red arrow starting from a red star and taking an angular path around the canvas. The frame has flowery edges and corners, with red dots at each. Those edges and corners can be clicked to make the painting jerk in those directions. The painting under that has a grid of yellow and black squares, with red arrows running to the right across the top and to the left across the bottom.
Turn left. There's a noticeboard with two more clues posted, a grid of six green squares with roman numerals I to VI in yellow, and an annoyingly nonconvex solid made of truncated square prisms, with a red arrow at the bottom and faces facing the arrow colored. (It's so complicated I can't words!) This note also has a triangular indentation on the bottom right of its blue outline, but right instead of isosceles.
There's also another of those four-thing displays, which is also off, but it's connected to a meter labeled Energie. The energy meter fluctuates all over the place, but it's nowhere near the line marked in yellow.
Drawer capsule
Put the capsule in the activator machine, and close it up again with the button. The numbers 1234231243 appear on the screen, followed by a picture of a red button.
Now where did you see that red button?
Go back to the painting with the rainbow, and click the corners in order given by the clue.
1234 = UL UR LL LR
1234 = UL UR LL LR UR LR UL UR LR LL
So click the ⌜⌝ ⌞⌟⌝⌟ ⌜⌝⌟ ⌞ buttons.
After pressing the red button, the painting slides back up into the frame. Inside, there's another capsule, and a flat blocky piece, gold on one side and silver on the other, with protruding square columns on each side, one of which is red, and a triangular protrusion .
Behind all of that, there's a panel with two green buttons divided by a red line, and a red button above that that lets you put the painting back.
Follow the line
Use the clue from the left painting to unlock the panel with green buttons.
Hint: The first button is Right.
If you imagine walking along each of the dashes on the red line, the dashes have green lights on the RLLRRRLLR sides. (The inside is the "left" side.)
Press the RLLRRRLLR buttons. The panel unlocks, and you can open it up to get an orange pointed house piece.
Painting capsule
Go back to the activator machine, which now displays a CLEAR over the previous clue. Open the compartment, and the capsule has opened up to show the green insides. Take the green capsule, then put the capsule from the painting in its place.
After closing the compartment, the screen displays another clue: a red star in the middle of eight squares. The squares have flowery lines and red dots, which are easily recognizable as parts of the frame of the top right painting.
Use the arrow clue on that painting to figure out the order to click those parts of the frame.
The arrow passes through the following squares:
5431/6
287
which are the following parts of the frame:
7256 8
143
So click the SW N SE S NE W NW E edges of the frame, which slides up so you can take a robot behind it. Upon examining the robot, you find that its head has a gold key sticking out of it.
Unlock!
Use the gold key to unlock the top drawer, which has an already-open orange capsule and a blue four-pointed star piece.
Unlock too!
Use the blue and brown pieces on the holes next to the door. Now we just need a pentagonal piece. Or maybe not...
Use the robot on the middle pentagonal hole. He unlocks the door for you, and is now stuck there forever.
Open the door and go through to the next room.
Exploration 2: A whole new room
Despite appearances, there is really nothing interesting on the floor of this room. So look at the wall ahead, which has a sign on an almost-invisible door telling you to push a button to charge the Energie meter. To the left of the sign, there's a safe with a row of five buttons that toggle between yellow and black when pressed. To the right, a safe marked RAINBOW needs a sequence of seven colors to open. Of course, it doesn't have your usual rainbow colors available.
There's also a portal in the ceiling and another four-thing display in the upper-right, none of which you can use yet.
Turn right this time. There's another hidden door on the left which you can't open yet. Next to it, there's a pentagonal pedestal with five holes in the top around a central pentagonal grey thing with a corner colored white. It's marked GORWP as usual, but the arrow on this one extends beyond the left edge, wraps clockwise around the pedestal, and comes back on the right side. On the front of the pedestal, a rectangular panel has four sets of buttons, one on each corner, and it looks like the center opens up. Next to the pedestal, there's another four-thing display.
Turn right, and there's another- you get the point. Above the doorframe, there's instructions to SET the gold side of the blocky piece against a grid of squares. To the right of the doorframe, there's another clue: blue diamond, green square, yellow diamond. The upper-right corner of the green outline has a triangular indentation.
Turn right, and there's a clock in the room. It's accurate to the second, as you can see from the close-up display. The door of the clock refuses to open, but you can see an object and a button behind it. To the left of it, there's a safe with a 4 by 4 grid of square buttons. They cycle through a bunch of colors when pressed, except for three buttons which are missing and replaced by question marks, each rotated to the right. The safe also has a confirm button which has a corner arrow pointing down and then left. To the right of the clock, there's a grid of symbols, each consisting of three rectangles of various sizes, over a background with a phoenix outline. Only 10 of the symbols are present.
Lights
Use the clue from the lower-right painting from the wall in the first room to unlock the safe with five yellow buttons.
Hint: right then left, top to bottom.
Press the buttons to match each column from left to right, and then press buttons to reverse the sequence.
Press the 1325125 buttons, and then the same in reverse: 5215231. If you mess up the sequence, make sure to press the CLEAR button before retrying.
The wall panel with charging instructions flips around, and there's now a ladder in its place.
Climb up the ladder and examine the trapdoor, and there's one of those 3-by-3 square grids from that doorframe memo. To make it easier to control, there's a top-down view of the buttons.
Trapdoor
Copy the pattern of column heights from the blocky piece to the grid of squares, making sure that the red and triangular parts match.
Hint: on this screen, gold should face down.
The buttons need to be up or down (uppercase means twice):
DUDdue
uDd
which, by number of clicks, is
323410
134
3s and 4s are the gold (bottom) side, and 1s and 2s are the silver (top) side.
Once you hear a click, you can use the piece on the grid to unlock the trapdoor.
Behind the trapdoor is a single red button, which you can press to charge the Energie meter. Once it's charged, each of the four-thing displays lights up in yellow on green, showing a portion of a seven-segment display.
(Don't rush to solve this new puzzle, because it's intended to be done later.)
Projection
Refer to the diagram of the weird-shaped solid to figure out the colors of buttons in the 4x4 grid.
Hint: what and where would the question marks be?
The squares in the grid correspond to the colored faces on the solid, if you view the solid in the direction of the arrow. (The dark olive-colored faces are supposed to be black.)
The question marks are the hidden faces of the solid, one of which is the lower-left corner on the diagram and the upper-left corner on the grid. So...
The arrow in the diagram points right on the grid, and the colors are
(Red Yellow Blue Orange Green Pink Black White)?? Re Gr Bk
Or Ye ?? Or
?? Bk Wh Wh
Bk Re Pi Bl
So click the buttons
X 0 4 6times,3 1 X 3
X 6 7 7
6 0 5 2
and then press the button on the side.
All the golden parts of the panel fall off! Pick up the golden grille from the floor. Examine it, and there's a red arrow suggesting that you turn it over to look at the numbers on the back.
Overlay
After you've flipped the golden grille, use it on the panel on the right of the same screen, placing a number on each of the symbols.
Now, where have we seen that phoenix outline?
Use the numbered symbols to unlock the middle drawer in the first room.
Pull and push each drawer to match the symbols numbered 0-9, with 0 representing all three closed and 9 representing only the middle drawer open.
So click the Top, Bottom, Bottom, Top, Bottom, Top, Top, Bottom drawers, and then click the middle drawer to open it. Take the capsule from the drawer.
Drawer capsule 2
Go back to the activator, then open the compartment and take the white capsule from long long ago, and place the second drawer capsule in its place.
After closing the compartment, some red numbers appear on the screen, with a familiar outline above the number 30 and a red vertical pointer pointing... somewhere.
The pointer is a second hand, and tells you when the clock door is unlocked.
Go back to the clock, and click on the door at the time indicated by the hand (the time shown is randomized). For instance, if the hand points at 45, click the door at 45 seconds after the minute.
As far as I can tell, you just have to be accurate to the second, so go ahead and click once every second or as much as you want until it opens.
Take the yellow folded note from inside, and press the red button to unlock the buttons on the front of the pedestal. In between each pair of buttons, a letter shows up.
Unfold the note, which has an arrow pointing to the lower-left corner, where the outline doesn't have a triangular indentation. The shape is different. Is that... is that an M?
Letters
Put together the clues from the note outlines to get a letter for each corner of the pedestal front panel.
Solid note: N, lower-right
Green grid note: V, upper-left
Diamond note: Z, upper-right
Clock note: M, lower-left
Adjust the letters on the front to read
V ZM N
and then the center opens up for you to take a capsule.
Pedestal capsule
Go back to the activator machine, swap your new capsule in for the old purple capsule, and close the compartment.
A plan of both rooms appears, with roman numerals marked from I to VI.
What does each roman numeral represent? How are they arranged? Where does the answer go? And how does it go?
Each roman numeral corresponds to one of those four-thing displays, which as you recall now shows one-sixth of a seven-segment display.
Piecing all the bottom pieces together in order, you get the digit 9. Do this for all the pieces, and you get 1209 from top to bottom.
Use the clue next to the activator machine (with four green squares on a grid to convert this vertically arranged code to a horizontal one.
1111
2222
0000
9999
From left to right: the highlighted digits are 9201.
Shut the door to the second room, and put 9201 in the lock behind the door.
After pressing the red button, the digits are replaced with "OK". Go back to the activator and take the red capsule.
Capsule madness
Place the capsules in the holes of the pedestal top according to the hint written there.
The hint is GORWP with an arrow going left and then clockwise around the pedestal.
So place your pedestals in PWROG order from the lower left:
___ Red (4) ___White (5) / Orange(2)
Purple(3) Green(1)
Once they're placed correctly, a pentagonal frustrum rises from the center and can now be turned. It has a white triangle painted on top pointing to the lower right, between yellow and blue faces, and clicking on it makes it rotate counterclockwise so that the yellow face becomes blue, red, white, pink and yellow again.
Spectrum
It's clear that the rainbow painting (you can close it back up now) is a clue for the RAINBOW safe. But the six colors on the painting don't match the colors on the safe, and we need seven of those colors.
Perhaps there's another clue involved.
The note to the right of the doorframe tells you that diamond colors blend. The colors of the rainbow are blended from the colors of the seven diamonds, which would be the code for the safe.
How do you get gray, pink, purple, green, orange, purple from red, white, blue, yellow, black?
Gray = Black + White
Pink = White + Red
Purple = Red + Blue
Green = Blue + Yellow
Orange = Yellow + Red
Purple = Red + Blue
Enter Black White Red Blue Yellow Red Blue in the safe (4, 1, 0, 2, 3, 0, 2 clicks from red). A door opens up next to the pedestal.
There's not much to explore in this new room, just a rusty exit door and another pedestal with a lock on it, an upward pointing triangle centered above a slightly bent rectangle. There's a circular button in the triangle and five of them in the rectangle, long with some triangular decorative outlines. The five circular buttons cycle from yellow through blue, white, red, pink when pressed.
Orangey
You're probably going to need another clue to solve this final puzzle, but you seem to be out of extra clues. It's time to backtrack.
Go back to the pentagonal pedestal, where the orange capsule is faintly glowing. Yank it out and put it in the activator.
The screen now shows some dark gray shapes: circles among a triangular decorative outline. There's a white triangle pointing between the last two circles.
You should now be able to solve the puzzle in the last room. (Hint: the last two colors are yellow and blue.)
With blue as the last color, read off the other colors in counterclockwise order to get yellow, pink, white, red.
So put in the code Red White Pink Yellow Blue (3, 2, 4, 0, 1 clicks) and press the orange button.
With that solved, you can go back to the activator machine. Instead of the orange capsule, there's a jeweled key inside.
Save your game, it's time to do two endings!
Normal End
Use your key on the last door and go through. The credits roll over a slideshow of places in the game.
Finally, the red text stops scrolling and all that remains is "the End". But it feels like something is missing...
Full End
After you're done with the normal ending, keep watching the ending screen. Now that most of the red text is out of the way, you can see some spots marked on the screen, except for the picture of the dashed-line painting.
In fact, there are two different kinds of spots, either just blue or blue outlined in yellow. (The positions aren't important.)
The types and locations of spots are:
Noticeboard: Blue (top)
Robot: Blue (center)
Clock: Yellow (upper left)
Drawers: Yellow (lower left)
Doorframe: Blue (upper right)
Ladder: Yellow (upper left)
Pentagon: Yellow (lower left)
Activator: Blue (center)
Hit Replay, hit Load Game, unlock the last door again, and go back to the painting with the red dashed arrow. The left and right edges of the painting are now clickable. Notice (again) that the blue dot on the left side is outlined in yellow, while that on the right is not.
So click the RRLLRLLR sides. The painting comes loose and you can take a thank-you card from the top-right corner.
Exit while holding the card and you get a slightly different endroll, zooming in on each of the pictures while the card falls from the top-left corner. The credits finish rolling and all that's left is "complete End". And that's it, congratulations!
Wow! Mystery Room was amazing! Very old-school, with multilayered puzzles. Did it remind anyone else of MOTAS? (For which the website is down BTW, wah!)
kktkkr, I'm sure your WT is elegant, as always, but for once I didn't need it!
Thanks for the extra hinty walkthrough for Locked Room 2, @andr01d. I needed a few little pushes. (And thanks to @kktkkr as always for the walkthroughs.)
For Mystery Room, I'm stuck on the drawers. I have tried a bazillion times; well, maybe only a zillion. Is there something I'm supposed to have done before I open and close the drawers? I haven't found a video walkthrough, but since my own calculations match kktkkr's walkthrough, it doesn't seem like a video will help. I tried saving the game and reloading it, but it didn't help.
Hi Barbara,
For the drawers,
did you turn over the overlay while you had it in your inventory before you placed it over the picture? There should be numbers showing the sequence to open and close the drawers. The puzzle may not work until you have viewed the clue in this way.
Hope that helps!
Thanks for the suggestion, eondivad.
I had turned over the overlay. I have tried working the drawers with the overlay set both ways, but it doesn't work either way.
Ohhhh! For the drawers
What I hadn't done was actually place the overlay on top of the picture with the drawer patterns. I had just done it mentally, using the various screen shots I was working with. Once I placed the overlay, number side up, I could get the middle drawer open.
Thanks eondivad!
Update