
 This week is retro time again - the Retro Weekday Escape is here!
Let's try a bit of sympathetic magic. If we rejoice in beautiful games by favourite devs, maybe we get a new ones...who knows? So, we start off by Vitamin Hana's game. It's one of their first, but as good as any of later creations and fun. Hottategoya then takes you to a set of courtyards obviously built for escape purposes only (the builders spared no expense). Lutaru's room seems like an exhibition of some kind, of sport equipment perhaps, and after you escape it, atmosphere turns darker and heavier in Usawanhouse room...hopefully you get out of here in one piece!
Have a good time and enjoy!
Vivid and merry colors are Vitamin Hana's trademark, and this three years old game isn't an exeption. If you compare it to the last one (so far) from WE°167, you find they haven't changed... puzzles are pleasant and clever, not too hard but not too easy, and you get what you expect. Solid, fluent and very positive game!
The cursor is not changing, no save button, one ending.
Lutaru locks you in concrete courtyard and the only way out is the staircase partly visible behind thick metal bars. No file around. On second though, metal cutting saw would be more useful...or you can try to figure out the correct order of pressing buttons...and leave the courtyard for another one, also barred. Can you escape the whole place? And may we get new game by Appgoya? Please.
The cursor is not changing, no save button, one ending.
Cute Sanpoman's room contains many cute and helpful fish. The big smiling one in the corner can be activated by coins (not by card as in newer games) and to gather enough of them, you need to open few drawers and closets, and of course, solve few puzzles. Changing cursor is your good friend, follow it - few hot spots are difficult to find. At the end you can see the escape "room" from outside as in all Sanpoman's games - it's escape house actually!
The cursor is changing, no save button, one ending.
You materialize in white Lutaru's room without any window or door. In its centre is a platform with tennis mannequin and some tennis accessories; you can move around with navigation arrows, explore it from all sides and zoom on interestingly looking spots. Clean and simple graphic is helpful as there's more than meets the eye - you need good observation skill to discover all clues, solve the puzzles and escape to Tsure Game 6.3 and Tsure Game 6.4; then the adventure grows and continues in 7, 8, 9 and 10. Now we are still hovering on our airbike between two islands floating in the sky, the Myst-like which we left behind and the new one, from January already...
The cursor is not changing, no save button, one ending.
This beautiful Usawanhouse's game is also a story, but sadly, for Japanese speaking players only. For us who can't read Japanese remains great atmospheric escape game with original puzzles and good art. It would be a pity to miss it.
Intro at the beginning is easily skippable with one click and then you find yourself in a smoke filled (or foggy?) room. Nobody's here but you can see embers in the fireplace and lamps are shining so the house isn't abandoned, probably...anyway, you are trying to escape it so do the same as in any other game, look around for hints (there isn't any language barrier) and items, you know. When the exit opens, near the game's end, remember the save button as there is one choice in front of you!
The cursor is changing, save button, two endings.
We love escape games, and our readers love talking about them and sharing hints! How about you? Let us know what you think, ask for clues, or help out other players in the comments below.


Wandering house - help!
Got out with bad ending
Can't finish with good ending.
Walkthroughs for the first two:
Play with Colors!
Sometimes the best kind of escape room is a colorful toy room.
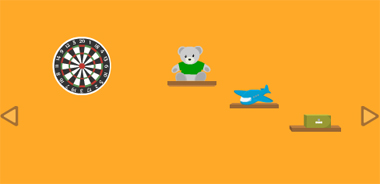
Exploration
The first screen of this room has a dartboard and three shelves attached to the wall. On the shelves you find a gray bear wearing a green shirt sitting on some colored markers, a blue toy plane, and a green four-digit box with a very tiny hotspot for its lock.
Turn right to face the locked red door. To the right of it, a chest of drawers has a top drawer locked with four color buttons around a left-pointing red arrow marking, and a bottom drawer locked with yellow, red, (light) blue and green rows of four identical buttons. There's also a red-and-white beach ball on the floor.
Turn right to face a sign with the same red arrow marking. The clue on the sign is scribbled over and the sign is fastened to the wall with screws. There's also a bookshelf with several brown and yellow books, as well as a smaller reddish book with a picture of blue, red and yellow darts, right next to three uncolored darts on the same shelf. The bookshelf also has two locked compartments, the left requiring symbols to be input on its blue, red and green buttons and the right requiring a three-digit code.
Toys
Use the clues from the items in the room to unlock the left bookshelf door.
The blue, red, green items are the plane, ball and bear (shirt).
So click the buttons 4, 3, 1 times, then open the door to find a paper cube with another arrow marking, numbers on its other faces and dashed lines on its edges.
Toss
Use the markers to color the darts so they match the book clue.
Then toss the darts at the dartboard, and use the clue from that to unlock the right bookshelf door.
The blue, red, yellow darts land in sectors numbered 5, 6, 9.
So enter that in the lock and open the door to find a pair of red scissors.
Unfold
Use the scissors to cut the cube open. After taking a crumpled rag from inside, you can flip the flattened cube over to view the arrow and numbers.
Clean
Use the rag to wipe off the smudged sign, revealing the clue with four arrows in squares.
Then use that clue to unlock the four-digit box.
The numbers on the ↓↑←→ sides of the red arrow marking are 5, 8, 7, 3.
Enter that in the lock, open the box and open it to find an eraser.
Recall
Use the eraser on the unfolded cube to remove the numbers.
Then use the markers on that cube to color in the squares where the numbers were.
Then use that clue to unlock the top drawer.
Since the arrow on the drawer is rotated, you need to rotate the colors from the cube as well. They should be
-- Y2 --

G1 <- R3

-- B4 --
so click the buttons that many times, then open the drawer to find a blue screwdriver.
Unscrew
Use the screwdriver to remove the sign from the wall. Now you can see the hidden compartment and the four plastic cups inside it.
The sign ends up on the floor and you can turn it over to find another clue with an arrow, four cups, and a grid with some of its squares marked.
Colorful
Use the markers on the cups to color them red, green, blue, yellow.
Then use the clue from the back of the sign to unlock the bottom drawer.
The clue tells you which buttons to press, and what order to press them in.
Each row has one button darker than the others, and you need to push those four buttons in the order red, green, blue, yellow:
- - 4 -

- - - 1

3 - - -

- - 2 -
Open the drawer and take the red key.
Then use that key to unlock the door and leave. You've escaped, and now you get to play with colors!
Concrete Stairs
Time to take the difficulty to another level.
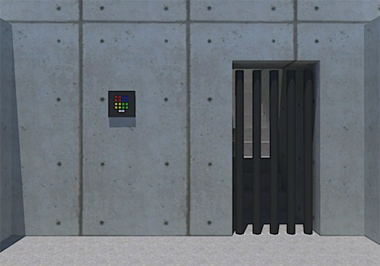
Exploration
A quick glance confirms that you are indeed in a concrete room with stairs. However, you're separated from them by some iron bars, and there's a panel with a grid of colored buttons on the left.
Turn right to find two gray square signs on the wall, each with four colored squares with arrows extending from them. The one on the left has blue squares and arrows, while the one on the right has green.
Turn right to find a blank concrete wall, then turn right again to find two more signs, this time with yellow and red squares and arrows. Also, only three of the yellow squares have arrows.
Sequencer
Use the clues around the room to push the buttons correctly.
If you mentally move each sign onto the colored button grid you'll find that they form a single path:
↘ ↙ ← ←

↑ ↘ → ↑

x ← → ↓

↗ ← ← ←
This path passes through the blue, red, green, and then yellow buttons:
07 05 04 03

06 08 01 02

16 15 09 10

14 13 12 11
Once you've pushed the buttons in that order, the iron bars open up and you can proceed to the next room.
Exploration 2
The stairs lead up to another concrete room… with more stairs behind iron bars. This time, the keypad next to the door has a grid of nine buttons marked with geometric symbols.
Turn right to see some a column of very similar geometric markings on the wall, but they seem to have been cut in half.
Then turn right to find the path back, as well as two clocks with red and blue numbers but no hands. The blue one has fewer numbers than normal.
Turn right to find another column of those geometric markings.
Formation
Use the geometric clues to unlock the gate.
You might guess that the shapes on the walls have to match up in pairs, from top to bottom. The only way to make this match the keypad buttons is to align the right edges of the symbols on the left wall with the left edges of the symbols on the right wall.
The resulting combinations look like an hourglass, a square, a leftward banner, a rightward pentagon and a leftward pentagon, so push those buttons in the
- 3 5

- 1 -

4 - 2
order, and the iron bars open up.
Exploration 3
Another room, another flight of stairs, another set of iron bars. These ones are bigger, and there's no keypad.
Turn right to find three buttons with different shapes on them.
Turn right to find the passage back and also an unlocked locker in the wall with a folded note inside. Unfolding the note, you find rows of red and blue numbers.
Turn right to face another three buttons with shapes on them.
Polygonal
Use the clue from the note to unlock the last gate.
The red numbers on the note should be read from the red clock face (in the second room), which has its even numbers spaced at equal 60° intervals from the top. Similarly, the blue numbers should be read from the blue clock face, which has its even numbers spaced at equal 72° intervals from the top.
If you connect the numbers indicated on each row, you find that they trace out five shapes: a downward triangle, a hexagram, a pentagon, an upward triangle, and a five-pointed star pentagram.
So enter the ▽✡⬠△⛤ code by pushing the left and right buttons on the left wall and then the center, right, left buttons on the right wall. The bars open so you can escape!
@ninjamomma: The bad ending is obtained
by clicking the bottom dialogue option when you're given the choice. (You don't actually get out in the bad end.)
The other option will let you continue for the good ending.
After the ending animation plays, you can click the line below "replay?" for a second chance at that choice, without having to load your save.
Speaking of favorite developers, anyone know what happened to Mildescape (Tesshi-e)? No new games since January 2018, after 10 years of regular additions on their site, totaling 119 games! I know many great devs stopped producing web games, but Tesshi-e is such a fixture.
I think this is my second time providing the solution, I hope it is decent.
Goldfish Game
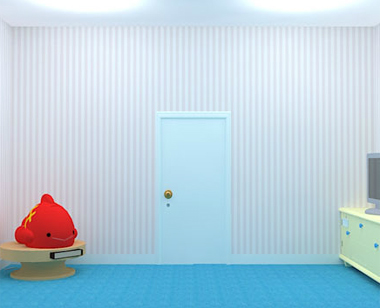
Exploration
We start by looking at a door. It's locked! And a puffy, hungry red fish that wants 4 coins.
Turning right, observe a TV on top of a cabinet. The left door is locked by a code relating to blue fish. The right door is locked too. The bottom drawer is missing a knob. The top drawer contains a yellow brick.
The chair on the right looks like it would be comfortable for a large, short person. Careful inspection reveals coin #1 under the cushion.
Turning right we see a pretty wall made colorful by some decorated spaces. The red alcove contains something but it is out of reach. In the blue alcove we find a clock, a plant, and behind a door on the left side is coin #2. The door hiding the coin closes too quickly for us to grab the prize.
The final wall features a poster of fish in various orientation and color, small table in which we find a notebook, and a bowl containing a lone blue fish. Clicking the blue fish makes it wiggle. In the drawer we find a notebook, which requires careful examination. The blue and yellow pages require a translator, but the red picture is easily decoded as "red fish + swimming gray fish = red clouds or something".
It's time to solve some puzzles!
Coy Coin #2
Let's collect the coin from the blue alcove. That darn door won't stay open.
Select the yellow block and then quickly jam it in the hole before the door can close.
Trading the block for a coin seems a good deal!
Blue Fish
The blue fish sits looking at 9:00. When clicked it moves to 3:00, 7:00 and 12:00.
Convert the directions to letters using the poster.
S Y F G
Open the left door of the cabinet to get a puzzle box.
Yellow Fish
You can actually see the yellow panel from the center of the room, so it's semi-legit not not pixel hunting at all.
Otherwise do some clicking around the TV.
Eventually a grid is revealed on the right side of the TV cabinet.
Look at the poster and swim like a fish!
Start from the lower left, follow the directions to click all the yellow spots.
If the top row is numbered 1-4 and the bottom 13-16, press 13 9 3 15 10 12 and 8.
The right door unlocks to reveal a tureen with a green lid.
In the tureen we find coin #3.
Puzzle Box
Compare the shapes on the box to the alcoves.
The rounded sides point out, generally.
Green Yellow Red Blue Purple, should work.
Green Red Yellow Blue Purple does work.
Obtain coin #4.
Too High
We need whatever is on the red alcove. We need something to help us reach it.
Search everywhere.
Search again.
Behind the red fish on the left hand side a pointer.
Use the pointer to get a knob.
It's almost as if someone set this up for us!
I always think that with elements like this.
Use the knob to open the lower drawer.
Retrieve a TV remote.
Examining it carefully we find it needs a battery.
Power
What else in the room uses electricity?
The clock in the blue alcove.
Examining it super carefully we find the battery.
Entertained?
Let's take a break and watch a relaxing show on the television.
Aiming the remote at the TV we find it only plays a show about a fish.
What shapes do the fish travel?
3 1 7
Advanced Math
The notebook tells us to add the TV number to the value of 3 red fish.
From the poster fill in the missing part of the equation.
317 + 529 = 846
Easy as pie
Feed the coins into the red fish.
Don't overthink the solution.
... even after observing all the numbers in the equation are unique.
Press each segment of the tail as indicated by the solution.
Left 8, center 4, right 6.
Rewarded with the key we take our leave!
Tsure Game 6.2
If I'm reading the text correct, this round's theme of "tennis" is a pun on the game number.
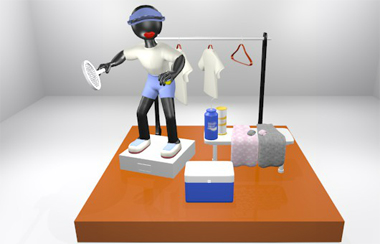
Exploration
All the objects you can see are mounted on a large glossy wooden base in the middle of the white room.
You start off facing a mannequin of a tennis player ready to serve. She's standing on a white box, and the panel on the front of that opens up to reveal a collection of eight circular wedge buttons you can click. To the right, you notice a locked cooler and a table with towels and sweatbands next to a "Bocari Sweat" bottle full of water and an empty tennis ball can with something at its bottom.
Click the left side of the screen to walk around the display. There's nothing special about this view, but it allows you quick access to the back of the tennis player's shirt where you can read her number tag. Make sure to zoom in as far as possible so the game counts it.
Walk left again. The shirt rack has three hangers, and the right two (from this view) have small and medium-sized shirts on them. You also notice a white rectangle on the right pole of the rack, which turns out to be a three-digit lock.
Walk left. You've seen everything on this screen before, except for what appears to be a drawer built into this side of the base. There's only a metallic disc laid flush with the surface where you might expect a handle.
Slice
Use the clue from the tennis player's number to unlock the box she stands on.
Each wedge on the lock has a different orientation, matching the black and white pinwheel on the digit 0.
After a bit of mental visualization, you find that the black wedges correspond to the four buttons along the corners of the lock.
So push those buttons, and the player drops the ball without hitting it!
Pickup
The cutscene showed you where the tennis ball landed, and so you manage to find it by zooming in on the cooler.
Select the ball in your inventory, and place it in the empty tube.
This makes the drawer handle protrude out, so open it to find a shirt with a stick figure design.
Fitting
Place the shirt on the empty hanger, and now you can read the label to learn that its size is L.
So use the clues from the shirts to unlock the rack.
The three stick figures are different sizes, representing the large, small and medium shirts.
What would happen if they took the poses shown on the shirt?
The sizes on the labels would be rotated! L would become 7, S would remain upright (looking like a 5), and M would become 3.
So enter 753 in the lock, which instantly opens to give you a silver key.
Unlock
Use the key to open the cooler. It's empty!
But you can open the hidden compartment on the inside of the lid to find a packet of drink powder.
Hydrate
Add the powder to the water bottle, and pick up the prepared drink bottle.
Give the drink to the tennis player's face. She gulps it down, thanks you, and then part of the wall behind her flies off into the distance!
Leave through the newly formed doorway to end the game.
As usual, next walkthrough will take longer due to translation.
having a problem with Tsure 6.2
that wedge puzzle is hard. i tried every combination. and even tried making a screenshot but every combination doesnlt accept and i looked at the back of the shirt in full view. Can someone help?
and Quazar, Try doing the walkthroughs like KK. If there is a book you need to pick up, type it like "you'll find a book you cab pick up". I love your walkthroughs just the same but it can help with those that can't see too well. Thanks :)
Guess I don't actually need to do that much translation — there's a link to the English version on the page!
Mansion of Wandering
In case it isn't clear from the title screen and intro, this game has just a bit of horror. Since many of the scares are also necessary clues in the game, I won't be treating them differently.
In a recurring nightmare, an unknown woman calls for help, but you never figure out who or what it's about. This time, you wake up in front of a suspicious mansion, and when you shut and open your eyes again you find yourself in a dim room with no exits. It seems your nightmare continues tonight. Will you meet that woman?
Exploration
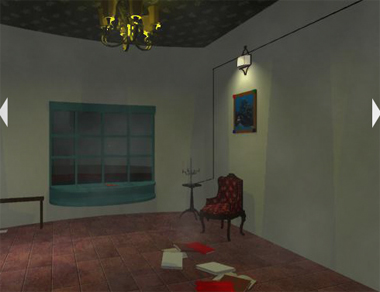
You see some scattered books in front of you. In the corner, a painting hangs over an armchair and you notice the colored squares on its corners. Beside the chair, a candlestick on the table is unlit, but it has a wire that extends from it across the wall. Beneath the window (did you just see something move?), you find a card with a line above a number. The window itself is securely locked, and it's also guarded by some ghostly handprints that appear when you click it.
Turn right. The wire ends in a wall lamp that's currently off, even though the wall is still lit in a few places. On the left, there's a wall box with a three-digit lock that you don't have the hint for yet. On the right, you find a hole near the floor with an old-fashioned cup and bowl in it, as well as an even darker hole that you don't dare to reach into. You can lift the bowl to find a clue with some symbols.
Turn right. On the floor, you find a matchbox next to a locked chest, as well as a slightly dirty blanket covering a glass dome with a key inside. There's also a clock with a wooden stick leaning against its frame (Boo!), a stack of colored blocks with shapes on them, and a not-very-big cloak hanging on the wall. You can only lift the cloak up for a while, but that's enough for you to reach and take the fire tongs on the hook.
Turn right. You see a lit fireplace and wonder who might still be in this room. The fire is too hot to touch. A large cupboard has three locked doors. The top one has a friendly picture with a round hole in it, the middle one has a keyhole, and the bottom one has a four-button lock with some creepy handprints next to it. Along the right wall, there's a creepy figurine on a base with a tiny square slot, and you can read an old-looking letter from the floor:
Beloved Riina:
Your birth brought me great joy, at least I would like to believe that.
Ah! Since you've been locked in here you haven't gone to school, so you wouldn't even be able to read this note.
Even though I've made riddles for you to escape this room, perhaps you might not be capable enough.
Please forgive your powerless mother. I still love you with all my heart.
Pry
Use the stick in the hole beside the bowl.
While trying to get something out of the hole, you use too much strength and it goes flying across the room.
Pick up the rat puppet from the fireplace.
It scares you when you look at it (so the text says), but you can also shake it a little to make a rattling sound.
Since you don't have a knife, the only way to get to whatever's inside is to…
Toss the rat into the fire. It instantly burns up and you deftly retrieve an angel coin using the tongs.
Prints
The bottom cupboard door doesn't really like it when you enter the wrong code, so let's try to get it right.
The handprints appear on the bottom row of the window (when you click it) in the 1st, 3rd, 4th, 2nd, 4th panes from the left.
So push those buttons, and the red text tells you "No way… you did it!"
Open the door to find three round holes inside.
Light
Use the matches to light the candles. The lamp turns on, illuminating a row of mysterious shapes on the floor.
So use that clue to unlock the painting above the chair.
The ◆△⬤⬤△◆◇ shapes are on the black, blue, green, green, blue, black, red blocks.
So click the ⌟ ⌞⌝⌝ ⌞⌟ ⌜ corners of the picture, which eventually shifts up enough for you to access the numbered red note inside and another letter:
I have been keeping a secret from you. You are… Older sister is…
That girl will surely come to help you.
Vinculum
Use the clues from the red notes to unlock the red three-digit wall box.
The line on the note by the window is actually a fraction bar/line, indicating that you need to divide each of the numbers on the other red note (in your inventory) by 12.
Doing so gives you the code 9 6 3, so enter that in the cupboard and open it to get a winding key and a normal silver key.
Unlock
Use the key to open the chest. Inside, you find an angel coin and a letter:
Since you've opened this box, it means she's come to help. I wonder if you're able to read these letters. Leave this house and get a happy life.
Clicking the letter gets you some commentary:
If it's a letter from mother to daughter, then why lock a kid up, and who's "she"?
Turnkey
Examining the winding key, you notice that its tip has a rectangular cross-section.
So use it on the doll base, where it fits perfectly. As it turns, the doll also spins and when it faces you again it holds a white ball.
The light from below now illuminates the doll's startlingly wide grin. You probably want to leave this room quickly.
Scenery
Place the ball in (the painting in) the top cupboard door, and open it to find a suspicious red box with four buttons on the top face.
So use the remaining clue in the room to unlock the box.
The symbols behind the plate match the shapes on the star, tree, moon, sun scenes on the buttons.
So push the buttons 2, 0, 3, 1 times, then open the box and take the angel coin from its drawer.
Triple
Place all three angel coins in the bottom cupboard door, and they fly across the room.
A ghostly figure fades from your view as you turn your gaze towards the vigorously shaking blanket.
Lifting the blanket, you find that the small dome has moved and you can now take the red key from beneath.
Unlock 2
Use the red key to unlock the middle cupboard door and find a lever.
Pulling the lever makes the entire cupboard slide aside.
Now that you're done with the room, you should save your game.
Bad End
(From here on, I'll use the same spelling for names as the English version.)
Leave through the hidden passage, and you meet a girl with her hand outstretched.
Whoa, what?
"Mom…"?
A-are you Lina?
"Incorrect…"
Who are you?
"Take me with you too…"
The top option accepts, and the bottom refuses.
Maybe you find her too creepy, and you decide not to take her along.
"Then, stay here forever…"
The room and its puzzles decay away, and you never wake from the dream.
Good End
Choose the option under "Replay" (in the English version, click "Return"), and you're back in the room.
This time, you agree to take the girl with you. After she thanks you, you find yourself in a room with a shiny door you can't open. Take the angel coin pendant and letter from the floor.
It seems the day of your escape has arrived, and that girl has come to help you.
You had two elder sisters. The older was born in an unimaginable appearance. Kind-hearted Emily was feared by everyone. The second, Sara, had a selfish character but was beautiful.
When Sara suffered an unexplained death, the ugly Emily was suspected. Everyone in her village and family feared her, and named her the devil's child.
Since she was about to be killed, Mom (I) claimed she went missing, and hid her in this house. After that, she really vanished, and I still believe she must be living somewhere. At that time, I had you in my womb.
Your birth became my reason for living, and Dad thought so too. But it was not to be.
Not being able to unconditionally love and accept you, we found ourselves in fear. In order to protect your life, we faked your death and locked you in this room. But we trusted that Emily would come to save you.
Lina, and the two of them, you are my angels. I give you this pendant, and love you from the bottom of my heart.
Clicking the last page gives the comment:
Looks like this mother's wish went unfulfilled.
After reading the letter, back out into the original room and look around, and you find a female silhouette on the screen with the lamp you turned on.
(I'm also going to replace those ellipses with normal punctuation.)
"I'm Lina."
Y-you're Lina? Would you tell me what's going on here?
"I've been here since young."
"My older sister has told me the truth."
That would be Emily, right?
"That's right. Emily was kind, but she died too."
Oh no!
"When Emily and I were escaping, Sara appeared."
Sara's also no longer living, I presume.
"And so is Emily. Sara thought I was leaving to see Mom alone, so she couldn't let me go."
But she's your sister!
"To Sara, this pendant…"
She vanishes and now you have to look for Sara.
Go back into the silver room, where Sara is waiting.
"Nobody shall leave from this room."
S-Sara…
"It was lonely. They were only worried about Emily, nobody noticed me in my suffering."
That's not true! Sara, you were loved!
(What should I do?)
Give the pendant to Sara to prove her mother's love.
It's true, you were loved!
"A-Ah, Mother…"
After she disappears, you can click the door to escape.
The red text carries a mother's voice.
"In order to meet my three beloved daughters, I kept sending messages. You took notice and came here, and you saved their souls. They can finally pass on. Thank you, truly."
The three angels fly across the screen, and then there's more text in white.
"And thus the three wandering souls turned into angels and departed back to their mother's side. I never saw that dream again."
Congratulations, thank you for playing, and if you want to restart the game from the title screen or decision point there are options to do so.
Right on thanks Paul :)
Thank you for the link! I didn't noticed it.
no one answered my post on Tsure Game. I can't figure out that first puzzle with the arrows. can someone show me a screenshot?
@Paul: here's a screenshot of the combination. Another way of getting the game to count the clue is to
click the back of the shirt while looking at the three-digit lock
so you can try that too.
Update