
 Retro Weekday Escape lets you travel to the past - have a nice time there!
10 Color Dots softly locks you in tender pastel room with a nice view. After you leave it, you find yourself in another, hmm...not room, but...a place, a bit dada maybe, and poetic - created by Strawberry Cafe. Another lovely room follows, it's by Sanpoman, and before all that cuteness and sweetness turns too much, you arrive into Yeahm's room and this is something completely different.
Have a good time and enjoy!
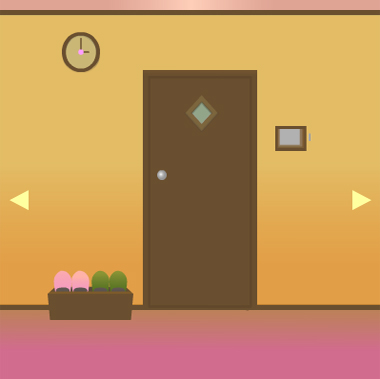
Escape from mute 10 Color Dots' room is quite short, and puzzles only few, but to get out may take longer than expected. First, there are well hidden items, so explore the room carefully (though it's so small). Second, there is a puzzle which needs some thinking about. Third, there is piece of Strawberry-and-Cream Cake - appears iconic in Japanese games - and you may eat it! You must, in fact. Without eating it you wouldn't get through.
The cursor is not changing, no save button, one ending.

Dreamy Strawberry Cafe's island is peacefully floating through the skies and to escape it, you need to collect fifteen notes. They appear in upper brown bar and emerge from your activity; however, sometimes the actions aren't important for progress in the game, just for the sound they make. The last found note closes the game - sadly, you won't get any parachute, huge drone or trained giant eagle, only short outro.
The cursor is not changing, no save button, one ending.
P.S. Strawberry Cafe created similar game Tone of Vesper, and it's beautiful!
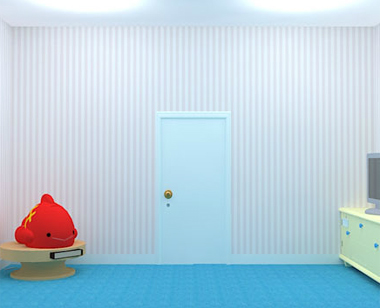
Cute Sanpoman's room contains many cute and helpful fish. The big smiling one in the corner can be activated by coins (not by card as in newer games) and to gather enough of them, you need to open few drawers and closets, and of course, solve few puzzles. Changing cursor is your good friend, follow it - few hot spots are difficult to find. At the end you can see the escape "room" from outside as in all Sanpoman's games - it's escape house actually!
The cursor is changing, no save button, one ending.
Yeahm's game, again, is more interesting and creative than it seems at the beginning - simple graphics is paired with clever and original gameplay, and solutions are unexpected even for escape games' veterans. Pure joy.
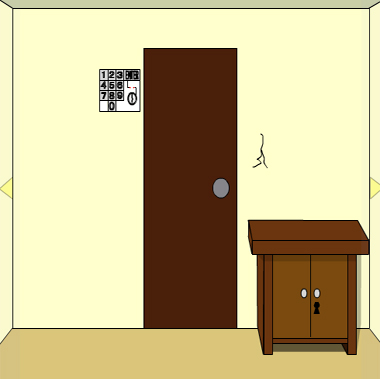
You are locked in a room which isn't even trying to look comfortable, its only purpose is to escape it - and you will, I'm sure! Just find few items, use them at right places, explore the room from all angles...you know. Good luck!
The cursor is not changing, no save button, one ending.
We love escape games, and our readers love talking about them and sharing hints! How about you? Let us know what you think, ask for clues, or help out other players in the comments below.


10 color dots walkthrough
I really needed to use photoshop, to solve this one...
Look around
Door view
Clock
Note arrow color and direction
Shoe stand
Pink Shoe
Take the pink block
Green Shoe
Note arrow color and direction
Code pad
Take the green block
We can already see, that we will need a magnetic card, in order to type in a three digit code.
Dining table view
Picture on the wall
Upper right corner
Note arrow color and direction
Note the cake, just begging for a fork.
Bookshelves and cabinet
Bookshelves
Click the orange book
Flip the book
Note arrow color and direction
Cabinet
Over the top
Pick the knife
The glass doors are locked, we'll return there soon
Bottom drawer
Pick the note
Flip the note and remember the order of the letters
Sofa and window
Window
Pick the eraser on the right
The box next to the sofa has three rectangular slots
Starting to solve
The box next to the sofa
remember the three letter note?
After we flip it, it reads "pgw". This refers to..
p=pink, g=green, and w=?
Look closer at the eraser, click to strip it
Use the knife on the eraser, and you get a white block!
Solve the box code
Place the colored blocks from left to right:
Pink, Green, White
and take the key
The glass cabinet
Use the key on the cabinet glass doors, take the fork.
Zoom on the color hint, under the middle shelf.
That's where I found taking a screen shot really helps.
The cake
Use the fork on the cake. It disappeared, and I didn't even gain weight.
Look at the plate
A square in a blue circle! note that.
Flip the plate and get a magnetic card
Combining it all
We have:
The colored arrows
pink=down, green=up, yellow=left, orange=right
And the blue is actually...
A "stop" icon
And we need to combine this information with:
The color grid we found in the cabinet
Here is where I went hardcore photoshop, marking an arrow or a stop icon according to each color on the grid.
An attempt to share a screenshot
And we still have...
the magnetic card
Flip it. Do the grid dimensions remind you of anything?
The front of the card hints, that "S"=Start. Let's mark those on the colored arrow grid
An attempt to share a screenshot
So, if we start with...
each "S", and follow the arrows until the "stop" signs, we get the code:
An attempt to share a screenshot
And the solution is
657
Getting out
Access the code-pad next to the door
Use the magnetic card to raise the glass
Enter the three digit code and hit "PUSH"
Get out.
help, i'm stuck in "Tone in the Sky" with 14 notes and
the umbrella and the red rag (?)
already activated the
color wheel
and i have no idea what to do next!
I got stuck at that same point too, so I looked it up.
The item you haven't used is needed to
clean something.
The thing it's used on is
at the very start of the game:
the smudge on the glass bowl.
Stuck on Goldfish game with the only unused object being the yellow block thingy and one coin left to find.
I was stuck in the exactly the same place. You'll need to do some pixel hunting.
The changing cursor is your friend
One of the alcoves on the wall
the one with the clock
There's a hatch on the left hand side.
Tone in the Sky
Listen closely!
Exploration
The intro shows you an overview of a floating island, and then drops you straight into the game.
Zoom in on the middle of the screen, where you find a glass bowl on a table between two pink chairs. The bowl holds a muddler (stirrer), and you notice that the glass is smudged on one side. You can also zoom in on the ground behind the table, but there's nothing there. Backing out, you see an empty drain on the left side, and one of the pillars in the distance has a red flag on it.
Turn left. Good thing you're levitating, because there's a giant square hole in the island below you. The drain from before leads up to a tall marble structure with some sort of glass ring on top. The stone forms a ramp that continues towards the left.
Turn left to find another hole in the ground. This one is octagonal and surrounded by red carpet which has a red piece of cloth on it.
Turn left. Some amazingly tall pillars support the ceiling, which is made out of the same material as the rest of the island. The brick structure in the middle supports a wheel with colored spots on its spokes. However, the spot in the top left isn't colored, but holds a bar of soap!
Climb the staircase at the back. At the top landing, you notice something brown at the left, which turns out to be the handle of an umbrella.
Turn right. There's a brick tower here with a single red box where one of the bricks is supposed to be. Behind that, you spot a green octagonal platform directly facing the red flag, with a golf tee set up in the middle. Pick up the empty glass on the left side.
While facing the brick tower, you can click the top of the screen to look up at a bell above.
Wipe
♪1: Use the cloth on the smudged part of the glass bowl.
Solution
♪2: Fill the glass with water from the bowl.
Add the soap to the glass of water.
♪10: Then stir it to form a clear solution.
Flow
♪7: Pour the water onto the ring at the top of the marble structure.
♪11: Pull out the ring.
♪3: Water flows out onto the ramp and out of the base of the pillar.
Look in the drain on the first screen to find a small white ball.
Also look at the red octagon where you got the cloth, which now has a harp in the middle. Pick up the crowbar next to the harp.
♪14: Then play the harp.
Pry
♪4: Use the crowbar to remove the red brick/box on the tower, revealing a button hidden behind.
♪15: Push the button.
♪5: This makes the bell in the tower ring loudly.
Flap
♪6: Open up the umbrella.
(The umbrella closes and remains closed after you back out.)
Swing
Place the ball on the tee.
♪12: Use the umbrella to swing at the ball.
♪9: The ball lands in the pillar with the flag.
Drop
Look behind the table again to find a clear gemstone dislodged onto the ground.
Round
♪13: Place the gemstone in the white spot on the color wheel, activating it and opening up its hub.
♪8: The wheel emits some magic particles.
This also completes your collection of 15 notes.
Once you have all the notes, the ending automatically triggers and you get to watch a montage of marshmallows playing on the island.
Note list:
The notes, from left to right, correspond to the following actions/events:
Cleaning the bowl
Scooping water
Water flowing (with 11)
Removing a brick
Ringing a bell (with 15)
Opening the umbrella
Pouring water out
Wheel making magic (with 13)
Ball hitting a pillar (with 12)
Stirring soap water
Releasing the water flow
Striking a ball
Activating the wheel
Playing the harp
Pushing a button
Goldfish Game
(Literal translation: Red Goldfish Room)
As usual, the right button on the title screen gives you the story:
Sanpoman found an antique toy store while wandering downtown, and a giant goldfish hanging from its roof caught his attention. While (fantasizing about) talking to the fish, he found a hole on its top whose secret should be readily apparent to anybody who looks. Please verify it in the game!
Exploration
The giant goldfish greets you to the left of the locked door. Looking at its top, you find a hole that reminds you of a piggy bank, and the sign on its front confirms this by displaying "400 more yen to activate".
Click the left side of the goldfish to look around it and find some sort of rod, which turns out to be a pointer that you can examine and extend!
Turn left to find a picture with fish in different colors and facing different directions. The red fish are numbered while the blue fish are lettered. Beneath that, a table has a bowl with a small blue goldfish that swims around when clicked, and also an unlocked drawer with a notebook inside.
Turn left to find a chair whose cushion hides a large 100 yen coin. The rest of the wall has alcoves in different pastel colors. The reddish one (second from left) has something that you can't reach, and the blue one holds an unremarkable clock. While holding the clock, you can click its lower right corner to turn it over, and open its battery compartment to get a battery.
In the blue alcove with the clock, click the area to the left of the potted plant to find a hidden compartment. It contains another coin, but the door closes too quickly for you to do anything.
Turn left. The television screen is on a cupboard with two doors and two drawers. The left door requires a four-letter code, the top drawer is unlocked and contains a yellow square block, the bottom drawer is missing a handle, and the right door doesn't open.
While zoomed out, you notice something on the side of the cupboard. So zoom in on the right door and click the right side of it to look around the cupboard and find a grid of buttons marked with a yellow goldfish.
Reading the notebook, you find three clues written in different colors:
Poke the blue goldfish and you'll understand.
Visually follow the yellow goldfish's friends.
Push the red goldfish like this.
(Diagram of red fish, a screen with a swimming fish, and a large fin.)
Screen
Place the battery in the remote control and use it to turn on the TV, which shows a black goldfish swimming on a white background.
Blue
Use the clue from the fish in the bowl to unlock the left cupboard door.
The fish swims to face the →↙↑ directions, before returning to its original ← direction.
The fish in the picture facing the →↙↑← directions are labeled YFGS — but that doesn't work!
That's because the sequence starts from ←(S) and ends at ↑(G).
Enter SYFG in the door to unlock it, then open the door to find a mysterious box with five color-changing buttons and a clue with a pattern made out of small squares.
Shape
Use clues from the room to unlock the five-button box.
The colors of the buttons match those of the alcoves on the wall, which are rectangles of different shapes.
What about the squares on the box?
The figure formed by the squares can also be assembled from the rectangles.
Notice that the tall columns of squares come in three different heights, corresponding to the different heights of the vertically-oriented green, yellow, purple alcoves. The spaces between those columns have two different widths, corresponding to the different widths of the red and blue alcoves.
So turn the buttons on the box green, red, yellow, blue, purple by clicking them 4, 0, 3, 2, 1 times, then open the box to get another coin.
Yellow
Use the clue from the yellow fish in the picture to unlock the right cupboard door.
As the notebook suggests, you need to consider what each fish is "looking" at.
Each yellow fish faces directly at another, except for the lower-left one. This forms a chain with each fish pointing to the next:
--3-

---7

25-6

1-4-
(If the code doesn't work, back out and zoom in again before retrying.)
Push the corresponding buttons on the right side of the cupboard to unlock the door, then open it to find a green pot containing another coin.
Rich
Place all four coins in the big red goldfish, which spins around. Three buttons appear on its tail fin.
The display also changes to read "Thank you for the money", and clicking it shows the reply "Not at all, it was my pleasure."
Hold
Use the yellow block on the compartment near the clock to hold its door open, then take the coin from it.
Reach
Use the extended pointer to get the blue handle from the top alcove.
Then attach it to the drawer and open that to find a remote control.
It doesn't seem to do anything to the TV, so you examine it and turn it over to find that it's missing a battery.
Red
Use the remaining clue from the notebook to solve the puzzle on the fin of the large goldfish.
The red fish at the top of the last page face the →↙↓ directions, and the red fish facing in those directions on the picture are numbered 5 2 9.
The fish on the screen trace out the digits 317.
So work out the sum 529+317 to get 846. How do you use that on the fin buttons?
Push the left button 8 times, the middle button 4 times and the right one 6 times (in any order!), and a key pops out of the hole.
Use the key to unlock the door and escape.
You've helped the goldfish find his coins, and now you get to view the goldfish-shaped house from outside! While its placement in the middle of the pond is refreshing, you'll need to watch your step as you cross the stepping stones.
B2S Room
What does the title mean? Escape the room and you'll find out.
Exploration
The keypad to the left of the locked door also has a keyhole and a diagram of a gap in a wire with both unconnected ends colored red. On the right, there's a crack in the wall above the locked cupboard.
Turn right to find a wall with a large rectangular outline next to a card reader.
Turn right. There's a picture frame which you can remove from the wall and flip over to find a key, and an unusual digital clock whose power cable passes through a screwed-down grate. You can also vaguely see something else through the grate. Lift the clock to find a magnetic card underneath. (There's one more object on this screen which I'll mention later.)
Turn right. There's a shelf here with a small bird and a frog-shaped vacuum cleaner. At the top left, a picture of a sailboat has shallow holes where the sail and boat should be and a deeper one for the anchor. At the top right, there's a more complicated machine with several slots and a pattern whose appearance reminds you of a cashier. At the bottom right, a deep hole in the floor holds a 100 yen coin at the bottom.
Examining the vacuum cleaner, you find that it doesn't have enough charge to run, though it has a 10-yen coin in its dust compartment.
You can place that coin in the machine's coin slot, but the cashier and cash register just rejects your small change.
Access
Swipe the card on the slot, which opens up the wall compartment.
At the back, there are diagrams of big and small men with an arrow between them. Moving closer makes you stand on the pressure plate, lighting up the green footprint indicator on the right. If you back out, you can also zoom in on the bars below the red button, which have some sort of key hidden behind and a really tiny red dot to the lower left.
Technology
Step on the pressure plate and push the red button. Your viewpoint changes, and the arrow flips. What just happened?
Looking around the room again, you find that you're viewing everything from a lower perspective. You've gone from big to small!
Some of the devices higher up are now out of reach, but you can now see that the table leg under the clock is separate from the table top, which is just a wall shelf. (Before, this was hinted by a subtle difference in their wooden colors.)
There's one more object that wasn't visible before: a protractor just above the bird on the underside of its shelf.
(You can return to normal size by pushing the red button again.)
Examine the table leg, and you'll find that it extends to thrice its length.
Unlock 1
Use the key to unlock the cupboard on the first screen, which contains a triangular set square.
Unscrew
Use your coin to remove the screws on the grate beside the clock.
If you're still small you can now crawl through the vent to the next room. The wire ends near an open safe which you can close to find a charging cable behind the safe door.
Click the left edge of the safe to find the end of the clock's cable plugged into the wall behind it.
After turning around, you can leave through the same grate.
Pieces
At normal size, place the protractor, set square and screw in the sailboat picture in place of the sail, boat and anchor.
The rope flies out and lands neatly on the nearby shelf.
Strength
Transform to small size and pass through the vent again, then use the rope on the closed safe to tie a loop around it.
Then return to normal size and pull on the end of the rope.
After shrinking once more, you can reenter the vent to verify that the safe no longer blocks the power plug.
So unplug the clock, then attach the charging cable to the vacuum cleaner and plug it in.
Back out and zoom in again, and you can pick up the now-charged vacuum cleaner.
Currency
Use the vacuum cleaner to retrieve the 100-yen coin from the hole.
Use the coin on the cashier machine, which removes a hammer from its shelf and dispenses it through the large slot.
Fragile
Use the hammer on the crack in the wall, which reveals a hidden light switch.
Dark
Turning off the light switch, you find the digits 15 glowing on the wall with the clock.
The keypad code has got to be much longer. Search for more clues.
Plug the clock back in and flip the picture once more to make its front visible.
After turning the light off, you see a total of six digits on the same wall, which read (from left to right) 315473.
So enter that in the keypad to activate the top red lamp.
Squeeze
With no way to remove the bars in the shrinking machine, you need to be more creative to get to whatever's behind.
Maybe you could convince the machine to make you just a bit smaller.
After shrinking down, step off the machine and use the extended table leg to push the button. The machine is now ready to shrink you again!
If you step back on the machine and push the button, you'll be much smaller. Small enough to pass through the bars, but too short to reach them! You're not even able to carry all the items you saw earlier. But the red dot is now the perfect size of button to press if you want to return to normal.
(While being not tiny) zoom in on the bars, and place the grate in front of them to form a ramp.
This allows you to (while being tiny) crawl up and between the bars, and lift the key out of its holder.
Unlock 2
Return to normal size, and use the key to unlock the keyhole on the keypad.
Now that both the keypad lights are on, the door opens up so you can leave!
you're me hero, kktkkr! i did only one walkthrough and it almost killed me :D
thanks, in the name of whole human kind.
So sad.
Two of these games are gone.
Strawberry Cafe
BS2
I wonder when the others will be gone too.
Update