
 Ahoy, yo-ho-ho, and a bottle of rum! Piratey Retro Weekday Escape is here!
Pirates from Esklavos' Pirate Coast sailed away and their ships can't be seen anymore, but you are supposed to escape the seashore in different way, through magic door, and your task is to open it. Selfdefiant takes you to a pirate ship, but you aren't so lucky as you might have thought; the captain behaves strangely so you decide to leave as quick as possible...and eventually you land at Creepy Island and it's creepy indeed!
With UsawanHouse and Suzunari you join two girls in their hunt for old pirate's treasure.
Have a good time and enjoy!
Welcome in Pirates from Esklavos' magic world! You find yourself at the bluish seashore, at dusk, probably, torches are lit already, but pirates are gone. They left behind some crates, daggers and hungry pet toucan, and also puzzles and closed magic door. For opening you must find four eyeballs and put them into empty skulls' sockets; this not only cheers the skulls up, but also opens the door for you!
The cursor is changing, no save button, one ending.
P.S. Here is Pirate Coast Escape 2 from WE N°102.
You've escaped from the Bahamas being saved by Selfdefiant's pirate ship. Soon it emerges that the captain isn't very sane and your rescue turns into another getaway, unfortunately - you'd better run, who knows what would he do in this state of mind! The whole ship needs to be explored in hope that there must be hidden small boat or something, and while in it you may find some small treasure too...
The cursor is changing, autosave, one ending.
So you did it. You've got from the crazy ship and the mad captain! Your raft isn't designed for long sea journeys though, there is less and less air inside it, must be some little hole somewhere...it's slowly sinking...oh look, an island! In right time! Well you are saved from drowning now and you are no longer lost in the middle of nothing, but the island definitely isn't a friendly place...will you find your way home?
The cursor is changing, autosave, one ending.
In this long game with clever and interesting puzzles you play for two girls, UsawanHouse and Suzunari (the game is collaboration of Usawan House and Suzunari), each being locked in different room - the button with Japanese text just above the save button switches between them. From skippable intro (in Japanese only) is clear what they are trying to do - somewhere in this house is hidden a treasure chest full of gold and the girls wouldn't leave without it! Well, they can't anyway....will you help them?
Seemingly frozen puzzles aren't a bug, it's just a message "you don' have a clue yet".
The cursor is changing, save button, one ending.
P.S. Don't miss adventure Stachmou and the Golden Compass by Didier Guagliano, it's fun!
We love escape games, and our readers love talking about them and sharing hints! How about you? Let us know what you think, ask for clues, or help out other players in the comments below.


Alternative theme for this week: four ways to use a crowbar.
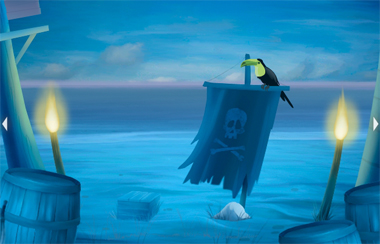
Pirate Coast Escape
Exploration
(Remember that you need an empty hand to take most items. You can click the "handle" icon to deselect your item.)
A toucan sits on a tattered pirate flag planted in the ground. As the changing cursor informs you, you can't do anything with the flag, the stone it's planted at, the box on the left, or the torches surrounding them. That still leaves the barrels in the foreground that you can't open (take the dagger from the left one), the sign in the upper left with colored stones (take the banana from its corner) and the entire sea that you can see to the left of the toucan.
Go right to face the exit portal surrounded by two skulls on stakes. On the left, there's a tree with a rope tied to its top and a dagger at its base, a sign with digits and symbols next to it (take the dagger from its left edge), and a unusual pile of light sand. On the right, a torch burns vividly in the ground, a bamboo stalk (actually cane) grows at the edge of the screen, and a magnet is hidden at its base.
Go left twice to find a large tree atop which three things are placed on a platform: a shovel part (handle), an unusual machine that tells you its missing a gear when you click it, and a locked chest. On the right, a dagger sticks out from the ground near a rock. On the left, there's a puzzle with eight colored stones. The sea here is also clickable, although you can't see anything obvious to do there.
Ten stones
Use the clue from the sign on the first/center screen to solve the colored stone puzzle on the left screen.
Colorblind help:
The stones on the sign are:
red blue green yellow gray
black white red red red
The stones in the puzzle are, in clockwise order:
(right half, top down) green yellow gray black white
(left half, bottom up) red red red red blue
As we've seen in other Esklavos games, the colored stones will connect whenever they're close enough, and you need to arrange them to have exactly the indicated number of connections.
Place the four red stones close together, making each connect to the three others. (You only need to move the outer two red stones to make this happen.)
Leaving the other stones in their original positions shift the white stone so it connects to gray only. The puzzle should be solved.
An eyeball falls from the sky and lands to the left of the tree.
Magnetic
Combine the rope and magnet, and use it in the sea on the middle screen to get a black key.
Use it again to get a crowbar.
Pop
Use the crowbar to pry each of the barrels open, and click them until you stop getting items.
From the left barrel, you should get a machete, some bullets and a dagger.
From the center barrel, you should get a fruit.
From the right barrel, you should get another fruit.
Feed
Use the banana and two (other) fruits on the toucan, who spits out an eye.
Slice
Use the machete to cut down the cane on the right screen.
Unlock
Use the key to open the locked chest on the tree, then click it until you stop getting items.
You should have obtained a shovel part (head), gun and glasses.
Dig
Combine the shovel parts to get a shovel, and use it to dig in the sand pile on the right screen. Take the gear.
Objective
Combine the cane and glasses to get a telescope, and use it to look out over the sea on the left screen. What do you see?
There's a rock with some sun symbols drawn on it, birds in the sky in the upper right, even more cane growing below the birds, some fish at the bottom, bottles on the left, and colored flags in the lower-left corner.
By the way, those first five things are randomized so don't be surprised if you only see one of some of the objects named.
Digits
Now that you have all five daggers, you should find that you can push them into the sign on the right screen by clicking on the digits.
So use a clue from the telescope to solve that puzzle.
The symbols in the middle of the sign indicate objects to count. This includes the middle "slash" which is actually a plant stalk.
So click the correct numbers of those objects to put five daggers in the sign, and an eye falls in the background.
Motor
Place the gear in the machine, and click it. The machine pulls some colored cans down a clothesline.
So load the gun with bullets and use the other clue you saw through the telescope to shoot the correct cans.
As the flags suggest, you need to shoot the black, green, red, purple, white, yellow cans in that order.
Those are the 2nd, 6th, 4th, 5th, 1st, 3rd cans from the left (or 5th, 1st, 3rd, 2nd, 6th, 4th from the right).
Once you've shot them in the correct order, another eye falls from the sky.
Escape
Place all four eyes in the skulls' eye sockets, and click the portal to leave!
Escape Crazy Pirate Ship
It's so crazy, the title screen gets an extra "The".
Exploration
The pirate ship is a little more fancy than you might expect. Just in the sleeping quarters, there are different colored blankets and lockers for everyone. Some useless objects are lying on the floor. All the lockers are unlocked except for the last one, which has six colored buttons. It seems someone's been playing tic-tac-toe by himself in the back of the second locker.
Go… back? South? Just click the bottom arrow. There's a three-digit metal safe on the counter with colored digits, and you can look in the fridge to count its vegetables. Also, the third cupboard under the counter holds a dispenser for fuel oil.
Go right. A young-looking pirate has spilled his purple juice, and asks you to swab it up. Also, that's definitely a shark swimming just outside the window, eek!
Go right. You can't do anything with the crates here, but there's a padlocked trapdoor and a locked door, both requiring keys. The door is surrounded by two skulls on crossbones, the left one with red markings on the ends of the bones and the right without.
Go right. Five labeled barrels surround a fiercely burning stove.
Go right. There's another useless basket, another locked door, and then there's some barrels that you can click to reveal a clue on the back one, and a pile of cannonballs that's missing just one.
Six colors
Return to the first screen, and use the clue there to unlock the last locker.
The blankets are:
blue(4) green(3)
red(2) purple(0)
yellow(1) blue(4)
So click the buttons that many times, then open the locker to find a dry mop.
Three digits
Use the clue from the fridge to unlock the safe on the counter.
The yellow, brown, orange colors of the digits correspond to those of the onions, potatoes and carrots.
So the code you need is the counts of each vegetable (356). Open the safe to find a silver key.
Four corners
Use the clue from the left skull to unlock the right one.
The markings on the bones tell you to click the upper-left, lower-right, upper-right, lower-left corners/ends of the bones on the right skull.
The skull opens its jaw, and you can take a pearl from it.
Unlock (Silver) / Exploration 2
Use the silver key to unlock the door between the skulls. Now you can go up.
The pirate captain lays out an unappealing dilemma for you: plunder South America with them or die in the sea.
Ignore him and go left. Click the cannon to lower it, and a cannonball rolls out.
Go left again. Move a barrel on the left to find a crowbar hidden behind. There's a ladder leading up, but its bottom section is missing.
Go right thrice. There's a ladder chained to the wall and the padlock on the chain has a grid of nine buttons that turn black. The gate at the back is stuck.
Go right. There's a lot of junk similar to what you've seen before, but also a bucket of water to the right of the ladder.
Climb the ladder. A parrot at the top wants a cracker. You can search the hay on the left, but there's nothing there.
Taller
Use a clue from the first screen to unchain the ladder.
Click the buttons in the same grid squares as the marks in the second locker: upper right, middle, lower left, lower right.
Open the padlock and take the ladder.
Then bring the ladder to the leftmost screen on the deck and set it down so you can climb up.
The hay here hides a treasure chest whose lock has five buttons with dots.
Dot patterns
Use the hidden clue from a barrel downstairs to unlock the five-button chest.
Match the patterns on the barrel by clicking the buttons
_2_

456

_1_
times. Opening the chest, you find an lantern without fuel.
Errand
Dip the mop in the water bucket, and use it to clean up the juice spill.
The pirate gives you a cracker.
So give the cracker to the parrot, who rewards you with a gold key.
Perfection
Place the cannonball on the pile, which falls apart to reveal a pearl in the center.
Unlock (Gold)
Use the gold key to unlock the door behind the cannonballs, and enter.
It's a treasure room! The giant treasure chest in the back is secured behind bars, and the lever on the wall won't work until you fill the three round slots beside it. A badly drawn world map on the table has Peru marked on it. Search in the gold pile on the left to find a five-digit chest.
Five digits
Use the clues from the marked barrels to unlock the chest in the treasure room.
From left to right, the roman numerals on the barrels represent the digits 63495.
So enter that in the chest and open it to get a rusty key.
Unlock (Rusty) / Exploration 3
Use the rusty key to unlock the trapdoor. It's too dark to go down.
So fill the lantern in the kitchen, and light it on the stove (among the numbered barrels).
Keeping it equipped, descend down the trapdoor. The three barrels on the left hide a treasure chest with a four-letter lock.
Go left. Three valves on the back wall can be spun clockwise (click the right side) to raise their numbers by 10 or counterclockwise (left side) to lower them.
Go right twice. Luckily, you can avoid the huge pool long enough to light the lantern on the right and reveal a clue on the wall.
Four letters
Use the clue from the treasure room to unlock the chest under the hatch.
Enter PERU in the chest, then open it to find a life raft
Drain
Use the clue beside the pool to drain it.
Turn the valves on the left so the numbers match the clue.
There's no feedback for when you have it correct, but when you go back to the pool it should now be empty except for a pearl on the floor.
Treasure
Place all three pearls beside the lever in the treasure room, and pull it to open the gate.
Now you can take the treasure!
Escape
Use the crowbar to force open the gate on the deck (behind where you got the ladder).
Then use the life raft on the water to leave!
Escape Creepy Island
Yes, those eyes are watching you.
Exploration
Creepy Island welcomes you with a cool sign with shrunken heads hanging from it. Pick up the wooden plank on the left.
Go right, and read the message on the bottle which has roman numerals written with bones.
Go right. There's a path forward here, so remember it for later.
Move the weeds on the right side to find a pocket watch.
Go right again. There's a strong vine hanging from offscreen, but you don't have the tools to cut it down yet.
Go right again to find a huge rock, and look in the wrecked boat to find another wooden plank.
Go left twice and then forward. There are three gravestones here that you can touch, each having only a two-letter inscription.
Go right. The bridge here is missing and you need 3 planks to fix it.
Go left twice. The gate of this pointy fence is flanked by posts, and it seems like the right one is missing a skull. Pick up a crowbar from the bush beside it.
Go left to find a hooded boatman asking for a fare of three coins to cross the river. The plants on the left side hide a sign with unusual wording and a skull.
Gate / Exploration 2
Go back right and place the skull on the post, which opens the gate so you can enter.
The bridge across the purple swamp has a glowing wooden plank you can remove using the crowbar.
Cross over it to a dark room where all you can see is the unlit fireplace (with logs) and an unlit torch on the table.
Light
There are lit torches on both sides of the bridge, so light your torch on one of them.
Then use it to light up the fireplace. Now you can see the man in a tribal mask asking for a rare cave flower. Searching the shelf above the fire, you find that the green flask second from the right hides a gold coin.
Bridge / Exploration 3
Place all three planks to fix the bridge (east of the gravestones).
Crossing over, you face a tree with a dark crack in it.
Follow the pebble path to the left where there's a large dark cave entrance. Move the weeds on the right to find a three-digit chest.
You can use your lit torch in the tree to find another gold coin.
Enter the cave with the torch. A flower grows on a shelf overhead.
Go right. The path deeper into the cave is blocked by an annoying bat.
Three digits
Use the clue from a bottle to unlock the three-digit chest.
The roman numerals on the message in a bottle read 7, 3, 4.
So enter 734 to open the chest and find a boomerang.
Shot
Use the boomerang to hit the bat.
The path forward ends in a chest which requires you to enter a time.
So use the clue from your watch to unlock the chest.
The time on the watch is 10:25. Opening the chest, you find a sword.
Hack
Use the sword to cut down the strong vine.
Three stones
Use the clue from the sign near the boatman to touch the tombstones in the correct order.
Reading the letters in GO BOAT BO GOAT in pairs, you see that they correspond to the inscriptions on the RLCLRC tombstones.
So touch them in that order, and a gold coin falls from the sky.
Crossover
Give all three gold coins to the boatman, and click the arrow to instantly cross the river.
The only thing here is the bamboo on the left which you can cut down to get bamboo poles.
Higher
Select the poles and then the vine in your backpack to combine them into a ladder.
Then use it to get the flower in the cave.
Favor
Give the flower to the man, who tells you to play a magic flute next to the rock in the sea.
Doing so makes a mermaid appear! Click on her to have your wish granted.
(The last walkthrough will take a while longer due to translation. Stay tuned.)
The game resolution may feel a bit small, but zooming in reveals a surprise: the furniture graphics are vector art!
Silver Roger's Treasure
The title tells you that this is Usawan's version; there's also a slightly different Suzunari version linked from the game page (see bottom of walkthrough).
Intro
(Click to advance the text.)
A long time ago, when the world was controlled by military-like organizations with only the name of governments, a king of escapes who had everything in the world — wealth, fame, power — appeared: Silver Roger. A government who feared his charisma sent him to the gallows for treason, and his last words provided hopes and dreams for the oppressed people.
"My treasure? I'll give it if you want. He who finds the treasure is the next escape king who will save this corrupted world. I have built an escape room somewhere in the world, and all of the world has been left in it."
"Search! Seek it out! Find it, and my treasure shall be granted."
With so many escape rooms in the world, which one is Silver Roger's? Famed escapers have abandoned their lovers and their entire fortunes to journey in search of his room, dreaming of getting the treasure and becoming the next escape king themselves…
…but the treasure has not emerged from any room.
And so, before anyone knew, Silver Roger's escape room became a legend.
Ages have passed since then, and the year is 2013. The era of escape games has returned!
Many escape rooms appeared one after another, and people rushed to get trapped in the rooms. However, nowadays nobody remotely believes in Silver Roger's escape room.
Except for these two…
Suzunari: 6 years escape experience, poor sense of direction so she's not good at mazes
Usawan: 7 years escape experience, speaks to herself much, weak at puzzles
They're looking for Silver Roger's escape room, and standing before them today is a grand towering Western mansion, as majestic as the old escape king.
The two of them fearlessly headed into the mansion through the front door.
Usawan went first, and Suzunari followed, and just then!
SLAM
Oh no, Usawan's trapped inside! Go forth courageous escaper, find the treasure and get out of here.
Exploration
As mentioned above, the button above SAVE switches between the two rooms and characters. (It also lets you skip animations if you're really impatient.) For now, you're playing as Suzunari.
The door separating you from Usawan is locked, and there's a small keyhole under the right handle. Thankfully, the blue box on the left connects directly to her room. On the right, a clock with unusual hands is stuck and apparently needs winding. The clock's glass case is locked, and you can click the tiny square above the handle to find that it says CLOSE.
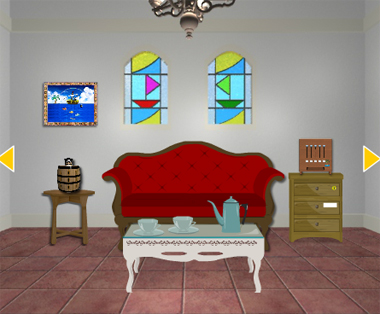
Turn right to face a red couch under two stained glass windows with different-colored sailboats. You can move the couch cushions to find a toy sword On the left, there's a nice painting of a boat and fishes hanging above a barrel with nine small holes and a mustached head sticking out of it. On the right, a box with five vertical sliders (no guessing, Suzunari will tell you when you're missing the code) sits on a chest of drawers. The top drawer has a keyhole, the middle one has a three-letter lock and the bottom one is unlocked, but you need to click it again to look inside and find another toy sword. In the front, the tea set looks pretty normal except for the teapot that turns out to have a toy sword instead of tea.
Turn right. A huge wooden T-rex model is struggling to reach a red button on the wall, and so are you because you're shorter than it. The exit door on this screen isn't locked, but there's no way you'll leave your friend (and the treasure) behind. On the right side, a stone bust has a series of colored squares on it.
Turn right. There appears to be a fountain in the middle of the room with a weird pirate flag on it, and a hexagonal hole in the wall beside. On the left and right, two round lamps sit on pedestals, and the left lamp has a toy sword next to it. The left pedestal has a four-digit lock and the right one has a two-button lock.
Swap over to the other room. You're Usawan now.
You're still facing the door that shut on you. Thankfully, the pink box on the right lets you exchange items with the next room. There's a chair on the left which hides a toy sword in the corner, and a plaque above it which can be moved by its corners (marked with zodiac signs):
"Those who come alone to claim the treasure for themselves will not be able to escape. Those who trust their partners and collaborate, will be able to obtain the treasure." ―Escape King Silver Roger
Usawan: So the treasure is real then.
Turn left to find a desk facing a window. The desk has two compartments, the right one unlocked and containing a toy sword, and the left one locked with a code you don't know yet. The series of books on the left (Sea Atlases I–VI) have different-colored roman numerals, and you can shift the last two aside to find simplified drawings of a pirate and what looks like a drawer. Shifting the chair aside, you find a red rod hidden under the table. You can now also look at the table top, which has a hint with three drawings, a capped ink bottle and a feather quill. To the right of the table, a ring extends down from a trapdoor in the ceiling, and a wall compartment below that is marked with the same parrot.
Turn left to find a cabinet with locked glass doors and six empty drawers. To its left, there's a keyhole in the wall.
Turn left. A short cabinet holds a pirate hat (hiding a toy sword) and a pair of pirate boots, of which you can take the right (our left) boot. And it's a nice boot with a pirate logo at the top, but its sole is almost completely caked in mud. The cabinet also has two small compartments, the left one having a four-digit lock and the right one unlocked and containing a globe with an E marked beside something that looks like Australia. The pirate clothes match those on the rack on the right, where you can look in its abdomen to find a toy sword. The shelf above the cabinet has six different pirate figures pointing in different directions, and the barrel to the left of the cabinet has a toy pirate doggy tied to it, holding a toy sword.
While looking at the four-digit door, you can click its left edge to find a clue on that side.
Six directions
(Usawan) Use the clue from the books and pirates to unlock the display case.
The book numbers suggest that you should look at the pirates with white, blue, red, green, black, yellow hats.
Those pointers are pointing to the top right, bottom right, top left, bottom left, right, left directions.
So open the drawers of the case in that order, and you hear the display case unlock.
In the left side, you find an empty wineglass, and the green book on that same shelf hides a winding key. On the right shelf, there's a miniature T-rex model missing one of its arms, and the red button beside it cannot be pressed.
Four digits (Usawan)
Use the hidden clue beside the four-digit lock to unlock it.
It looks like a four-letter clue, so where are the digits?
The B in the clue is formed from a 1 and a 3, and the R is formed from a 1 and a 2.
So the whole clue can be read as 130×12, which works out to 1560.
Enter that in the door, open it, and take the crowbar.
Letter
You've looked at the globe, so go back to the desk and check the hint again.
Usawan: Something seen in this room is… Suzunari will certainly need this memo, how should I pass it to her?
Uncap the ink, dip the quill in it and use it on the hint to mark the letter you've seen.
Now you can pick up the memo.
Transfer
As Usawan, place your five knives in the pink box. Then as Suzunari, pick up the knives from the blue box.
Do the same for the boots, memo, winding key and crowbar. (Usawan will advise you against transferring your other items.)
Stabby
(Suzunari) Look at that barrel again.
Suzunari: Only one hole makes the face pop out.
The hole is randomized to the point that even saving and reloading will change the outcome.
But since you have all 9 knives, you can use them to test all of the holes.
The head key flies out and you can pick it up beside the table.
Unlock 1
Use the head key to unlock the top drawer. As before, you need to click again after opening to see the part of something (dinosaur arm) in there.
Wind up
Use the winding key on the clock, whose hands spin around. The clock's case is now OPEN.
Which means you can pick up another memo with drawings of pirate faces.
Transfer 2
Put the T-rex arm in the pink box and pick it up on Usawan's side, and do the same for the pirate memo.
Four pirates
(Usawan) Use the clue from the memo to unlock the left desk compartment.
The pirates shown on the memo are wearing blue, green, white, red hats.
So click the buttons 2, 5, 0, 1 times, and open the door to find a half-hexagonal plate.
Above (Suzunari)
Attach the arm to the small model dinosaur, and then push its button.
The dino lowers its head, and you hear something moving in the other room.
(Suzunari) The large dinosaur's head has pushed the wall button in.
Suzunari: The dinosaur's nose has pushed the button, moving the marble statue. I wonder what Usawan did?
Below
The tile where the marble statue was is a darker color than the others.
Looking closer, you find that there's a gap between the tiles, but you can't just remove it.
All you need is to use the crowbar to pry the tile up. In the hidden compartment, you find a ship's helm (wheel) with the letter S on it.
Flip the removed tile over to find a clue with red shapes.
Four digits (Suzunari)
Use the clue from the back of the tile to unlock the left pedestal.
The shapes on the clue match those of the clock hands, so the circle, triangle, diamond in the numerator represent the numbers 7, 3, 11.
Therefore the fraction shown represents 7311/3 = 2437. Enter that in the pedestal, then open it up to find a model ship with a letter A and a lever that you can pull to make five digits appear on the left lamp.
Two arrows
Use the clue from the marble statue to unlock the right pedestal.
The pink and green colors of the squares match those of the sails in the stained glass windows, which form triangles pointing right and left.
So the statue clue tells you to click the RLLRRLLR buttons to unlock the pedestal. Open it up and pull the lever inside to make five letters appear on the right lamp.
Spin
If you examine the wheel, you'll find a hexagonal protrusion on its back.
So fit it into the wall beside the fountain. Now you can click its left and right sides to spin it.
So use the clues from both lamps to spin the wheel correctly.
The clues combine to form the pairs R3 L1 R4 R2 L5.
So turn the wheel right thrice, left once, right six times and then left five times.
Water pours into the fountain, along with a capsule.
Which means you can now wash the dirt off the boot in the fountain.
Spell
Use the clue from the picture memo to unlock the three-digit drawer.
The letters on the wheel, globe, ship spell out SEA.
So enter that in the drawer, open it, and look inside to find a hook.
Transfer 3
You know how this works by now: pass the clean boot and hook through the tunnel to Usawan.
But since you don't know what's in the capsule, Suzunari says it's not time to hand it over.
Above (Usawan)
Attach the hook to the rod and use it to pull the ring hanging from the ceiling.
This opens up the wall compartment, which contains a wine opener.
Zodiac
(Usawan) Use the clue from the clean boot to move the frame of Silver Roger's message.
The zodiac signs on the boot are surrounded by upward-pointing chevrons that tell you to read them from bottom(back) to top (front): ♒♒♓♎♋♓♎♒.
So click the LR LR UL LL UR UL LL LR (⌟⌟ ⌜⌞⌝ ⌜⌞⌟) corners of the frame to raise it and find a wine bottle with a key inside!
Uncork
Use the bottle opener to uncork the wine bottle.
Then pour the wine and key into the wineglass, from which you can just pick up the key.
Unlock 2
Place the key in the keyhole beside the display case.
Usawan: This is a nice key. Er…
Bookcase slides to the right.
Usawan: Ah, something fell from above.
Zoom in on the uncovered door to see its skull and crossbones above a hexagonal hole, and the coin at the bottom.
Transfer 4
Give the coin to Suzunari.
Pop
(Suzunari) Use the coin to open the capsule and get a fish memo.
Five fish
Use the clue from the fish memo to unlock the slider box.
The fish on the memo are in the 4th, 3rd, 1st, 5th, 2nd positions from the top in the painting.
So click the buttons under the sliders 3, 2, 0, 4, 1 times to match, and the box dispenses a golden key and another half-hexagonal plate.
Unlock 3
Use the key to unlock the door.
Suzunari: Usawan, the door's open. I found it like this but…
Usawan: Suzunari!
The combined inventory now shows both names at the top, and there's no longer any need to visit the other room.
Treasure
Place both plates in the hexagonal hole, which opens the door to the treasure! Click it to end the game.
Ending
(Click to advance the text.)
Silver Roger's treasure finally appeared before the two who continued to believe.
"…We finally found it."
"Yeah."
"Shall we open it?"
(Text of the scroll in the chest:)
Brave Escapers,
I give to you the seeds of escape-fruit that I've gathered from around the world. Take them back and nurture them with care, and it will grow into escape-fruit. If you eat the fruit, you will become "escape-fruit-capable people" who make special escape games according to the abilities of the fruit.
Silver Roger
Along with the note, there were many seeds placed in the chest. Even escape-fruit whose existence had been a legend were inside. Rumors spoke of a Fruit of 3 Cats, a Fruit of Picto, a Fruit of Wan-Nyan, and a Fruit of 3D, among others, whose seeds had been lost at some time. Perhaps those with those fruits' abilities had escaped this world.
Uwasan and Suzunari each brought a seed home. And then the two of them, who didn't know how to look after the seeds at first, together and with the help of many people, raised them until they bore fruit.
Now, what kind of fruit abilities did they gain? I'll leave it to you to imagine based on playing their games…
There are still many more seeds of escape-fruit remaining. Won't you come with your peers to look for Silver Roger's treasure, grow your own seeds, and make an escape game? With partners you trust, they will certainly bear fruit.
(Roll credits.)
Suzunari Version
The version on Suzunari's page is the same except for some item changes in Usawan's room: the book in the display case holds the wine opener instead of the winding key, which is in the four-digit safe in place of the crowbar, which is in the left desk compartment in place of the plate, which is behind the wall plaque in place of the wine bottle, which is in the wall compartment in place of the wine opener.
This makes the gameplay more linear by forcing the crowbar to be obtained after the winding key. There are two other minor differences: the red rod is now in front of the barrel instead of under the desk, and the clock hands start at different positions but eventually rotate to give the same clue.
hey dude thanks a lot, good luck
Update