
 After a long pause, Retro Weekday Escape is here for your retro fun!
We start with two games by Strawberry Cafe, both about bunnies heads spotting - sometimes you pick up some item, too - still, thinking where you haven't looked yet and where is hidden another bunny consumes most time. The silhouettes are not running around like the green guys, at least. Tateita takes you to the room with good and interesting puzzles, and finding their solution is satisfying. In SuzumeDr's locker room are eight smaller puzzles (how to open each locker) and one big (how to deduce the code for door lock from ten hints).
Have a good time and enjoy!
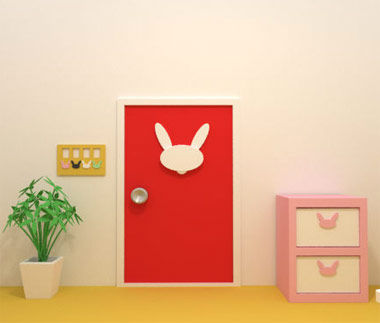
Your temporary prison seems luxurious, a bit cold, true, as it's built from huge half transparent ice blocks and stones, but stylish and with some comfort - there is a bed with fur blanket and a bar, and even a waterfall (not frozen). Bunnies heads count automatically, you just have to click each - note, that in the inventory too! Now you can demonstrate what you've learned in previous game by Strawberry Cafe! So, will you find all the silhouettes to open the gate?
The cursor is not changing, no save button, two endings (Aurora End and Winner End).
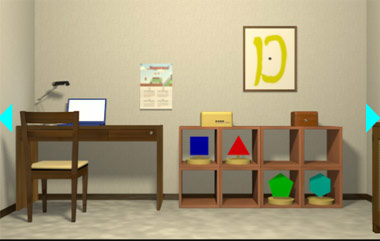
Tateita's room is standard escape room with several safety deposit boxes, locked door and working place with laptop, needless to say, coded. Look around carefully, because there is something you can open without a key or password; one solved puzzle leads to another and eventually you get to the end and find out what game title means.
The cursor is not changing, save button, one ending.
At the beginning, you get a binder with the first hint without any effort; but to get out of SuzumeDr's locker room you need to collect another nine...ten hints make the clue for final code. There are more sets of hints, randomly generated for each game, and therefore the last code is variable. Also note, that hints apply to qwerty keyboard.
Before you get to it, there are the lockers - the room contains eight and you have to open them all and explore - and each is closed differently. You will be surprised what some people keep in their ordinary lockers and how cunning their safety systems are! Their effort is vain though, for experienced escapist it's child's play to get inside; good observation is all what you need - however, the last puzzle is really tough.
The cursor is not changing, save button, one ending.
We love escape games, and our readers love talking about them and sharing hints! How about you? Let us know what you think, ask for clues, or help out other players in the comments below.


Hmmm. I'm a little stuck on Ice Cave Escape. I think I've solved all the puzzles, and I've found as many bunnies as I can, but I must be missing some. Based on what I've found so far, the code for the door should be
3453
Can someone who's solved it tell me how many I still need to find?
Never mind! I just found an additional bunny, and a new puzzle. More to do, apparently!
Solved the new puzzle, and now I'm up to
3473
Still not enough bunnies, apparently!
I do still have an empty inventory slot (the fourth).
Whew! Out with the Aurora ending.
The 10 hints part of Lock, Stuck, and 10 Hints is baffling me. I have ideas, but haven't cracked it yet. I've got all 10 hints. Fun!
Cross Points is SUPER FUN! I was kind of stuck on the last puzzle until...
I remembered the name of the game
Billy-o, here are hints for the hints!
Clue 1 - This is what you need to decode
Clue 2 - Unsure what this clue means
Clue 3 - Unsure what this clue means
Clue 4 - We are not looking at time
Clue 5 - The letters are treated as pairs
Clue 6 - Every number has a word that correlates with it. 1 = ONE, 2 = TWO, etc.
Clue 7 - If you decode HEWTZO, you get YES
Clue 8 - You only care about odd numbers
Clue 9 - What is under your hands right now? What is under my hands right now?
The last hint for clue 10 is a SUPER-SPOILER
Clue 10 - If you look down at your keyboard, you see those same letters in the exact same pattern
Here are another three clues in case those clues don't help
If you look down at your keyboard, START from letter D.
If you look down at your keyboard, and you START from the letter D, if you travel towards 1 you get an R, towards 3 you get an F, towards 5 you get a C, towards 7 you get an X, and so on and so forth.
If you look down at your keyboard, and you START from the letter D, if you travel towards ONE you get an R, towards THREE you get an F, towards FIVE you get a C, towards SEVEN you get an X, and so on and so forth.
How to get Hints 2 through 9
Hint 2
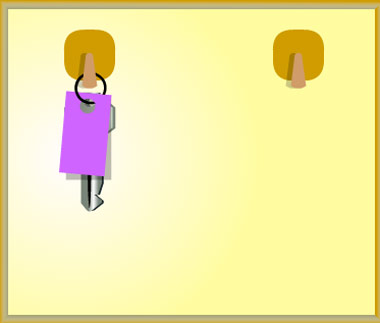
Use the key with the purple tag on the only locker with a keyhole.
Hint 3
Try looking under furniture.
Hint 4
Try looking on the sides of furniture.
Looking up is key.
Hint 5
Check out the gaps between the lockers and the wall
Use what you found on the piece of art you found
Did you check the back of the art piece?
How do things measure up?
Use what you found on the combination lock
Hint 6
In order to open the door, you need to spell it out
Try standing on furniture
Things are looking up.
Hint 7
It's time to go fishing!
You'll get a better cast if you take the high ground.
Hint 8
Leave no ball unturned.
These words are black and white.
Hint 9
Time to get unscrewed.
Still working on getting Hint 10 ...
@Bliznik, I'm pretty sure that Hint 2 means
that each key (the square) is surrounded by 6 other keys
and that Hint 3 shows
that is more than one way to get the same answer; if you translate both and get the same word, then you've got the hang of it!
And, furthermore, if you put the hints together,
Each key has 6 keys around it. If we throw out the even-numbered clock directions, then O = up and to the right, T = directly to the right, F = down and to the right, S = down and to the left, N = directly to the left, and E = up and to the left.
Very clever puzzles on Cross Points.
Ohhh, thanks for that @lavamuffin! Totally makes sense now. :)
Walkthrough time!
Ice Cave Room Escape
Don't get overwhelmed by the rabbits in this ice cave! Just click each one and the game will count them for you.
Exploration
(I recommend that you start the game with sound on, even though most of the background sounds in the game are boring/repetitive.)
Pillars of ice support the ceiling of this ice cave, some of them a lighter color than the others.
Start with the bar in front. All sorts of drinks are on display, but you can zoom in on the purple wine bottle in the middle of the third row, which has a yellow rabbit on its label, and also the pair of green tea(?) bottles at the right of the second row, which look perfectly normal until you move the left one to reveal a white rabbit on the wall behind. At the end of the bar, there's a drink dispenser with three digit buttons arranged vertically, and a folded red note (pick it up by its top corner) is hidden between it and the wall. Unfolding the note, you find a clue with a bent arrow leading away from a white rabbit.
Look down at the bar to find a brown rabbit on the right seat.
Then zoom in on the left side of the bar, and click the blue rabbit hidden in the ice.
There's nothing interesting on the pillars to the left, but on the right side the pillar in the corner has a blue rabbit on it.
Turn right to face an ice bed with a bright red phone on an ice table beside. You can pick up the crystal to the left of the bed, the right pillow that hides a blue rabbit on the bedframe, and the phone which has 15 buttons, the bottom-left one being a white rabbit.
Turn right to face exit doors which have a four-digit lock controlled by colored rabbit buttons (that don't count towards your totals). The floor in front of the door has a yellow rabbit on it. On the left side, a pyramid of ice blocks surround a safe with no keyhole, and you can click the top and right sides of that pyramid to find a hexagonal hole and a white rabbit. To the right of the door, a nicely carved ice block has a fourteen-button lock on the front panel and a white rabbit on the top.
Turn right to face a waterfall that pours into a semicircular pond. You can't see anything special about it other than the yellow rabbit on the left side.
Soak
Place the crystal in the pond (at the base of the waterfall), and it melts away leaving an elegantly sculpted trophy.
Slot
Place the trophy in the hexagonal hole in the ice block pyramid, unlocking the safe.
After picking up the ice cup from within the safe, you can click on the yellow rabbit on the safe door and the brown rabbit on the back of the safe.
Pour
Use the clue from the bottles at the bar to activate the dispenser.
The checkered rectangle grid beneath the digits tells you to look at the compartments of the display.
Those compartments are arranged in three rows, with 3, 6, 4 bottles in each row.
So enter that in the dispenser to activate it.
Gulp
Now you can place the cup in the dispenser and turn the handle to fill it.
Then pick up the full cup and drink it all.
Click the cup again to look at the bottom and find a brown rabbit there.
Dial
Follow the clue on the note to "unlock" the phone.
The arrow on the note indicates that you should push the buttons in the following order:
09 08 07

10 05 06

11 04 03

12 13 02

15 14 01
Do so (it will help if you zoom in on the game and listen to the button sounds), and a white rabbit appears on the screen.
Grid
Use the clue from the pillars to unlock the button grid panel.
The top eight buttons on the panel represent the pillars that are visible while facing the doors, and the lower six buttons represent those visible while facing the bar.
So the buttons you need to turn on in the grid are
.O.O

O.O.

...O

O--.
So click those six buttons to light them up.
Then back out and open the panel to find a blue button that turns water on and off.
Dry
Use the button on the fountain to turn it off.
Now you can access the blue rabbit on the back wall and the white rabbit in the pond.
Colors
You should have found all the rabbits, so use the clues from them to unlock the door.
(It's possible to glitch out the counter, but you should be able to unlock the door as long as you know the correct code.)
The rabbit locations are:
Brown
On the seat
In the safe
In the cup
Yellow
On wine bottle label
On floor in front of door
On left of fountain
On safe door
White
Behind bottle
On note
Phone button
On pyramid
On ice block with grid panel
On phone screen
In pond
Blue
In bar counter
On pillar
Behind pillow
Behind fountain
This makes 3, 4, 7, 4 rabbits in total, so click the door buttons that many times to unlock it.
Aurora End
Just leave through the doors to enjoy a beautiful aurora display.
Winner End
In normal gameplay, you would have to notice that after the doors open, you can reclaim your trophy.
Since we're restarting the game anyway, you can just enter the final code in the doors and acquire the trophy by soaking the crystal in the fountain.
After leaving with the trophy, you enjoy a scene of marshmallows enjoying themselves around the bar.
crosspoints
You might think that setting an escape in a small room with four-digit safe after four-digit safe after four-digit safe would be a recipe for disaster, but this game shows how you can do it well.
Exploration
This room is packed with all sorts of puzzles, starting with the laptop on the table that takes a password consisting of the letters A to H. The table itself has an unlocked drawer with a book in it labeled book1 (but numbered 5), and the other drawer is locked and requires a key. The shelf on the right has colored shapes in four of its compartments, and the locked boxes on it require a sequence of four colors and a key. On the wall, there's also a calendar and a picture frame with a yellow letter D and a black dot.
Turn right. The cupboard here has an unlocked right door that holds book2, and its other door is locked and requires a key, but what's that shape on the door? There are two four-digit safes here, a small gray one and a large purple one whose digits only go up to 6. The picture frames on the wall have a black E and a light blue F (and dots).
Turn right to face the locked door. An bookshelf holds only the Cross Points series of books, with some of them missing. An eight-button box has buttons that can be toggled between down and up. And of course, there are picture frames with a pink G and brown H.
Turn right to face a wall that's empty except for a green four-digit safe and picture frames with a red A and blue B.
Push in
Use the clues from the shelf with shapes to unlock the eight-button box.
The compartments with shapes are the left two in the top row and the right two in the bottom row.
So push those four buttons on the box, and it opens up so you can take book3.
As you put the book away, you find a missing corner in the base of the box.
Removing the false bottom, you find a card (hint1) with a row of colored squares.
Five colors
The blue outline from hint1 matches the color of the laptop, so use the clue to unlock it.
The squares on the hint are red, blue, black, pink, red and the corresponding colored letters are ABEGA.
So enter that in the laptop, which opens up an "Angle" page with some numbers in a search bar.
Vertex
The yellow outline on the search box matches the color of the four-color box, so use that clue to unlock it.
The numbers 90, 108, 60, 120 are the internal angle measures, in degrees, of the regular polygons: square, pentagon, triangle, hexagon.
Those shapes are colored blue, green, red, cyan, so click the 3rd, 2nd, 1st, 4th buttons on the box to open it and get a tiny key (key1).
Unlock 1
Use key1 to unlock the right table drawer, and take hint2 from it.
Ten green… books
Place all of the books on the bookshelf, and then use hint2 to unlock the green four-digit safe.
If the books were arranged in the order written on hint2, the red digits on the spines would read 5348.
So enter that in the safe, which opens up so you can take a file.
Modification
Use the file on key1 to slowly cut a new notch in its tip.
Unlock 2
Now that the outline of key1 matches the left cupboard door, use the modified key there to unlock it.
Pick up hint3 from it.
First to Last
Use hint3 to unlock the matching-colored purple four-digit safe.
The clue (first–last) suggests that each column should be read separately.
So for the first column, you need to find the month starting with Tuesday and ending with Monday, and so on.
Those months are numbered 2, 3, 6, 4, so enter that in the safe to unlock it.
As usual, the safe is way oversized for its contents: key2 and a thumbtack remover.
Peel
Use the thumbtack remover to take the calendar off the wall, revealing a green letter C behind.
Then examine the calendar and click it to find hint4.
Unlock 3
Use key2 to unlock the brown box beneath the D picture frame.
The interior of the box is a scale model of the room! You get a top-down view of everything, and some spots are marked with digits.
Named
hint4 has a black outline, so use it to unlock the black safe.
Hint: Each square in the hint has four letters corresponding to one digit. How does it work?
The four letters in each box occur in pairs. If you consider the points where each letter occurs on the walls, the lines connecting each pair will cross at a spot marked by a digit.
So, for instance, the lines A-E and B-F intersect in the middle of the room, at the location marked 6.
Doing this for each square, you get the digits 6725.
So enter that in the safe to unlock it and find key3.
Unlock 4
Use key3 on the door to escape!
Lock, Stuck & 10 Hints
"Are you the type to deliberate over the hints you have? Or do you constantly seek out new hints?"
For this game, you do not need all 10 Hints to escape. Feel free to try solving the final puzzle with fewer hints!
(Puzzles which are "randomized" don't seem to go through many variations, so I could in theory list each solution out. I'm not going to, just in case I miss one.)
Exploration
The game starts you off immediately looking at a hint book, with PASS written on its cover and Hint 1 already included. As you close it, you face a rack which you can take a key from. There's also something else on this screen we'll leave for later.
Turn left to face the locked door in front, the light switch next to it, and the password device on the left.
Turn left again to face a round table with a small pot that contains a rectangular piece in the shape of a letter O.
Then look under the table to find Hint 3 taped to it.
Click the left edge of the screen to look at the side of the lockers.
And then click the top of the screen to find a button with a key symbol.
Back out to face lockers, which are of course locked.
(Move left.) There's one with a grid of six buttons that turn black (and something else is different about it), but only the leftmost one has a keyhole.
Click the lower-left corner of the left locker to zoom in and find a translucent ruler.
Back out. Now you're facing the back wall, which has two small holes in it.
Click the lockers on the left. There's one with a green box on top, out of reach, and there's one with OPEN written on it… but if you zoom in you find that it's just letter-shaped holes and only the P piece is present.
Move left. There's a locker with a three-digit padlock, and one with two blue rectangular things on it.
So click the left side of that locker to find that its door is blocked by blue brackets held down by screws.
It's not over yet!
(Turn left and) back out until the red bench is visible again, and click it to stand on top.
Turn left to find a weird handle attached to the top of one of the lockers. Of course, it's out of reach.
Turn left again to face the back wall. The locker at the back on the left side also has something on top, but it's so far you can't even tell what it is.
Wait, what's that on the ceiling light? Click it to look up and find a letter N hidden in it.
Unlock
Use the key to unlock the locker with the keyhole. There's a messy jacket which hides Hint 2, and a picture frame with colored squares.
Flip the picture frame over to find the letters CM covered in three colored stripes.
"Unlock"
Push the button with the key symbol on it, which unlocks the locker it's attached to.
That locker contains a giant swordfish that hides Hint 4 beneath, and a weird tadpole with hooks.
Bar Code
Use the clues from the colored square picture to unlock the padlocked locker.
The (randomized) colors on the letters occur on the picture in consecutive squares, forming long rectangular bars.
So use the ruler to measure the bars, or just count the squares, then enter the lengths of each bar (in centimeters) into the padlock and click the arrow under it to pull it open.
In the locker you find Hint 5 and (empty?) cans of beer that hide a letter E.
Magnets
Place all the missing letter pieces in the holes on the locker, and OPEN it.
Hint 6 is attached to a hanger, and there's two halves of a fishing rod here.
There's also two blue rectangular slots on the inside of the locker door.
Extend
Examine the fishing rod, and assemble it by clicking it.
Climb up on the bench, and use it to reach the handle on top of the locker… Hmm, it seems this rod's missing something.
Attach the tadpole (actually fishing lure) to the rod.
Now it can hook onto the handle and pull it. The locker's open!
Inside, there's a black and white striped shirt which hides Hint 7, and a rugby ball with a photo of the locker room on its back.
And the photo itself has a grid of words on its back.
Contrast
Use the (randomized) clue from the back of the photo to unlock the locker with six buttons circled in the photo.
Each of the words in the clue names an object which can be black or white.
(This is also hinted by the striped shirt from the previous locker.)
So click the buttons corresponding to those which are black to unlock the locker.
Inside, you find a toolbelt with a screwdriver in it, a pair of shoes covering Hint 8, and a bright lamp attached to the bar.
Unscrew
The locker beside the key hook is held shut by two blue brackets. Use the screwdriver to unscrew each of the brackets, and the screws also end up in your inventory.
This locker has an entire Santa outfit in it, with Hint 9 hidden in the vest and a red filter under the hat.
Climb
Open the locker with the letters on it, and place the brackets on the door.
As you step back, you find that you can now climb the door to reach the four-digit lock on the last locker.
Seeing digits
Use the clue from the four-digit lock to unlock it.
(But there's something you need to do first as part of the solution.)
As hinted by the photo, you need to hang the picture frame on the back wall.
So attach the screws to the back wall, and use the picture there.
Hmm, nothing special. What if we tried looking at it in a different light?
Turn on the lamp in the locker. Now when you turn off the lights, the picture is illuminated with bright stripes, but there's still no digits.
You need to place the red filter on the lamp, and then turn off the lights.
It may be hard to see what's happening, so let me explain that the bright stripes of the lamp filtering through the locker are now red, and the blue squares within the red striped areas (2nd, 3rd, 5th, 6th, 8th, 9th, 11th, 12th rows) are now purple.
The clue (blue square + red "red") tells you to look at the squares which are purple (blue + red).
And the digit buttons are placed at the four corners of the locked panel.
Looking closer, you find four digits at the corners of the red-filtered picture, formed by the purple squares (and one square that's actually purple + red).
The digits in the corners read
5 0

7 3
So enter that in the lock, then open the locker to find an express delivery box containing Hint 10.
Let's review
You can flip through the book to review all the hints, which I'll explain in the next spoiler.
(Thanks to Bliznik and lavamuffin above for providing their own explanations.)
Note: while hints 1, 3, 5 are "randomized", they each contain the same sequence of twelve letters.
Hint 1: twelve letters
The other hints tell you how to decode this one to get the password.
Hint 2: digit 6, arrow around a square
You need to find a square with six things around it.
Hint 3: two rows
This actually tells you that both rows get decoded to the same password.
So if you're observant enough, you can guess most of the puzzle and the password just by reading both rows.
Hint 4: no alarm clock
You're supposed to consider a non-digital (hence analog) clock, the AM/PM are not really relevant.
Hint 5: six squares
The twelve letters are split into pairs, and the first letter of each pair fits in a square.
Hint 6: word circle
The placement of the words around this circle should remind you of a clock.
Hint 7: YES
Six letters get decoded to three.
Hint 8: strikethrough
Remove all the even numbers.
Hint 9: down arrow
Look down at your hands.
Hint 10: the key
These six letters in a hexagon are not random. Where can you find them and what makes them special?
Puzzle explanation in next spoiler.
The first part of the puzzle concerns the numbers on the face of an analog clock (Hint 4). Discard the even numbers and keep the odd ones (Hint 8), and read them as words (Hint 6).
The second part of the puzzle concerns the keyboard beneath your hands (Hint 9), specifically adjacent keys (Hint 10). Since letters on the keyboard are on a hexagonal grid, they can have neighbors in six directions (Hint 2), which are labeled by odd numbers (Hint 10 again).
(If you don't have a QWERTY keyboard, you can refer to a picture of one.)
The third part of the puzzle concerns the twelve letters you have to decode (Hint 1, 3). Each pair of letters represents one letter of the password (Hint 7), and the first letter of each pair fits in a square (Hint 5), which is actually a key (previous paragraph).
In particular, the example in Hint 7 shows that HE=Y, WT=E, ZO=S. Looking at the first pair, Y is indeed adjacent to H, in the direction marked 11 (Eleven). The second letter of each pair is the initial of the number that labels the direction! Similarly, E is in the three o'clock direction from W, and S in the one o'clock direction from Z.
Putting it all together: you need to split your twelve letters from Hint 1 (or Hint 3) into pairs as shown in Hint 5. Locate the first letter of each pair on your keyboard, then translate the second letter to the odd number with that initial (O, T, F, S, N, E = 1, 3, 5, 7, 9, 11), then find the key adjacent to the first letter in the direction given by that number. Six pairs gives you a six-letter password, which fits in the device.
Exit
Whatever language your password may be in, you easily type it in the device to unlock the door and leave.
The end screen congratulates you with a message written in open lockers, while some unusual music and your hint count gets displayed on the right. If you picked up few enough hints, the music will be different, and you'll get a message beneath the hint count. You can also click the bird for a message (in Japanese) about the production of the game.
sounds interesting
Update