
![]()
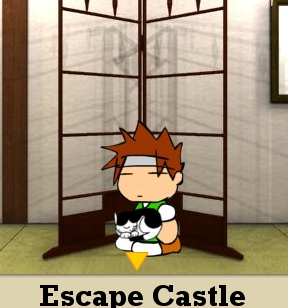 Déjà vu is hard to define. When déjà vu overtakes you, it is an unexpected and otherworldly sensation, like a vision of some place you're meant to be or a predication of some task you're fated to do. It's enough to make you stand back and pause, musing "I'm sure I've been here before... but when?" Now experience Team Escaper: Escape Castle, an unexpected new escape game that moves beyond genre definitions. It's also the first release by Team Escaper, a collaboration of several game designers, some who are well-known to JIG fans including Strawberry Café, Tesshi-e, Cogito Ergo Sum, and some who are new to the Casual Gameplay scene (Dora Game, Dominion's Rest, Four-Leaf Clover, and more).
 In Team Escaper's Escape Castle, true to the spirit of team effort, not only do you need to escape the devil king's trappings, you also must elicit help from a menagerie of familiar characters, building a dream team to undertake gaming's iconic quest: rescue the fair princess from the villain's diabolical grasp. You've done it all before, but never quite like this. Use the arrows at the side of the screen to navigate by clicking on them, and a map at the top left of the screen will help you keep track of where you are and where you're facing. Items appears in your inventory on the right when you pick them up, and you'll need to make sure to save your game often if you want to take a break by clicking the "save" button!
Analysis: Playing Escape Castle will feel like a comprehensive test for anyone who aspires to be called an expert escaper. You'll rely on your experience to work out puzzle solutions that are not obvious on the surface but which seem oddly familiar. While the puzzles are not exactly formidable, it's refreshingly entertaining to see these well-known figures drawn together... and that offers a new challenge in recalling characters from games past. Do you remember Motchi's favorite dish? Nyan's best skill?
 Novice players are not left out: Escape Castle has an Escape-the-Room 101 feel to it as well. Simple navigation, inventory items close at hand, clean graphics and a changing cursor come together to make this game accessible to everyone. Still, it's best to not underestimate the amount of cunning achieved when multiple room escape designers meld their efforts. Necessary objects don't wear neon signs and solutions are not overt so expect to employ diligence in your detective work. Regardless, leaps in logic or eclectically lateral conclusions are not a factor here; the power of deduction and a keen eye are all that's needed to successfully make your way through.
Although some puzzles may leave you feeling you've been there, done that, Escape Castle's final "puzzle" is a welcome twist on the genre, elevating it to a new level while harkening back to an age-old gaming tradition of the final boss battle. Maybe you'll even stand back and muse "What if?" before re-launching the game to try again, so fortunately the save button comes in handy here.
With all it has to offer, Escape Castle is a sure crowd-pleaser, and yet it's not without some disappointments. During main game play, there is no ambient music but the final overtures are jarringly loud to the degree where you might want keep one finger hovered over your computer's sound controls. Every puzzle in Escape Castle is well-designed and coherent, but some tasks seem too by rote; that makes for a rather quick escape despite the multiple rooms and some players might be left wanting for additional obstacles or escalating difficulty or greater risk in the end battle... yet none of that takes away from this game's echoing charm.
Escape Castle consistently defines fun. There is something for everyone to enjoy in the fusion and (if the 1 after Team Escaper's URL portends anything) I expect we'll be seeing this cast of characters again someday.


Walkthrough Guide
(Please allow page to fully load for spoiler tags to be functional.)
Walkthrough
Room 1: Here Kitty Kitty Kitty
Note the cat and the boy in front of you. Click the cat and it will point in different directions.
Down and left, up and left, down and right, up and right, down and left, up and right.
Back away and zoom in on the painting to the right. Coins? Uh, okay, if you say so.
The painting's corners react if you click on them. Obviously, click on them in the order the cat pointed out to you.
Lower left, upper left, lower right, upper right, lower left, upper right.
If you do it correctly, you'll get a stick called "silver vine".
Go offer the silver vine to the cat and he'll turn into a coin and come with you. Chibi-Nyan coin GET! Hey, that slogan on the coin's rim looks familiar, don'tcha think?
Zoom in on the lantern beneath the painting. It opens; take the bowl of corn inside. Back away.
Turn right. You'll see another cat sleeping on a mat beside the table and a strange multicolored pattern.
Zoom in on the table. Offer the silver vine to the cat to get the Chai coin, then look under the other mat to get a key.
Back away and make a note of the color pattern. Copy it down somewhere. Don't worry, I'll parrot it for you when it becomes relevant.
Turn right. You'll see yet another cat scaring a rooster on a stair-shaped piece of furniture, a door, and a window-like cabinet with a padlock on it.
Zoom in on the cabinet. The key you picked up earlier will be sufficient to open the padlock.
A hand mill? Odd, but it's not like we don't have a use for it. Dump the corn in it to get some corn flour, then back away.
Zoom in on the cat and rooster. Give some more silver vine to the former and the corn flour to the latter to get the Shokola and William Atkinson coins, respectively.
Don't bother with the drawers just yet; they're all empty, and that sliding door won't open. Do notice, however, that they bear a minor resemblance to the color pattern from before. Back away and turn right.
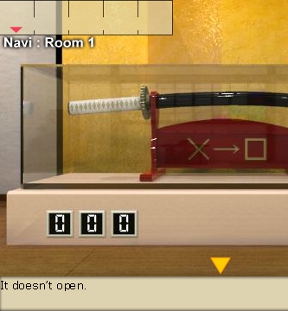
Neat, a niche with a folding screen, hanging scroll, faux pond, and sword! Zoom in on that sword, I want it.
A three-digit code, some strange symbols, and "X = Square"? A baffling puzzle if I ever saw one, but it's actually simpler than it looks.
Replace X's with squares in the array of symbols and the result will look like the numbers 6-8-9, which will indeed open the case.
Nab the sword and back away, then check out the scroll. A sequence of colored numbers? Those are the same colors as from the window on the opposite wall, aren't they? Now you've got a proper sequence!
Go back to the staircase-shaped object. If you combine the layout, the colored pattern from the window, and the numbers behind the scroll, you'll have all the information needed to solve this puzzle.
Map the drawers to the colors and open them in the order the colored numbers suggest: middle drawer in bottom row, drawer in second row, drawer in top row, right drawer in bottom row, left drawer in bottom row, sliding door. Don't close them after you've opened them.
If you did it right, you'll have a claw hammer. But before you put it to use, turn around and give that sword to the boy to get the Hero coin.
Now, go to the door to the next room (now behind you). It's nailed shut, but that's not a problem your claw hammer can't solve. Remove the nail, and proceed onwards!
Room 2: A Picture Is Worth A Thousand Numbers
The second room is similar in layout to the first room, but with plenty of differences. First things first, zoom in on the floor under the calendar and pull up the string to get the artist's palette.
Back away and zoom in on the calendar. Click it to move it aside to reveal a strange sequence of numbers. Don't pretend you don't know what to do here, you did it in Room Perfection 2.
Map the sequences of numbers onto the calendar and they'll trace out giant numerals: 4-1-7.
Back away again and turn right. No sword this time, but check out that folding screen. There's a ladle behind it. Take it; it'll come in handy very soon. Back up.
Check out the mini-pond now. Take some water from it using the ladle, and grab the paintbrush stuck among the flower's leaves (it's a little hard to see). It'll automatically combine with the palette.
Back up and look at the scroll. I can't read Japanese either, but is that a water drop in the lower left corner? Hmm, try splashing it with the water from the ladle and see what happens.
That looks strikingly like a sequence of numbers. 7-8-6-3, eh?
You're done with this view, so step back and turn right to face the door you came in from. You're now facing a chest, a strange star lamp, and a painting.
Zoom in on the painting. Looks like a strange green alien using a palette and paintbrush just like the ones you've already got. Nothing else to see here, so back away.
Look at the star lamp. It wants a three-digit code, so try the one from the calendar.
4-1-7 in case you have a really short-term memory.
Open sesame! ...But there's nothing useful inside? Take a closer look at the lid's inside and nab the key that got stuck to it somehow, then back away.
Turn right to see a familiar-looking green alien. Zoom in and give it the palette and paintbrush and you'll have the Marinmo coin. Back up.
Turn right again and use the four-digit code from the scroll to open the lock on the cabinet.
7-8-6-3. You really should start remembering these things yourself.
Press the button on the padlock once the code is in, then take the strawberry on the plate inside. Back away and turn around.
Open the chest to reveal a weird white blob thing with a cat face. Give it the strawberry and you'll earn the Motchi coin. Of course weird white blob things with cat faces like strawberries; why did you think they hung around Strawberry-Cafe's games so much?
That's enough of that. Go to the "NEXT" door and crack it open with the key.
Room 3: I Hope You're Not Colorblind
Deja vu. The alcove towards the left is new, so zoom in on it. Move all four lucky cats to the right to get the key, then move two of them back left and throw the switch.
The switch opens the little cabinet below, so back up and take the hair tonic from it. Then zoom in on the cabinet and unlock it with the key. Take the beef jerky and note the red letter "P".
Back away and turn right. That guy looks like he's balding a bit, so hand him the hair spray and he'll grant you his aid in the form of the Nomu-chan coin.
This time there's nothing else to do here, so turn right again. Give the dog the beef jerky to get the First coin (and don't anybody dare crack any jokes).
You don't have the code for the chest, so turn right. Note the green E, and zoom in on the shelves towards the right; you should find an eraser in one bowl and a blue O in another.
Back away and zoom in on the table. Check out the notepad in particular; it looks like the word "YELLOW", but I'm suspicious. Run the eraser over it and the Y and W will go away.
ELLO? Not quite... look at it from the other side on it's 0773. Go try that on the chest to open it, and you'll get a teddy bear. You'll also see a white letter H on the lid.
Go return the teddy bear to the girl by the table to get the Yumi coin. Now I think it's finally time we tackled the door.
What you really want to pay attention to is the word "NEXT" above; whereas it was monochrome in the last two rooms, it's multicolored this time. White, blue, red, green? Uh-huh...
Remember the colored letters you've been finding all over the place? White H, blue O, red P, green E? Put them in that order and the code is HOPE.
Try that code on the door lock. You're through!
Room 4: Too Much Information
This time there's a weird black demon-thing guarding the door. He's not budging, but his shirt suggests a possible weakness. Keep that in mind, but back away and turn right for now.
The screen's useless, and the arrangement on the scroll is just gibberish for now, so ignore everything for the moment and turn right again.
There's a cat asleep on the cabinet. (How did he get up there? I thought Wan was the one who could jump high.) Give it the last of the silver vine to get the Nyan coin.
Turn right and you'll see two dogs talking. Give both some beef jerky to get the Wan and Monjirou coins. Your coin collection's complete now!
Check out the lamp on the table. 5-9-6-3? Huh. Turn it on and some lights will come on: middle right, lower left, upper left, middle.
Don't worry about the numbers themselves, they're a red herring.
Try mapping the lights to the letters on the window and see what you get.
Looks to me like the word T-E-A-M. What does it look like to you?
Back away, turn right, and take a peek at the cabinet. It's locked, and it needs a four-letter combination. The one you just found will do nicely; I won't parrot it, it's literally one paragraph above this one.
Take the film from the cabinet. Back off, turn right, and slap the film onto the scroll to get a more sensible code.
Upper right, right, upper left, left, right, left. Do the hokey pokey, turn yourself around, that's what it's all about.
Turn right and try that code on the cupboard by pressing the green lights corresponding to the notches. Again, I mentioned it too recently for it to be worth repeating, so just look up a bit.
Open the cabinet and take the HRK 48 premium ticket. I know someone who's interested in that baby! Go give it to the demon-thing guarding the door and he'll skip away happily. No, seriously.
He dropped a scroll! Pick it up and look at it; it looks like instructions for what to do with all those coins.
Now, as for the door. When you try to enter, you'll get a warning that you won't be able to retreat or save once you're through. If that's not sufficient encouragement for you to save before entering, you're probably not very good at this gaming business.
Room 5: Insert Coin To Continue
The music here would be pretty epic if it wasn't so repetitive. Mute it and put on One Winged Angel if you want.
Oh, and the battle. Make sure there's a coin displayed next to the COIN LIST button (click that button and choose one if not), then click the white summoning circle below the folding screen to summon an ally to attack the Devil King.
Don't worry about the decision too much. Just pick five coins at random and the Devil King will go down. Just keep in mind that some attacks are... funnier than others.
Aha! Did a Happy Coin drop? What a fitting reward. Make out with the princess if you want, then head out the door. You win!
Posted by: SonicLover |
June 30, 2011 11:58 AM
|
June 30, 2011 11:58 AM