
 A new game by Tomatea! Yes, Tomatea, not Amajeto - what a surprise! Another likeable comeback this week, and totally unexpected - after more than two years from the last Tomatea's game (Vintage Card) and many, many games from its successor Amajeto is the old team back with such a pleasant and quality game!
You are back in one of their cosy rooms - it's a new room but feels familiar, and this feeling supports calming tune which I'm sure I've heard before and not just once. Nice. Good memories. The graphics is the same too, maybe even better, and their color palette hasn't changed neither - warm brown wood has always been their favourite material. So relaxing.
Puzzles are very clever and some of them may take a while to figure out - but their solution always makes sense and it's logic. The cursor isn't changing as it used to in their older games, so explore the room thoroughly because there are more views than one would think - but not any pixelhunt. Enjoy!
Have a good time with another great escape game!


So excited about TT's return. It's been too long. A few puzzles are slightly different from past TT staples, and a few design changes might surprise veterans of this developer's room escapes. For example, there is no series of collector's items (such as puzzle pieces), nor is there a left-right puzzle (has there ever previously been a TT game without one?). Also, no changing cursor with the familiar little glow that lets you know a puzzle in the area still needs solving, no warnings when you lack the hints needed to solve a puzzle, and no magnifying glass for inventory items (if you want to examine an item, you just double click). But instead of detracting, these alterations serve as a refreshing change of pace and challenge, making Tea Room just as charming and intuitive as anything we've learned to expect from TomaTea.
Tea Room Walkthrough/Hint-through
Exploring
Desk Wall
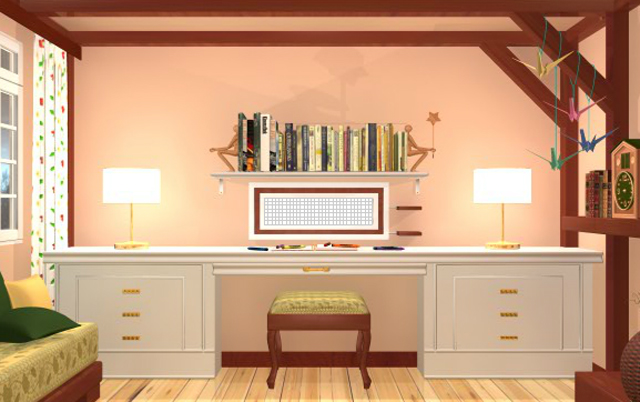
You begin facing a desk with six drawers and a bookshelf overhead with two figurines for bookends.
One figurine is holding a star wand, the other is not. You can zoom in on the missing one.
You can also zoom in on the desk and again on the stool, which allows you to look at the desk's underside. You can slide the front glide out and in as well. The desk has crayons strewn across it and an empty, very long white grid across the wall in front, with two small wooden shelves to the right of the grid.
The three drawers on the left have (top to bottom respectively) a four-button lock, a four-letter combination, and a star with five points that can change to five different colors.
The three drawers on the right need a four-shape code, a four-digit code, and a 3x3 grid of white and orange squares topped by two circles, each half orange and half white.
In the right corner over the desk hanging from the rafters is a colorful mobile of origami birds. You can zoom in to examine their order and height.
"Leaf" Wall
On this wall are three frames holding leaves. The right frame displays three columns of leaves in pink, grey, and blue. The left frame, four columns in green, yellow, yellow, and red. The middle frame, a pile of different colored leaves. Clicking on the "column" frames reveals the words "tea" and "room" behind them.
On the left shelf there is a cuckoo clock with buttons for setting the time.
On the right shelf there is a red and yellow vase with yellow and orange daffodils. Beside it is a little "house"(?) that you can collect.
On the bottom shelf there is an oversized basket with flowers (or perhaps it's the flowers that are undersized?). Beside it is a turtle with nine spots on his shell. When you click each spot, his eyes light up.
In the center of the wall is a star figure, enclosed by several other shapes of progressively increasing sizes.
Door Wall
On this wall is an unresponsive door, a large empty picture frame, and a low bar below it with four blue teacups each on a green saucer, and a gas burner. Three teacups have what appear to be teabags in them of different colors: yellow, red, green. The second cup is empty.
Window Wall
Between the two large windows that show a dim rainy evening outside, there are two puzzle boxes. The top one is an adaptation of a numberlink puzzle (imagelink?) that can be solved without any in-game clues. The bottom box is a slider button puzzle that's unresponsive. Probably missing a piece.
Zooming in on the sofa and shuffling the pillows reveals an unresponsive box with a circle of yellow jigsaw spaces in its center.
Solving Puzzles
First, collect the house beside the daffodils, and collect the paper from under the desk glide (zoom in on desk, open the glide, then click on the stool to look under the glide and take the paper).
Shapes puzzle (top right desk drawer)
Hint: Look at the shapes accompanying the star in the center of the "leaf wall". The code order is largest to smallest.
Code: square, rhombus, circle, pentagon
Take the matches.
Digit code (middle right desk drawer)
Hint: Play around with the "house" in your inventory. The roof separates from the bottom. Now where have you seen two slots where these two halves just might fit?
to the right of the grid over the desk are two shelves, which seem to be projector slots. Place the house parts onto them. Notice that the roof goes on the bottom, and the base goes on the top slot. Read and combine the resulting two halves of code that appear on the grid.
Top and bottom are switched, so the code reads 5692
Collect the star wand and flip the switch.
3x3 Grid (bottom right desk drawer)
Hint: Play with the turtle. Click on all the buttons and watch his eyes carefully.
Based on when the eyes flash orange and when they flash white, work out the following 3x3 pattern, where o is orange and w is white:
o o o
w o w
w o w
(The location of the "eyes" (the half-white-half-orange circles) on the drawer puzzle indicate that the above orange "T" shape is the pattern's correct orientation on the lock grid)
Take the bird clue
Four buttons (top left desk drawer)
Hint: The bird clue from the bottom right drawer. Where have you seen birds before?
Combine the mobile birds' order and height, to translate the birds on the paper into your code. E.g., The lowest bird on the mobile (green bird) is the second bird. So the lowest bird on the paper clue equals the second bird on the mobile, which equals the second button on the lock.
Press the buttons as if they were numbered: 2 4 3 1 1 2
Take blue teabag
Four letters (middle left desk drawer)
Hint: The paper from under the glider. Four colored leaves, combined with the leaves in the picture frames on the wall.
The letters "t e a r o o m" behind the columns of colored leaves in the frames coresspond to the leaf colors in front of them: pink, grey, blue, green, yellow, yellow, red. The paper clue reads blue (a), pink (t), yellow (o), red (m). ATOM.
Collect the
paintbrush.
Star (bottom left desk drawer)
Hint: Place the star wand into the left bookend above the desk. Something changes in the room.
Check the star on the wall with all the leaves. The points are colored now. From the top, clockwise: yellow, pink, green, red, blue
Collect the canvas.
Clock
When you flipped the switch inside the bottom right drawer, something changed above the desk.
The desk grid now shows 21:15. Set the clock to 21:15 (9:15)
Collect the key slider.
"Imagelink" Puzzle (top window puzzle)
This puzzle requires no in-game clues. The way to solve a link puzzle like this is to connect the matches into pairs (in this case the same colored paint brush and paint cans) without crossing lines with another pair's link path. If it's needed, here is a tutorial on how to solve numberlink puzzles: http://www.nikoli.com/en/puzzles/numberlink/rule.html
Solution: (G-green trail, B-blue trail, etc.)
BBGGGG
BRGYYY
BRGYRY
BRRRRY
BBBBBY
YYYYYY
Collect water bottle.
Slider Puzzle (bottom window puzzle)
Insert the key slider. Shuffle the pieces according to the arrows on them until you can get the key slider to the lock on the far right.
Solution: Move the KEY right. Move the slider above the key right. Move the upper-left-corner slider all the way down to the lower left corner. Move the two top-of-the-board sliders all the way to the left. Move the slider on the right edge of the board, up. Move the slider above the Key, left. Move the center slider (that's blocking the key) all the way up. Move the KEY all the way right to unlock.
Collect the blue kettle.
Art project
You should now have everything you need to make tea, and create great art.
Make tea
Go to the bar beside the door. Switch on the gas burner and use the matches to light it. Fill the kettle with water from the bottle and place the kettle on the burner. Back out to let it boil.
Place the blue teabag into the empty teacup. Pour the steaming water over each teabag. Viola. You have a vivid set of colors to work with.
Create art
Place the canvas onto the empty frame. Click on it again to bring up the "paint" teas. Use the brush to paint the picture correctly, according to the true colors of the items around the room.
daffodils: yellow
vase: red top, red bottom, yellow center
kettle and teacup: blue
saucer: green
puzzle box: yellow
Note the change in the painting
Sofa puzzle box
Note the puzzle box in the painting changes colors upon completion: (clockwise) yellow, red, yellow, blue. You can now access the puzzle box on the sofa and change its colors to match the painting. Take the key for the door.
Enjoy a spot of tea on your way out of this colorful cozy little corner. You've earned it.
Thanks for the walkthrough/mini-review! (I was just about to start doing my walkthrough, so this is perfect timing.)
Being so used to Amajeto's format, I didn't even notice the lack of missing hint warnings, even though I'm sure many of us first saw that mechanic from Tomatea. The different variety of puzzles and much higher visual polish really sets this game apart from the Amajeto series, and of course it's only fitting that Tomatea made a game with a tea theme.
Thanks kktkkr. You seem to be writing all the walkthroughs lately, and thank you. Great committment. Glad I could take some of the pressure off.)
Judy, can you
show the direct solution to the imagelink puzzle? I tried several ways and they all seem to cross over each other no matter how i try.
Thanks for your help.
anyone?
the direct solution to that imagelink puzzle?
i cant solve it.
Logic for the imagelink puzzle:
(For simplicity, I'll call the path connecting the green cup and teabag the green path, and describe it as if it runs from the cup to the teabag, and similarly for the other colors.)
Consider the green and yellow paths. If the green path passes under the yellow cup, it must disconnect it from the yellow teabag, which makes the puzzle unsolvable. So the green path must connect within the rectangle contained in the top two rows and rightmost four columns.
The green and yellow paths combined form a bridge connecting the top right to the bottom left. In order to not cut the board in half separating the red and blue pairs, the yellow path must pass behind (to the right of) the red and blue cups, by following the right column: UR2D4L5. This also forces the green path to follow the top row: U2R3.
The remaining steps should be intuitive, but to be logically rigorous you can trace the red and blue paths square by square. For instance, the red cup is now completely surrounded except for its bottom side, so the path must start by moving downwards, and can only continue to the left. This puts the blue cup in the same situation, so its path must start by moving to the left twice. This puts the red path in the same situation, and so on.
Solution
Click the squares
4 _ 4 1 1 _

2 _ 2 4 1 5

2 2 _ _ _ 2

2 3 1 1 6 2

3 1 1 1 _ 2

_ 1 1 1 1 6
times, forming the pattern
┌ b ┌ ─ ─ g

│ r │ ┌ ─ ┐

│ │ G Y R │

│ └ ─ ─ ┘ │

└ ─ ─ ─ B │

y ─ ─ ─ ─ ┘
Screenshot: https://i.imgur.com/0pHva0E.png
Can't change the colors on the sofa box puzzle even though I solved all the other ones! (no items left in inventory) -- is this a bug or am I missing something?
Update