
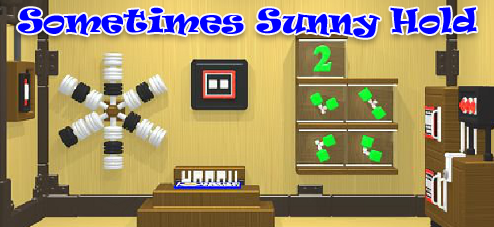
![]() Welcome to Sometimes Sunny Hold, Haretoki's marvelous fun factory, where every surface is made of fun toys to play with and fun gadgets to explore! Yes, it is fun I tell you; please don't bang your head against the wall like that. Although there's no turning away from the comically complicated contraptions and delirious devices, things are not as devious as they seem. No matter how trapped you feel, no matter how futile your efforts to make sense of that hinge thingy, I'm not kidding you, escape is possible. After all, I wouldn't be here to tell you about it if it wasn't.
Welcome to Sometimes Sunny Hold, Haretoki's marvelous fun factory, where every surface is made of fun toys to play with and fun gadgets to explore! Yes, it is fun I tell you; please don't bang your head against the wall like that. Although there's no turning away from the comically complicated contraptions and delirious devices, things are not as devious as they seem. No matter how trapped you feel, no matter how futile your efforts to make sense of that hinge thingy, I'm not kidding you, escape is possible. After all, I wouldn't be here to tell you about it if it wasn't.
 Despite looking complicated, the interface is pretty intuitive and will be old hat to anyone familiar with escape games. Just in case you're new to this: navigate by clicking the grey bar that appears at the edge of the screen to turn or back up. Clicking on certain objects will zoom you in for a better look or will grab them for your inventory. You can then use an inventory item by highlighting it or examine it in detail by double-clicking. Although there's only one ending, using the "save" feature will help you take a break to regain sanity. Finally, you'll be well-equipped for puzzle solving by combining certain items, correctly using others, and making inferences from the clues which are nestled into the room's fixtures and furnishing.
The static cursor adds to a couple instances that would be pixel hunts except Haretoki dropped hints here and there, alerting us to the hunt. Because the puzzle presentation is semi nonlinear, the greatest difficulty comes in the beginning until you tick off some puzzles from your checklist, lessening the slew of clues and narrowing the possibilities. Admittedly, not everyone will call this game his idea of fun. So maybe it seems designed by a third-grader on a Chocolate Frosted Sugar Bombs bender, and maybe Sometimes Sunny Hold sometimes seems illogical, but as odd and befuddling this place is on first beholding, there's near lyrical perfection in its creative logic and inventive construction. Cool stuff will unfold if you have the patience or mental tenacity to solve your way out. So don't hold back—let Haretoki's fantastical architecture work its wonkiness while you work your way to freedom.
Thanks to John and Cyberjar88 for sending this one in!


Walkthrough Guide
(Please allow page to fully load for spoiler tags to be functional.)
Sometimes Sunny Hold Walkthrough
Since a lot of the puzzles can be done in any order, this walkthrough is organized by puzzle. But, if you want step-by-step through the whole game, just start with the first spoiler and work your way down. Thank you for visiting elle's walkthrough and have a great day!
Two Buttons: Left and Right
When you begin the game, you're facing a door that folds down and locks you in. From here, turn right.
Now you're facing a six-spoke wheel thing, a green 2 and, right in the middle of the wall, two square buttons.
Zoom in on the "steps" just below those two buttons, and lift up the blue "Hare toki" flap to find...
a SCREWDRIVER. Take it.
After getting the screwdriver, turn right to see a wall-mounted monitor and a cabinet with three doors. Zoom in on the lower right side of the cabinet:
Use your SCREWDRIVER to remove the screw.
Open the cabinet door and take the HINGE-LIKE PART.
Examine the other side of the HINGE for a clue.
4R,4L,1R
Back up from the cabinet where you got the hinge and turn left to face the wall with the two square buttons.
Zoom in on the two buttons:
Using the clue you just found, press the two buttons in the correct sequence.
SOLUTION:
As shown on the back of the hinge-thing...
Click the RIGHT 4 times, then click the LEFT 4 times, then click the RIGHT once.
When done correctly, you'll hear an unlock sound and the border will turn blue.
Open the panel behind the two square buttons to get:
a grey block with a ROUND BUTTON on it.
4-Digit Code: Top Cabinet Door
After obtaining the "grey ROUND BUTTON block", turn twice to face a green 1 and, to the right of the 1, a black shelf sticking out of the wall.
Examine the black shelf to see it has a panel with a digital "8" display on it and four small lights...
Put the grey block with ROUND BUTTON into the right side of the panel and now you have a way to operate the display.
Press the button several times, taking careful note of how the number display changes and which of the four indicator lights turns red.
Back up from the black shelf and turn left to view the cabinet again. Zoom in on the cabinet's top left side:
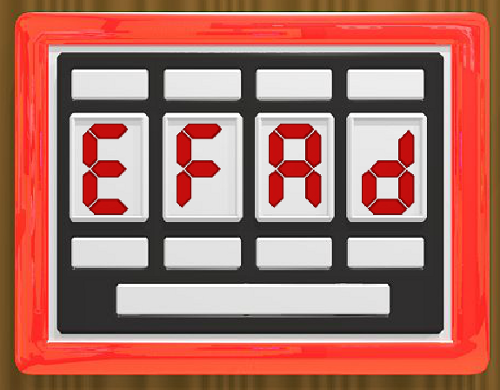
Using the smaller buttons above and below each letter box to change the letters, input the correct 4-digit code.
SOLUTION:
The four tiny lights on the digital panel/black shelf indicated which digit was being displayed as you pressed the round grey button. But, the first and fourth letters were given in two parts. After pressing the button six times, you should have all the needed parts to get the answer...
E F A d
Screenshot: 4-Letter Code Solution
When done, press the long rectangular button to input the answer. The border turns blue and you'll hear an unlatching sound.
Back up and open the top cabinet door to get:
Some kind of BASE/BOARD (what would you call it?)
Connect the HINGE-LIKE THING (from the two-button puzzle) to the BASE/BOARD to create a new part: a BASE WITH A HINGE-ROD THING ON IT.
Asterisk-Shaped Six Lever Puzzle
Turn to face the green "1" and examine the design of that box on the floor next to it.
It has six channeled groves, each of which has a lever that you can slide into one of three positions.
The top spoke is the exception: it's shorter and has only two lever positions.
If you search the room for something else that looks like that six-spoke lever puzzle, you'll find a six-spoke wheel thing...
Notice that each spoke on this thing has a black segment.
From the asterisk-shaped lever puzzle you saw earlier, you know this thing should have a shorter spoke, too...so look for where you might remove one of the segments...
Closely examine the southeast spoke and you'll see a little red button nestled in between the segments.
Press the button and take the WHITE SEGMENT PIECE.
Now back up and examine the altered six-spoke wheel...which its one shortened segment, you now have the clue you need.
Go back to the asterisk-shaped six lever puzzle:
Slide each of the black levers to the correct positions.
SOLUTION:
Match the shorter grove on this puzzle to the shorter segment of the six-spoke wheel. Then, match the black levers to the positions of the black segments...
Screenshot: Asterisk Puzzle Solution
When correct, the border turns blue and you hear an unlatching sound.
Back up and get the CRANK HANDLE.
3 Green Numbers
This baffling has an important clue hidden in the wall-mounted monitor. To operate the monitor, though, you'll need to find the connector cable....
If you haven't already, note how the asterisk-shaped puzzle has one shorter arm.
Go over to the six-spoke wheel and examine the southeast spoke. There you can press a hidden button to remove the segment.
Now, look at that WHITE SPOKE SEGMENT in your inventory:
Open it to find a red CONNECTOR CABLE.
Once you find the connector CABLE, open the panel under the monitor and plug it in.
Now three sets of numbers will appear on the monitor's display. Take note of what you see.
Then, go around the room and make note of the types of green plastic "Snap Together" toys you see for each number.
Turn back to the three-cupboard cabinet and zoom in on the bottom left door:
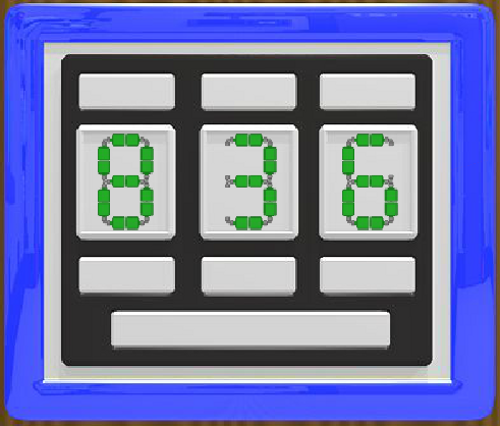
Based on the clues found on the monitor, around the room, and in the puzzle itself, input the correct 3-digit number.
SOLUTION:
The thing to note is how "1" has only one green segment, "2" has two green connecting parts and "3" has three... so if you think about how the pieces fit together, you can deduce the numbers you need to make according to the directions on the monitor.
8 3 6
Screenshot: Green Numbers Solution
After entering the correct code, press the rectangular button; if correct, the border turns blue.
Open this cupboard door to get:
a BATTERY.
The Silver Key
For each door opened on the three-cupboard cabinet, one of its red lights will turn blue. When all three doors have been opened a panel will open up below the three blue lights...
take the SILVER KEY.
Turn around to face the door flap and insert the SILVER KEY into the keyhole, press the button and...watch the fun!
Four Corners and a Square: Five Buttons
Now the room is tilted...sort of. See the red half-arrow at the corner of the door jam? Follow it to view a newly revealed clue...
Several sets of four squares. A red line indicates the order.
Screenshot: four squares clue
Back up from there and turn around twice. Now you see a new door. Zoom in to the right of this new door, on a panel with five shapes: four corners and a solid square....
Press each of this uniquely shaped buttons in the correct sequence.
SOLUTION:
Think of the black squares on the clue as simply not there and look at the shape left behind by the remaining squares. Those shapes can match up to the shape of the buttons and following the red line will indicate the sequence in which to press them...
Screenshot: Five Buttons Sequence Solution
When done correctly, the panels above the five buttons open up and you can get...
a GEARS AND ROD thing.
attach that to your BASE/BOARD thingy, along with the other parts, and you start to see you're making a VEHICLE.
"Gun" and 3x3 Grid
To the left of the new door is a hole. Put the CRANK HANDLE into this hole.
Now turn the crank and keep turning, making careful note of direction each arrow shown on the display next to it.
Turn left and see a 3x3 grid on the wall. Zoom in on it:
The object is to fill press each button, turning it blue, in the correct sequence.
You must use the directions given by the arrows (while turning the crank handle).
HINT:
That the clue isn't delivered from the starting position might be misleading. The idea is: there is only one way you can follow the arrows that would correctly fit on the board. Once you figure out where to start, the rest is gravy.
SOLUTION:
The only place you can start, and still follow the arrows, is the top right corner square. So start by pressing the upper right corner square...THEN, from that position go:
DOWN, DOWN, LEFT, LEFT, UP, RIGHT, UP, LEFT
If you did that correctly, you will have filled the board with blue squares all while following the arrows. The border will turn blue and the panel will open.
Get the CORK CARTRIDGE.
Turn twice until you can see an arched tunnelway in the wall. On the floor, below that, is an open grey box. Look inside...
...pick up a scoped GUN.
Now, attach the CORK CARTRIDGE to the GUN BASE.
Four Letter Puzzle "Up Above"
Turn to face the door view. To the right of the door, low on the wall, is a black panel. Open it up:
Flip the switch.
A new puzzle has been activated.
When you back away from the switch, you'll see the yet-to-be-solved puzzle...up above, too high to reach.
Look through your CORK GUN's scope to get a close-up view of the puzzle. The cork allows you to aim and hit each button. Kind of nifty! But, you still need a clue...
Turn to the left and you'll see the "HARE TOKI" flap is hanging down. Get a better look at it:
Lifting the flap up and down, you can see the white "hinges" actually make a word: HAPPY.
Go back to the door view and use your CORK GUN again to view the puzzle up above:
Change each of the letters to spell out the needed code word:
SOLUTION:
H A P Y
Then click the button below the "P" to put the "x2" there.
After you've spelled the code word, click the long rectangular button at the bottom. When correct, you'll hear something fall to the floor.
Back up, and zoom in on the green case (which has tumbled to the left of the door).
Click on the green case to pour out its contents then pick up FOUR WHEELS.
Attach the four wheels to the VEHICLE BASE to make a sort of CAR.
Car in Tunnel and the Gold Key
Turn right from the door and examine the niche in the wall with the arched tunnel.
Place the BATTERY in the receptacle on the left side of the road.
Then, put the completed CAR (base, two hingy/rod things, and four wheels) on the road.
A flap will lift up, revealing a button. Press the button and watch the car drive into the tunnel. When it returns...
get the GOLD KEY.
Turn left, go up to the door, and use the GOLD KEY in the keyhole.
To exit: click on the doorknob.
Congratulations!
(This game has only one ending.)
Posted by: elle |
January 16, 2014 8:19 PM
|
January 16, 2014 8:19 PM