
 After several lean weeks the fat one has arrived - we get one more excellent escape game this week!
Ichima Coffeedo's games are always quality, but this one is really satisfying on many levels - music, graphics and puzzles are working together very well and make playing fluent and enjoyable.
From the first look at the room where you are trapped you can see that there are more than one locked door and that there are puzzles and hints which don't match. The obvious conclusion is correct - the game is quite long and the puzzles cunning, often requiring thinking out of the box. But always fair and logic. Enjoy!
The game has autosave and one ending. You don't any Japanese to solve the puzzles.
Have a good time with another great escape game!
![]() https://play.google.com/store/apps/details?id=com.chagasi.heisei (Android, Android Tablet)
https://play.google.com/store/apps/details?id=com.chagasi.heisei (Android, Android Tablet)


Heisei Escape
The Heisei era of the Japanese calendar is ending soon, and this is the last room before it does.
(The game has a dynamic hint system that's also supposed to show ads, but I don't see any in this version.)
Exploration
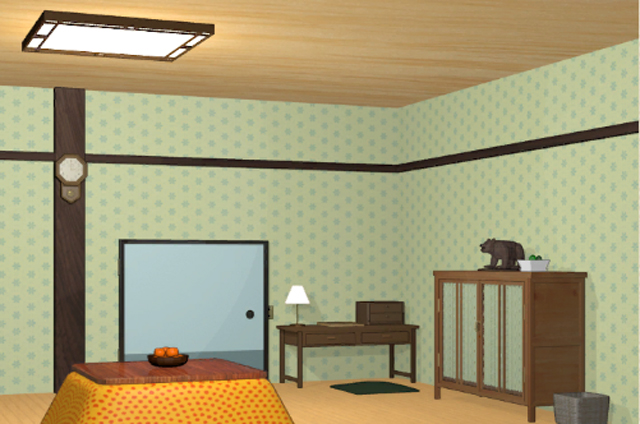
It's a lovely Japanese room! The kotatsu in the middle has a bowl of oranges on a note:
"I've made the final escape room of Heisei, please enjoy. (I've escaped this world long ago.) — Granny"
Behind it, you find a switch with six round buttons. Along the back wall, you also see a blue door that's bolted on its right side. To the right of that, there's a desk with an empty Go board and drawers that contain a T panel and what looks like half of a fish made out of wood. Further to the right, you see a cupboard with an orange keyhole and a wooden bear on top, and an empty bin which covers an irregular puzzle piece.
Turn right to face the main door. The wooden flooring gives way to carpet, and you find that the door has a yellow keyhole and the potted plant beside it hides an orange key. A wooden table in the back has a variety of items with triangular markings and a coffee grinder that ejects a note with a word on it. The white table beside it has a working portable stove and sink. The fridge is locked and has letters on its buttons.
Turn right. There's a small door here with a green keyhole, as well as a cabinet with a three-digit lock and a device with two holes on its top. Pick up another puzzle piece from behind the potted plant.
Turn right. This bookshelf has several items that you can slide back and forth over blue arrows (and one that you can't). A small shelf on the right holds a glass box with circular pictures on its front, and directly above it is a picture with the kanji characters for Heisei.
Unlock (orange)
Use the orange key to unlock the bear cupboard. Inside, you find a rectangular can, and a drawer with some puzzle pieces already inside.
Gaps
Place both puzzle pieces in the drawer (in the bear cupboard) to get the clue for the other cabinet.
There are two ways you can place the pieces between the two that are already present, and the clue only makes sense if you place the piece with two protrusions on the left and the other piece on the right.
The space between the pieces then spells out the code 253 (and the space in the right piece looks like the button).
Enter that in the cabinet and push the button to open it and find a saucepan.
(The pieces now vanish from your inventory, but if you check the drawer again you find them fixed in place.)
Recipe
Use the clue from the note in the coffee mill to unlock the fridge.
You can spell out
cookingbookwith the buttons on the fridge, but bear in mind that "ok" is two letters.Push the
c o ok i n g b o okbuttons, and open the fridge to find a plate of clams.Steam
Fill the saucepan in the sink and add the clams, then place it on the stove and turn it on to boil them.
After a short wait (back up and zoom in again), you find something sparkling in the clams: a coin which appears to have some inspirational messages.
Twist
Use the coin to open the can, and pull out the magnifying glass from inside. There are some letters on the glass.
Detailed
Use the magnifying glass on the glass box under the kanji frame. Now you can see the pattern in each circle.
So use that clue to unlock the switch on the floor.
Each pattern has a small portion that breaks the symmetry by being different:
Four swirls: The bottom curve is thinner and S-shaped.
Cloudy: The bottom-right outline isn't filled in, and it just forms an M.
Striped cross: The bottom-right shape is supposed to match the top-left, but instead it's a hollow almost-triangle in an A shape.
Honeycomb: The thicker left hexagon and the line leading out from it form a Q.
Barcode: The only horizontal line in the entire pattern connects two vertical ones to form an H.
Square variety: One of them is actually a circle, or letter O.
So the AOQSMHH letters appear on the UR DR DL UL U D D circles. Push the corresponding buttons, and the entire kotatsu shifts aside to reveal a staircase leading down!
Exploration 2
The basement is unexpectedly cozy. It even has a piano with triangular buttons! On the table, you find a book which contains what looks like a transparent face panel over a lot of unusual shapes. You also see some purely decorative circular windows and a large white box hanging from a chain through a hole in the ceiling.
The nearest chair on the left of the table has an arm that opens up so you can take a spanner.
Catalog
Use the clue from the book to unlock the piano.
The shapes in the book are mostly abstract shapes, except for some that look like the containers on the kitchen table upstairs. Specifically, all the silhouettes of the containers appear in the second-last row on the right page, in the order Bottle Bowl Bowl Plate Can Can Bottle.
The triangles on those containers point RDDULLR, so push those buttons on the piano to open the piano and find the other half of a fish.
Feeding
Combine both fish halves into a complete wooden fish, and give it to the bear. A green key falls out.
Unlock (green) / Exploration 3
Use the green key to unlock the door at the back of the room.
It opens into a bathroom where it looks like they only had enough tiles to form the clue on the wall. The bath is full of water, and there's a machine on the left with four digit buttons and number clues.
Numeric
Use the clue from the wall in the bathroom to unlock the machine next to it.
The wall clue has exactly 12 tiles, and the number of tiles on each digit can be counted in the same way. Which digits have the counts given?
(It helps to realize that digits which are symmetric to each other can't be in the code. You can also eliminate 0 which appears on the wall, which leaves you with just five digits to count.)
The digits formed from 5, 7, 9, 13 squares are 1, 7, 4, 8.
Enter that in the machine and push OK. This drains the tub and leaves some sort of electric device.
Display
Place the device you found onto the cabinet beside the bathroom door. Now you can press the button beside to make some arrow clues appear on the screen while the small rectangular lights on the right glow green.
Displaced
Use the clue from the arrow device to solve the bookshelf puzzle.
The arrow clues tell you which way to move the objects on each shelf. Since each object slides right and then left when you click it, you need to click the three colored pots and the lantern once, and the kettle, dog, glass jar, books twice.
Push the OK button, and the shelf swings into another room!
Exploration 4
Amongst all the brick walls, you spot a three-letter panel in the back. On the left, a small table has a drawer lock with a grid of four black buttons. Something extends down a hole in a floor on the right (you can take a closer look at it), and you see another clear kanji panel on the floor beside.
In the wall
Use the clue from the basement windows to unlock the three-letter panel in the brick room.
The lines in the windows form like letters if you turn them upside-down. If you turn the entire view upside-down then the empty window (which looks like the button) appears on the right, and the letters then read YTI.
Enter that in the panel and push the button. A hidden compartment opens up and you find a pair of pliers in front of a clue with black-and-white grids.
Cut
Use the pliers to cut the wire in the brick room. You can now pick up the pot of Go stones.
Play
Place the stones onto the board (on the table in the corner of the first screen). They magically form into isolated white and black clusters.
So use that clue to unlock the drawer in the brick room.
Each cluster represents one pattern from the wall clue, but only the white or black stones in each pattern are visible on the board.
Thankfully, each pattern is numbered according to the number of black stones it has, and for white clusters you can get that number by subtracting the number of white stones from 9.
Each cluster represents a different-numbered pattern:
Top left: 8 over 7
Top right: 1 over 4
Bottom left: 3 over 6
Bottom right: 2 over 5.
Putting them in order, you find that you need to click the buttons in the
⌝⌟ ⌞⌝⌟ ⌞⌜⌜ order. Open the drawer and take what looks like an arrow panel.
Wrench
Use the spanner (you found in the basement) to unbolt the blue door on the first screen. It opens up into a small closet with a yellow safe, which has two rectangular holes instead of a lock.
Missing
Combine the pieces in pairs to form the kanji shown above the shelf, and then place them in the safe and open it to find the golden key.
Use it to unlock the door and leave. (It turns out you're not haunted, just having a really nice dream.)
Lovely game. Challenging but logical puzzles, soothing music, beautiful design. It's games like this I keep coming back here for!
Update