
![]()
 I feel kind of bad for these ladies. Nobody can ever be happy to see them, since every time they show up, it usually means someone's dead. Sometimes a lot of someones. That's kind of a worse reputation to get stuck with than the gal who double-dips at parties. Rizzoli & Isles: The Boston Butcher from PastelGames drags you out for another fun day of murder, motives, and mystery to solve a case point-and-click adventure style down at the docks. Turns out when a body with severed hands turns up dumped, people don't immediately think "natural causes". Click around to gather the clues in each area, making use of the detective-type tools at your disposal, and don't be afraid to stick your badge in someone's face for answers. Bonus points if you scream "I AM THE LAW" while doing so. You'll have to sleuth your way around the city and return to headquarters frequently to combine evidence to make your case stick when you eventually find a suspect.
Play all the Rizzoli & Isles games:
Make no mistake, The Boston Butcher is a gorgeous game. The artwork here is top-notch in a rich oil painting sort of way that really makes you want to sit back and let all the details sink in. Of course, you'll probably have to since that lovely artistic style unfortunately also tends to get in the way of easily identifying points of interest on site, leading to a lot of frustrating pixel-hunting as you wave your cursor over the screen like you're dowsing for water. There isn't a whole lot of direction given, so your best bet is to frequently just talk to everyone, double-check everything, and blast blood spray like you're trying to seal up your beehive hairdo. The Boston Butcher is a bit of bite-sized investigation that might require a bit much of the proverbial eagle-eye for some people, but it's an intriguing and gruesome little mystery that'll help you get your serial-killer fix for the day. Or you could just wait for Dexter to get around to it, but where's the fun in that?


Walkthrough Guide
(Please allow page to fully load for spoiler tags to be functional.)
Rizzoli and Isles: The Boston Butcher walkthrough
Docks:
Click on the left of the screen to talk to the police officer there.
Head straight through the gates.
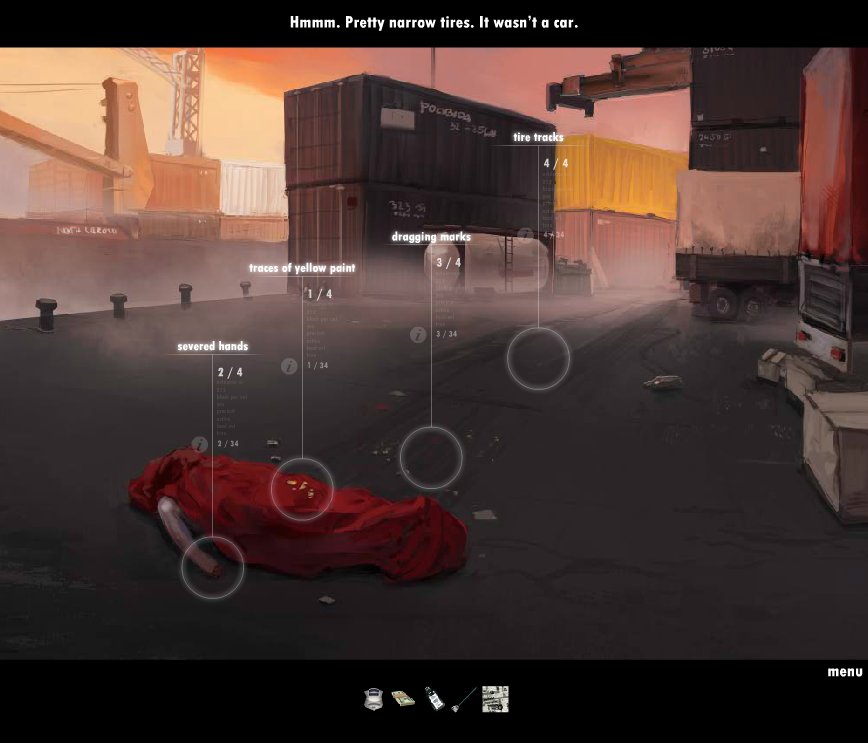
Scene of the crime:
Examine the middle of the body to find traces of yellow paint.
Click on the wrist of the body to notice the hand is severed.
Click above the body to notice the dragging marks.
Slightly above and to the right of the drag marks are tire marks.
Click on the tire marks, and it opens up the next location.
Screenshot
Cargo Containers:
Click on the orange machinery to move in closer.
Click again on the machinery to move in even closer.
Click the blood stain on the door.
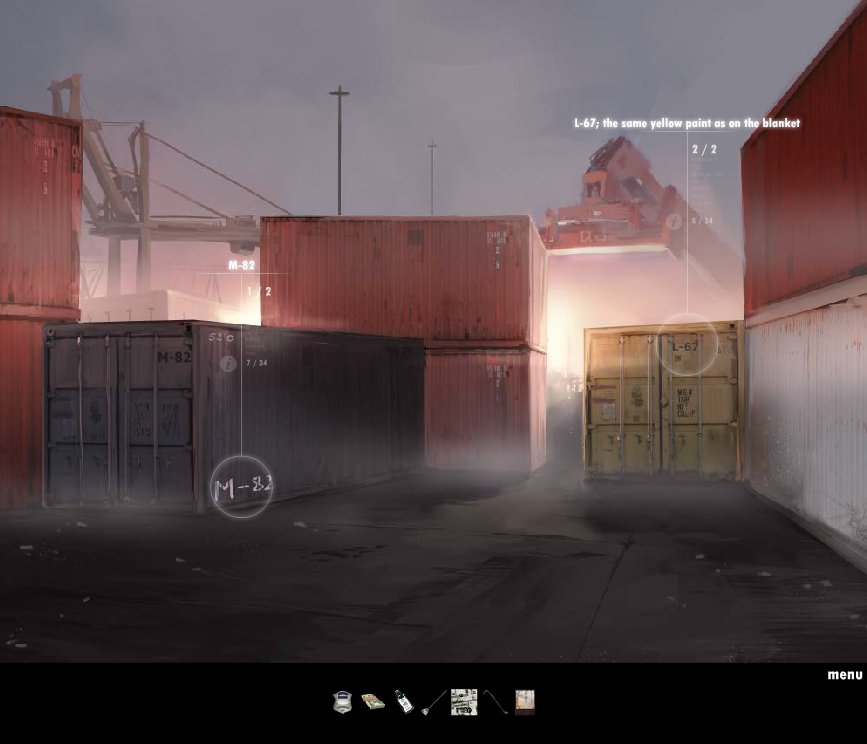
Click the clipboard in the machinery to find the work list.
Click near the circled numbers on the paper. It will tell you to check out those crate numbers: L-67, and M-82.
It's not immediately clear, but the worklist is the second clue.
Click on the crowbar hanging at the bottom of the door to add it to your inventory.
Back out twice.
Click on the bright white spot to head that direction. You'll be in an alley between crates.
Again click on the brightness at the middle of screen to move on.
Two crates you are looking for:
Click on the M-82 on the gray crate.
Click on the L-67 in the upper corner of the yellow crate. Note that it's the same yellow paint as is on the body.
Use the crowbar on the yellow crate, then go in it.
Screenshot
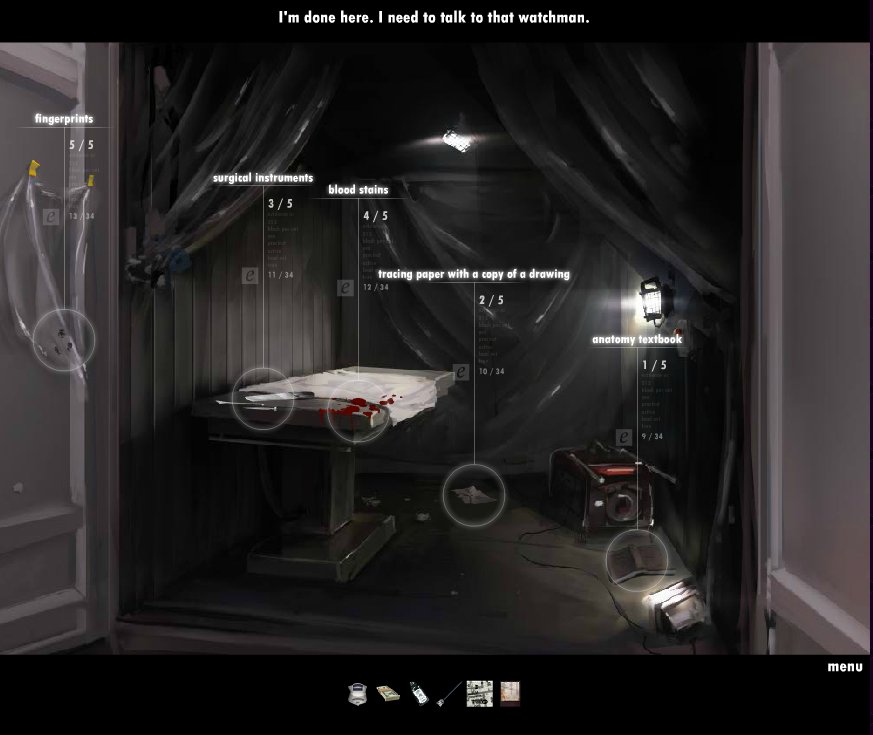
In the yellow crate:
There is a book on the floor in the lower right of the screen. Click it to see it's an anatomy textbook.
Click on the paper in the middle of the floor to discover tracing paper.
Click on the knife on the table and note the surgical instruments.
Spray your blood stain spray to the right of the knifes until blood appears, then click on it.
There is plastic hanging on the door on the left of the screen. Use your fingerprint brush near the bottom until a fingerprint appears. You'll know you're in the right spot when you actually hear a brushing noise.
Click on the fingerprints to find the last clue. You will be told to talk to the watchman.
Screenshot
Back all the way out until you are at the scene where you first talked to the policeman.
Talk to the man in the orange jacket.
Choose whether to scare him with your badge or bribe him. (I chose badge.)
After the conversation ends, a new location will open up on your map: Headquarters!
Headquarters:
Talk to the woman on the left. She tells you to make sure to visit the autopsy room.
Sit at your desk, then pick up the paper and pencil on your left.
Go back.
Click on the right to check out the bulletin board to see what has been figured out so far.
Click on the door to the autopsy room and talk to the doctor there.
Go back.
Talk to the woman again, and a new location will be opened on your map: Street Corner!
Street Corner:
Click on the hot dog cart to buy a hot dog.
Go back and click on the ambulance.
Click on the homeless man on the bottom left. Give him the hot dog from your inventory and then he'll talk to you.
Click on the right of the screen to go back.
Click the alleyway near the cop to go left.
Alley:
Click on the woman: she'll tell you wait a sec. Back out of the alley, then back in, and she'll be there waiting to talk to you.
After your conversation, click on the glove on the left.
Use the blood stain spray above the dumpsters, then click on what you reveal.
There is a button on the tipped over dumpster on your right. Click on it, then head back to headquarters.
Screenshot
Headquarters:
Look at the bulletin board to see new connections in the case.
Click on the woman standing by the autopsy room to speak with her. A new location will open on your map: Medicus Foundation!
Medicus Foundation:
Click the door with the red awning on the right to enter the building.
Talk to the receptionist. She'll tell you desk 32 is what you are looking for.
Click on the elevators to continue.
Go through the glass doors.
Click above the 32 to examine the desk.
Note the number star-489, then lift the phone and dial it. Be sure you dial the asterisk first!
Talk to tech support. They will print a paper for you to pick up from the receptionist.
Go back to the reception desk. There is a paper on the desk on the left. Pick it up, then go back to headquarters.
Headquarters:
You are immediately in the autopsy room. Click on the Dr. to speak to her.
Exit through the doors.
Click on the archives.
Get the box from the docks. Use your fingerprint brush to reveal a print on the large knife, then click on it.
Click on the box from the alley. Reveal fingerprints on the button on the rubber glove. Click on them.
Go back and look at the bulletin board.
Click on the lady at the desk. A new location will open on your map: Massolit Books!
Massolit Books:
Click on the street sweeper to speak with him.
He won't talk give you much information. But notice the poster over his shoulder and click on it.
Go back to headquarters and look at the bulletin board. This will open up a new location: Renaissance Fair!
Renaissance Fair:
Enter through the archway.
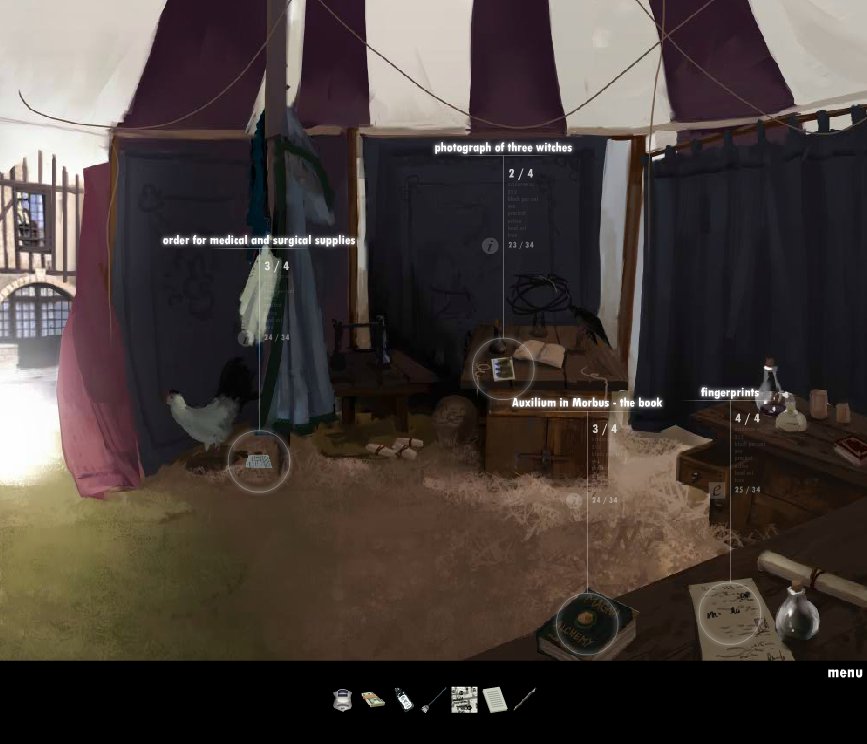
Enter the tent on the right.
Click the alchemy book on the bottom of the screen.
Click the photograph on the table in the middle.
Click the paper near the chicken.
Use your fingerprint brush on the paper next to the book to reveal fingerprints. Click on them.
Screenshot
Click the arrow at the bottom of the screen to go to another area in the tent.
Talk with the alchemist to arrest him.
Return to headquarters, talk to the lady at the desk. She advises you to look over your evidence.
Go to the archives to look over the fair evidence.
Go back and look at the bulletin board.
Go to interrigation room and talk to the alchemist.
After the conversation, give him the paper and pencil from your inventory.
A new location will open on your map: Warehouse!
Warehouse:
Click on the door to the right of the blue crates to zoom in.
Click on the rock on the bottom right of the porch to pick it up.
Use the rock on the window to break it.
Click to door to enter.
Inside the warehouse:
Click the right of the screen to go that way.
Click on the surgeon.
Congratulations! You've solved the case!
Thanks to Kimberly for writing the walkthrough!
Posted by: Mike |
June 1, 2012 8:28 PM
|
June 1, 2012 8:28 PM