
![]()
 Certain 1980s teen comedies notwithstanding, if ever anyone had weird down to a science, Detarou does. Their uncanny ability to simultaneously captivate interest, elicit giggles and leave us teetering near repulsion make Detarou escape games the reigning champions of strange diversion. Take Nobushi as a case-in-point: gratuitous amounts of Detarou's idiosyncratic oddness are dressed up with some "Saitou Get" collecting fun to equal peerless puzzling enjoyment.
While the raison de jouer is amusement, your objective is to solve multiple brain-teasing puzzles and get out with the best possible ending (there's three to choose from), all ten collectible figures in your possession. Use the bars at the edges of the screen to move about and let the changing cursor help you identify active spots where clues and other goodies might be stashed. The neat design aids your search and provides a surreal setting to look at, just for the sake of looking. There's so many random oddities to sieve through, you might be diverted from the actual informative tidbits.
What is silly to some, though, can be off-putting to others. If you're unwilling to poke and jiggle a pudgy belly or handle keys that were moments ago inside someone's mouth, then Nobushi will undoubtedly make you squeamish. Nobushi might also trick you in a way that some would call unfair. You'll want to make frequent and ready use of the "Save" button because Detarou is up to no good when it comes to tempting you into the "bad Panda" ending. Of course, that's all part of what makes this Detarou experience so satisfying. When it comes to brain stimulating entertainment, Nobushi is a knock-out!
Game not loading? Try this alternative link.


Walkthrough Guide
(Please allow page to fully load for spoiler tags to be functional.)
Nobushi Walkthrough
When you begin, you're facing a punching girl. Zoom in on the desk to her left:
Open the blue book on top of the desk:
Take the grey doll: SAITOU GET (1/10).
Press the button in the lower right corner of the "saitou get" detail screen to close it.
Then make a note of several clues inside the book:
On the left page, there is a clue for the horse.
On the right, some Japanese characters (don't worry, you won't have to read Japanese to solve this).
Finally, make a note of the moon in the bottom left corner and the sun in the bottom right corner.
Back up once to view the whole desk again. Click on the bottom drawer:
Click several times to uncover and pick-up:
Two more "SAITOU GET" dolls (2/10 and 3/10).
Back up and open the middle drawer. Another clue:
There is a button and an arrow going from right to left. Then the equal sign seems to indicate that this information belongs to two vague people-like figures.
The two top drawers are locked...
The top right drawer needs a 4-digit number code.
The top left drawer needs a key.
Back up three times to the wide-view of the punching girl.
Examine the tall cabinet on the right:
Open the top doors of the cabinet. From the middle shelf:
Pick up another doll -- SAITOU GET (4/10).
Then, zoom in on the plate on the left side of the middle shelf to see its details:
Note the pattern of hearts, diamonds, clubs and spades around the plates edge.
Back up. Then, zoom in on the box in the middle of the bottom shelf:
Notice how the designs on the buttons look like balding heads of various types.
You can back up and take a peek at what's in the bottom of the cabinet. For that matter, there are quite a few random oddities not mentioned in this walkthrough...I'll leave the fun of discovering them to you. :)
Back up from the tall cabinet and turn right to face the sofa:
Zoom in on the center of the sofa; something is stuck behind the cushion:
Another SAITOU GET (5/10).
Now back up and click on the right edge of the sofa to look at its side:
Make a note of the pattern of triangles, circles and square.
From this side view, click the gap behind the sofa to see what's back there:
Pick up another SAITOU GET doll (6/10).
Back up to full view and then zoom in on the clock above the sofa:
Make a note of each number and where its positioned around the clock's circumference.
Turn right to see a door and two men dressed in grey standing side-by-side.
Upon closer examination you note a few things:
You can push on left and right sides of one guy's stomach.
The other guy has a note stuck in his neck fold.
And, of course, the door needs a key.
Turn right again to see two people in a horse costume.
Examine the panel in the horse's side; it needs a 3-letter code:
Use the clue in the blue book on the desk to solve this:
1 between R and T.
2 is "O".
3 is "X" 'd over.
Putting it that clue together, you end up with...
SOLUTION:
S O X
...enter that code in and press the button to see what happens.
Get the DOOR KEY from the man's mouth.
Back up from the horse and turn left. Examine the lock on the door:
Use the DOOR KEY.
Open the door and go through to the next room.
Turn right. Click the right edge of an old man in a rice ball to peer behind him:
These 4 buttons back here are positioned in a familiar way. Zoom in a little closer:
There's a round button at 12 o'clock, 3 o'clock, 6 o'clock and 9 o'clock.
Push them as shown on the clock the sofa.
SOLUTION:
Click each button in this order:
Bottom.
Right.
Left.
Bottom.
Top.
Top.
Left.
Then, click the square switch in the middle.
Something ucky happens with old man (put your lunch away!) and then the door to the third room opens. We'll go back to that later, though.
Before going anywhere else, turn to face the left wall. In the center of the wall is a big red button tempting you to push it. RESIST!
Or...if you want the "Bad Panda" ending...
go ahead and push it.
Just SAVE your game before activating the red button.
Then, you can choose "Load Game" from the start menu and you'll end up back at this wall again.
What's more interesting is this pattern of suns and moons along the wall, under the button:
Memorize or write down their order.
Back up twice to re-enter the first room. Zoom in on the jiggly belly of the old guy on the right:
Combined with the clue inside the middle drawer and the pages of the blue book, the pattern of suns and moons from the second room's wall tell you what to do here:
The sun is RIGHT. The moon is LEFT.
In the drawer, it shows an arrow under the button going from right to left.
Follow the pattern of suns and moons to know which side of the belly to push.
SOLUTION:
RIGHT; LEFT; LEFT; RIGHT; LEFT; RIGHT; RIGHT
When you've pressed the belly (buttons?) in the correct order, he'll tap the other guy who'll then fix his head straight-ahead:
Click on the old guy on the left.
Take the NOTE from his back.
Put the note away and back up twice.
Turn right twice and go back to the top right drawer of the desk:
You just recently uncovered the 4-digit number code needed to open this drawer.
Have another look at that note you took from the old man:
At first glance, it looks like some foreign character or design.
But, consider how its being folded up under that guy's sweaty neck might affect it.
The two identical twins side-by-side provide a major hint, also.
Still not sure?
SOLUTION:
The design on the note is a vertical line of 4 numbers mirrored. Cover up the right half (where the fold of the paper might be) and you get:
5 9 6 3
Using the smaller buttons directly under each digit, change the numbers to the correct code and then push the white bar below it all. The drawer will open:
From inside the drawer, get AN EMBLEM of Japanese characters.
Put it away and back up three times.
Turn right twice and go through the door to the next room. Then, continue through the door to the third room.
Up ahead is a big crate. Have a look at it:
On the top of the crate, note the circle, triangle and square. You saw a pattern of those earlier.
Open up the lid to find three balding men crammed inside.
Make a note of each man's pattern of baldness and correlate that to the shapes on the lid.
Go back three times to the first room. Turn left twice, zoom in on the tall cabinet, open the top doors and examine the grey box with three buttons on the lower shelf:
Couple the triangles-circles-square pattern on the sofa with the three baldies cramped in the crate. Know you know the correct order for pushing the buttons.
SOLUTION:
Click the buttons in this order:
Right
Middle
Right
Left
Middle
Right
Then click the bottom button to open the box.
From inside the box, get:
Another EMBLEM of Japanese characters.
The DESK KEY.
Put them away and back up three times.
Zoom in on the top left drawer of the desk:
Use the DESK KEY to open it.
From inside, get:
Another NOTE. Notice that the design has three points with lines drawn on them. Put it away for now.
Also make a note of the block design painted inside the drawer. That pattern may be useful soon.
Back up three times to leave the desk view.
Take another look inside the top doors of the tall cabinet:
Examine the plate.
You'll find three symbols by using the design on the NOTE from the top left desk drawer.
DIAMOND.
SPADE.
CLUB.
Make a note of them for later use.
Back out three times.
Turn right twice, go through two doors and into the third room. Turn left to see a palm tree guy:
Zoom in on the left edge of the tree's base:
Pick up a SAITOU GET doll (7/10).
From this view, click on the back edge of the tree base again to look behind it:
Here's another SAITOU GET doll (8/10) that's pressed up against the back of the tree's planter. Grab him.
Back out twice.
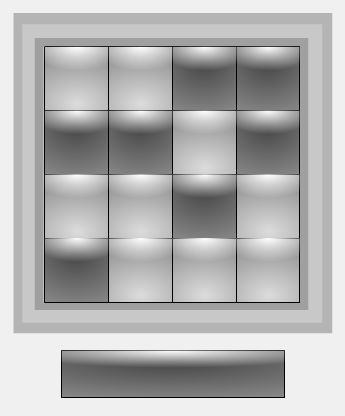
Now examine the square panel/4x4 grid next to the large grey door:
Use the pattern you saw in the top left desk drawer to push the correct buttons.
Click only the buttons you need to be light/white.
SOLUTION:
Screenshot: 4x4 grid pattern solution
With the correct pattern entered, click the grey bar to open the door.
Go through the large grey door into another room with a big green question mark on the wall:
Recall the other clue in the blue book: "PL + PL = ?"
In your inventory, combine the two EMBLEMS of Japanese characters.
Then, place that combined emblem on the big green QUESTION MARK.
The wall opens to reveal:
A GOLD KEY. Take it.
Three colors—YELLOW on top of RED on top of GREEN—make a note of their order.
Back out twice.
From the view of the palm tree guy and large grey door, turn right twice until you're facing a wooden door. You're almost to the exit.
Zoom in on the cylinder next to the door:
Solve this cylinder by using the symbols you gathered from the plate in the cabinet and the colors from in the question mark room.
Use the arrows on the left or right edges to change the symbols.
Click directly on a symbol to change its color.
SOLUTION:
Top: YELLOW DIAMOND
Middle: RED SPADE
Bottom: GREEN CLUB
Colorblind Help:
Top: 2 clicks to make yellow.
Middle: 0 clicks; it's already red.
Bottom: 3 clicks to make green.
With the correct colors and symbols lined up, press the button on the top of the cylinder to unlock the door.
Go through the wooden door to the exit room:
Zoom in once on the white mat on the floor in front of you:
Take the SAITOU GET (9/10) from under the white mat. Back out.
Then get the last SAITOU GET (10/10) from by the red shoes. Back out./li>
Now you have a choice of how to exit this weird place. Be sure to use the "SAVE" feature now before trying all three.
Normal End:
Use the GOLD DOOR KEY immediately after you've entered through the wooden door and have collected the final two "saitou get" guys.
Leave the room with nothing else in your possesion.
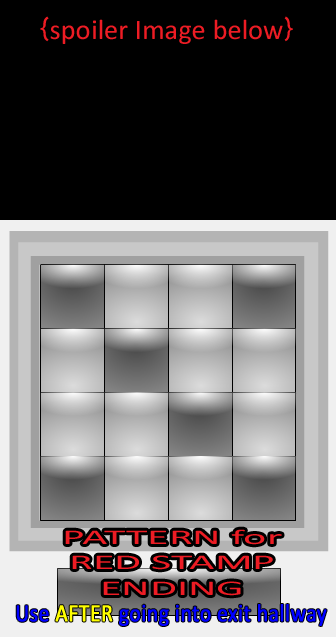
Red Stamp "Perfect" End:
Take a look at the tile pattern on the floor in this exit room (if you zoom in once on the white mat, you can see the whole tiled floor).
Go back out to the third room, and input that pattern into the 4x4 grid/square panel (palm tree guy view).
SOLUTION:
Screenshot: red stamp pattern solution
The panel will open: take the RED STAMP.
Now return to the exit room, use the GOLD KEY on the door, and leave with the red stamp in your possession.
"Bad Panda" End:
You reach the Bad Panda End any time you press the red button in the second room.
Enjoy!
Posted by: elle |
August 5, 2012 11:16 AM
|
August 5, 2012 11:16 AM