

![]() Don't you just hate it when you fall asleep in a public bathroom? In Must Escape the Museum, a point-and-click escape puzzle by Selfdefiant, you play a child who's in just that position. You awaken in the museum bathroom, but the museum is closed and, as it always is in these games, all the doors are locked. Can you find your way out before your parents start to worry? Click around to navigate, gather clues, and solve puzzles.
Don't you just hate it when you fall asleep in a public bathroom? In Must Escape the Museum, a point-and-click escape puzzle by Selfdefiant, you play a child who's in just that position. You awaken in the museum bathroom, but the museum is closed and, as it always is in these games, all the doors are locked. Can you find your way out before your parents start to worry? Click around to navigate, gather clues, and solve puzzles.
 Must Escape the Museum is very short and easy to solve, but makes up for its simplicity by being well written and just challenging enough for its length. Unlike many games in the genre, there are no pixel hunts and very few of the other annoyances that would make most players go scrambling for a walkthrough. The graphics are clean, the gameplay is intuitive, and even though it's very simple and it doesn't bring anything new to the table, it's a nice little way to spend a few minutes on your lunch break.


Walkthrough Guide
(Please allow page to fully load for spoiler tags to be functional.)
Must Escape the Museum walkthrough
One tip: You can turn the sound off using the round button on the bottom, next to the inventory.
PART 1: THE BATHROOM AND MAIN HALLWAY
You begin the game in the bathroom, facing the closed gate. Take the unfolded towel on the janitor cart and look at the box on the cart's bottom shelf.
Turn around (either arrow will do) and open up the rightmost stall door by clicking its handle. Take the spray bottle from the toilet and note the order of the stars on the wall.
Use the sprayer, then the rag on the stain on the top left of the mirror, exposing the door code.
Turn around again and enter the code on the keypad (grey rectangle to the right of the door). Open Sesame!
The code: 426
Leaving the bathroom you find yourself facing a bench, a poster, a pay phone, and a water fountain. Read the phone number scrawled on the right side of the bench.
Click the payphone once to enlarge it. Click the top of the handset to expose the number pad. Then dial the number from the bench. Hey, a free dime pops into the coin return. Neat. Take the dime, and click out from there.
The phone number: 555-7134
Click the rightmost button. There's a small plaque below and to the left of the potted plant. Read what the caption tells you.
Start opening up lockers by clicking on their handles. One of them has a numeric lock. Where have we seen a 4-digit code just recently? Right. Enter the code from the wall and press the big light gray button below the numbers.
The locker code: 1718
There's a dark panel inside the second locker. Click it and get a black key.
PART 2: SPACE EXHIBIT AND MAIN LOBBY
Move to the side until you're facing the space exhibit, and use the black key on the lock (bottom right corner of the grate). Enter the exhibit.
Make note of the diagram of the solar system on the wall. (Only eight planets. Poor Pluto.)
There's a box on the leftmost pedestal of this screen, with four familiar-looking buttons.
Make the planets match the sizes of their counterparts on the wall. There's no indication when you get this right; you have to click the latch yourself. Take the screwdriver from inside the box. (It isn't a proper room escape without a screwdriver.)
From left to right, it's 2 clicks, 3 clicks, 0 clicks, and 1 click
Turn around and click the satellite on the central podium. By the satellite dish on the bottom, you find another dime! At this rate you could buy the museum and make your own key.
Click the arm of the statue on the right to expose a secret compartment and a red gem.
Click an arrow to turn around, and then click the "back" arrow to get out of the exhibit.
Click the left arrow until you're facing the dinosaur exhibit. Click the white buttons on the vending machine and click the coin that comes out of the coin return. One more dime! Go left from here into the main lobby.
Click the cash register, and then the big green button. Odd place to store a key, but if it works... Take the key and back out.
Buy a newspaper by moving each of your three dimes to the white strip at the top of the newspaper machine. Another odd place to put a key, but there's a yellow key to take there.
PART 3: GOLD MINING AND ANCIENT EGYPT
Let's go to the Gold Mining exhibit first. Use the silver key to open it up, and take the lantern on the left podium.
Turn around and take the kettle. Leave the exhibit — there's nothing more for you here. (The wheel is a red herring. You can evidently find and replace the rail, but I haven't figured it out and you don't have to do it to escape the museum.)
Go to the Ancient Egypt exhibit and unlock the door (yellow key). Go on in.
Examine the vase on the left. It looks blank, but if you click on the opening, you find out that it used to hold water. Interesting. If only you had something that could hold water...
Go back out so you're facing the bathroom. Click the water fountain to make it run, then use the kettle on the stream of water so it fills up. (You should get a kettle with a drop of water overlaid on it; if you don't, then make sure you're clicking the water and not the fountain.)
Go back to the Ancient Egypt exhibit and use the filled kettle on the opening of the vase. Hey, symbols. Better make a note of them.
Turn around and examine the tablet on the left podium. Well, that clarifies the symbols from the vase.
Turn back around and click the gold box on the right. Now that you've decoded the vase, you know how to open this. (Again, you don't get a strong indication of when you're right; you have to click the latch.) Take the yellow gem and back on out to the main hallway.
The code for the golden box is 2538.
PART 4: JANITOR CLOSET, DINOSAURS, AND BATHROOM
Go back to where you have a view of the lockers, and open the door next to those lockers. It's awfully dark, so it's good that you have a lantern. Click the lantern to turn the light on, and then you can put it back in your inventory.
You can move some of the boxes around if you want (bonus dime!) but you don't have to. Click the panel on the right; it's stuck shut. Use your screwdriver to open it and take the purple key. Leave the room.
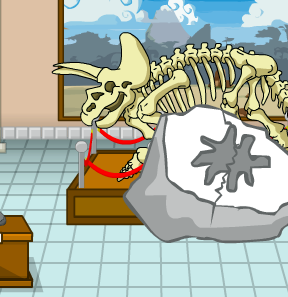
Go to the dinosaur exhibit and open it up using the purple key. Go on in.
Once you're in the exhibit, turn around and take the hammer on the right. Turn back around, look at the fossil on the left, and use the hammer to split it up. Take the green gem. Three gems down, one to go.
Leave the dino exhibit and go back so you're facing the restrooms. Click the poster on the left, exposing the crack in the wall, and use your trusty hammer to expose the blue gem. Take the gem.
Enter the bathroom. You'll want to look back inside the toilet stall to refresh yourself on the order of the stars, if you didn't before.
Click the box on the bottom of shelf of the janitor's cart and arrange the gems from your inventory in the same color order as the stars.
The colors: yellow, green, blue, red
Click the box's latch and take the blue key. Leave the bathroom and go left until you reach the main lobby (where you found the newspaper box). Use the blue key on the keyhole in the door.
And you're gone!
Posted by: HopefulNebula |
April 2, 2013 12:36 PM
|
April 2, 2013 12:36 PM