
![]() Fire Maple Games has a special talent with point-and-click adventure titles. The team's latest effort, Mosaika, retains the tap-based formula established in The Lost City and The Secret of Grisly Manor, sending you to a mysterious world with a simple goal in mind. This time around, though, the Myst-like experience is more streamlined, with puzzles that don't go out of their way to twist your gray matter into knots.
Fire Maple Games has a special talent with point-and-click adventure titles. The team's latest effort, Mosaika, retains the tap-based formula established in The Lost City and The Secret of Grisly Manor, sending you to a mysterious world with a simple goal in mind. This time around, though, the Myst-like experience is more streamlined, with puzzles that don't go out of their way to twist your gray matter into knots.
 A crash in the next room wakes you from an unsteady sleep, and suddenly you realize there are strange symbols above the fireplace in your uncle's home. You soon discover a secret world hidden behind the wall, one filled with magic, intrigue, and strange contraptions with missing pieces. You begin your journey through Mosaika with one thought: what's that frog doing here, why was it waiting for me, and why can it talk?
Tap points on the path or the edges of the screen to navigate through Mosaika. You can zoom in on certain areas to take a closer look, pressing the circular arrow to zoom back out when you're done. Tap the backpack icon to open the inventory where you can examine or use items, check your journal, or get a quick clue about what to do next. You won't get stuck often, but the built-in hint system does a great job of pointing you in the right direction when you need it.
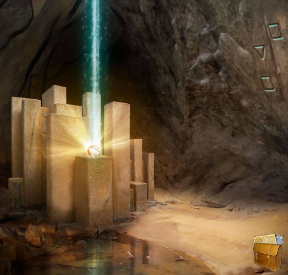
Mosaika feels very much like Fire Maple's previous releases. Things are a bit simpler this time around, though. Puzzles aren't as intricate, requiring a minimum number of inventory items and featuring a solution that can be found elsewhere in the game. The answers are never thrown in your face, so you still have to do a bit of thinking to find the solution. You won't feel frustration, only excitement and success. The visuals are absolutely gorgeous, and the atmosphere of slow, quiet exploration keeps you engaged from beginning to end.
NOTE: This game was played and reviewed on the Nexus 4. Game was available in the North American market at the time of publication, but may not be available in other territories. Please see individual app market pages for purchasing info.


Walkthrough Guide
(Please allow page to fully load for spoiler tags to be functional.)
Mosaika Walkthrough
Chapter 1
Part 1: Leaving Uncle's House
Hallway
You'll start the game inside the bedroom. Go through the open door to enter the hallway.
Tap the open box on the floor under the windowsill to look inside.
Open the folded note to find a pattern of diamonds segmented into black and white triangles. This clue is also added to your Journal.
Zoom out and tap the bottom of the screen to move back and return to the bedroom.
Bedroom
Examine the front of the mantel above the fireplace.
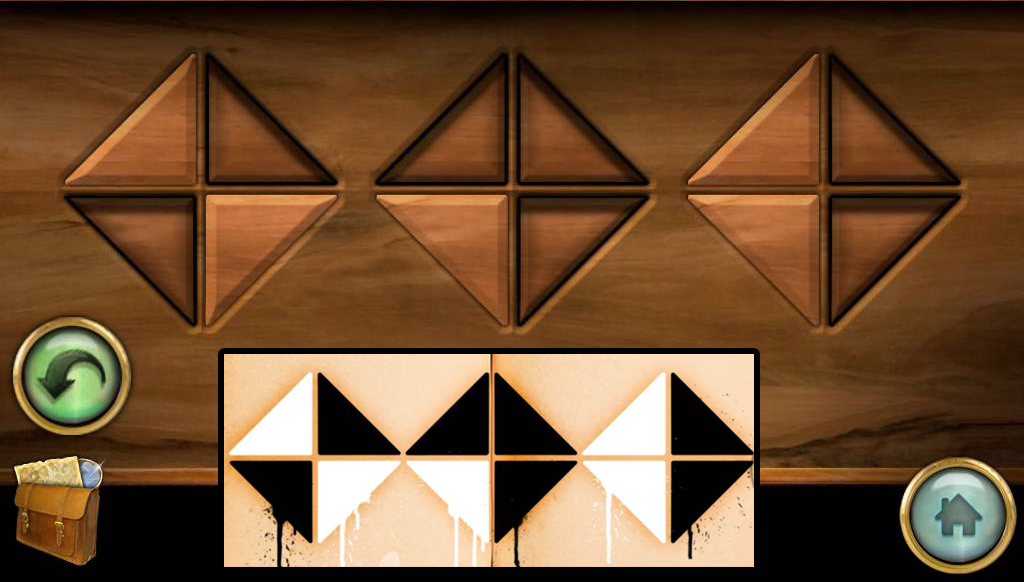
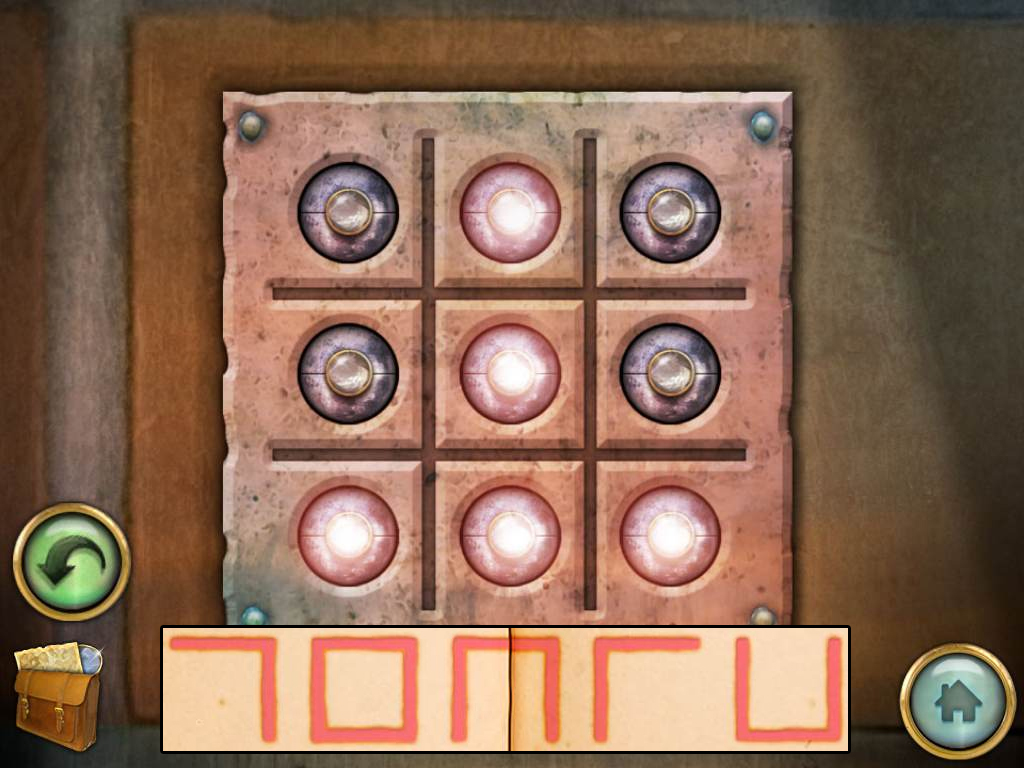
It's our first puzzle! At a glance you can tell that the wooden buttons on the mantel are shaped exactly like the diamond pattern you just saw on the note.
Let's inspect the note again in your Journal now. Pay close attention to which triangle segments of each diamond are black and which are white.
The black sections indicate which buttons on the mantel need to be pressed down, while the white triangles are buttons that need to be left untouched.
Therefore, on the left diamond:
Push down the lower left and upper right triangular buttons.
On the middle diamond:
Push down the upper left, upper right, and lower right triangular buttons.
And on the right diamond:
Push down the upper right and lower right diamonds.
Solution
After the puzzle is solved, the back of the fireplace will lower and reveal a hidden doorway. Go through the passage to enter Mosaika.
Part 2: Unlocking the Blacksmith Building
First Shrine
Tap the Frog to speak with it. It will explain the situation to you and also ask for some fireflies.
In this scene you'll also see a sealed magical door and a shrine with a spherical notch at its center. There's nothing we can do about these objects yet, so we'll have to return later.
Tap the road at the left side of the screen to walk towards the Planetarium Entrance.
Planetarium Entrance
Inspect the bottom of the large potted plant at the corner of the building.
Take the TELESCOPIC LENS on the ground beside the wall.
Zoom out and then take the left road to reach the Garden. Follow the right path to the Blacksmith Entrance.
Blacksmith Entrance
Examine the front door to the blacksmith building to start a puzzle.
Correctly arrange the square tiles into the assembled image of a wood carving.
Tap one tile to select it, then tap a different tile to swap their places.
It's easier to solve this puzzle if you start with the outer pieces first. Look for the pieces with the rounded sections of the circular border.
Solution
The door will open after the puzzle is solved. Go through the open doorway to enter the Blacksmith Building.
Blacksmith Building
Take a handful of BIRDSEED from the sack leaning against the wall.
We don't yet have the necessary items or clues to interact with anything else in this room yet, so back out twice to return to the Garden. Next, take the left path to the Fountain.
Part 3: Accessing the Planetarium Building
Fountain
Pick up the SUN STATUE that's lying in the grass on the left side of the road.
Examine the flowers in the middle of the ivy growing on the wall to add another note to your Journal.
Go up the stairs to reach the Balloon Platform, then continue up the left stairway to the Balcony area.
Balcony
Take the HATCHET that's leaning against the pink flower pot at the left side of the scene.
Tap the bird feeder underneath the bird statue to take a closer look.
Put the handful of BIRDSEED (from the sack in the Blacksmith Building) into the empty feeder
Once the feeder is full, several birds will appear beside the bird statue and a new note will be added to your Journal.
Tap the right side of the screen to go back downstairs to the Balloon Platform, then tap the bottom of the screen three times to move all the way back to the Planetarium Entrance.
Planetarium Entrance
Tap the front doors to the building to zoom in.
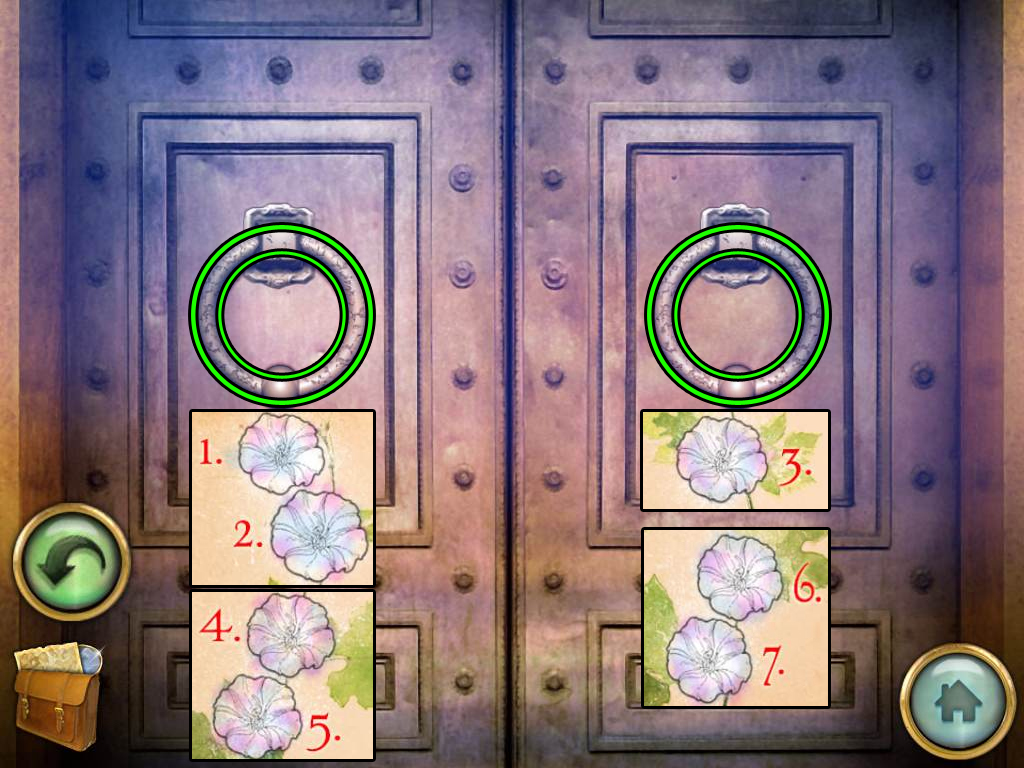
To open the doors you must use the door knockers in the correct order.
Refer to the clues from the flower wall to find the solution.
Hit the door knockers in the same pattern as the numbered flowers in the Journal diagram.
Flowers on the left side represent the left door knocker and flowers on the right side represent the right door knocker.
For example, flower 1 is on the left side, so hit the left door knocker first.
The complete order is:
Left, Left, Right, Left, Left, Right, Right.
Solution
After the puzzle is solved you can go through the open doors to enter the Planetarium Building.
Planetarium Building
Examine the scale on the table at the left side of the room.
Place the SUN STATUE (from the ground at the Fountain) on to the scale to begin a new puzzle.
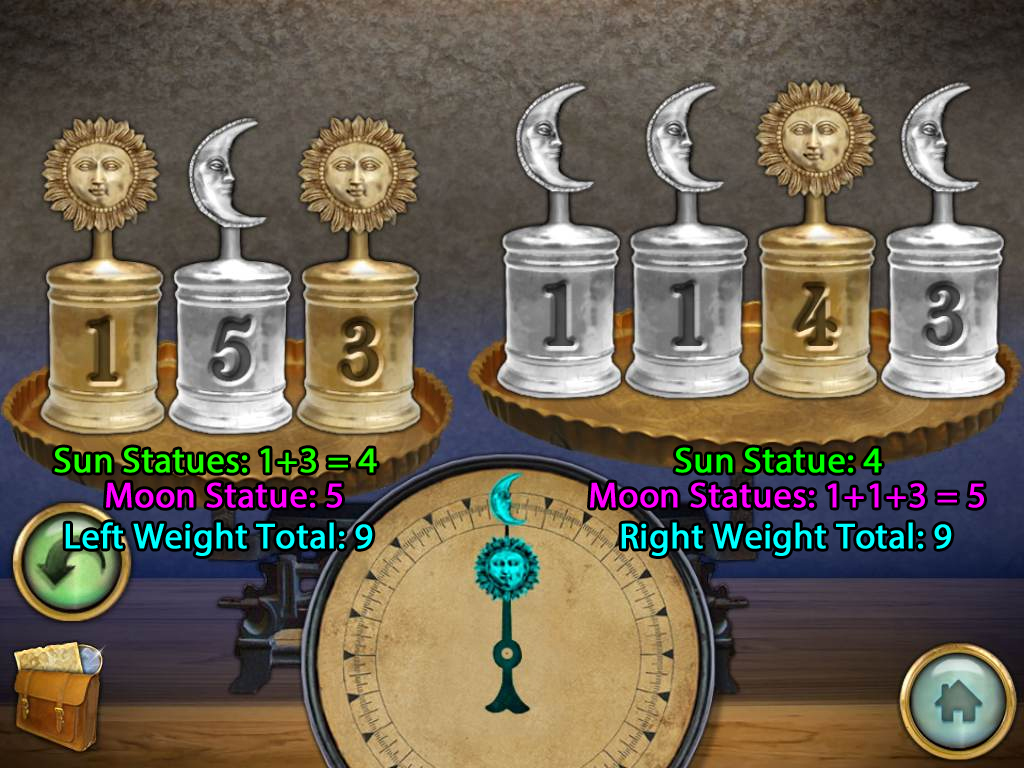
Balance the weights of Sun statues and Moon statues on both sides of the scale.
Not only must both sides be equal in total weight, but the weight of both types of statues (Sun and Moon) must be equal on each side as well.
First find the weight of all the statues by adding the numbers at the front of each one.
The total sum of all statues is 18, therefore you know that each side of the scale must weigh 9.
Additionally, the sum of the Moon statues is 10, so you know the weight of Moon statues on each side must equal 5.
The sum of the Sun statues is 8, so the weight of the Sun statues on each side must equal 4.
Now organize the weights following those rules to balance the scales.
Solution
Take the SILVER INGOT from the compartment that opens above the scale.
Back up and exit the building, tap the road on the left, the tap the road on the right to return to the Blacksmith Entrance.
Part 4: Repairing the Fountain
Blacksmith Entrance
Use the HATCHET (from the floor beside the flower pot at the Balcony) on the log atop the stump to chop it.
Pick up the CHOPPED WOOD from the stump.
Go through the open door into the Blacksmith Building.
Blacksmith Building
Put the CHOPPED WOOD into the section at the bottom of the furnace.
Inspect the sliders at the middle of the furnace to start another puzzle.
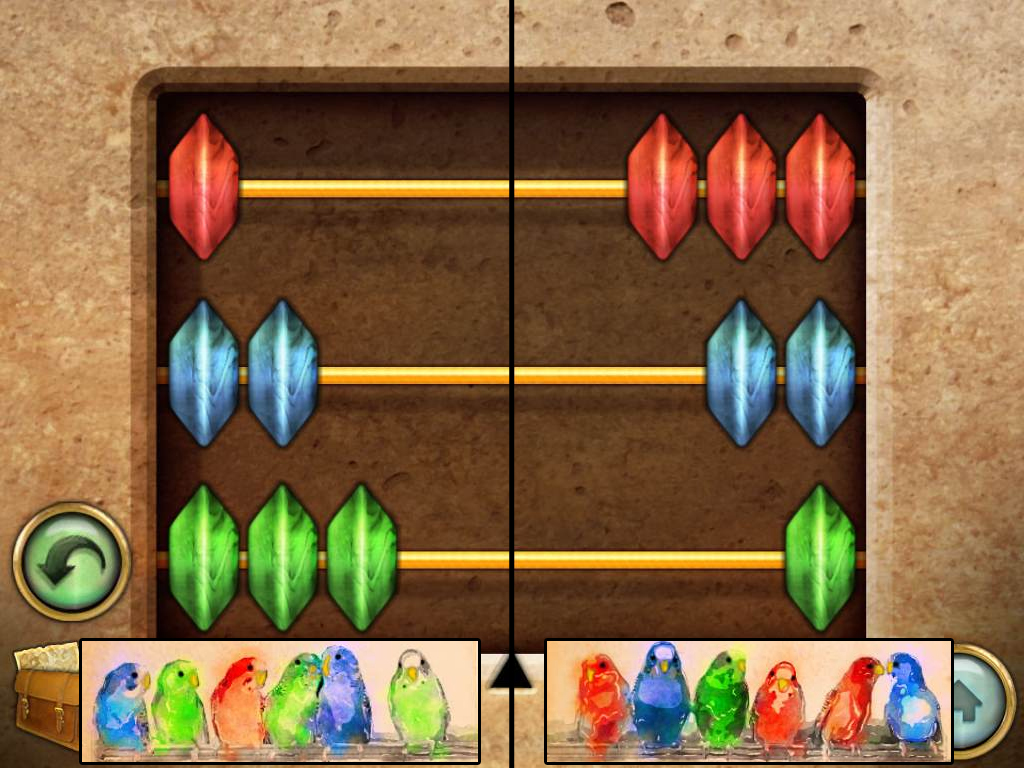
Organize the red, green, and blue sliders to either the left or the right side according to the clues from your Journal.
Refer to the picture of the multicolored birds above the bird feeder.
There are two blue birds, three green birds, and one red bird on the left side.
On the right side there are two blue birds, one green bird, and three red birds.
Move the sliders on the furnace to match the same order:
Left side: 1 red, 2 blue, 3 green.
Right side: 3 red, 2 blue, 1 green.
Solution
Push the flashing button beside the completed puzzle to light the firewood in the furnace.
Drop the SILVER INGOT (from the compartment above the puzzle in the Planetarium) into the hole at the top of the furnace to melt it in the forge.
Open the door to the forge beside the furnace and tap it to look inside.
Take the SILVER CASTING from the mold.
Zoom out and tap the bottom of the screen to exit the building. Go back once and then left once to travel to the Fountain.
Fountain
Tap the decorative grate on the wall to take a closer look.
Insert the SILVER CASTING (from the mold inside the forge at the Blacksmith Building) into the indentation at the center of the grate.
Go through the revealed hole in the wall to enter the Hidden Cellar.
Hidden Cellar
Use the HATCHET (from the floor beside the flower pot at the Balcony) to cut the frayed rope tied to the top of the suspended brick wall.
This will drop the brick wall, allowing you to take the LADDER from the uncovered alcove.
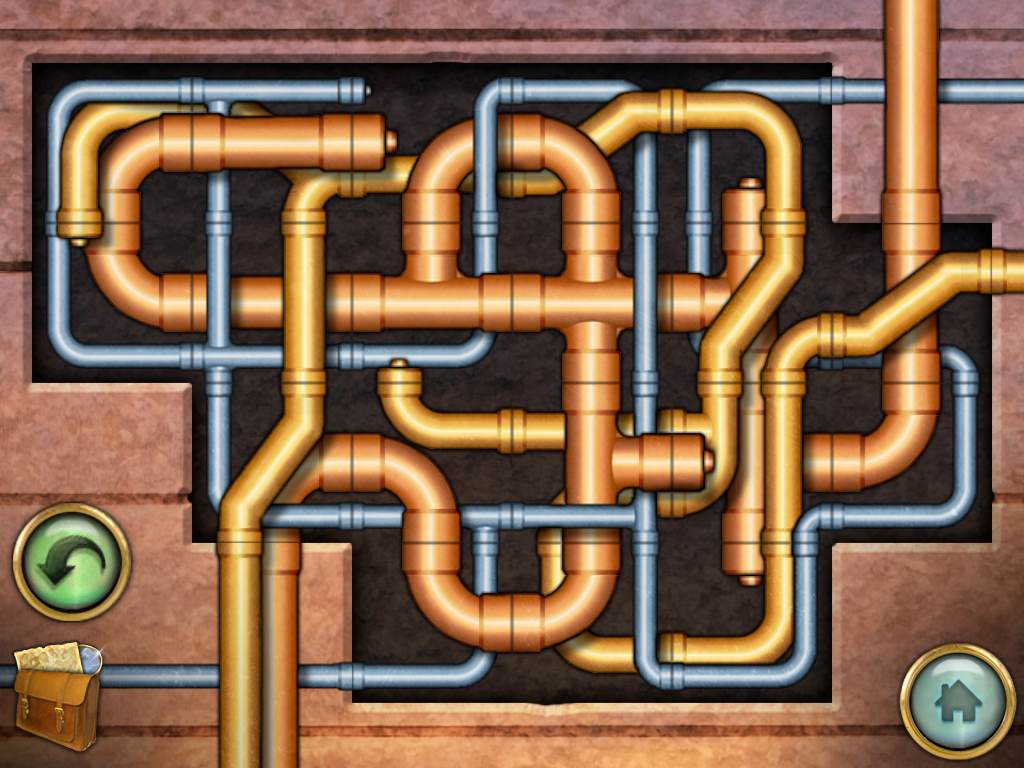
Inspect the array of pipes in the middle of the wall to begin a puzzle.
Arrange the pipes so that they create an uninterrupted path from the lower left side of the wall to the upper right side of the wall.
Simply tap a pipe to rotate it 90 degrees clockwise.
There are three different kinds of pipes - silver, bronze, and gold - and all three pipes must be connected to an adjacent pipe (or a stopper) of matching color.
Solution
Solving this puzzle will cause water to run through the clear glass pipe and out to the Fountain. Move back once to go there now.
Fountain
Tap the flowing fountain to look inside the basin.
Take the BRASS KEY from the water at the left side of the basin.
Walk back once and then right once to return to the front of the Blacksmith Entrance.
Part 5: Locating the Mystical Orb
Blacksmith Entrance
Place the LADDER (from the secret alcove in the Hidden Cellar) up against the tree at the left side of the scene.
Tap the hollow at the top of the tree to look inside.
Take the GLOWING STAR 1/3 from the bottom of the tree hollow, then zoom back out.
Go through the doorway to enter the Blacksmith Building.
Blacksmith Building
Tap the front of the large chest at the left side of the room to zoom in.
Open the lock with the BRASS KEY (from the basin of the Fountain).
Take the ORANGE BANNER from inside the opened trunk.
Zoom out and walk back three times to reach the Planetarium Entrance.
Planetarium Entrance
Place the ORANGE BANNER (from the trunk in the Blacksmith Building) in the space between the two other banner pieces at the left side of the building.
Note the ringed pattern and the three dots on the completed banner. A diagram is also automatically added to your Journal.
Enter the Planetarium Building through the front door.
Planetarium Building
Examine the rotating discs on the plate at the top of the pedestal, which is found directly below the telescope.
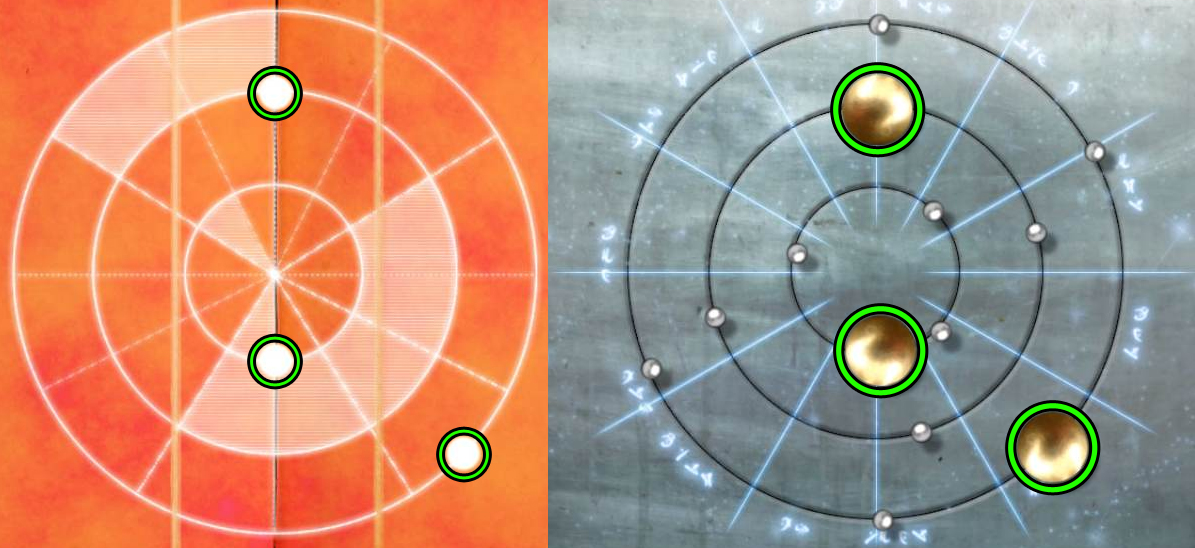
Tap the rings to stop the orbs so that the large, gold spheres are paused at the correct positions.
Refer to the image of the orange banner in your Journal. The large dot on each ring represents the gold orb and the diagonal lines indicate the sections of the discs, which are organized like the hours on the face of a clock.
The orb on the outer ring should be stopped between 4 and 5 o'clock.
The orb on the middle ring should be stopped at 12 o'clock.
The orb on the inner ring should be stopped at 6 o'clock.
Solution
The plate will retract after the puzzle is solved. Take the MYSTICAL ORB revealed in the cache behind it.
Zoom out and move back to exit the building. From there, walk right to return to the First Shrine.
First Shrine
Tap the shrine for a close-up view.
Insert the MYSTICAL ORB into the spherical notch at the center of the shrine.
Go through the opened doorway at the top of the staircase to travel to the next area.
Chapter 2
Part 1: Unlocking the Alchemy Building
Alchemy Entrance
Tap the large flower pot to the left of the building to take a closer look.
Note the pattern of lines carved into the top of the pot. A diagram will also be added automatically to your Journal.
Go up the stairs to the Stone Monument. From there, walk left to the Second Shrine.
Second Shrine
Inspect the rock at the right side of the cliff.
Take the STRANGE KEY from the hole in the rock.
Zoom out and walk back once, then walk right twice to reach the Lake.
Lake
Tap the hollow at the bottom of the tree to zoom in.
Pick up the SYMBOL WHEEL from inside the tree hollow, then zoom back out.
Move back three times to return to the Alchemy Entrance.
Alchemy Entrance
Tap the front door to the building for a close-up view.
Insert the SYMBOL WHEEL (from the tree hollow at the Lake) into the empty space on the lock to start the next puzzle.
Follow the equation carved into the door: left symbol segment + middle symbol segment + right symbol segment = completed symbol on the far right.
In other words, you must set the three symbol wheels on the left so that each of their shapes combine to create the pattern on the symbol wheel at the right.
You can tap a symbol wheel to rotate it, which changes the currently selected symbol at the center of the wheel.
Solution
Solving the puzzle will unlock the door, allowing you to enter the Alchemy Building.
Part 2: Feeding the Frog
Alchemy Building
Go up the stairs to the second floor.
Take the INSECT COLLECTING KIT from the shelf on the left wall.
Go back down stairs and exit the building, then go up the left stairway to reach to the Stone Monument.
Stone Monument
Use the INSECT COLLECTING KIT (from the shelf on the second floor of the Alchemy Building) to catch the FIREFLIES beside the monument.
Move back two times to return to the First Shrine.
First Shrine
Give the jar of FIREFLIES to the Frog.
Pick up the PEARL the Frog leaves for you on the ground.
Follow the road to the left three times, then go up the stairs to arrive at the Balloon Platform.
Part 3: Preparing the Balloon
Balloon Platform
Examine the locked door to the building on the right.
Insert the PEARL (from the Frog at the First Shrine) into the circular opening at the top of the door.
The pearl will roll to the bottom of the path and unlock the door.
Go through the opened doorway to enter the Balloon Control Room.
Balloon Control Room
Take the JEWELED FLOWER hanging from the hook to the left of the window.
Although you can interact with the four ropes in the control panel, we don't yet know the correct pattern so we must return later.
For now, exit the room and walk back twice to return to the Garden.
Garden
Tap the small pillar under the flower case for a closer look.
Insert the JEWELED FLOWER (from the hook at the Balloon Control Room) into the impression at the middle of the pillar to remove the glass case.
Take the now exposed RED FLOWER from the top of the pillar.
Go all the way back to the First Shrine, then go through the magical doorway and into the Alchemy Building.
Alchemy Building
Inspect the mortar and pestle on top of the right table.
Put the RED FLOWER (from the flower case at the Garden) into the mortar to grind it.
Pick up the crushed RED POWDER that appears on the table beside the mortar and pestle.
Zoom out, then examine the color machine on the left table.
Pour the RED POWDER into the left tube on the machine.
Tap the faucet at the right side of the machine to pour the colorful contents into the measuring jar on the table, then tap the FILLED JAR to add it to your inventory.
Next, tap the shelves on the wall to zoom in.
Add the FILLED JAR to the space on the top shelf to begin a new puzzle.
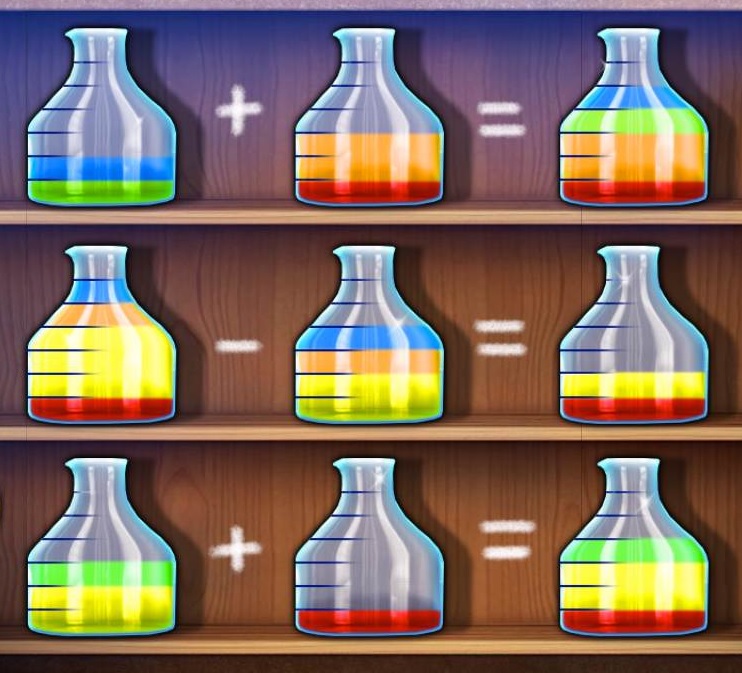
Organize the jars so that the equations written on each shelf are true.
For example, the first equation shows the jar on the left plus the jar in the middle equals the jar on the right.
Therefore, you'd find two jars whose colors combined would be found together inside a third jar.
Make sure to also pay attention to the amount of each color liquid, indicated by the lines at the side of the measuring jar.
To move the jars, tap one jar to select it, then tap a different jar to swap places.
Solution
Once the puzzle is complete, the shelves will separate. Take the STAINED GLASS piece from the revealed space between the split shelves.
Go up the stairs to the second floor of the building.
Tap the missing section of the window where the sunlight is shining through for a close-up look.
Place the STAINED GLASS into the matching space in the window.
A pattern of light and dark diamond will appear at the center of the window and a diagram will be added to your Journal.
Exit the building and travel all the way back to the Balloon Control Room.
Balloon Control Room
Tap the control panel below the window to begin another puzzle.
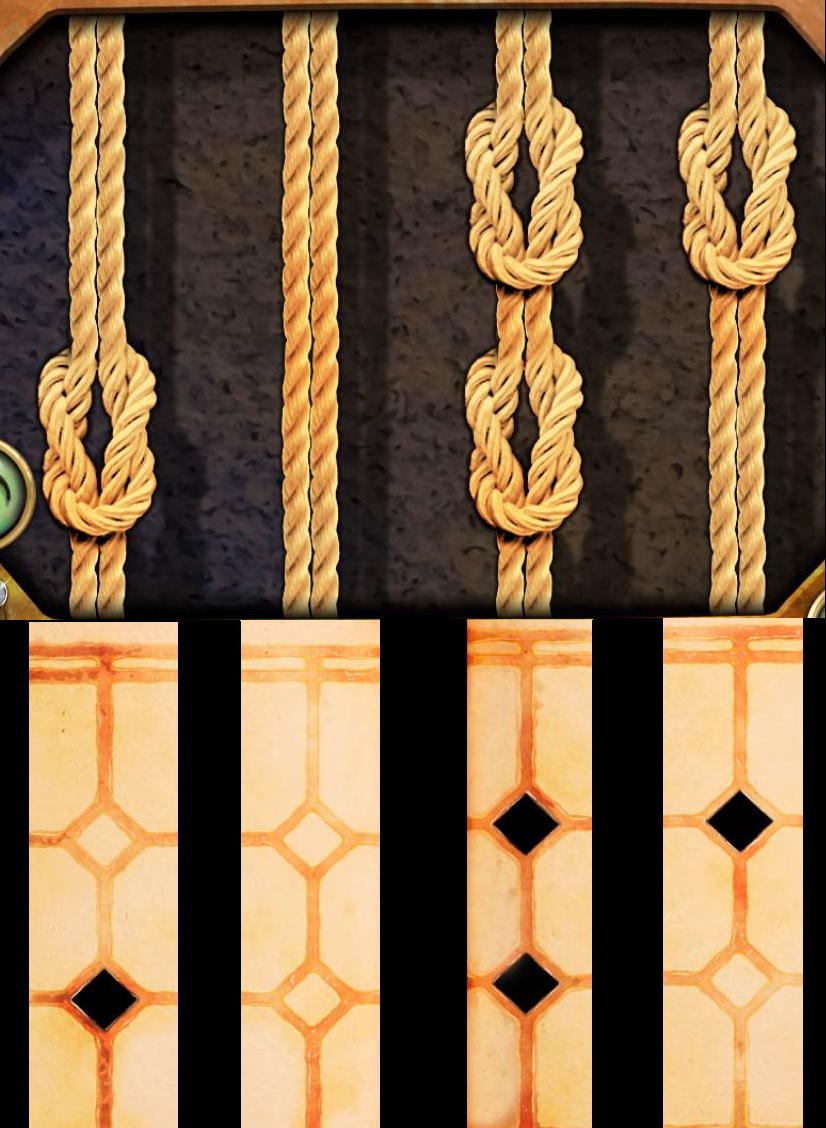
Arrange the ropes according to the clues from the stained glass window at the Alchemy Building.
Refer to the drawing in your Journal, then adjust the ropes accordingly. A black diamond indicates a rope knot and a beige diamond is an empty space.
So from left to right, the pattern is:
Untied rope on top half, knotted rope on bottom half.
Completely untied rope.
Double knotted rope.
Knotted rope on top half, untied rope on bottom half.
Solution
The light on the control panel should glow green once you've finished the puzzle, indicating that the balloon is ready for lift off!
Step outside to the Balloon Platform.
Balloon Platform
Tap the basket at the bottom of the hot air balloon to enter it.
Push the lever to ride the balloon up to the Owl Ledge.
Part 4: Discovering the Island
Owl Ledge
Pick up the PRY BAR leaning against the rock wall.
Tap the Owl to speak with it.
The Owl will instruct you to look for a powerful ring and also to find its missing feather.
Attach the TELESCOPIC LENS (from the potted plant at the Planetarium Entrance) to the golden telescope at the edge of the cliff, then tap the repaired telescope to look through it.
You'll see an island with a tile platform and three flags. Note the location of each of these flags on the grid. A diagram will also be added to your Journal.
Zoom out and then tap the balloon to travel back down to the Balloon Platform. Walk back three times and then right twice to travel through the magical door by the First Shrine.
From there, go forward once and right once to arrive at the Library Entrance. Tap the front doors to open them, then enter the Library Building.
Library Building
Take the pair of OARS leaning against the wall in the corner of the room.
Inspect the star-shaped notches at the center of the bookcase on the left side of the room.
Insert the GLOWING STAR (from the tree hollow at the Blacksmith Entrance) into the first notch.
Exit the building and follow the road forward to reach the Lake.
Lake
Put the OARS into the row boat on the water.
Tap the boat to travel to the Island.
Island
Examine the pedestal at the top of the stairs to start the next puzzle.
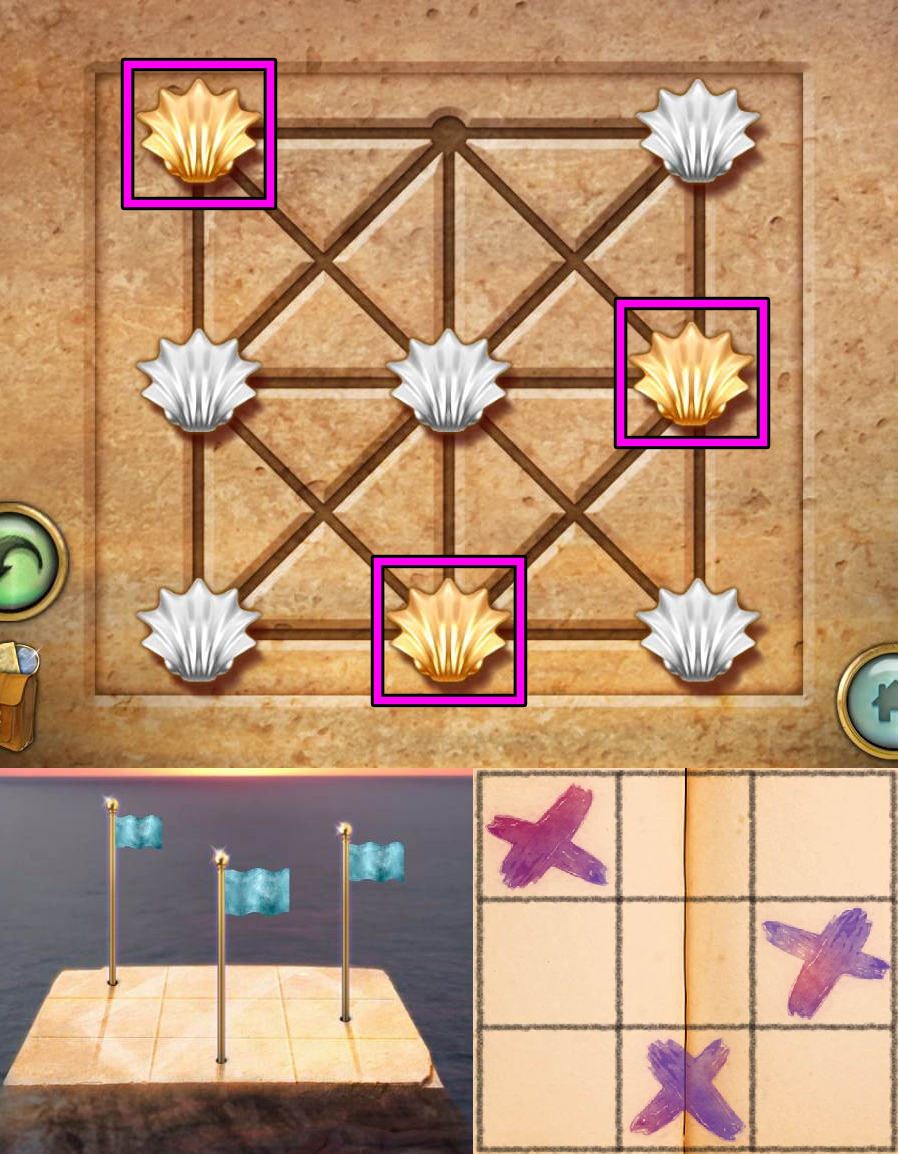
To complete the puzzle, position the golden shells into the correct points on the board.
Check the Journal for a diagram of the three flags on the grid that you saw through the telescope at the Owl Ledge.
Each square on the 3x3 grid is represented by the circular points around the board.
Tap and drag a shell to move it to an adjacent unoccupied point. Shells can only move along the tracks of the board into an empty space.
Place the golden shells at these three positions:
The top left corner of the board.
The far right point in the middle row.
The middle point in the bottom row.
Solution
After the puzzle is solved, take the PIANO KEY from the revealed cache inside the pedestal.
Tap the boat to ride back to the Lake. Walk back once, then go through the doorway to enter the Library Building.
Part 5: Locating the Mystical Orb
Library Building
Tap the piano to take a closer look.
Insert the PIANO KEY (from the shell puzzle on the Island) into the empty space under the blue bulb.
Pull the slider underneath the keys all the way to the right to start a puzzle.
First, watch the lights and memorize the pattern in which they turn on and play a note.
Push the keys in the correct order to copy the tune played on the piano.
If you need to see the pattern again, pull the slider under the keys.
You must repeat three patterns to complete the minigame. Each time you successfully recreate one song, one of the three orange lights next to the slider will change from orange to green.
The first pattern is: Blue, Purple, Green, Orange, Red.
The second pattern is: Orange, Purple, Purple, Blue, Red, Green.
The third pattern is: Red, Blue, Green, Purple, Red, Orange, Red.
Once the puzzle is complete, take the MYSTICAL ORB from the cache revealed behind the music stand on the piano.
Exit the building, then step back once and left once to return to the Second Shrine.
Second Shrine
Insert the MYSTICAL ORB (from the piano puzzle in the Library Building) into the spherical notch at the center of the shrine.
A bridge will appear over the large ravine, allowing you to continue forward to the next area.
Chapter 3
Part 1: Finding the Feather
Forest
When you first cross the bridge, you'll arrive at the base of the Bell Tower Entrance. Continue forward once to reach the Forest.
Tap the squirrel on the branch of the right tree to speak with it.
The squirrel will request some acorns from the other side of the wall.
Walk forward to find the sorceress's gate by the Third Shrine.
Third Shrine
Take the FEATHER from the recess in the middle of the left wall.
Walk all the way back to the hot air balloon and then push the lever to ride it up to the Owl Ledge.
Owl Ledge
Give the FEATHER (from the wall by the Third Shrine) to the Owl.
In exchange, the Owl will drop a BLUE CRYSTAL on the ground for you; pick the crystal up to add it to your inventory.
Ride the balloon back down to the platform. From there, walk back three times, then go through the door to enter the Planetarium Building.
Part 2: Accessing the Secret Side Room
Planetarium Building
Inspect the crystal mechanism within the gold plate on the right side of the wall.
Insert the BLUE CRYSTAL (from the Owl at the Owl Ledge) into the empty space at the upper right side of the mechanism.
This will cause a rainbow to shoot out from the telescopic machine on the upper platform.
Look through the lens of the machine to find the end of the rainbow beside the row boat.
Leave the building, walk right, and then go through the magical doorway. Walk forward once, right once, and forward again to return to the Lake.
Lake
Tap the point where the rainbow meets the water to take a closer look.
Pick up the submerged GLOWING STAR 2/3 from the floor.
Zoom out and step back three times, then go through the doorway to enter the Alchemy Building.
Alchemy Building
Climb up the stairs to go to the second floor.
Examine the loose board sticking up from the right side of the floor.
Use the PRY BAR (from the wall at Owl Ledge) to lift the loose board up.
Take the revealed GLOWING STAR 3/3 from the hole in the floor.
Zoom out and walk back twice to exit. Continue forward once and right once, then enter the Library Building.
Library Building
Tap the middle of the left bookcase to zoom in.
Insert GLOWING STAR 2/3 (from the water in the Lake) and GLOWING STAR 3/3 (from under the loose board at the Alchemy Building) into the remaining two star-shaped notches.
If you haven't yet already, also insert the GLOWING STAR 1/3 (from the tree hollow at the Blacksmith Entrance).
The left bookcase will slide away, revealing a passage into the Secret Side Room.
Secret Side Room
Tap the magic mirror on the wall to look through it.
Pick up the MIRROR SHARD from the shattered glass on the floor.
Tap the wall behind the broken mirror for a close-up view.
Note the drawing of the Stone Monument with a large, red X underneath it.
Next, inspect the box on the middle shelf behind the desk to start another puzzle.
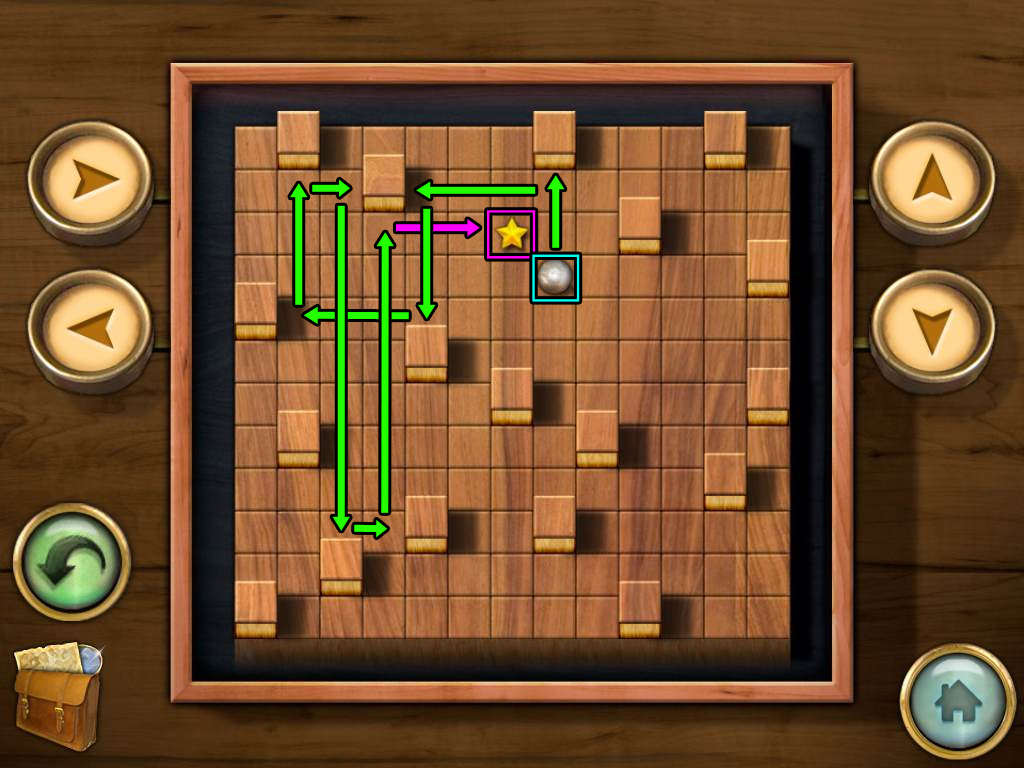
Maneuver the silver bar onto the square with the golden star.
Tap the up, down, left, and right arrows to move the ball in that direction.
The ball will continue to move until it either touches the star, hits an obstacle, or slides off the edge of the board.
To solve the first puzzle, move the ball in the following directions:
Left, up, right, down, left, up.
Part 1 Solution
To solve the second puzzle, move the ball:
Up, left, down, right, up, right, up.
Part 2 Solution
To solve the third puzzle, move the ball:
Up, left, down, left, up, right, down, right, up, right.
Part 3 Solution
Once you've completed the puzzle, take the SMALL GEAR from inside the opened puzzle box.
Leave the building and walk all the way back to the Second Shrine, then cross the bridge to return to the Bell Tower Entrance.
Part 3: Unlocking the Belfry
Bell Tower Entrance
Tap the broken section of the wall to the right of the door to take a closer look.
Place the SMALL GEAR (from the puzzle box in the Secret Side Room) into the space between the other gears in the mechanism.
Go through the opened doors to enter the Bell Tower Ground Floor.
Bell Tower Ground Floor
Pick up the WOODEN BUCKET from the floor beside the stairway.
Tap the barrel in the alcove at the left side of the room to examine the lid.
Use the PRY BAR (from the wall at Owl Ledge) to remove the lid from the barrel.
Take the SHEARS from the bottom of the opened barrel.
Next, tap the lock mechanism beside the green door to begin another puzzle.
Press the buttons in the correct order according to the clue from the flower pot outside the Alchemy Building.
Refer to the diagram in your Journal. You'll see a list of symbols - each shape is actually a segment the grid.
For example, the second shape in the list is a square. This refers to the center tile, where the lines of the grid make up a square.
Press the button to turn on the light for each tile indicated by the flower pot clue.
Solution
The door will open after you've solved the lock, allowing you to continue up to the Belfry.
Belfry
Take the WHITE CANDLE from the recess in the right wall.
Although you can interact with the four bells hanging from the ceiling, we don't yet know the correct pattern, so we'll have to come back later.
Go back downstairs and exit the tower, then walk forward once to return to the Forest.
Part 4: Uncovering the Hidden Cave
Forest
Attach the WOODEN BUCKET (from beside the stairs at the Bell Tower Ground Floor) to the hook above the well.
After the bucket dips into the well, tap it to look inside.
Take the WAX STAMP from the bottom of the bucket.
Zoom out, then walk forward to reach the Third Shrine.
Third Shrine
Use the WHITE CANDLE (from the wall at the Belfry) on the burning torch to light it.
Walk backwards four times and right once to go all the way back to the Library. Enter the building, then go through the doorway into the Secret Side Room.
Secret Side Room
Examine the parchment on top of the writing desk.
Use the LIT WHITE CANDLE (from the torch at the Third Shrine) on the parchment to drip a puddle of wax.
Mark the wax with the WAX STAMP to complete the seal.
Take the CONCH SHELL from the opened compartment at the bottom of the desk.
Exit the building, then walk forward once to the Lake. Tap the row boat to ride it to the Island.
Island
Place the CONCH SHELL (from the writing desk in the library's Secret Side Room) into the matching space on the face of the rock.
The rock will lift upwards, uncovering a hidden doorway. Tap the lock at the center of the door to begin a puzzle.
Arrange the tiles to complete the image of the octopus.
To move the tiles, tap one tile to select it and then tap a second tile to swap their places.
Solution
After you've solved the puzzle, go through the opened door into the Cave.
Cave
Tap the the center of the altar to take a closer look.
Take the MAGIC RING in the middle of the star.
Place the MIRROR SHARD (from the broken mirror in the library's Secret Side Room) under the beam of light.
Examine the glowing shapes carved into the right side of the rock wall.
You'll notice that each shape is marked with as many as one to six dots. A diagram of these dotted shapes is also added to your Journal.
Zoom out and exit the cave. Use the row boat to return to the Lake. From there, go all the way back to the bell tower, then continue up to the Belfry.
Part 5: Locating The Mystical Orb
Belfry
Tap the bells to ring them in the pattern indicated by the dotted shapes inside the Cave. Use the image in your Journal as a reference.
The number of dots indicates the order (1 dot being first and 6 dots being last) and the shape indicates which bell (square shape = square bell, etc.)
Using these clues, the final order is:
Triangle bell, Square bell, Circle bell, Diamond bell, Square bell, Circle bell.
Screenshot
Ringing the bells in the correct order will reveal a broken section at the bottom of the wall. Tap the hole in the bricks to look inside.
Take the MYSTICAL ORB from the hole.
Exit the building and walk right twice to reach the Third Shrine.
Third Shrine
Tap the shrine to zoom in.
Insert the MYSTICAL ORB (from the broken wall in the Belfry) into the spherical notch at the center of the altar.
Go through the opened sorceress's gate into the next area.
Chapter 4
Part 1: Feeding the Squirrel
Stairway
Examine the recess in the rock wall to the right of the stairs.
Note the images in the carving depicting the stone monument and the ring flashing with lightning.
Continue up the stairs to the Dragon Archway.
Dragon Archway
Take the ACORNS from the end of the branch hanging over the flame pedestal.
The fire-breathing dragon prevents us from going any further, so let's go all the way back to the Forest.
Forest
Give the ACORNS (from the tree at the Dragon Archway) to the squirrel on the branch of the right tree.
Pick up the EMPTY TINCTURE BOTTLE the squirrel leaves for you on the tree branch.
Go back once to the Bell Tower Entrance.
Part 2: Opening the Monument Portal
Bell Tower Entrance
Fill the EMPTY TINCTURE BOTTLE with the green liquid dripping from the brass urn.
Walk forward three times to return to the Stairway.
Stairway
Pour the FULL TINCTURE BOTTLE (from the brass urn at the Bell Tower Entrance) on to the sickly ferns wrapped around the shovel.
Pick up the SHOVEL after it falls to the ground.
Go all the way back to the Stone Monument.
Stone Monument
Use the SHOVEL to dig the soil in front of the monument.
Look inside the hole and take the FLAME GEM 1/2.
Zoom back out, then use the MAGIC RING on the monument to open a magic portal.
Go through the portal to return to the Bedroom in Uncle's house.
Hallway
First, go through the doorway to leave the bedroom and enter the Hallway.
Tap the box full of junk to look inside.
Move away all of the objects that are blocking the middle of the box to uncover a hidden lock.
Insert the STRANGE KEY into the lock to open it.
The painting above the junk box will disappear, revealing a hidden cache.
Search the cache and take the roll of TRANSPARENT OVERLAY you find inside.
Go back to the bedroom, then through the portal in the fireplace to return to the First Shrine.
From there, walk through the magic doorway, then move forward twice to reach the Library Entrance.
Part 3: Passing the Dragon Archway
Library Entrance
Inspect the brick wall to the left of the library building.
Use the SHEARS (from the barrel at the Bell Tower Ground Floor) to cut away the ivy covering the wall.
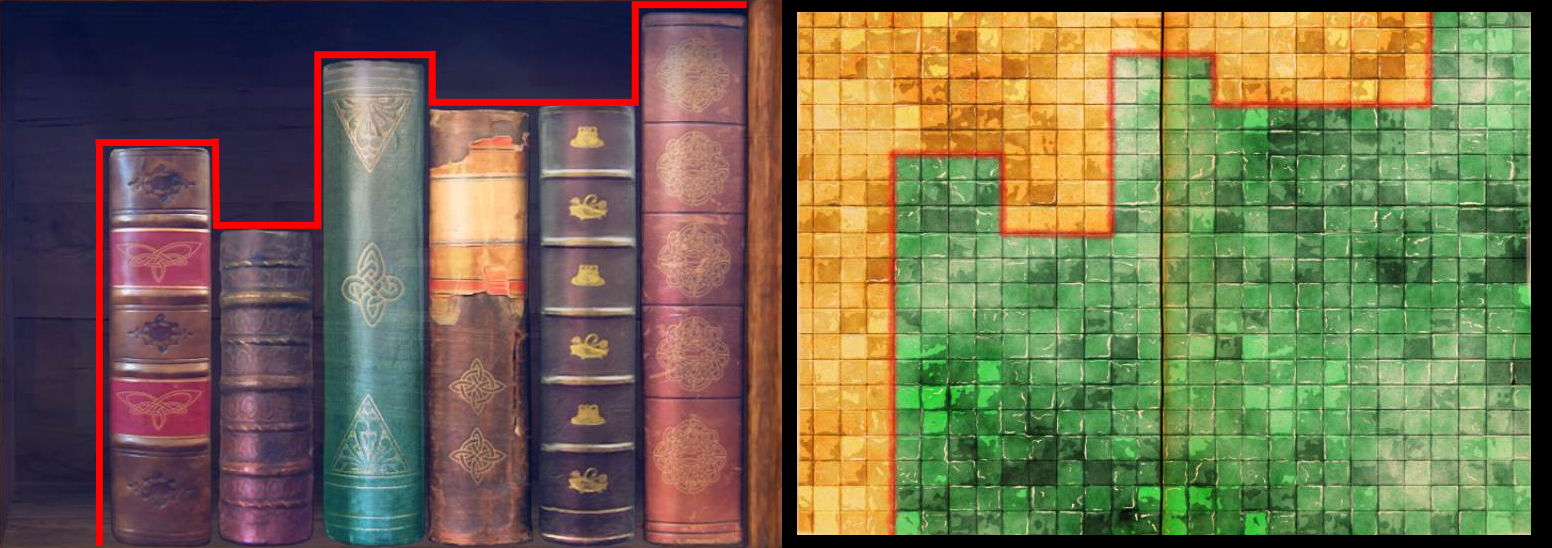
You'll uncover a mosaic pattern of yellow tiles and green tiles at varying heights. A diagram will also be added to your Journal.
Zoom out, then enter the Library Building
Library Building
Tap the right bookcase to begin a new puzzle.
Organize the books by height according to the mosaic clue that you saw on the ivy wall outside.
Refer to the image in your Journal. The height of the green blocks indicates the height of the book.
Since the far left side of the mosaic is empty, you know from the start that the far left side of the book shelf should also be empty.
Similarly, the tallest green bar on the mosaic was at the right end of the image. Therefore, you know the tallest book is also on the right end of the shelf.
To move a book, tap one to select it, then either tap an empty space to put the book in it or tap a different book to swap their positions.
Solution
After the puzzle is solved, take the FLAME GEM 2/2 from the middle of the bookcase.
Exit the building and walk all the way back to the Dragon Archway.
Dragon Archway
Tap the panel at the top of the pedestal to take a closer look.
Insert the FLAME GEM 1/2 (from the ground underneath the Stone Monument) and FLAME GEM 2/2 (from the bookcase puzzle at the Library Building) into the notches in the panel.
Tap the lever in the revealed control panel to lower the temperature.
Zoom out, then continue forward to the Lava River.
Part 4: Crossing the Lava River
Lava River
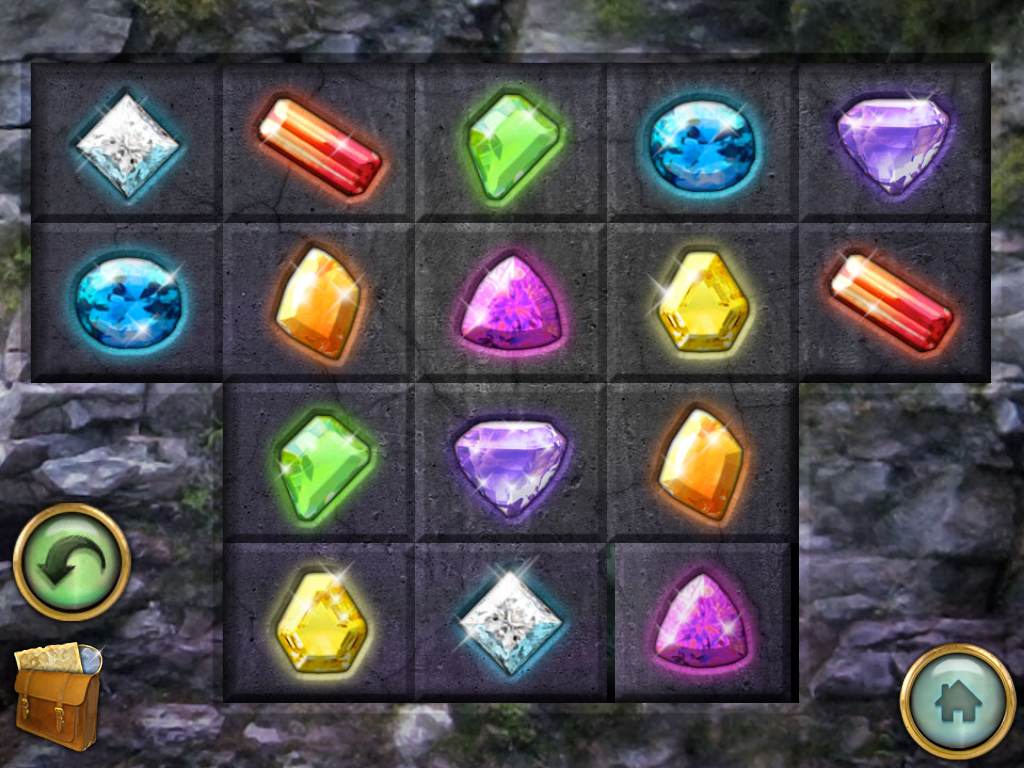
Tap the tile board on the left side of the rock wall to start a puzzle.
Complete the matching game by pairing the tiles of identical gems.
Tap two tiles to flip them both over.
If the gems on each tile match, they will remain flipped upward. If they don't match, they'll turn back over.
Solution
Once the puzzle is complete, take the revealed DRAFTING COMPASS from the hole in the wall.
Walk back five times, then go through the door to enter the Bell Tower Ground Floor.
Bell Tower Ground Floor
Examine the blueprint on top of the desk.
Place the TRANSPARENT OVERLAY on top of the blueprint.
Use the DRAFTING COMPASS on the overlay to highlight a circle of symbols.
A picture of this circle and the selected symbols is also added automatically to your Journal.
Zoom back out and exit the building. Walk forward five times to return to the Lava River.
Lava River
Tap the turtle standing on the rock to begin another puzzle.
Move the turtle's head, legs, and tail to highlight the same symbols you saw on the blueprint in the bell tower.
Refer to the image in your Journal, then tap the section of the turtle's shell beside each body part to aim them at the correct symbols. The currently selected symbols will glow blue.
Solution
Walk across the bridge that appears in the middle of the river to reach the Sorceress's Lair
Sorceress's Lair
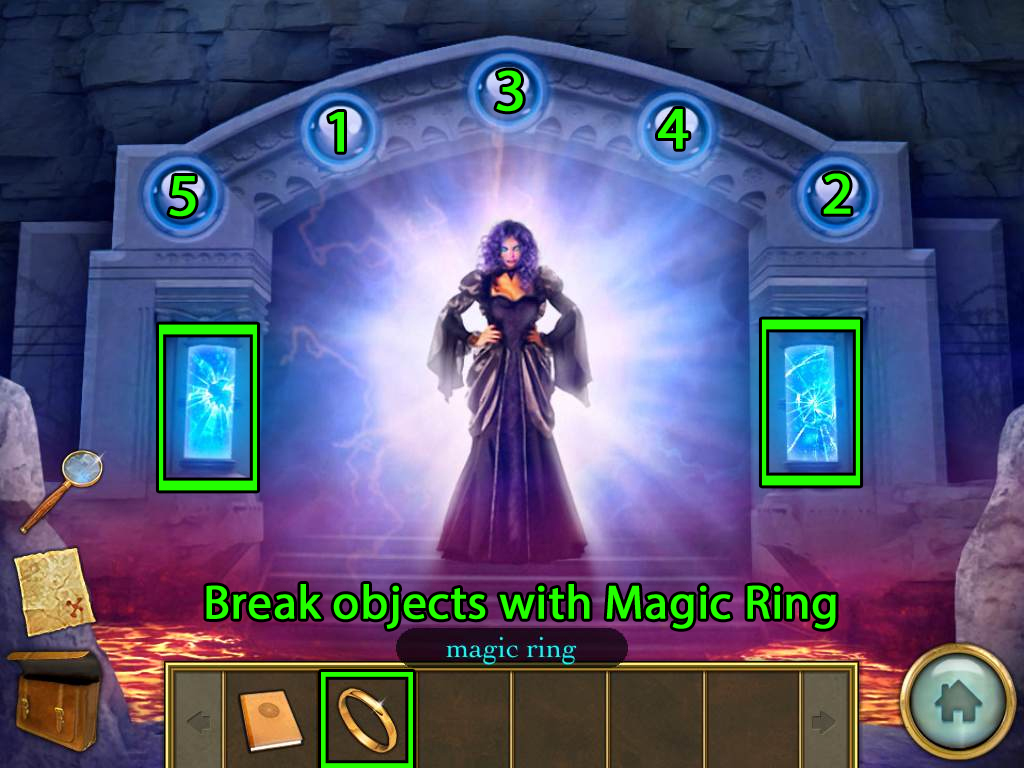
First break the two glass columns with the MAGIC RING to expose the five spheres.
Next, use the MAGIC RING to destroy the spheres in the correct order.
The second sphere from the left will glint every few seconds, indicating the first sphere to break.
Break the spheres in this order to defeat the sorceress:
Inner left, Far right, Center, Inner right, Far left.
Screenshot
Lastly, use the MAGIC RING one more time on the sorceress herself to banish her.
Posted by: Trinn |
October 19, 2013 3:10 PM
|
October 19, 2013 3:10 PM