
Monkey GO Happy Roundup 18
By Arceus
|
July 4, 2018
Comments (1) | Views (9,658)
 Time flies when you're playing monkey puzzles! Meet a ninja, the full moon, track down some olives (not for a pizza, I'm afraid), and mind those etchings in the cliffs this time.
Are those ninja stars, better known as shuriken? You're going to need to collect a bunch of them to get cooperation from a nearby ninja and help your monkey pal.
The moon is full and the monkey is out. A cryptic sign hangs with directions beckoning you to enter a tree...
An odd old man is deep in meditation, and it seems the only thing that will rise him is a collection of...olives? Head on your quest to help him reach olive-lightenment!
A tower in the mountains...


Monkey GO Happy Roundup 18 (Stage 193–196)
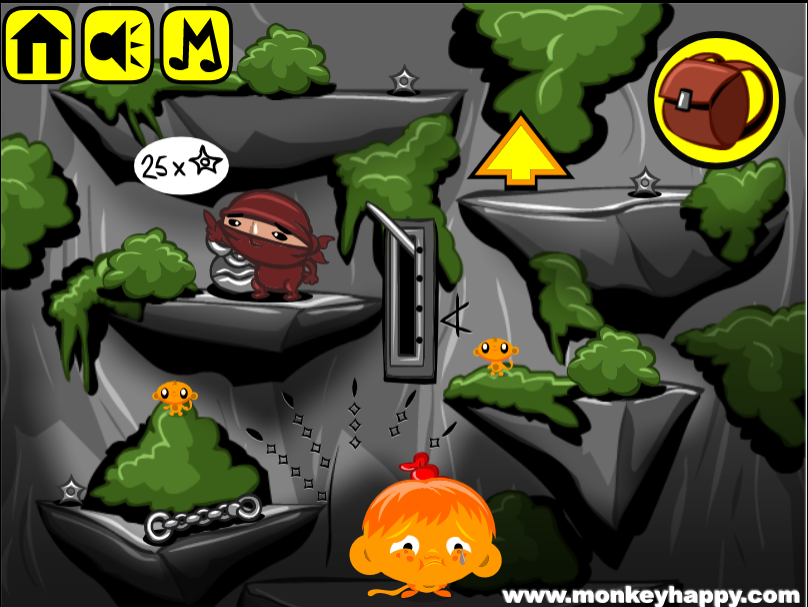
Stage 193: Climbing Ninja
Exploration
Several ledges protrude out from the cliff face around a lever (that you can't move) with markings to its right and bottom, and the ninja standing on the left one asks for 25 shuriken (throwing stars). So pick up the chain, 3 shuriken and 2 Mini Monkeys, then click the small bushes to move them and find another 3 shuriken.
Go up to find more weird levers, a locked diamond panel and another clue. After you click all three small bushes, you should see 8 shuriken, a chain and 2 Mini Monkeys.
Go up to find a samurai standing at the top, missing his sword. Around him are three levers that can each be flipped to five different positions. There's also a locked panel with a clue and a weird-shaped socket to its left. Click the three bushes, then pick up 9 shuriken, a chain, a red diamond and 2 Mini Monkeys.
Triplet
Hang a chain on each lever slot, then place the red diamond in its matching panel, and use the clue there to unlock it.
The four lines under each symbol indicate that you need to pull each chain to the fourth (bottom) position.
As the clue on the first screen tells you, the diamonds indicate that you need to set the levers to the 3rd, 2nd, 4th positions from the right. So click them (from left to right) 2, 3, 1 times.
When you have it all set up, return to the panel and push the diamond to open it. Take 2 shurikens, a head piece and a Mini Monkey from inside.
Stars
Give all 25 shurikens to the ninja, who leaps away leaving you a head piece and Mini Monkey.
Triplet 2
Combine the head pieces (with the Combine Items button in your inventory), and place the horn head in the socket on the top screen, then use the clue on the panel there to unlock it.
As before, the horizontal lines in the clue tell you where to set the chains: the one on the bottom screen should be in the top position, and the two on the middle screen should be in the 2nd (left) and 3rd (right) positions.
The diamonds tell you that the levers on the top screen should all be set to position 1 (all the way to the right).
Click the horn head to unlock the panel. Take the sword and Mini Monkey.
Armed
Give the sword to the samurai to end the stage, and pick up the Mini Monkey that appears at his feet.
For finding all ten Mini Monkeys, you get a bonus clue: (spiral) = 1.
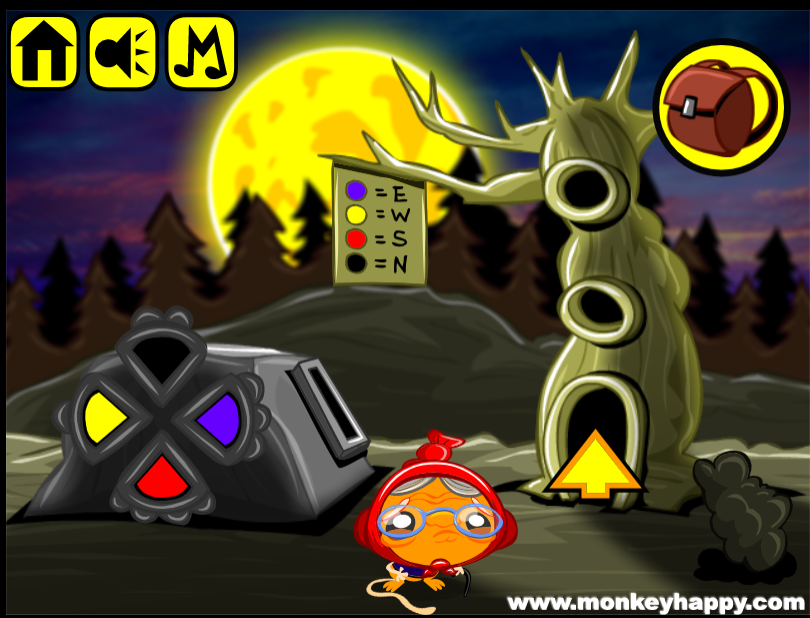
Stage 194: Lunar Treehouse
Exploration
The full moon is so large it illuminates the entire scene: the tree which has round windows and a door with a round hole, the sign attached to it with letters and colored circles, the weird machine with four color-changing buttons and a lever slot, and the bush in the lower right. Click that bush to shift it, then pick up the purple lever, 2 buttons and 3 Mini Monkeys.
Entry
Place the lever in the door and use the clue from the sign to unlock it.
The clue tells you that the east, west, south, north (R L D U) buttons on the machine should be purple/blue, yellow, red, black. So click them 2, 1, 3, 0 times.
Then push the lever on the door to open it.
Exploration 2
In this cramped space, you see two locked panels with diamond-shaped holes. Pick up the lightbulb and 2 Mini Monkeys.
Climb up. It's pitch black in here, but you can attach the lightbulb to the ceiling and turn the light on. Even with the lights on, the man here still needs a pair of glasses to read. Look at the wall clue, then pick up the metallic lever and 2 Mini Monkeys.
Spin
Place the buttons in the wall panels downstairs and the lever in the machine on the first screen.
Then use the clues from upstairs to unlock the panels.
Notice that the lever rotates the four buttons around, but you can still tell the four buttons apart by the number of protruding lobes around the outside.
The marking on the right edge of the top square tells you that the button with one lobe should be on the right (so pull the lever 4 times), and then the triangles tell you that the top and bottom buttons should be red and the left and right should be yellow.
Once done, push the button on the top panel to open it. Take the lenses and Mini Monkey.
Similarly, the bottom square clue tells you to rotate the buttons until the one with two lobes is on the left, and then to make the top triangle red, bottom yellow and the other two purple.
Once done, push the button on the lower panel to open it. Take the glasses frame and Mini Monkey.
Vision
Combine the lenses with the frame and give the completed glasses to the man to end the stage. Pick up the Mini Monkey that appears on the desk.
Bonus clue from this stage: Z = 2.
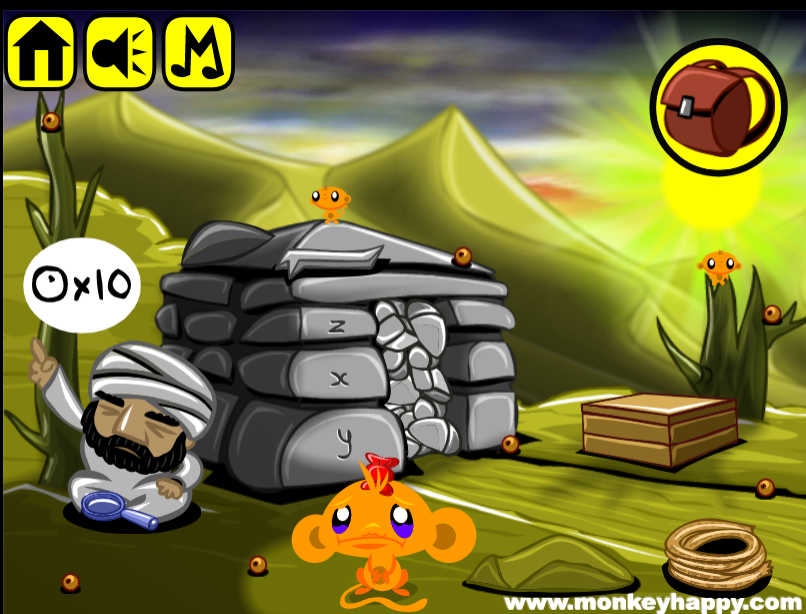
Stage 195: Olive Bunker
Exploration
This unusual building has an entrance blocked by rocks with letters etched beside and a bump on its roof that's too difficult to move, and it seems you can't open the crate on the right either. The man sitting on the left has a magnifying glass and wants 10 beads. Move the rock in the foreground, then pick up 8 beads, a rope, a crowbar and 2 Mini Monkeys.
Leverage
Use the crowbar to open the crate and find a bead on top of a stick of dynamite.
Also use the crowbar on the roof of the building to remove the rock on top and find a bead.
Exchange
Give all 10 beads to the man, who lets you take his magnifying glass.
Danger / Exploration 2
Combine the magnifying glass with the dynamite, and place the lit dynamite at the entrance to blow it up.
Entering the building, you see a locked wall panel with a round hole, four levers on the opposite wall, and a ring attached to the ceiling over a large hole in the floor. One of the stones forming the back wall has a rectangular marking. Pick up 2 Mini Monkeys.
The large stone in the top left corner of the back wall is loose, so use the crowbar to remove it and find a red ball and Mini Monkey.
Descent / Exploration 3
Tie the rope to the ring, then climb down.
Just like the previous room, this one has a locked wall panel with a round hole, four levers on the opposite wall and a stone with a rectangular marking. Unlike the previous room, this one also has a large boulder device with a "Z" on its front. Pick up 2 Mini Monkeys.
Use the crowbar to remove the loose stone in the top right corner of the back wall and find a red ball.
Fine print
Place the red balls in the wall panels, then use the magnifying glass to read the stone clues and use them to unlock the wall panels.
The ditto marks under the top row of each clue indicate that each succeeding row is the same. So the stone in the top room tells you that the left lever of each row should be set to x, and the right lever set to y.
From the letters beside the entrance, you know that x is the middle position and y the bottom, so click the left lever in each row once and the right lever twice, then push the ball in the upstairs panel to open it. Take the key bit and Mini Monkey.
Similarly, the stone in the bottom room tells you to set all the left levers to y (bottom) and the right levers to x (middle). Push the ball in the downstairs panel to open it, then take the key bit and Mini Monkey.
Treasure chest
Combine both key bits into a full key, then insert that in the device in the bottom room and use its clue to unlock it.
Set all the levers back to Z (top position), and push the key to open the device up.
You find a hoard of gold coins! And a Mini Monkey.
Bonus clue for this stage: (backwards 4) = 3.
Stage 196: Mountain Tower
Exploration
It's another moonlit level! There's a tower with mysterious devices attached to its door which has a diamond-shaped hole, a well with a round hole right next to the edge of the overhang, and some clues on the mountain in the background. Pick up a diamond, 7 stars and 2 Mini Monkeys.
Doorway
Place the diamond in the door, then use the clue from the distant mountainside to unlock it.
The clue tells you that the northeast device should display three dots, the northwest one should display one dot, and the north device should display two dots.
Translating those compass directions to actual directions, what you actually need to do is click the devices (from left to right) 1, 2, 3 times to display that many dots.
Push the diamond to open the door.
Exploration 2
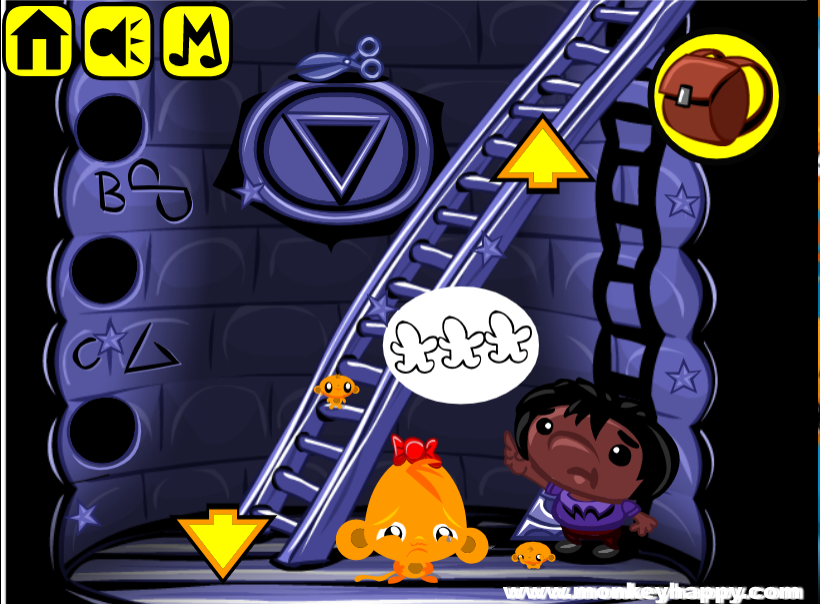
Inside the tower, you see round devices that display symbols, and some of those symbols marked on the wall between them. There's also a locked panel with a triangular hole, and the boy in the corner is asking for a chain of figure cutouts. Pick up the scissors, 7 stars and 2 Mini Monkeys.
Climb up the ladder. At the top, you see more of the same round devices, symbols and another locked panel with a triangular hole, but there's also a tablet on the wall with some interesting clues. The big-eared man(?) asks for 20 stars. Pick up 6 stars, a triangle piece and 2 Mini Monkeys.
Starry
Give all 20 stars to the man, who leaves behind some paper and a Mini Monkey as he leaves.
Chain
Combine the scissors and paper to cut out some paper men.
Then give it to the boy, who returns your favor with another triangle piece.
Up and down
Place each triangle piece in its matching wall panel, and use the clues from the walls to unlock them.
The clue for the up triangle on the tablet is a column of letters (ABABAB) followed by three pairs of vertical strokes.
So you need to make the round devices display the symbols corresponding to ABABAB from top to bottom, and set each of the devices outside to show 2 dots.
Once you've done that, push the triangle upstairs to open the panel and find an ornament piece and Mini Monkey.
Do the same for the downward-pointing triangle (CDCBCB, 312) and open its panel to find another ornament piece and Mini Monkey.
Orb
Combine the ornament pieces and place it in the well outside, then use the last clue from the tablet to unlock it.
The shape at the top of the last clue is actually a D, corresponding to the round symbol.
Which means all the ditto signs under it also represent D, so set all the round devices to show the round symbol.
Then set all the devices on the first screen to show 4 dots.
Then push the ornament, and the well rises up, a large bird lands, and a Mini Monkey appears.
Bonus clue from this stage: ++ = 2.
Bonus Stage 49
As usual, you will need to do some math for the bonus stage. Start by solving the top equations (1+3=4, 2÷2=1), then the middle one (1+4=5), and then the bottom four (2÷1=2, 5−1=4, 1+3=4, 4−3=1).
Enter the final code (2441) in the box and open it!
Update