
Monkey GO Happy Roundup 15
By Arceus
|
May 23, 2018
Comments (1) | Views (6,733)
 Another week and it's time for some more lovely monkeys. What lies below this time? Read below to learn more!
A gremlin looks for shiny coins as our monkey explores the inside of a sort of temple replete with puzzles.
A jungle explorer seems to have gotten himself stuck with his broken-down car in front of a felled tree. Help him out, along with gathering berries for a bird who never seems to have his fill.
A jungle explorer seems to have gotten himself stuck with his broken-down car in front of a felled tree. Help him out, along with gathering berries for a bird who never seems to have his fill.
Now you'll have to solve some more interesting puzzles in another underground temple...seewhere it leads the monkey this time!


Monkey GO Happy Roundup 15 (Stage 181–184)
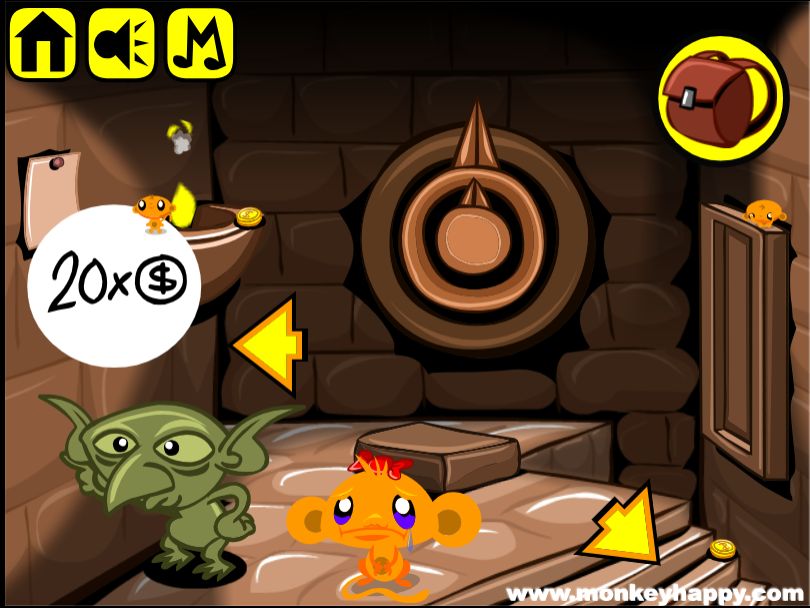
Stage 181: Tricky Coins
Exploration
You start off at the base of some stairs. The left and right walls have locked panels with holes marked by different numbers, and there's also a lever slot with five dot patterns marked on its side. Move aside the rock at the lower left, then pick up a red ball, 4 coins and 2 Mini Monkeys.
Climb up. At the top of the stairs, a goblin/gremlin asks for 20 coins, and the note above his head is filled with cryptic clues. There's also two dials on the back wall, a locked rectangular device on the right and a rock on the floor that you can move. Pick up a ball, 4 coins and 2 Mini Monkeys.
The left arrow guides you around a well-hidden corner. Now you face a large castle door with a large diamond hole under two smaller pinholes. There's another numbered locked panel with a hole on the left wall. Move the rock aside, and pick up a ball, a square piece, a lever, 4 coins and 2 Mini Monkeys.
Three, Four, Five
Place the lever in the lever slot, and then the balls in each numbered panel, and use the clues from the note to unlock them.
Each row on the note refers to a time. For example, row III gives you a clue for 1800 seconds before midnight, or 11:30 PM, so click the small dial 11 times and the large dial 6 times to match, then push the lever to the position with three dots, then push the ball in panel 3 to unlock it.
Do the same for
IV (4): √36 is 6, so set the time to 6:00.
V (5): Set the time to 8:15.
Opening those panels, you get a total of 6 coins and 3 Mini Monkeys.
One
You still have two clues left on the note. If only you knew which one to use.
The tall rectangular wall panel looks like the outline of an I.
So you need to read row I, which tells you to set the dials to 1:10. Push the lever to the position with one dot, then click the rectangular panel to open it and find 2 coins.
Twenty
Give all 20 coins to the goblin, who walks away, leaving the other square piece.
Two
Time to finish this up. Combine the two square pieces to form a square button that fits in the door.
Then use the last clue from the note to unlock it.
(Notice that the two dots above the square button match the two dots at the top position of the lever slot.)
Move the lever to the position with two dots.
FiVEPaStThReE, or five past three, is 3:05. Adjust the dials accordingly.
Then push the square button to unlock the door, where a weird creature and Mini Monkey is hiding.
Collecting all the Mini Monkeys gets you a bonus clue: (circle with four dots) = 4.
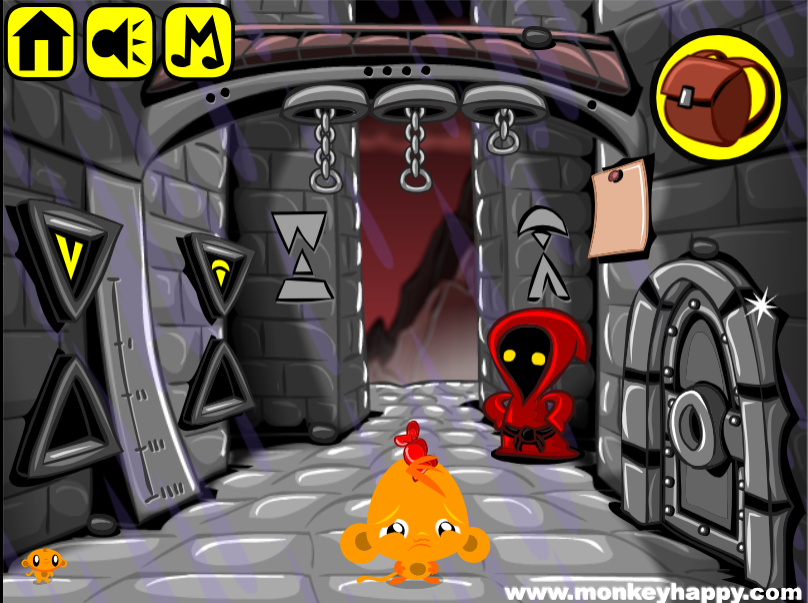
Stage 182: Rainy Castle
Exploration 1
You're drenched by the rain, but this figure in a red cloak seems perfectly happy. He asks for 15 pebbles. Look around at chains hanging from the arch above with dots marked on it, the symbols on the walls in the back, the triangular devices on the left wall with a ruler between them, and the locked door with a round hole on the right, then read the note above the door with some unusual symbol drawings. Pick up a square-shaped gem and an almond-shaped gem, as well as the round key between them, 6 pebbles (including two blending in with a wall and door) and 2 Mini Monkeys.
Passcode
Place the key in the door, then use the clues around the screen to unlock it.
Let's start with the dots which appear in groups of 2, 4, 1. According to the chart on the left, you need to pull the chains down 2, 4, 1 times from their starting (shortest) positions.
For the symbols, you need to copy the pattern on the walls by clicking the triangular devices
2 4

3 1
times. Now you can open the door.
Exploration 2
You're now in the basement, facing a wall where a complicated lock has a diamond-shaped hole. There's also a large hole in the ceiling and a lever slot beside the door where you entered. Pick up the ball with hole, 4 pebbles and 2 Mini Monkeys.
Go right to find another complicated wall lock with an almond-shaped hole. There's a clue on the ceiling and two triangular devices on the right wall, but a red alien guards the lower triangular device and the stick at his feet. Pick up a large syringe, 3 pebbles and 2 Mini Monkeys.
(Check that you have 13 pebbles and 6 Mini Monkeys.)
Combination
Place the shaped gems in the wall locks, then use the clues from the note to unlock both of them.
The top clue indicates that all four of the triangular devices on the first screen should show wedges, that the almond-shaped gem should be pressed, and that each of the chains should be set to position Ⅰ (1).
So set the devices, then the chains, then push the gem to unlock the wall panel. Inside, there's a pebble and a Mini Monkey.
Similarly, the bottom clue tells you to set the devices to mountains and the chains to position 2, and push the other gem to unlock the wall panel. Inside, you find another pebble and Mini Monkey.
Compile
Give all 15 pebbles to the person in the red hood. As he walks away into another alley, you can pick up the sleep potion on the floor and the Mini Monkey behind it.
Placate
Fill the syringe with the sleep potion. It works instantly and you can take the stick on the ground.
Everything
Attach the stick to the ball with hole to get a lever which fits in the slot beside the basement entrance.
Then use the clues from the ceiling above the alien to set every device properly.
The pairs of symbols need to be input into the triangular devices, the four left symbols on the first screen and the next two on the wall behind the alien.
There's also a clock which shows the time 4:10, so pull the chains until they are in positions 4, 1, 0.
Now you can pull the lever to lower a bat from the ceiling, and take the last Mini Monkey from it.
Bonus clue from this stage: (circle with two dots and two lines) = 3.
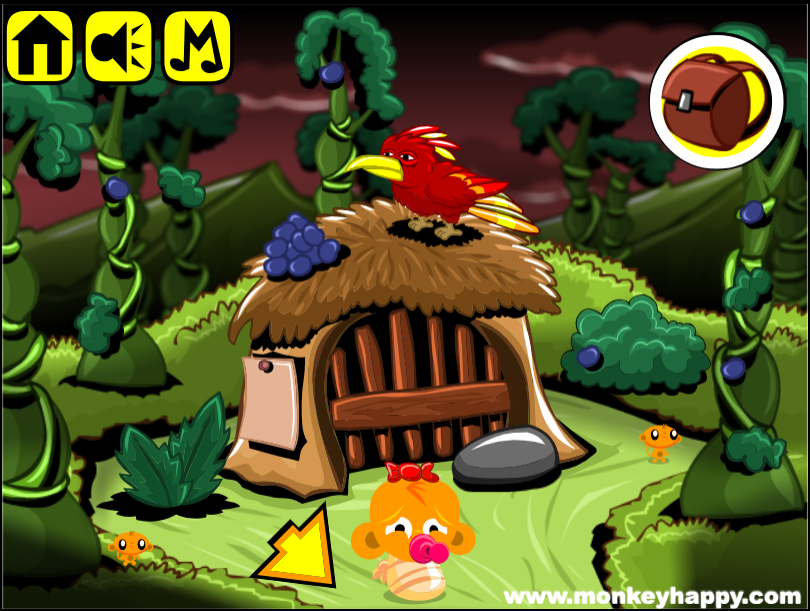
Stage 183: Road Block
Exploration
An explorer has his path stopped by a giant log in the road. There's nothing wrong with his car, but you can still open it up to find a machete. Click the rock in the lower left, the fern between two right trees, and four clumps of leaves on the trees, giving you access to a total of 12 berries. Now there's just a wheel and 2 Mini Monkeys remaining, as well as one stubborn bush in the left corner.
Go forward along the road to find a bright red bird perched on a house next to a pile of grapes. The bird asks for exactly 30 more grapes, and the house itself has a locked door and a note on its left wall. After clicking the rock, fern, and five leaf clumps, you can pick up 15 berries and 2 Mini Monkeys, leaving (you guessed it) one bush next to the house.
Slice
Use the machete on the bushes to get another 2 berries. (Check that you now have a total of 29.)
Then use the machete to chop the door of the house in half, and pick up the Mini Monkey that appears before you enter.
Exploration 2
The inside of the house is very simply decorated, with one large wall button, which displays symbols, surrounded by 7 smaller ones, which display lines. There are also two huge domes on the floor with circular holes, and 2 Mini Monkeys on them.
Wheel 1
Place the wheel you have in the matching dome (the right one), and use a clue from the note to unlock it.
The shape on the wheel matches the lower clue on the note, so you need to produce the symbol with radiating lines by clicking the middle button 4 times.
Those radiating lines have to continue onto the outer buttons, so click them (clockwise from lower left) 2, 3, 4, 1, 2, 3, 4 times.
Turn the wheel to unlock the dome and get a petrol can that hides a berry and Mini Monkey.
Feed
Give all 30 berries to the bird, and they vanish into the pile as it walks over to eat. Pick up the other wheel behind the bird.
Wheel 2
Place the second wheel in the left dome, and then use the remaining clue from the note to unlock that.
The middle symbol on the top clue matches the first one on the button (two arcs and a short line segment), and the squiggly tilde beneath it matches that on the wheel.
This leaves the cryptic letters around it, which occur in seven closely-spaced pairs of directions. For example, the top pair reads W E, which indicates a line from west to east, and the pair immediately on its right indicates a line from northwest to southeast.
Working through each pair, you find that each line needs to be rotated 90 degrees from its current orientation to form a circle around the middle button. So click them (clockwise from left) an additional 2, 3, 3, 2, 2, 3, 3 times.
Now turn the wheel to open the dome and get a chainsaw and a Mini Monkey.
Clear
Fill the chainsaw with petrol to get it running, then use it to cut the log in half.
Then click on the log again to remove the halves and clear the way! Pick up the last Mini Monkey after the car leaves.
Bonus clue from this stage: (circle with dot and line) = 2.
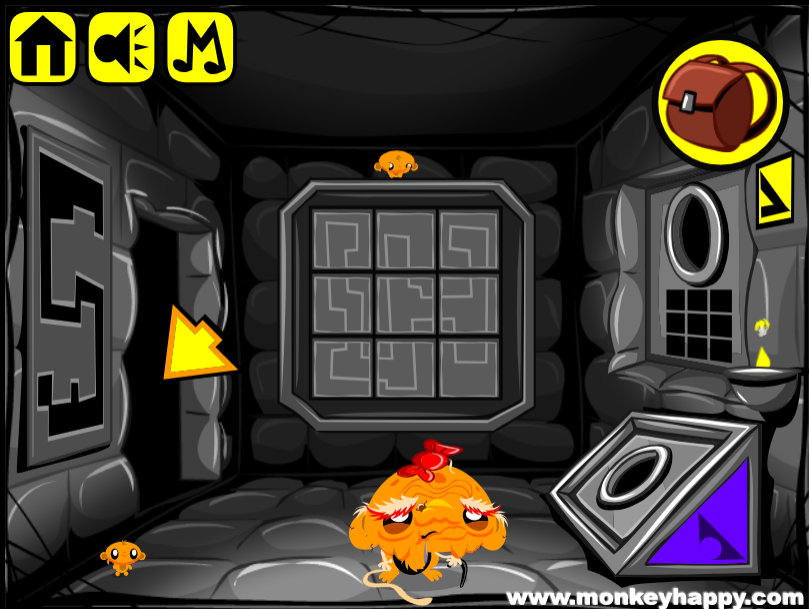
Stage 184: Jigsaw Dungeon
Exploration
You're stuck underground in a room with stone walls. There's a picture on the left wall, a large hole next to it, and a small hole in a chute in the corner with a bright red marking. There's a panel on the back wall with a grid of nine buttons that each show a different tile and rotate it. Pick up 2 Mini Monkeys.
Go right. This room has two square buttons in the back wall. The left one cycles through gray shapes, and the right one cycles through colored squares. Move the rock in the lower left to reveal a red button, and then take the locked box on the right, as well as 3 Mini Monkeys.
Go up the stairs to the right. This room has another picture on the left wall and another grid of nine buttons on the back wall. There's also a panel with a hole on the right wall and a small hole beneath it in the corner, both of them with colored markings. Pick up 2 Mini Monkeys.
Red
Place the red button in the hole with the red marking, and use the clues there to unlock it.
Click the left button in the middle room thrice to match the darker region of the marking, then the right button five times to show the color red.
You also need to solve the tile puzzle in the left room by replicating the picture in the right room, which basically involves making the pieces match up. The only difficulty is the middle tile, which has two very similar positions. It should only be clicked once.
Once you have that set up, push the red button to open up the container which has a roll of duct tape, a purple button and a Mini Monkey.
Purple
Place the purple button in the hole with the purple marking, and use the clues there to unlock it.
Click the left button in the middle room four more times to match the marking, and the right button four more times to show the color purple.
You also need to solve the tile puzzle in the right room by replicating the picture in the left room. This time around, each column in the puzzle changes completely when you click any tile in it, with a total of 7 possibilities per column. So click the columns 2, 5, 4 times.
Then push the purple button to open up that container, and take a pair of sticks and a Mini Monkey from inside.
Unseen
Combine the sticks with the duct tape, and extend it into the large hole in the wall of the left room to retrieve a key.
Unlock
Use the key to unlock the box in your inventory to get a ball.
Yellow
Place the ball in the wall panel in the right room, then use the clues there to unlock it.
Click the left button in the middle room three more times to match the marking next to the panel, then the right button four more times.
You also need to make the tile puzzle in the left room match the clue on the panel, by clicking its buttons until all of them are black again.
Then push the ball to open the panel and release a red flying… owl? The stage is over, so just pick up the last Mini Monkey.
Bonus clue from this stage: (circle with dots within, above and below) = 4.
Bonus Stage 46
The bonus clues from each stage are 4, 3, 2, 4, so work out the equations above the boxes from left to right (4−3=1, 4÷2=2, 2+1=3), and then the equations within the boxes (3÷3=1, 3−2=1, 2+2=4, 2−1=1).
Enter 1141 in the box and open it!
Update