

![]() Mirror, Mirror, on the wall, who's the fairest of them all? When you look into a mirror do you see just the surface, or do you see deep inside? The answer depends both upon what type of person you are as well as what type of mirror that you are peering into. In Mirror Escape, the fantastic new room escape from Kotorinosu, the mirror (or, rather, mirrors, as this room is full of them) is one that looks straight into...your ability to solve your way out of this tricky room. What, you were expecting something more profound? This is Weekday Escape, not Weekday Soul Search.
Mirror, Mirror, on the wall, who's the fairest of them all? When you look into a mirror do you see just the surface, or do you see deep inside? The answer depends both upon what type of person you are as well as what type of mirror that you are peering into. In Mirror Escape, the fantastic new room escape from Kotorinosu, the mirror (or, rather, mirrors, as this room is full of them) is one that looks straight into...your ability to solve your way out of this tricky room. What, you were expecting something more profound? This is Weekday Escape, not Weekday Soul Search.
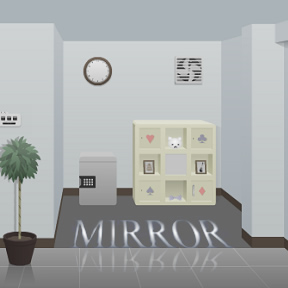 Mirror Escape is a classic one (well, one and a half) room escape. You wander around using the standard bars/arrows at the edges of the screen and simply click on objects in the space for a close up. Solving your way out will depend on guile, cunning, the ability to find objects, the ability to combine objects, the ability to observe very carefully, but most especially your ability to solve puzzles. And what a fantastic bunch of puzzles await the intrepid gamer!
Kotorinosu, designer of past favorites Shadow and Dangerous Gen-Kan Escape 2 has created yet another moody, terrific puzzle room. The challenges depend on color perception, spatial perception, and your ability to think ahead. This is definitely not a five minutes and out type of room, which makes the save feature very handy if you want to walk away for a while and approach the game with a fresh perspective. The graphics are lovely with a muted color palette, leaving the logic of the room to take center stage. Trust me, you'll need a lot of logic to get out of this one.
The designer is treading into Mya's Neutral territory with Mirror Escape in regard to variety and difficulty of puzzles. The game is fun, challenging, logical, and a joy for experienced room escapers looking for something fresh and new. Just remember, when gazing into mirrors it is sometimes wise not to look too closely lest you get lost inside with no hope of escape. Although, in this case, perhaps you'd better really look deep...
The mirror crack'd from side to side;
"The curse is come upon me," cried
The Lady of Shalott.


Walkthrough Guide
(Please allow page to fully load for spoiler tags to be functional.)
Mirror Escape Walkthrough
Turn right. Open the floorboard and remove the box.
Turn right. Take the beaker. Look under the left stool for a note. Note the spade fixture on the wall.
Turn right. Open the left cabinet. Move the binders out of the way and take the diamond key.
Look closely at the diamond key.
Note that its teeth are roman numerals V II VI in red, green and blue, respectively.
Open the box in your inventory with the code
V-II-VI.
Take the phillips-head driver bit. Remove the insert and take the puzzle piece and triangle coin.
Turn right. Notice the safe has 12 buttons in a 3x4 pattern. The holes on the test tube tray had the same pattern. Your note tells you the order to press them: lowest to highest, and then back to lowest.
Left to right, 1-4:
B1, B3, T4, T3, M2, T3, T4, B3, B1
Open the safe. Take the screwdriver handle and the book.
Look through the book. Take note of the information on the various pages. Flip through until the end and take the circle coin.
Combine driver handle and bit and remove the screws from the diamond door. Open it with the diamond key and take the CD.
Remove the screws from the fan cover and take it.
Turn right. Open the CD case and take out the cover and CD. Open the cover to the inside (where the partial numbers are) and hold it over the picture, lining up the numbers. The numbers indicate the order in which you must bump the picture.
Top, left, right, top, bottom, left.
Flip the CD and place it into the wall. Rotate it, noting when each letter lines up, and the image that is also made.
L=fan, C=bowtie, R=shirt.
Pick up the club key from the floor.
Turn left. Open the club door. Take the heart-shaped box. Miss Nirvana a little bit.
Note the pattern on the bow tie and the shirt. Look at the fan and note the pattern behind it.
Bowtie=blue/light blue polka dot
Shirt=brown/beige diamonds
Fan=black/gray waffle.
Enter the patterns onto the panel next to the door, in the order the CD gave us:
Press the center button 8 times, and the right button twice.
Press ENTER.
Enter the door. Take the diamond coin from the wastebasket. Pick up the kaleidoscope and look through it. The key here is to match up the buttons on the heart-shaped box with the colors in the kaleidoscope.
Left to right (number of clicks):
Top row: green, red (1,0)
2nd row: yellow, blue, green (3,2,1)
3rd row: red, yellow (0,3)
Bottom: blue (2).
Take the heart key.
Place the puzzle piece into the picture. Note the darkened pieces, especially the side that is different as you move left to right.
R-L-D-L-U-R-D
Back out. Open the heart door and take the mirror.
Turn left. Open the left cabinet. Open the box on the top shelf using the code on the back of the fan cover.
Up 1, down 1, up 2, down 3.
Take the clock hand.
Turn left. Use the code from the jigsaw puzzle and then click the center button to turn on the water. Take the + coin. Fill your beaker with water.
Turn around and enter the door. Use your beaker on the tray on the top shelf. Note the numbers and colors.
7Y-3G-10Y-5G-8Y-12G
Back out. Use the clock hand on the clock. Move the hand to each number indicated in the direction of the color indicated.
7CC-3C-10CC-5C-8CC-12C
Take the wavy lines coin and the slide from behind the clock.
Turn around. Place the mirror and the slide onto the microscope. Look through the microscope and note the numbers, along with their relative size.
Largest to smallest: 8-2-4-7
Turn around and enter the door. Solve the brown wall puzzle using the numbers you got from the microscope. Match each number to the size of the circle it's in.
Top to bottom: 8-4-7-2
Open the puzzle, and take the flathead driver bit.
Back out and turn right. Dismantle your screwdriver and attach the flathead. Open the breaker box. Note that if the power exceeds 100%, you will trip the main breaker. Turn off the fan.
Turn left. Take the spade key out of the fan. Open the spade door. Take the binoculars.
Turn right. Overload the box, or just turn off the main breaker. Look at the mirror: it's a 1-way mirror, as the book illustrates. Use the binoculars to see the code on the bottom of the wall.
S-C-T-C-T-S-S-C
Turn the main breaker back on. Turn off everything but the square matrix.
Turn around. Use the code from the mirror to move the cabinet.
M-T-B-T-B-M-M-T
Open the door. These switches control the slanted walls on the spade fixture above the desk, which are mirrors. The object is to reflect the red light at the bottom left to the blue sensor at the top right.
Top: / \ /
2nd: \ \
3rd: \ \ /
4th: / \
5th: / \ /
Turn around. Open the breaker and take the star coin. Turn off the light, and turn on the computer and keypad.
Turn left and enter the door. Use the computer. Click EXIT, then OPEN and the 1-way mirror will retract. Close the OPEN window and open Memo.jpg. Note the combinations here. The dark gray spaces indicates nothing must be in that location. Note the location of the light gray space.
Triangle to the lower left of light gray
plus-empty-empty-circle
circle-empty-triangle-empty
empty-empty-diamond-star.
Back out and turn right. Enter the mirror and look at the chinese checkerboard on the wall. The object is to place your 6 coins in such a way that all the patterns from the memo are made.
Top row: empty
2nd row: empty-triangle-empty-circle
3rd row: wavy lines-empty
4th row: star-diamond-empty-empty
Bottom row: plus.
Exit. Congratulations!
Posted by: DAM |
June 29, 2011 3:41 AM
|
June 29, 2011 3:41 AM
Mirror Escape Walkthrough
Beginning:
From the initial view, turn right. On the floor you'll notice a slightly darker tile with a small line across the bottom of it. Click on this tile to zoom in, then click it again to open it and take the box inside the compartment.
Zoom out and turn right. Take the glass beaker from the counter. Click the stool on the left and take the note taped underneath it.
Zoom out and turn right again. Click on the dresser to zoom in. Open the left door, then click the red and green books to move them and uncover a diamond key. Take it.
The Numeral Box:
Examine the box you took from under the floor. It has three colored buttons that display the Roman numerals for 1 through 9.
Now examine the diamond key you took from the dresser.
Notice the notches on the key. They are in the shapes of V's and I's, and they have colors on the ends of them.
Solution
Enter V-II-VI into the box. Take the cross-shaped screwdriver head. Click the inside of the box to reveal a puzzle piece and a red coin with a triangle on it; take them.
The Safe:
Examine that note you took from the stool. It shows a series of test tubes containing varying levels of liquid.
There are test tubes with different levels of liquid sitting in a holder on the left side of the counter.
The holder has spaces for test tubes in a 3x4 pattern.
The arrows on the note depict moving from the lowest test tube to the highest test tube and back to the lowest.
Using the positions of the test tubes and the hint from the note, you can open the safe by hitting the buttons in the same locations as the test tubes from the lowest to the highest and back to the lowest.
Solution
Press the buttons on the safe in the following order:
XX43
X5XX
1X2X
Then:
XX67
XXXX
9X8X
Open the safe and take the screwdriver handle the the blue book.
Inside the blue book are depictions of a microscope, a kaleidoscope, reflection, a magic mirror, and a series of symbols. A few pages past those symbols you'll find a green coin with a circle on it.
The Slider Box:
Examine the screwdriver handle and combine it with the cross-shaped screwdriver head. Zoom in on the fan above the shelves. Remove the screws securing the grating and take the grating.
Inside the left side of the dresser on a shelf is a box with four sliders on its front and lines next to those. Notice that the middle line is red.
Examine the grating from the fan. Flip it over to show a series of grey boxes and lines down its left. Notice that the middle line is also red.
Put the sliders on the box in the positions of the boxes on the grating, using the lines of each to determine their heights.
Solution
From their default positions along the red line in the middle: 1st slider up once; 2nd slider down once; 3rd slider up twice; 4th slider down three times. Open the box and take the clock hand.
The Club Picture:
Go to the shelves next to the safe and zoom in on the diamond cupboard. Remove the screws with the screwdriver then unlock it with the diamond key. Take the CD case from inside it. Examine the CD case and remove both the CD and the paper; examine and click each of them to unfold the paper and flip the CD.
On the wall with the large mirror is a picture with an upside-down club in the middle. Zoom in on it. If you click the sides you'll notice the picture moves, but nothing happens.
Select the paper from the CD case and mouse over the picture. When lined up, the paper reveals numbers along the sides of the picture.
The numbers give the order in which to click the sides.
Solution
Click the sides in the order: top, left, right, top, bottom, left. The picture will slide up to reveal a niche with shapes in it. A club key will drop to the floor; zoom out and grab it.
The Door Keypad:
Use the CD from the diamond cupboard on the round slot behind the club picture. You can now rotate it to line up the shapes by clicking and dragging.
By lining up the parts of the shapes on and off the CD, you'll notice that the shapes on the inside make the letters C, L, and R, while the parts of the shapes on the outside make a shirt, a bowtie, and a fan.
C, L, and R refer to center, left, and right, so you can determine that center is bowtie, left is fan, and right is shirt.
On the shelf next to the safe is a blue polkadotted bowtie and a picture of a shirt with a green diamond pattern, while behind the fan is a grid of grey squares on a black background.
Enter the corresponding patterns into the keypad in the order given by the CD puzzle and hit the 'Enter' button.
Solution
The order is: grey squares, blue polkadots, green diamonds.
The Sink:
Enter the now-unlocked door. Click on the trash can and take the grey coin with a square on it.
Zoom in on the picture and place the puzzle piece from the numeral box into the empty space. It will complete a cross shape, and a series of four-sided puzzle pieces will appear.
If you examine the tap on the sink in the middle of the counter on the other side of the room, you notice it's capped with a cross shape like the one on the picture, and has four buttons along its sides that can be pushed in and out.
You can find the order for the sink by relating the puzzle pieces in the picture to the buttons on the sink, and thinking of protrusions on the pieces as buttons pushed out and insets on the pieces as buttons pushed in. Finish by hitting the middle cross button.
Solution
Hit the buttons in the order: right, left, bottom, left, top, right, bottom, middle. Take the blue coin with a plus sign from the full sink.
The Clock:
Fill the glass beaker with water from the sink. Enter the small room behind the door, zoom in on the tray on the top shelf, and use the full beaker on it. This will reveal numbers in different shades of green, as well as changing the water symbol's color.
Exit the room and zoom in on the clock above the safe. Take the clock hand from the slider box and place it on the clock; you can now rotate the hand clockwise and counter-clockwise. Notice that the end of the hand has the same colors as the numbers on the tray.
The left side of the clock hand is light green, and the right side is dark green. They're the same shades as the numbers on the tray.
Treat the clock like a combination lock, where light green is left and dark green is right.
Solution
Move the clock hand left to 7, right to 3, left to 10, right to 5, left to 8, and right to 12. Take the brown coin with a wave on it and the microscope slide.
The Color Box:
If you haven't already, head over the to club cupboard in the shelves next to the safe, open it with the club key from the club picture, and take the color box.
On a shelf in the small room is a kaleidoscope. Examine it and look through the hole.
You'll now see a distorted view of some colored squares. You can click and drag to rotate them.
The squares in the kaleidoscope are in the same pattern as those on the color box. Using some spatial knowledge, you can determine the color of each square. Note that the top segment of the view is not distorted but merely cropped, making it useful in solving the puzzle.
Solution
The colors are:
G R
Y B G
R Y
B
Take the heart key from the box.
The Circle Picture:
Open the heart cupboard with the heart key and retrieve the microscope mirror. Go to the microscope on the counter and place both the mirror and the slide, then look through the lens.
At x400 zoom you can see 4's composed of 7's, at x150 zoom you can see 2's composed of 4's, and at x30 zoom you can see and 8 composed of 2's.
Look at the circle picture in the small room, above the computer. Note that it requires four numbers, and each number is in a circle nested in a larger circle.
The circles are a reference to the zooms on the microscope, with the smallest circle corresponding to the highest zoom and the largest circle corresponding to the lowest zoom.
There are four circles, but only three zooms. However, the 7's which compose the 4's are the smallest, and thus correspond to the smallest circle.
Solution
The code is: 8
4
7
2
Take the flat screwdriver head from behind the picture.
The Dresser Drawers:
Examine the screwdriver. Remove the plus-shaped head and insert the flathead. Go to the power box on the wall next to the club picture, zoom in, and remove the screws.
Turn off the power to the fan; head over to it and take the spade key from behind it. Open the spade cupboard and take the binoculars.
Go back to the power box and turn off all power via the switch on the right. This will turn off the lights.
Go to the tall mirror to the left of the power box and look through your binoculars to see a series of shapes.
Zoom out and turn the power back on. Examine the dresser on the opposite wall. Notice the handles.
Solution
Pull the drawers in the order: middle, top, bottom, top, bottom, middle, middle, top.
The Spade Mirrors:
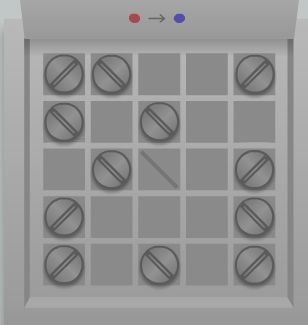
Behind the dresser is a panel that opens to reveal a grid of diagonal switches. Above the switches is a sign showing an arrow pointing from a red dot to a blue dot.
First, go to the power box and turn on power to the grid of squares. Now look at the spade box above the counter on the wall to the left. Note the diagonal mirrors, and the red and blue nodes - notably the red one firing a laser which is bouncing off the mirrors.
The switches in the panel behind the dresser control the mirrors in the box, and need to be flipped to enable to the red node to feed the laser to the blue node.
Solution
Flip the switches to look like this:
/ \ O O /
\ O \ O O
O \ \ O /
/ O O O \
/ O \ O /
The Exit:
Go to the power box. A new compartment has opened; take the yellow coin with a star on it and turn off the lights. Also turn off the grid, and turn on the computer.
Enter the small room and zoom in on the computer. Click on 'EXIT' and hit 'OPEN' to open the mirror.
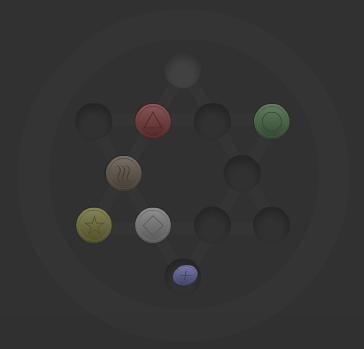
If you enter the mirror and look at the door you'll see it has 12 recesses on it in the shape of a Star of David, with the top recess shaded white.
Open Memo.jpg on the computer. This is the only clue for solving the final puzzle.
The upper diagram rather obviously tells you where the triangle coin goes. The other three lines of four circles each correspond to a separate line of four recesses on the Star of David.
Using the middle line first, you can determine where the circle coin goes, which you can use to determine where the plus coin goes via the first line. The third line must then correspond to a line with two consecutive empty spaces and can't conflict with either of the other lines. After placing every coin shown, there is then only one place to put the wave coin without conflicting with anything shown in the diagram.
Solution
Place the coins:
O
O T O C
W O
S D O O
P
(T=Triangle, C=Circle, S=Star, D=Diamond, P=Plus, W=Wave)
Exit the room.
Posted by: Night Stryke |
June 29, 2011 4:22 AM
|
June 29, 2011 4:22 AM
Mirror Escape Walkthrough
General Information
Look very closely at everything you pick up. Some items may be hiding clues or even other items.
There are a lot of color-based puzzles, so this walkthrough will attempt directions for the colorblind.
Once you solve a puzzle make sure you double check that the area you just opened isn't hiding a second, or even third object.
Good luck!
Exploration
You begin facing an alcoved wall with a door on the left. On the wall to the right of the door is a small panel, click on it.
Note that the buttons in this lock make colored patterns. We don't know what patterns to enter yet, so back up.
In the alcove of the wall itself are a safe and a shelving unit. Click on the safe for a close up.
The safe door appears to have a 3 x 4 grid of buttons. Again, we don't know the code so back up.
Click on the shelving unit for a close up.
Notice that in each of the four corners of the unit are four doors with card suits on them. Three of the doors (hearts, clubs, and spades) need keys. The fourth door, the one with a diamond, appears to have some sort of plate screwed on it, requiring a phillip's head screwdriver.
The objects in the open cubbyholes are also of note, especially the bowtie with the blue polka-dot pattern and the picture of a sweater with a diamond pattern. We've seen these patterns before...
Back up.
Above the safe is a clock. In close up you will notice that the clock is missing hands.
Above the shelving unit is a vent with a turning fan. A close up will show more screws needing a phillip's head screwdriver.
Back up and turn right.
You are now facing a wall with a large mirror. Click on the mirror and you will see a reflection of a picture of a Dharma doll. Back up.
There is also a large painting on the wall. A close-up of the painting shows an upside down club symbol, parts of some other symbols, and the fact that the pictures moves left-right and up-down slightly. Back up.
On the right side of the wall, high up near the ceiling, is a panel of some sort. The lightning bolt symbol shows that it is probably an electrical panel, and you need a flat-head screwdriver to open it.
Back up.
On the floor in front of you is a tile that looks different from the others (it's underneath the picture). Click on the tile for a close up.
Once the tile is in close up click on it to open it and take the item from inside (box).
Pull the box into close up and you will see that you need a three digit code involving colors and Roman numerals.
Back up and turn right.
You are now facing a wall with a long lab table against it. On the table are some test tubes, a beaker, and a microscope.
Above the table is a picture, click on it for a close up.
Hmmm, this picture has a picture of a spade on it, and it appears to have a lot of small cubbyholes with mirrors in it. Back up.
Click on the left stool underneath the table for a close up.
Take the note that is taped to the underside of the chair. Examine the note in close up to see a mysterious picture of test tubes. The note seems to imply going from least filled to most filled and back to least filled.
Back up.
You can click on the microscope but there's no slide or light source at the bottom. Back up.
Click on the sink in the center of the table. Notice the odd water tap with four buttons on it. Back up.
Click on the beaker to take it.
Click on the test tubes for a close up.
There are five test tubes here, each with a different amount of a colored liquid. Hey, does the pattern on that rack holding the tubes look familiar?
Back up and turn right.
You are now facing a wall with a picture of a Dharma doll (we saw that reflected in the mirror) and a small cabinet. Click on the cabinet for a close up.
The drawers have pulls that are geometrically shaped, but we can't open them.
Click to open the left door of the cabinet.
On the top shelf inside the cabinet is a small safe with a slider lock.
On the bottom shelf are some binders. Click on the binders to move them to the right and take the object that is revealed (diamond key).
Back up and turn right.
We're back where we started, time to solve some puzzles!
The Black Box
We can't use the diamond key in the shelving unit until we find a screwdriver, so let's pull up the key and take a closer look at it.
Look at that! The teeth of the key are in the shape of a clue! We have a red V, a green II, and a blue VI.
Where have we seen Roman numerals with those colors?
In the black box we got from underneath the floor tile!
Pull up the black box from your inventory and click on the code lock for a close up.
Enter the code you just got from the key (V, II, VI).
Back up from the close up and click on the lid of the box to open it.
Take the screwdriver part (phillip's head).
Unfortunately we can't use this screwdriver part until we find the rest of the screwdriver.
Once you've taken the part click on the space where it was in the box and a secret panel will lift up. Take the red coin and the puzzle piece.
The Large Safe
Let's turn our attention to the large safe between the door and the shelving unit.
Remember, the lock on this safe has buttons in a 3 x 4 grid pattern.
Where have we seen that pattern before?
Perhaps in the rack holding the test tubes?
But are there any other clues?
There's that note we found underneath the stool with the test tube pictures. That note implied going from lowest filled to highest filled and back again.
Note the positions of the test tubes in the 3 x 4 rack. These correspond to buttons on the safe door.
The colors of the liquid in the test tubes don't mean anything, all you need to worry about are the fluid levels.
As the note implies, you are going from least filled to most filled and then back down to least filled.
Therefore you will be pushing 9 buttons in total to open the safe.
The solution: Bottom row left button, bottom row third from the left button, top row far right button, top row third from the left button, middle row second from the left button, then back up to top row third from the left button, top row far right button, bottom row third from the left button, and finally bottom row far left button.
Click on the safe twice for a close up and push the buttons in the proper order. If you get it right the note will disappear from your inventory.
Back up once and click on the door to open it.
Yay, on the bottom shelf is the screwdriver handle! Take it.
Pick up the book on the top shelf and start reading by clicking on the far right page.
In the book is five pages of hints (the microscope, the kaleidoscope, reflection, the magic mirror, and a list of coins (you will find six in all).
Keep leafing through the blank pages and eventually you will find a green coin, take it.
Close the book and back up.
The Diamond Door
Pull up the screwdriver handle from your inventory. Once it is in close up attach the phillip's head to it. We now have a functioning screwdriver!
Click on the shelving unit for a close up, then click on the diamond door for a close up.
Use the screwdriver to remove the plate, then use the diamond key to open the door.
Click on the door to open it and take the CD case.
Pull up the CD case from your inventory and click on it to open it.
Take the CD and the note from inside.
Open the note (which has a club on it) and you will see parts of numbers.
Close down the note and back up twice.
The Vent
Now that we have the screwdriver, click on the vent on the wall above the shelving unit for a close up.
Use the screwdriver to remove the vent. Note that the vent goes into your inventory.
There's a spade key in there, but we can't get it while the fan is still running.
Hey, does that background pattern behind the fan look familiar?
Back up.
The Club Picture
Turn right to face the wall with the large mirror.
Click on the club picture for a close up.
This picture has a club on it, and the insert from the CD case had one as well.
Use the note on the picture and numbers will emerge. These numbers indicate the areas in which to click on the picture.
Drop the note back into your inventory and then click on the sides of the picture as indicated by the clue.
Top, left, right, top, bottom, left.
If you get the sequence correct the picture will slide up. Notice that something dropped out as it goes up.
Back up and pick up the club key from the floor (beneath the picture).
Turn left.
The Club Door
Click on the shelving unit for a close up, then click on the club door for a close up.
Use the club key to open the door.
Inside is a red box with buttons on it. Take the box and back up twice.
The Door
We now have all the clues needed to open that door.
Turn right to face the mirror and the now raised club picture.
Click on the club picture for a close up.
Now that the picture is raised there is a circular notch in the wall. Looks about the right size for a CD, doesn't it?
Pull up the CD from your inventory. Once it is in close up click on it to turn it over. Look, symbols!
Use the CD on the hole.
You can drag the CD around, lining up the symbols. Each time you line up a picture you will also line up a letter.
The picture of the shirt will get you the letter R.
The picture of the fan blade will yield the letter L.
The picture of the bowtie shows the letter C.
Back up and turn left.
Click on the panel to the right of the door for a close up.
Time to solve the pattern buttons.
The hints are all around the room.
The first hint is from the CD on the wall. It shows an item (shirt, fan blade, bowtie) and a letter.
Each of those items in the room represents a pattern. The shirt is the brownish diamond pattern, the fan blade has a black and gray pattern of squares, and the bowtie has blue polka dots.
The letters indicate the order in which the patterns go. C means center, L means left, and R means right.
Thus the pattern should be (from left to right): black with gray squares, blue polka dots, and brown diamonds.
For the colorblind: Don't push the left button (it starts on the correct color), push the middle button eight times, and push the right button twice.
Once you have the patterns entered push the "Enter" button below.
The indicator light on the panel will move from locked to open.
Back up and click on the door to open it.
Guess this isn't the way out.
The Anteroom Exploration
Oh boy, there's a lot to look at in here.
On the back wall is a large picture. In close up you will see that the picture is missing a puzzle piece.
In the trash can on the floor is a gray coin with a square on it, take it.
On the top shelf of the unit against the back wall is a tray with a picture of a drop of water in it.
On the middle shelf is a kaleidoscope, click on it. Once the kaleidoscope is in close up you can drag the pattern around. Pretty!
On the desk against the right wall is a PC, but it is off.
Above the PC is a picture on the right wall. The picture has four concentric circles and a four digit code.
Okay, now what?
The Puzzle Picture and the Sink
Click on the puzzle piece picture on the back wall for a close up.
Place the puzzle piece from your inventory into the picture. A clue pops up!
You will see a plus sign at the top, and a picture of eight puzzle pieces, each a different shape.
Where have we seen a plus sign before?
On that strange tap in the sink!
Back up twice and turn right (or left) twice to face the lab table.
Click on the sink for a close up, then click on the tap for a close up.
Perhaps the puzzle pieces on the picture are a clue as to which buttons to push?
Look at the puzzle pieces in the picture. The "knob" ends of the puzzle pieces indicate an out position for the buttons on the tap, the holes in the puzzle pieces indicate an in position for the buttons.
Using the puzzle pieces as the clue, push the buttons in this order: push the right button in, push the left button in, push the bottom button in, push the left button out, push the top button in, push the right button out, push the bottom button out.
When you've completed the sequence push the plus sign in the center.
If you enter the sequence correctly the tap will turn on and the sink will fill with water.
A blue coin will also drop out of the tap, take it.
Back up.
The Small Safe
Turn right to face the wall with the Dharma doll picture and the brown cabinet.
Click on the brown cabinet for a close up.
Open the left door to see the small safe with the sliders/levers lock.
Click on the safe for a close up.
Have we seen a clue for this?
Pull up the vent cover from your inventory.
Click on the cover to turn it over. Notice the faint marks on the other side? This is the clue.
The marks indicate the positions of the levers to open the safe.
From left to right: one notch above the center, one notch below the center line, two notches above the center, and three notches below the center.
Once you've set the levers you will hear a click. Click on the safe door to open it and take the object inside (clock hand).
Back up twice.
The Clock Puzzle
Turn right once to face the door.
Click on the clock for a close up and put the hand on the clock.
Notice that the hand is yellow on the left side and green on the right.
Now what?
Back up.
Turn right (or left) twice to the lab table.
Click on the sink for a close up.
Use the beaker on the full sink to get some water.
Back up and turn left (or right) twice to face the door.
Go through the door and click on the tray on the top shelf for a close up.
Use the beaker of water on the tray. A clue!
Numbers will come up. A yellow 7, a green 3, a yellow 10, a green 5, a yellow 8, and a green 12.
Notice that the water droplet now looks like the top of the clock hand, yellow on the left and green on the right.
Back up twice and click on the clock for a close up.
You now have all the clues you need to solve the clock.
If you hover your mouse left or right of the clock hand you will see arrows which will allow you to move the hand.
Move the hand to the numbers indicated by the color clue: left to 7, right to 3, left to 10, right to 5, left to 8, and right to 12.
If you enter the sequence correctly a secret compartment will slide open behind the clock.
Take the two items revealed, another coin and a slide for the microscope.
Back up.
The Kaleidoscope and the Pink Box
Pull up the pink box from your inventory.
Doesn't the pattern of those buttons look like a heart? Maybe this is hiding the heart key.
Each button changes color, and the four colors are green, yellow, blue, and red.
Where have we seen squares that color before?
That's right, the kaleidoscope!
Looking through the kaleidoscope and rotating the colors will indicate the pattern in which to push the buttons on the box.
Picture the buttons as an almost 3 x 3 grid tilted to the left.
The columns run from the upper left on a diagonal down to the right, and there are three columns, two with three buttons and one with two buttons.
The colors should be: first "column": yellow, red, blue; second column: green, blue, yellow; third column: red, green.
For the colorblind: first column: three clicks, zero clicks (it starts on red), two clicks. Second column: one click, two clicks, three clicks. Third column: zero clicks, one click.
If you enter the color pattern correctly you should hear a click. Click on the top of the box to open it.
Take the heart key.
Click on the shelving unit for a close up, then click on the heart door for a close up.
Use the heart key to open the door and take the small mirror.
Back up twice.
The Microscope
Turn right (or left) twice to face the lab table.
Click on the microscope for a close up.
You now have all of the pieces (according to the book) to use the microscope.
Place the slide in the microscope. Place the small mirror below the slide.
Click on the eyepiece of the microscope at low power (30x). You should see the number 8, made up of twos.
Click on the next magnification (150x) and you will see that the 2s are made up of 4s.
Click on the highest magnification (400x) and you will see that the 4s are made up of 7s.
Hmmm, numbers within numbers within numbers, where have we seen that?
Back up and turn left (or right) twice to the door.
Go through the door and click on the circular thing above the PC.
Notice the circles within circles, from large to small.
Enter the numbers to match what you saw in the microscope.
Look closely at the circles, the numbers will not be in the exact order you saw them in the microscope.
From top to bottom they will be: 8, 4, 7, 2 (largest to smallest circles).
If you enter the numbers correctly you will hear a click.
Click on the surface of the picture to swing it aside and take the revealed object (flathead screwdriver bit).
Back up twice.
The Electrical Panel
Now that we have the flathead screwdriver, we can tackle that electrical panel.
Turn right to face the mirror.
Pull up the screwdriver from your inventory. Remove the phillip's head and replace it with the flathead.
Click on the electrical panel for a close up.
Use the screwdriver to remove the screws and open the panel.
Notice the power consumption of each item. If the power hits 100 percent the breaker will trip and you will lose all power.
Turn off the to the two left items (the fan and the door lock).
Back up and turn left.
Notice that the fan is now off. Click on the fan for a close up.
Take the spade key and back up.
Click on the shelving unit for a close up, then click on the spade door.
Use the spade key on the spade door to open it and take the binoculars.
Back up and turn right..
Click on the electrical panel and turn on the PC. Notice that the PC uses 60 percent and the power bar is at 90 percent. There must be something running which we can't see the button for.
On the right is the breaker switch, click on it to turn it off.
Back up and look closely at the mirror. Yep, just like in the book it's one of those tricky two way mirrors. Click on the mirror for a close up.
You can see down a hallway to a door, this mirror must be the way out!
Use the binoculars on the mirror to see a code,
Back up, then click on the electrical panel.
Turn the breaker back on.
Back up.
The Brown Cabinet Drawers
That clue we saw in the mirror, those shapes looked familiar.
Turn left (or right) twice to face the small brown cabinet.
Click on the cabinet for a close up.
Yep, the drawer handles are the same shapes.
The code in the mirror must be the order in which to click on the drawers.
The clue was square, circle, triangle, circle, triangle, square, square, circle.
Therefore you should click on the drawers in this order: middle, top, bottom, top, bottom, middle, middle, top.
If you enter the code correctly the cabinet will slide away, revealing a panel.
Click on the panel for a close up and open it. Okay, some sort of grid.
Now what?
The Spade Picture
That grid in the panel looked pretty familiar.
Didn't it look like the grid on the spade picture?
It also looked like the small grid in the electrical panel.
Turn left twice to look at the mirror.
Click on the electrical panel for a close up.
Turn off everything except the button underneath the picture of a grid.
Back up and turn right.
Click on the spade picture for a close up.
Yep, there's a red laser beam in the lower left corner.
The screws in the grid in the wall panel must control the mirrors in the spade picture.
Back up and turn right.
Click on the panel for a close up and click on the panel to open it.
Notice on the open panel door it shows a red dot with an arrow leading to a blue dot.
In the spade picture the red dot is in the lower left corner, the blue dot in the upper right.
We need to turn the screws to adjust the mirrors in the spade picture so that the laser beam travels from the lower left corner to the upper right.
Here's a screenshot with the proper configuration.
When you get the screws turned correctly you will hear a click.
Back up and turn left twice.
Click on the electrical panel for a close up and click on the panel to open it.
Notice that the left side of the panel (where the spade picture was) is now open.
Take the coin and turn off the switch underneath the light bulb.
Turn off the switch underneath the grid, then turn on the door lock switch and the pc switch.
Back up and turn left.
Go through the door and click on the PC for a close up.
Click on the memo.jpg file to see a clue involving circles and symbols.
Click on the exit icon then click open. The mirror will open up.
Back up twice and turn right.
Getting Out
You can now go forward through the mirror.
Go forward to the door then click on the symbol at the top of the door for a close up.
The star of David consists of lines comprising four circles each.
Remember the patterns from the PC?
Those patterns were clues as to how to put the coins in the slots in the door.
Using a process of elimination, you can figure out which coin goes where.
Here's a screenshot with the proper configuration.
If you place the coins correctly the door will slide open.
Proceed forward and out!
Posted by: grinnyp |
June 29, 2011 4:52 AM
|
June 29, 2011 4:52 AM