
![]()
 A Long Time Ago riddles were solved at great risk of peril upon failure; one slip-up often meant thousands of deadly beetles pouring down on your head, that is if legends of pyramids and mummies and Indiana Jones movies are to be believed. TomaTea's puzzles pose no such threat to your mortal longevity, which is a relief. Even so, the mental gauntlet in TomaTea's enigmatic escape-the-pyramid game might hold some jeopardy of its own—a horrible face-palm gone wrong disfigurement or a tongue-biting injury? It's possible!
Finding yourself trapped inside the limestone walls of an ancient Egyptian room, click around on all you see, taking detailed notes with your papyrus scroll and mineral paints—or maybe just open Notepad—to work out the solutions. You can view items in your inventory by selecting "i" for more info or utilize an item by highlighting it and clicking where it should be used. If you're uncertain where that is, employ the escaper's tried-and-true "try every item everywhere and with everything" method. TomaTea will tell you when you're not ready to solve a code but is much less expressive than Robamimi who offers plenty of verbose hints. The scarcity of textual directions encourages experimentation although the visual indicators are all present; no puzzle here is without its clues plainly accessible. While a few clues are cleverly inconspicuous and mixed with some misdirection, Long Time Ago is not especially long or arduous, only momentarily tricky.
The glowing cursor also helps, indicating interactive areas although it won't decipher hieroglyphics or tell you where to go next. So, if you do get flustered, think "How would Indy handle this?" instead, putting your deductive reasoning and lateral thinking into full force (if you need extra motivation, have a friend stand behind you making "whoosh whoosh" sounds so you can picture a tribe of angry natives on your tail). What is it with escape game designers playing ancient mind games, anyway? Tell that sphinx to "Bring it!" because your figurative bullwhip is on your hip and you're ready!


Walkthrough Guide
(Please allow page to fully load for spoiler tags to be functional.)
Long Time Ago Walkthrough
Picture Piece Locations
First Wall (bench side of the room):
On the bench, left side, in plain sight.
Behind the right pillow, on the bench.
Next to the red-eyed sphinx, on the shelf above the bench.
In the brazier on the wall, above the left side of the bench.
At the base of the column in the left corner of the room.
Also at the base of the column, left corner of the room.
In the basket to the right of the bench (click on the round table first, then see the picture piece on the left).
In the urn, right side of the round table, next to the wall.
Second Wall (beaded necklace side of the room):
Hanging under the blue-eyed sphinx. NEED AN INVENTORY ITEM to access it.
Third Wall (big table side of the room):
Under the chair.
Under the table (click on the chair first to see the picture piece slightly behind a vase).
On the table, on the left side by the fruit, in plain sight.
On the table, in the middle, in plain sight.
In the top drawer. SOLVE A PUZZLE to access it.
In the middle drawer, after SOLVING A PUZZLE.
In the bottom drawer, after SOLVING A PUZZLE.
Gems and Other Item Locations
Red Gem - on the fruit plate.
Blue Gem - inside of the mini-pyramid (use knife on top).
Green Gem - inside the wooden box.
Mini-Pyramid - inside top drawer.
Hammer - inside middle drawer.
Knob/Lever - inside middle drawer.
Knife - inside the wooden box.
Scale's Tray - inside top drawer.
Scale's Needle - use knife on tile which is under the urn.
Puzzle Clues
Just some clues-full solutions are in walkthrough.
Top Drawer:
The beaded necklace that's hanging on the wall.
Look between the black beads.
Middle Drawer:
The pattern on the pillow, on the bench.
Note where the darker images are in the pillow's design.
Bottom Drawer:
Use the scale to weigh each of the three gems.
You need a tray -and- a needle/arrow for the scale to complete it.
Wooden Box:
Look at the tile under the urn that's next to the small, round table.
Then, look at the bottom of the mini-pyramid that you get out of the top drawer.
Notice that the symbols on the tile are one on top of the other.
Notice that the symbols on the mini-pyramid are side by side.
The Three Sphinxes:
Look at the symbol on each sphinx statue's base--it tells you what you need to do with it.
Walkthrough Part 1: Top Two Drawers and Wooden Box
You start out facing a bench. Click on it to get a closer view:
Grab the PICTURE PIECE (1/16) on the left edge of the bench.
Move the pillow on the right to get another PICTURE PIECE (2/16).
Take a good look at the pillows and remember their designs.
Back out.
Zoom in to view the sphinx statue above the bench:
Take the PICTURE PIECE (3/16).
Note the red eye symbol on the statue.
Back up.
Click on the brazier hanging on the wall, left of the bench:
Get PICTURE PIECE (4/16)
Back away.
Click on the base of the column, left corner of the wall:
Get PICTURE PIECE (5/16) and PICTURE PIECE (6/16).
Back out to face the bench again.
Click on the small round table, right side of the bench.
Take the PICTURE PIECE (7/16) out of the basket, left edge of the small round table.
Click on the top of the wooden box to examine it more closely--looks like you'll need four images but, without a clue, you can play with it to find out your options. Make a note to come back to it later.
Back out twice.
There's a brass urn under the round table in the corner, on the right side. Zoom in on it:
Get PICTURE PIECE (8/16).
Click on the urn again to move it.
Make note of the raised tile under the vase and the two symbols portrayed on it.
Back out again.
Turn right. Examine the necklace hanging on the wall.
You can't get the PICTURE PIECE yet because you need something to cut it free.
The beads are mostly all blue, green, yellow and red...but there are two black beads. Possibly indicating a clue.
Back up.
Turn right again so you're facing the big table. Click on the chair on the left side.
Get the PICTURE PIECE (9/16) from under the chair.
Then get the other PICTURE PIECE (10/16) that's further back under the table, slightly behind a vase.
Back up to face the whole table again.
Click on the fruit on the left side of the table.
Get the RED GEM that's nestled amongst the fruit.
Take PICTURE PIECE (11/16) from the back edge of the table.
Back up.
Now zoom in on the middle part of the table...
Pick up another PICTURE PIECE (12/16).
Make note of the device with the symbols around its circumference. Looks like it's missing some parts.
Back away again.
Zoom in on the set of drawers on the right side of the puzzle.
From your exploration, you now have enough information to open the top and middle drawers.
TOP DRAWER SOLUTION:
Use the clue you got from the beaded necklace:
blue - red - yellow - green
Colorblind Solution:
2 clicks - 1 click - 0 clicks - 3 clicks
When you've entered the correct four colors (see solution above), the top drawer will open so you can get:
A MINI-PYRAMID.
Examine this pyramid closely; notice the line at the top?
Also make a note of the symbols at the bottom of the pyramid.
A BRASS TRAY.
PICTURE PIECE (13/16).
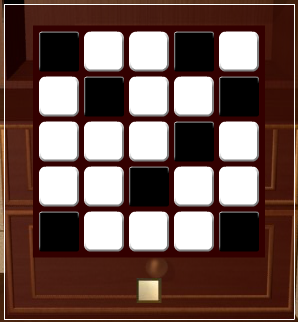
MIDDLE DRAWER SOLUTION:
Look at the middle pillow over on the bench. Dark squares are indicated by the pattern on the pillow.
Screenshot: middle drawer solution
The correct pattern will open the middle drawer so you can get:
PICTURE PIECE (14/16)
STONE HAMMER.
KNOB/LEVER.
Back up and return to the wooden box by the bench (turn right 2x then click on the small table.)
Since you've seen all the clues you need to solve the wooden box's puzzle, you're able to manipulate the symbols on each of the four buttons.
Click through all the symbols on the buttons. Some of those symbols should look familar... you've seen them around the room and in your inventory.
Change each symbol to match those you've seen around the room, keeping in mind the top-bottom, left-right locations.
WOODEN BOX SOLUTION:
The tile under the urn had a green feather on top and a green bowl on the bottom. The mini-pyramid had a hand on the left and a lion on the right. So arrange your symbols in the same way.
Screenshot: wooden box solution
The correct symbols will open the wooden box so you can get:
KNIFE.
GREEN GEM.
Now you have almost all the tools you need to solve the last puzzle and get out. Go on to the "Walkthrough Part 2."
Walkthrough Part 2: Bottom Drawer, Sphinxes and Getting Out
Bottom Drawer
Next to the small round table is a brass urn. Click it to move it aside. That raised tile can probably be pried up. Use your knife on it.
Get the scale's NEEDLE/ARROW.
Then use your knife to pry open the top of the mini-pyramid:
take out the BLUE GEM.
Go back over to the table (back up, turn right twice) and zoom in on the device in the middle:
Put the TRAY on top of the device's base.
Then add the NEEDLE/ARROW to the middle part of the device.
Now "weigh" each gem and make note of the symbols you get for each color.
Step back then click on the bottom drawer. Enter the symbol for blue, red and green as shown from the weighing them on the scale.
Bottom Drawer SOLUTION:
diamond -- circle -- square
When the bottom drawer opens, take out the:
PICTURE PIECE (15/16).
SPHINX STATUE.
Back up.
The Sphinxes
Zoom in on the shelf above the table. Now place the newly acquired SPHINX STATUE on the shelf.
Notice how each of the three sphinxes has a colored eye symbol on its base?
For the sphinx statue above the table, put the GREEN GEM in its left eye (the green gem is in the bottom of your inventory.)
The sphinx statue above the bench gets a RED GEM for its left eye (the red gem is in the top of your inventory).
Finally, go over to the wall with only statue shelf and the beaded necklace. This sphinx gets the BLUE GEM.
With all the sphinxes and their eyes in place, the cobra flute sounds and the colored eye symbol flashes. You're now almost ready to solve the picture puzzle.
Back up once.
The Picture Puzzle and Getting Out
You need to solve the sphinxes and gather all 16 picture pieces before you can arrange the picture and escape.
Zoom in on the last PICTURE PIECE (16/16) under the shelf on that wall with the beaded necklace and blue-eyed sphinx statue.
Use your KNIFE to take the picture piece.
Turn around twice to face the wall by the windows.
Next to the three eye symbols, the smooth area of the wall has changed to have 16 indentations.
Put the 16 PICTURE PIECES there.
Now rearrange all the pieces to form a complete picture.
To move pieces around, click on a picture piece (it will have a faint red line around it when you do), then click on the piece you want to replace.
Keep swapping pieces until they're all in place (see screenshot).
Screenshot: completed picture
The completed picture causes stones to move out of the wall. Back up.
Now you can reach that panel in the middle of the window.
Click on the panel to zoom in on it.
Use your HAMMER to break it.
Back up.
Follow the beams of light (turn right twice) and examine the wall where the spot of light is shining (just to the right of the beaded necklace). Examine that spot.
Use the KNOB/LEVER in that hole.
Pull the lever.
Yay! There's your escape route...Go through and be free!
Thanks to elle for the walkthrough!
Posted by: Dora |
June 6, 2012 2:08 PM
|
June 6, 2012 2:08 PM