
![]()
 One of the reasons escape-the-room games are enjoyable has to do with being at a place in which we'd actually like to spend time, gaze about, soak in the atmosphere. The primary goal is titular: leave. But since you're trapped there, solving puzzles, until you can get out, you want it to be as pleasant an experience as possible. This is why you'll enjoy Escape from the Pool Bar by Jan's Room.
The Pool Bar is a convivial spot, especially for players who don't mind searching out every viewable corner and clickable area without a changing cursor to help. Looking around for clues and puzzles to solve, use arrows on the sides and bottom of the screen to turn or back up. Collected clues and objects are accessible in the side bar. "About Item" brings it up to examine; a single click to highlight it readies an item for use. Most puzzles involve entering codes and pressing buttons so all the challenge comes from trying to find clues and then interpreting them.
Gameplay can feel pixel hunt-y at times—especially when, for example, you know an ashtray is hiding somewhere, but can't find it. Then again, ashtrays aren't objects normally seen lying about any odd place. An absence of the cursor's hints and no English translation of Japanese messaging are drawbacks. If you'd rather focus energy on the puzzles themselves, not on uncovering some needed tools, your positive opinion of the game could be lessened. On the other hand, if exploring unaided is a delightful challenge instead of a frustration to you, you're in for extra fun in this regard.
Beyond feelings on mechanics in detective work, there's plenty in Escape from the Pool Bar to please escape fans of all ilks. With the right bit of difficulty and enough to do in the puzzles to make us feel we've earned our way through, leaving from the Pool Bar is just as enjoyable as being there.
Page not loading? Try the alternative link: Escape from the Pool Bar


Walkthrough Guide
(Please allow page to fully load for spoiler tags to be functional.)
Walkthrough: Escape from the Pool Bar
The Bar Area
You start out facing the bar; zoom in on the counter in front of you:
Pick up three things:
The GLASS
A NOTE
and a COASTER.
Examine the NOTE and the COASTER in your inventory for two different clues.
Back out to full view of the bar again.
Now, observe what you see. There are a couple notable details to see from this angle.
Before heading toward the puzzles, do one last thorough examination of the bar area, to see what else might be hiding:
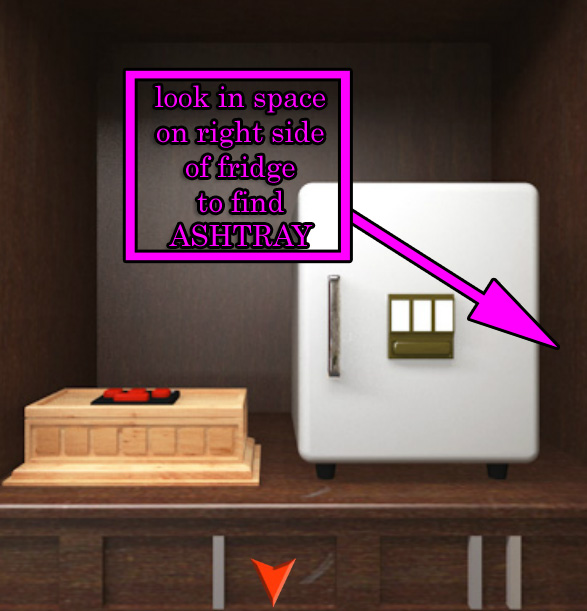
You can peek between the wall and the fridge...
Get an ASHTRAY.
Screenshot: Ashtray Location
Now you're ready to solve two puzzles. Let's start by opening the bar fridge:
Click twice on the fridge to zoom in on it.
You need a three digit code to open it.
BIG HINT:
The COASTER gives you the first bit of information needed to solve the code. Then you need only explore the bar area to get the rest.
SOLUTION:
Count the bottles and glasses on the shelves from top to bottom to get...
549
After entering the correct code, click the bar below the code to unlock the fridge.
Back up and click on the fridge's handle to open it up and look inside:
Take an ICE CUBE out of the freezer.
Notice that there's a cue ball frozen inside the ice cube; you'll need a way to get it out.
Time to find out what's inside the wooden box with the 3-red buttons:
Click on the wooden box next to the fridge to examine it more closely. That pattern on top should look familiar to you...
Press the buttons in the correct order to unlock the box.
SOLUTION:
The answer is in the pattern of lines along the bar back; you can see them as you look at the bar from the wide angle.
Click the buttons in this order:
II - II - III - I - II - I - II
When the wooden box is unlocked, back up. Then, click on the box to open it and look inside:
Get the ICE PICK.
Notice the missing top, right corner of the panel inside the box? Click on it to find something hidden underneath:
Take out another PIECE OF PAPER.
Read the back side of the paper for another clue.
Now you can get cue ball 1:
Select ICE CUBE in your inventory and open its "about item" screen.
Use the ICE PICK you found in the wooden box to break open the ice.
Take CUE BALL#1 out of the ice.
Close the detail screen and back up.
The Pool Hall
Explore the pool tables area for more cue balls:
Turn left from the bar area to see wall of red tubes and a pool table from the long end.
Since you found one cue ball, perhaps there are more around here somewhere. Try looking around the pool tables, where cue balls tend to hang out and have fun.
The next ball is hiding more stealthily...check under the lower left corner of the pool table:
Get cue ball 3:
Screenshot: Cue Ball 3's Location
Hunt around a bit more and it turns out you can zoom in on the middle red tube on the far wall...
There's another ball inside, but you'll need something to get it out.
Back up.
On the wall next to the tubes is a grey panel with 3-buttons —triangle, circle and square:
Click the buttons in the proper order to open the panel.
The piece of paper at the top of your inventory tells you how to solve this one. Back up, turn left, and then get a close up view of the lights above the pool table.
SOLUTION:
Note the shapes of the lights in the order shown on the piece of paper...
CIRCLE-TRIANGLE-SQUARE-CIRCLE-SQUARE-CIRCLE
When you push the buttons correctly, you hear the sound of the panel sliding open. Back up.
Take the SCREWDRIVER
Back up.
Get another cue ball:
Zoom in on the middle red tube.
Use the SCREWDRIVER that you got from the grey panel on the screws holding the plexiglass in place.
Take CUE BALL#2
Back out.
Turn around twice and look at the rock wall:
On the left side of the rock wall, there seems to be a doorway, but it's blocked.
In the middle, there is a glass case with another cue ball inside it.
To the right of that, is a big display box with a red light in the middle. This must be where the cue balls go.
Get cue ball 4 from the glass case:
Zoom in on the glass case (on the little table along the rock wall).
To open the case, push the left and right buttons in the correct order:
The clue is on the paper you found in the wooden box. Those items should look familiar.
If you haven't found the ASHTRAY yet, go back and explore the bar area.
As another clue, look at the table the glass case is sitting on. Do you see something else on the screen that looks like that?
SOLUTION:
The pictures in the clue are on either the left or right side of your inventory. Go in the direction shown on the note to figure out the order....
LEFT-LEFT-RIGHT-RIGHT-RIGHT-LEFT
When correct, the glass case will open.
Take CUE BALL#4
Back up
The Secret Lounge and the Exit Code
Open the door to the secret lounge:
Put a CUE BALL in the display box on the right side of the rock wall.
After you put in one ball, the other three follow automatically. You'll hear the sound of a panel sliding up.
When you back up, yay! The ultra hip Pool Bar lounge is open. Go inside to explore:
As you're looking at the booths from this angle, you should see something...
There's another PIECE OF PAPER on the back of the two booths. Take it.
Examine both sides of the paper for your clue to the final password.
HINT:
Use the visual clues provided on the paper to make a connection to things you see around this room.
Take a closer look at each cocktail table:
Click to zoom in on the blue table, make a note of important details there, then zoom out.
Then zoom in on the green table and gather more details here.
After examining the blue and green tables, follow the arrow at the top of the screen to turn toward the red and yellow tables. Continue your investigations here.
When you're done looking at all four tables, you should now know the exit code.
Back out of the lounge, turn left and head over to the exit door:
Click the white panel next to the exit door and enter the the 4-digit code, then click the grey button to unlock the door.
SOLUTION:
The piece of paper said the last password is "POOL." This refers to the colors in the letters.
The shape on the other side of the paper is a circle. If you examine the colored circles on the cocktail tables, you'll see each has a different number of screws.
Put those numbers in the same order as the colors in the word "POOL" and you get this code...
8746
Now the door's unlocked and you can go through it anytime you're ready to exit.
Congratulations on your escape!
Posted by: elle |
September 27, 2012 11:11 AM
|
September 27, 2012 11:11 AM