
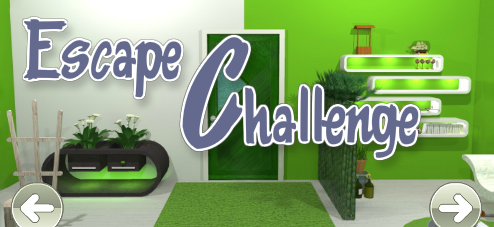
![]() Escape Challenge by Kristjan Luts is a room escape game in which you must escape multiple rooms... Oh, you've heard this story before? Well, this one has a slightly different ending to it: each room is nearly complete in itself, a scene which invites exploration and asks you accomplish several tasks before making your way through that locked door. At each stage, you need to earn the key by solving a scaffold of puzzles, finding and using objects and deciphering the clues that are hidden among the furnishings.
Escape Challenge by Kristjan Luts is a room escape game in which you must escape multiple rooms... Oh, you've heard this story before? Well, this one has a slightly different ending to it: each room is nearly complete in itself, a scene which invites exploration and asks you accomplish several tasks before making your way through that locked door. At each stage, you need to earn the key by solving a scaffold of puzzles, finding and using objects and deciphering the clues that are hidden among the furnishings.
 When you begin the first level, a pithy tutorial will show you through the basics of gameplay. From there, play is rather intuitive as you need only tap on the areas you want a better look at or, at times, tap the arrows to change directions. The responsiveness of the controls prevents frustration since you don't have to perform dexterous feats to progress. Instead, the challenge part of these escapes focuses on logical puzzles with plenty of "Aha!" moments that, once you find all the clues and tools needed, are easily had. There are a couple "pixel hunts" where you need to tap in just the right spots to look in places you might first think are unreachable; those instances are rare enough to not be a hindrance.
A possible drawback is the limited number of rooms because, well, it's too enjoyable to want it to end. And, although there are expansions promised, these updates take a long time in coming. That said, Escape Challenge has much more content than most browser escape games and it is an equally no-strings-attached free. Better yet, the settings are immensely beautiful, with nicely rendered graphics and interesting, personality-laden details. The puzzles are the right bit of challenging, not too hard but clever enough to bring a sense of accomplishment when you succeed, making Escape Challenge a mobile game that is as satisfying to your brain as it is to your eyes.
NOTE: This game was played and reviewed on the iPad 2. Game was available in the North American market at the time of publication, but may not be available in other territories. Please see individual app market pages for purchasing info.


Walkthrough Guide
(Please allow page to fully load for spoiler tags to be functional.)
Escape Challenge Walkthrough
LEVEL 1
Follow the tutorial until you get the FLASHLIGHT.
Then, click the area under the sofa, with the FLASHLIGHT highlighted, to find the KEY.
Use the KEY to unlock the door and exit.
LEVEL 2
Tap the clock above the door and make a note of the time (02:35).
Examine the picture to the left of the door...there's something on its upper righthand corner:
A blue ROUND BUTTON.
Zoom in on the small table's top drawer:
Enter the correct 4-digit code to unlock the drawer.
SOLUTION:
0 2 3 5
Open the drawer and get a KEY.
Now use the KEY on the narrow cabinet to the right of the door:
Look behind the ducks on the top shelf to get a yellow HALF MOON BUTTON.
Then, look at the numbers on the bottom shelf: 2103.
Finally, examine the puzzle on the middle shelf:
Click underneath the box and you'll see four wooden squares. If you tap them, they will move up a notch.
Set each square (or pin) to the correct height.
SOLUTION:
The answer is on the bottom shelf. Click each square that number of times:
2x 1x 0x 3x
When correct, you can back out and lift the lid of the box to get a green SQUARE BUTTON.
Go over to the bottom drawer on the small table:
Place each button - square, half moon and circle - in the proper place on the drawer handle. Then tap the drawer to open it:
Get the DOOR KEY.
Use the DOOR KEY to unlock the door and escape.
LEVEL 3
Look on the bottom shelf, left of the door.
Make a note of the yellow number 3 on the snow globe.
Look in the plant on the small table.
Note the red number 2 on the plant stake.
Examine the laptop on the desk...
Here is a blue 4.
Lastly, look on the scroll on the cabinet...
A green number 5 is painted on it.
There is also a SCREWDRIVER next to the scroll. Grab it.
Look on the top shelf to the left of the door:
Use the SCREWDRIVER to pry open the ornate egg. Get the SILVER KEY.
Zoom in on the trap door in the floor:
Use the SILVER KEY to open it and get a BRONZE KEY.
Examine the briefcase on the floor:
You need a 4-digit number. Each button is a different color - green, red, blue and yellow.
SOLUTION:
The colored numbers are found on objects around the room...
5 2 4 3
Open the briefcase to get a GOLD KEY to the cabinet.
Zoom in on the cabinet door and use the GOLD KEY to open it:
Now use the BRONZE KEY on the canister where you'll find...
The blue DOOR KEY. Take it.
Go over to the door, use the blue DOOR KEY to unlock it and escape!
LEVEL 4
Zoom in on the shelves to the right of the door.
Move the toy cars aside and get a TRIANGLE piece (1/2).
Then, look closer at the bottles and plant just below the shelves...
There is a remote control locked inside this strange container. There's also a spot on the container's corner for one of the triangle pieces; you still need another one.
Grab the CLIPPERS from the floor next to the container.
Back up to the first view then click the arrow to turn right and then examine the puzzle in the lower righthand corner of the scene:
Here is a multiplication tower. Determine the correct 3-digit number.
SOLUTION:
Each pair of bottom blocks can be multiplied together to form the adjacent number. So, for the top block, you need to multiply 12x14...
168
When you've entered the correct code, click on the panel on the front of the box to open it:
Get the FLASHDRIVE.
Go over the plants to the left of the door and examine the right drawer; it has a rather interesting lock on it...
Use the FLASHDRIVE on the drawer's lock to open it.
Get the HOOK.
Now turn left and look underneath the table...
There is a little hole in the panel under the table. Use the HOOK here.
Then, click the panel to open it and use the CLIPPERS on the wire to Get the BRASS KEY.
Turn back to the plant stand and use the BRASS KEY on the left drawer:
Take the TRIANGLE PIECE (2/2).
Now return to the bottles and strange container on the other side of the bamboo screen:
Insert both TRIANGLE PIECES on the corner of the container.
Get the REMOTE CONTROL.
Go back to the left side of the room, to the left of the table. There you'll see an antenna on the vent.
Use the REMOTE CONTROL to open the vent panel.
Get the GREEN KEY.
Unlock the door with the GREEN KEY and you've escaped!
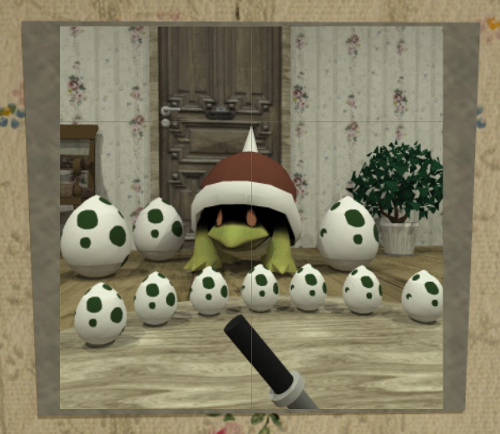
LEVEL 5
Move the curtains aside to reveal a puzzle:
Arrange the tiles to make a complete picture.
SOLUTION:
Screenshot: Tile Puzzle Solution.
When it's completed, tap the picture to open a safe in the wall.
Get the SPOTTED EGG (1 of 3).
Make a note of the clue written inside the safe (three parallel lines and a circle).
Examine the chest on the left side of the room.
Here is another math problem. Enter the correct numbers to unlock the chest.
SOLUTION:
The letters show the pattern you need to follow for each digit...you'll need to repeat those same numbers. Then, consider which digits fit the pattern while still adding up to 4987...
1 3 4 6
+
3 6 4 1
With the correct answer on the side of the chest, you can open it to get:
another SPOTTED EGG (2 of 3).
Now examine the skull on the right side of the room:
Clicking the glowing red eyes will change their design. Set each eye to the proper design.
SOLUTION:
As in the wall safe behind the picture...
Left Eye = three parallel horizontal lines
Right Eye = open circle
When correct, take the PYRAMID KEY.
Zoom in on the pyramid on the right side of the room.
Use the PYRAMID KEY to unlock it and get the last SPOTTED EGG (3/3).
Set each of the eggs in their stands in the middle of the room.
Pull the lever and the DOOR KEY will rise up out of the floor.
Use the KEY to open the door and escape.
LEVEL 6
Look under the coffee table and move aside the beer and printer:
Get a PINK KEY.
Examine the drawer in the TV stand and use the PINK KEY to unlock it...
Get a REMOTE
and a RED/BLACK STICK.
Use the REMOTE on the TV and make a note of the clue.
Zoom in underneath the TV stand until you find a basket; look inside the basket to get a number.
Now examine the colorful snail next to the TV.
Turn right and examine the drawer in the nightstand...
Enter the correct color code to unlock the drawer.
SOLUTION:
Combine the number clue in the basket under the TV with the colors on the snail...
ORANGE-YELLOW-RED-BLUE
When unlocked, open the drawer and take the DECORATIVE KNOB from inside.
Go back and find a panel in the wall between the door and the snail.
Use the DECORATIVE KNOB here to open the panel.
Get the BLUE BUTTON.
Now look at the chest on the left side of the room...
On the floor, to the left of the chest, is a RED BUTTON. Take it.
Go to the right side of the room and examine the front of the boxy device next to the nightstand.
Place the BLUE BUTTON and the RED BUTTON on the device.
Then you need to back up a bit and carefully click the top edge of the device to see its top:
Replace the missing RED/BLACK STICK.
Now set each lever to the proper setting to unlock the device/box.
SOLUTION:
Set each dial as if on the clock....
LEFT= 9; MIDDLE= 3; RIGHT=12 o'clock
Which the correct settings, press the front panel of the device box to open it up.
Get the CHEST KEY.
Go to the chest, use the CHEST KEY, open it, and get the RED KEY.
Use the RED KEY to escape!
LEVEL 7
Look under the end table by the couch:
Get GREY KNOB (1 of 2).
Study the picture above the couch.
Back up once then zoom in on the floor between the two sectionals of the couch...
In this puzzle, you need to move the three dots around the board until they're in the proper pattern.
SOLUTION:
Match the design on the picture above the couch.
Get another GREY KNOB (2 of 2).
Back out to the main view then focus in on the vent in the left corner of the room:
Place each of the GREY KNOBS on the left and right sides of the vent.
Click the vent panel to open it and get the SCREWDRIVER.
Examine the small chest of drawers next to the door:
Use the SCREWDRIVER to remove the screws and open the top drawer.
Get a GOLD KEY.
Go to the short cabinet under the gramophone:
Use the GOLD KEY to unlock the rightside of the cabinet to reveal a puzzle.
In this puzzle, you need to determine the 3-digit code based on the clue provided.
SOLUTION:
The letters DD and C represent numbers. D is the 4th letter of the alphabet and C is the third. So, multiply 44 by 3 to get...
132
With the correct code entered, you can click the handle and open the safe.
Get the BLUE KEY.
Use the BLUE KEY on the door and escape!
LEVEL 8
Examine the top door of the cabinet on the right side of the room:
Enter the correct 4-digit code to unlock this door. (Hint: a clue is very nearby.)
SOLUTION:
The answer is to the right of the code panel, written in very elaborate lettering...
5483
Get the red ROUNDED PIECE.
Now look at the bottom door of that same cabinet:
Here you have 3 dials. Set the dials to the correct positions.
SOLUTION:
The answer is above each dial, given in circumferance degrees. A full circle is 360, half is 180, a quarter is 90, and so on. So, thinking of the dials as if on a clock, set each dial to:
5 o'clock - 6 o'clock - 2 o'clock
When correct, click the handle to open the cabinet and get a green OBLIQUE PIECE.
Go to the cabinet on the left side of the room and examine its top door:
Turn the disks to accurately complete the picture. (Hint: the innermost disk doesn't turn, so match the next disk to it then go out from there.)
SOLUTION:
Screenshot: Rotating Disks Solution.
When the picture is correct, you can open the door and get the yellow STAR PIECE.
Go to the bottom door of this cabinet for the last puzzle:
Enter the correct 5-digit code. (The hint is in the shapes above).
SOLUTION:
Count the number of sides along each shape...
3 2 1 5 4
Get the blue OVAL PIECE.
On each side of the room there are two conductor fountains. Each is missing a piece, so go around the room replacing them:
Starting on the bottom left corner of the room and going clockwise, the pieces go in this order...
yellow STAR - blue OVAL - red ROUNDED - green OBLIQUE
After that, back up to the wide view of the room and tap the tesla ball that's suspended from the ceiling.
When that is done, reach up to the box above the tesla ball and open it up:
Get the DOOR KEY.
Use the KEY to unlock the door and escape.
LEVEL 9
Explore the room, looking for various colored shapes:
On the side of a fountain, you see a red circle.
Inside the statue niche next to the door is a blue square.
There is a yellow triangle on the plank over the pit.
Look down into the left side the crocodile pit...Make a note of the green octagon.
Examine the bottom part of the grey cabinet to the right of the door:
Tap the shapes until each is the correct color.
SOLUTION:
GREEN OCTAGON--BLUE SQUARE--RED CIRCLE--YELLOW TRIANGLE
When correct, the cabinet bottom will open. Get the BUCKET.
On the left side of the room is a crate; make a note of what's written on its side.
Zoom in on the upper part of the grey cabinet...
Enter the 4-digit code to unlock the doors.
SOLUTION:
The answer is on the side of the crate...
2131
Inside the cabinet, get the WRENCH from a jar on the middle shelf.
Face the fountain on the right side of the room then zoom in on the wooden panel to its left:
Use the WRENCH to remove the bolts securing the panel.
Get the GREEN KEY.
Go to the cage on the left side of the room:
Use the GREEN KEY to unlock the cage door.
Then, open the box inside the cage to get a SPIGOT KNOB.
Return to the fountain on the right side of the room and zoom in on the faucet...
Replace the SPIGOT KNOB.
Use the BUCKET under the faucet to fill it with WATER.
Walk over the plank to look down the well in the center of the pit:
There is a key on a boat down below...
Pour your BUCKET OF WATER into the well. The key is a little closer now.
Go back to the fountain, fill up the BUCKET WITH WATER, and pour it into the well again.
Repeat those steps a couple times until the boat is within reach. Get the KEY.
Use the KEY to unlock the door and escape!
LEVEL 10
To the right of the door is a safe with a clock on its front...
Tap the clock and watch what it does. Also make a note of the design on the front of the cabinet.
Then, enter 4 numbers to unlock this safe.
SOLUTION:
The numbers are determined by where the clock hand pauses. The "Z" on the left edge of the safe tells you where each number goes...
2 4
7 9
When correct, the doors automatically open: get the CAN OPENER.
To the left of the door is a small table with some stereo speakers on it...
Move aside the speakers to find a can.
Examine the top of the can and use the CAN OPENER to reach the item inside:
Get the MAGNET.
Examine the cabinet/shelves on the right wall:
Turn the tiles to complete the picture and unlock the door.
SOLUTION:
Screenshot: Green Tile Picture Solution.
When correct, the cabinet door will automatically open.
Turn the teddy bear around and unravel the loose thread on his sweater by tapping it several times until you get RED STRING.
Put the RED STRING and the MAGNET together in your inventory by tapping the highlight the string then tapping on the magnet.
Zoom in on the floor grate in the center of the room:
Use the MAGNET ON A STRING to reach the item at the bottom of the grate: a FLEUR DE LIS SHAPE.
In the left corner of the room, there is a picture (just above the red checkered flag). Take a closer look at it and make a note of what you see.
Now examine the black safe just below the picture...
Put a dot in certain squares by tapping them, creating the correct pattern to open the safe.
SOLUTION:
The answer is in the picture above the safe...
x---x
-x-x-
--x--
--x--
xxxxx
When correct, the doors open and you can get the CROSS SHAPE.
Turn to face the left wall; on either side of a boarded up doorway are two insets:
Put the CROSS SHAPE in the left inset and the FLEUR De LIS SHAPE in the right inset.
Next, tap the boarded up doorway and it will open.
Get the GOLD KEY.
Unfortunately, the gold key doesn't open the exit. So, back up to the other end of the room. There you see a large structure protruding out of the center of the wall...
There are green emblems on either side of the structure.
At the structure's base is a place for a 4-digit code...
SOLUTION:
The answer is in the green emblems on the wall, on either side of the structure. They're numbers that have been mirrored and turned upside down...
1 3 7 2
After entering the correct code, the structure decends and reveals another item:
A small grey safe. Use the GOLD KEY to unlock the safe.
Take the DOOR KEY.
Back up, use the DOOR KEY to unlock the exit door and escape!
As more levels are released, this walkthrough will be updated.
Updated: Level 10 added.
Posted by: elle |
July 15, 2013 6:41 PM
|
July 15, 2013 6:41 PM