
![]() One of the great challenges of a classic four-wall one-room escape game is to keep the puzzles fresh and interesting while working within such a confined format. Designers can rise to the challenge in a number of ways, from creating a themed room to inventing new types of puzzles. Or they could just do what Tomatea does with their latest room escape, Clueless, and simply cheat by folding seven rooms into one.
One of the great challenges of a classic four-wall one-room escape game is to keep the puzzles fresh and interesting while working within such a confined format. Designers can rise to the challenge in a number of ways, from creating a themed room to inventing new types of puzzles. Or they could just do what Tomatea does with their latest room escape, Clueless, and simply cheat by folding seven rooms into one.
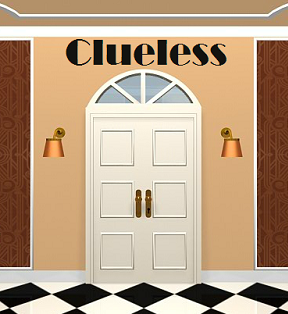
The first thing you might notice while navigating around Tomatea's usual beautifully decorated room is the presence of so many doors. Seven doors, in fact, and only one of them is the actual way out. Although navigation in the main room (or foyer, really) is the usual bars on the sides of the screen, which changes when you finally solve your way into one of the six "side" rooms. Each of these rooms is a simple face-on scene, no navigation necessary. Tomatea's usual gently glowing changing cursor indicates areas of interest and once again puzzles cannot be solved unless the clues to them have been discovered, preventing you from "cracking" a code by random chance. It's all done up with Tomatea's usual lovely visual style with soft colors to match the gentle background music.
Clueless provides an easygoing escape challenge that is sure to appeal to anyone who loves the genre. Logical, pretty, and challenging, here's a bonus escape for those who love solving their way out of locked rooms. Or, in this case, into six locked rooms and out of a seventh.


Walkthrough Guide
(Please allow page to fully load for spoiler tags to be functional.)
Clueless Walkthrough
General Information
You will not be able to solve a puzzle until you have seen the clue for it. There is no force cracking of the codes in this game.
If you pull up a puzzle and it allows you to try to solve it, that means you have seen the clue (even if you don't realize it).
Watch for the tip of the cursor to glow, that is the changing cursor that indicates hotspots.
There is only one ending.
Good luck!
Exploration
You begin in the foyer, facing two doors. On the left is a door with a rolling pin decoration, on the right is a door with a crossed knife and fork.
The doors are locked, so you can't open them.
Between the doors is a white stool, take it.
On either side of the doors is a flowering plant in a stand. You can click on the right plant stand for a close up.
Just underneath the plant, on the first white stripe of the stand, is a note, take it.
Pull up the note from your inventory. Once it is in close up click on it to open it.
The note says "light". Click on it again and the note turns upside down.
Close down the note and back up.
Turn right.
Here are two more doors, one with a shower head (left) and one with a lamp (right). Both doors are locked.
Turn right.
You should now be facing the main doors out. They are locked, of course.
You can click on the lamp to the right of the door for a close up.
Turn right.
You are now facing the last two doors, these have a note (left) and a book (right) decoration.
Between the doors is a small table, click on the table for a close up.
On top of the table is a brown book, click on it to open it.
Inside you will find a table showing which symbols go with which room, and a clue that reads ii ee rr.
Back up, then click on the table and click on the drawer.
Looks like we don't have the clue for this four digit code yet.
Turn right and you are back to the doors where you began.
Time to solve some puzzles!
Let There Be Light
What we need to do now is figure out the note we just picked up from the flower vase.
The note said "light", where have we seen a light?
Turn left (or right) twice to face the doors out.
Click on the lamp to the right of the doors for a close up.
Click on the lamp pull-cord to turn it on.
Now use the inverted note on the light and it will give you a clue, 4917.
Once you have the clue, back up and turn right to face the small table.
Click on the table for a close up, then click on the drawer to pull up the four digit code.
Enter the code you got from the note and click the button below.
Inside the drawer is a key with a note hanging from it, this is the key to the music room. Take the key and back up.
The Music Room
You should still be facing the small table.
The door on the left has a picture of a note, this is the music room.
Use the key on the left door to open it.
Inside there is a piano on the right, a window seat in front of you, and a window planter on the left.
Click on the window planter for a close up.
Looks like we need to do something here, but we don't have the tools. Back up.
Click on the window seat for a close up.
Look closely, there is something lurking behind the left pillow, take it (metal rod).
Underneath the window seat are some drawers, click on the center drawer.
Looks like a code key involving three symbols. Do those symbols look familiar?
They look like the symbols on the doors.
So how do we know which ones to use?
The clue is in the brown book out in the foyer.
Remember the ii ee rr clue?
Look closely at the room names and combine them with the clue.
The first clue is ii, so look for a room name that has two "i"s in it (dining room).
Now look for a room name that has two "e"s in it (sleeping room).
Lastly look for a room that has two "r"s in the name (library).
The symbols associated with those rooms are the fork, the lamp, and the book, which is the code.
Enter the code into the lock and press the button below.
The drawer will open to reveal a pair of scissors, take them and back up.
Look closely at the curtains to the left of the window seat.
Notice the key hanging on the left?
We just need to be able to reach it.
Place the stool below the hanging key.
Click on the key for a close up.
Use the scissors to get the hanging key (dining room key).
Back up.
Click on the piano for a close up.
Hey, there's sheet music here!
Those note may be a clue, maybe we'd better remember what they look like...
Back up twice to leave the room.
The Dining Room
The key we picked up in the music room has a fork, so it must be the dining room key.
Turn right to face the doors with the rolling pin and knife/fork symbols.
Use the key on the right door (knife/fork) which is the dining room.
Inside the dining room you will see a table set with a lovely dinner setting. Click on the table for a close up.
Take the glass form the left place setting and back up.
On the back wall on the right is some sort of cabinet, click on it for a close up.
Looks like the central drawer is stuck, so back up.
Click on the left cabinet for a close up.
Click on the central drawer and you see a code key involving four buttons.
Have we seen something that would help us solve this?
The clue was the sheet music in the music room.
Each cluster of notes had a different number of bars holding them together in pairs.
Look at the music and count the bars. You will get the number 142123.
Now number the buttons from left to right as 1 through 4.
Push the buttons in the same order as the clue, 142123, then click the small white button underneath.
If you entered the code correctly the center drawer will open.
Take the items from inside (sleeping room key and hook).
Back up.
Notice that you can click on the chandelier over the table for a close up.
Hey, there's a key up there! How can we get it?
Doesn't look like we have what we need to do this.
However, we can click on the button at the bottom to light up the chandelier.
Or, at least, light up one bulb at a time. Wonder what that is all about?
Back up twice to exit the room.
The Sleeping Room
Turn right to face the doors with the shower head (bathroom) and lamp (sleeping room) symbols.
Use the sleeping room key on the right door to open it.
Inside the sleeping room you will find a wardrobe on the left, a large bed, and a night stand to the right of the bed.
Click on the wardrobe for a close up.
Okay, we have a code here in the form of buttons in a hexagonal shape.
Why does that shape look familiar?
The shape of the code key is the shape of the fixtures on the chandelier in the Dining Room.
Hope you paid attention to order the lights would go on when you pushed the button on the light.
The code is the order: upper left, lower right, lower left, upper right, middle left, and middle right.
Click the buttons in the proper order and the wardrobe will open.
Inside is a pack of matches, take them.
There is also an odd clue involving ties at the back of the wardrobe. Make a note of it.
Take the large wooden rod from above the tie clue.
Back up.
Click on the nightstand for a close up.
The top drawer needs a four digit clue, the bottom drawer a four letter clue, but we have no idea what these are.
Back up twice to leave the room.
The Bathroom
Turn left to face the kitchen and dining room doors.
Go into the dining room and click on the chandelier for a close up.
Pull up the wooden rod from your inventory.
Click on the end of the rod to turn it and notice the hole at the end.
Attach the hook to the hole to make a pole.
Use the hook/rod pole to retrieve the bathroom key from the chandelier.
Back up twice and turn right.
Use the key on the left door (the one with the shower head on the door).
Inside you will find a tub full of water, click on it for a close up.
Use the glass to get some water from the tub and back up (yummy).
On the back wall is a shelving unit with two cabinets at the ends.
Click on the shelving unit for a close up, then click on the left side of the shelving unit for a close up.
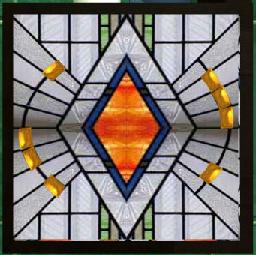
This cabinet is guarded by a simple jigsaw puzzle. Swap the pieces around until you complete the pattern.
Here is a screenshot of the pattern.
Once the cabinet opens you will notice a strange hole inside.
The shape of the hole is pentagonal, just like the metal rod you picked up earlier.
Place the metal rod in the hole and back up.
Now click on the right cabinet for a close up.
This code key has four buttons in and up/down, left/right pattern.
Wonder where we've seen something like that before?
The clue to this one is the tie picture in the wardrobe.
If you look at the tie picture, the bottom of the tie is like an arrow pointing either up, down, left, or right.
Looking at the picture the pattern is left, up, down, right, left, down.
Enter the correct code and click the small button at the bottom.
Inside the cabinet is a trowel, take it.
Back up twice to leave the room.
The Kitchen
Turn left (or right) twice to face the music room again.
Click on the window box of flowers on the left for a close up.
Use the glass of water to loosen the dirt, then use the trowel on the window box.
Inside the dirt you will find the key to the kitchen, take it.
Back up twice to leave the room.
Turn right to face the kitchen and dining room doors.
Use the key to open the kitchen (left) door.
Click on the stove on the right for a close up.
Take the spatula from the rack behind the stove and back up.
Click on the shelves behind the counter for a close up.
On the top left shelf take the oil
Back up twice to leave the room.
The Library
Open the dining room door and go in.
Click on the right cabinet (the one that was stuck) for a close up.
Use the spatula to unstick the drawer and open it.
Inside you will find a stack of post-it notes, take them.
Wonder if someone wrote on these?
Pull up the matches from your inventory.
Click on the matches to light one and wait for it to go out.
Now use the burnt match (charcoal) on the post-it notes to get a four digit clue.
Back up twice and turn right to face the bathroom/sleeping room doors.
Enter the sleeping room and click on the nightstand for a close up.
Click on the top drawer of the nightstand and enter the four digit code you got from the post-it notes.
Once the code is in click the white button below to open the drawer.
Take the library key from the drawer and back up twice.
Turn right (or left) twice to face the music room/library doors.
Use the key on the library door (right door) to go in.
Once inside the library click on the picture sitting on an easel to the right of the fireplace.
Underneath the picture is a wing nut, take it. Notice that it has a pentagonal hole.
Back up then click on the fireplace for a close up.
Note the candles on the mantel. Wonder what would happen if we lit them?
Use the matches on the candles.
Once both candles are lit you will see a small brass plate appear with the number 1936. The plate is attached to the wall with screws.
Back up twice to the foyer.
Getting Out
Turn right (or left) twice to face the bathroom/sleeping room doors.
Enter the bathroom and click twice on the left cabinet (the one with the puzzle) for a close up.
Open the cabinet and notice the metal rod you placed in there.
Attach the wing nut to the rod. Shame it won't turn.
Use the oil from the kitchen on the wing nut then click on it again to turn it.
Inside you will find a screwdriver, take it.
Back up three times to the foyer.
Turn right (or left) twice to face the music room/library.
Enter the library and click on the fireplace.
Use the screwdriver to remove the brass plate. Notice it reveals two buttons.
I wonder if we've already seen a clue for this?
The clue is the picture puzzle we solved in the bathroom.
Look closely at the picture, it shows gold beads either to the left or right of the central design.
These beads are the clues for the two buttons.
The pattern is left, right, right, right, left, left, right, left.
Enter the pattern then press the small white button below.
Now a grid is revealed on the wall.
It must be a clue to that last drawer on the nightstand, but that needs a four letter code.
Maybe if we combine the grid with the 1936 clue on the brass plate?
Look closely at the lines in the grid, they don't completely enclose it.
If you look at the lines of the grid as they surround a number in the 1936 clue, they form letters.
The lines around the 1 form a C.
The lines around the 9 form an L.
The lines around the 3 form a U.
The lines around the 6 form an O.
Therefore the clue is CLUO.
Here�s a screenshotof how to see the letters.
Back up twice to leave the room.
Turn left (or right) twice
Enter the sleeping room.
Click on the nightstand, then click on the bottom drawer for a close up.
Enter the clue then click the small white button underneath.
The drawer will open to reveal a fancy key. Take the key and back up twice.
Turn right to face the doors out.
Click on the doors for a close up, then use the fancy key to get out.
Snazzy car! And, "To be continued...".
Posted by: grinnyp |
May 30, 2012 1:26 PM
|
May 30, 2012 1:26 PM