
Cabin Escape: Alice's Story
Platform: iOS, Android
![]() Memories are amongst our most precious possessions, next to our flat-screen TVs. We spend millions on backups and storage and have been known to run back into burning buildings to save the family photos (after saving the kids and pets, of course, we're not monsters). Memories are what defines who we are, so the idea of slowly losing them can be terrifying, which is the basis of many a great movie, television show, and adventure game. Glitch Games knows this, which is why memory and its gain and/or loss is at the heart of their fantastic Forever Lost series of point-and-click (or point-and-tap) adventures. Now comes their latest effort, Cabin Escape: Alice's Story, the fabulous prequel in the form of a classic room escape.
Memories are amongst our most precious possessions, next to our flat-screen TVs. We spend millions on backups and storage and have been known to run back into burning buildings to save the family photos (after saving the kids and pets, of course, we're not monsters). Memories are what defines who we are, so the idea of slowly losing them can be terrifying, which is the basis of many a great movie, television show, and adventure game. Glitch Games knows this, which is why memory and its gain and/or loss is at the heart of their fantastic Forever Lost series of point-and-click (or point-and-tap) adventures. Now comes their latest effort, Cabin Escape: Alice's Story, the fabulous prequel in the form of a classic room escape.
 If you've played Forever Lost: Episode 1 or Episode 2 (and why haven't you, they're fabulous) you know at least some of the story. No spoilers here, but Cabin Escape fills in a significant blank in the story, as well as being a wonderful stand-alone gem. Jason, the protagonist of the aforementioned series, has left Alice alone in their vacation cabin. Being that she has difficulty retaining memories (Memento much?) Jason has tried to help by making the entire cabin a series of mind-benders in order to keep Alice's cognitive functions sharp. Yes, the plot has more than a passing resemblance to Tesshi-e's oeuvre of "locking someone into a confined space so they can have fun puzzling their way out", only with more moody atmospherics and less wobbly pictures.
You, as Alice, must tap around this haunting cabin and solve puzzles galore in order to walk out the front door. The game features the controls of the big games, the suitcase inventory and the wonderful in-game camera that you can use to take photos of anything that you might want to remember later. There is a hint feature available, but only as microtransactions, with one purchase unlocking a series of hints for one specific puzzle. With the presence of a few wicked brain-teasers and at least one mystery that requires thinking way outside the box, Cabin Escape: Alice's story is a lively challenge for room escape fans, especially those that would like to see the clear, logical elements common to the best eastern-designed escapes presented with a western flair. Glitch Games brings the escaping joy with this impressive titbit to tide the fans over until Forever Lost Episode 3.


Walkthrough Guide
(Please allow page to fully load for spoiler tags to be functional.)
Cabin Escape: Alice's Story Walkthrough
General Information
Use the in-game camera to take pictures of anything that looks interesting, it's a handy way to remember clues.
There will be hints and helps for the colorblind in this walkthrough.
Don't forget to pick up everything that isn't nailed down. And if something is, try to pry it loose and then take it.
There is only one ending.
Go forward by tapping on the area you want to explore. Use the arrow in the lower left of the screen to move back.
Don't forget to think outside the box.
Good luck!
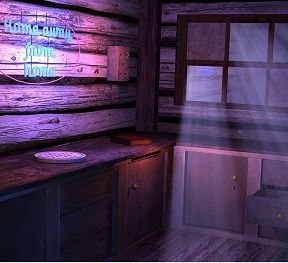
Exploration: Main Cabin
You begin inside a cabin with and open floor plan. There is an open door to your right, a door in front of you and a loft that seems inaccessible.
Just to the left of the open door, in the right corner of the cabin, is a table with a lamp, tap on the area to see it in close up.
There is a painting on the wall of Lake Solomon. It looks pretty.
There is a window with six panels above the table. Are those panels different colors?
On the table is a lamp, a bottle, and what looks like paper. Tap on the table for a close up.
On the table is a note, tap on it to read. Yay, Jason left us cleaning fluid?
Use the back arrow to put the note down, then take the white bottle cap sitting next to the bottle. You now have cleaning fluid.
Above the letter is a small yellow round thing, tap on it for a close up.
Hmm, it looks like a smiley-face button, but the eyes and mouth are triangular shapes. Maybe we'd better take a picture of it.
Back up three times to the main cabin view.
In the middle of that back wall is a door, the main door to leave, but it is locked.
In the middle of the room is an island, tap on it for a close up.
Tap on the top of the island for a close up.
There's another note from Jason, read it.
To the right of the note is another of those yellow buttons. Tap on it for a close up and take a picture.
To the left of the note is a rock, tap on it for a close up.
Hey, it's a pet rock! Note that one of the googly eyes is loose.
Back up twice.
There are two doors on this island, but they are locked. Between the doors is a drawer of some kind.
Tap on the drawer for a close up.
There are four round buttons on this drawer, and a square "start" button in the middle.
Back up twice to the main cabin view.
In the left corner is another of those panel windows, and a corner cabinet of some kind. Tap on the left corner of the room for a close up.
Another six panel window, and yes, those panes look like they are two different colors...
Tap on the cabinet beneath the window for a close up.
Hmm, we have a door on the left which is locked, and we can't remember where the key is.
To the right is an open drawer with a magazine inside. Tap on the magazine for a close up.
Well, the magazine says that size matters. Note the items on the cover. Maybe we should take a picture?
Back up twice.
Look at the left cabinet. There is a door, but it is locked by Jason. There is also a drawer that won't open.
On top of the cabinet is a round white thing (just under the neon sign). Tap on it for a close up.
Looks like one of those jumping peg puzzles. Back up once.
To the right of the jumping peg puzzle is a brown book, tap on it.
Inside the book is what looks like a clue. Better take a picture.
Back up.
On the wall, between the window and the neon sign is what looks like a small white box, tap on it for a close up.
There are five plus-shaped indentations in the box, back up twice to the main view.
To the far left is a fireplace, tap on it for a close up.
There are logs in the fireplace, but no paper or matches.
There is a box on the mantel, tap on it for a close up.
Hey, there is a glass cover on the box that says "use a hammer on the box". If you look closely you can see inside the box a red plus-shape.
Back up twice to the main view.
Let's explore the other areas of the cabin, shall we?
Exploration: Bedroom
Tap on the open door on the right wall to enter the bedroom.
Well, at least the lighting is better in here!
On the floor in front of you are what looks like papers with lots of color on them. Tap on the papers for a close up.
Yeah, the kids have been finger-painting, haven't they? Back up.
There is a bed in front of you, but it's no time for sleeping!
Above the headboard of the bed is some sort of installation, tap on it.
Okay, it's buttons that slide up and down, but it looks like one is missing. Back up.
To your right, beside the bed, is a nightstand, tap on it for a close up.
Okay, you can now see the nightstand, and some shelves as well. Let's check it out.
On the nightstand is a pretty wooden box, tap on it for a close up.
The top of the box has four round buttons, each of a different size. The buttons are green, but then change color when tapped. Back up.
The nightstand has a drawer, tap on it for a close up.
This is some sort of puzzle that has six buttons on the left and six on the right. Does that pattern look familiar?
Back up.
On the bottom shelf is a typewriter, tap on it twice for a close up.
Looks like Jason's full name is Jason Anthony Bethlam. Back up twice.
On the shelf above the typewriter is a long gray box, tap on it for a close up.
Looks like this is a safe, and it needs a 5 digit code. Back up.
On the next shelf up is what looks like another of those yellow buttons, tap on it.
Yeah, it's a button. There's also some black marbles here, take them.
Tap on the button for a close up, then take a picture.
Back up twice.
On the top shelf are some empty pill bottles, tap on them to get more of the story.
Back up until you see the full view of the bedroom.
On the far side of the bed is a desk with a laptop on it, tap on the desk for a close up.
On the desk is a jar of black ink, some paper, and the laptop.
Tap on the paper to take some.
Tap on the laptop for a close up.
Looks like we need a login, which we don't have. Back up twice.
There is a door in the far wall, tap on it for a close up.
The lock here appears to be touch activated, and it needs a three digit code. Back up.
Tap below the bed to see what's there.
You will find a pack of matches, take them.
There is also a fourth of those yellow buttons, tap on it for a close up and take its picture.
Back up twice to the main view of the bedroom.
Time to solve some puzzles!
The Nightstand Drawer
Tap on the nightstand for a close up, then tap on the drawer for a close up.
Note the pattern of buttons, six on the left and six on the right.
Have you seen this pattern before?
Yes, the windows in the main part of the cabin.
Remember how the window panes were different colors, some dark, some light?
That's the pattern for the drawer.
On the left set of six, tap the upper left and lower right buttons to turn them dark.
On the right set of six, tap the lower left, middle top, and lower right buttons to turn them dark.
When you hit the correct combination the drawer will open and you can take a pair of pliers.
Back up twice to the main view of the bedroom.
The Finger-Paints, the Back Door, and the Safe
Tap on the papers on the floor, the ones with the colorful handprints on them.
Remember what Jason's note said?
You should have in your inventory a bottle cap of cleaner specifically designed for finger-paints.
Use the cap on the paper and you will get a clue, 391.
Back up.
Now tap on the door on the back wall.
Use the code you got from the finger-paints to open the door. Tap and hold each pad with a fingerprint until the number reaches where you want it to be.
When you enter the combination correctly the door will open. Through the open door you can see a table and a ladder beneath it. Tap on the open doorway to go through.
Once you are in the darkened room, tap below the table to get the ladder.
Look at the right wall, it has glowing stars on it.
On the table is a small lamp, but it is missing a bulb.
Back up twice to the full bedroom view.
Tap on the nightstand for a close up.
Once you can see the shelves, tap on the shelf with the long gray box (safe) for a close up.
To open this we need a five digit code.
Where could we have seen a clue?
The clue was in the book on the left corner counter, the one that had a mathematical formula in it.
Remember what it also said? "Homework, Please keep safe".
That's the clue that tells you the numbers have something to do with the safe.
The solution to the math problem is 8 (2 x 5 = 10, 10 - 3 = 7, 7 + 1 = 8).
Notice that once you add the 8 at the end, you have five digits.
That makes the combination 25318.
Enter the five digit number into the safe, then tap the enter button (lower right button) and the safe will open up.
Inside are four white flammable powders, numbered from 1 to 4 in Roman numerals.
Take a little of each powder and back up three times to the main cabin view.
The Loft and the Peg Puzzle
Hey, remember that loft space above the door?
Well, now we have a ladder.
Open your inventory and place the ladder on the loft.
Tap on the loft and you can now go up.
In the loft you can see a television (with nothing on but snow), a picture on the wall, and a game of dominoes on the floor.
Tap on the picture for a close up.
Well, you never know, it might be useful, so take a picture and back up.
Tap on the dominoes for a close up.
You know, those dominoes appear to be in an interesting pattern. Take a picture.
There is also a button on the floor, take it.
Back up twice to the main cabin view.
Tap on the left corner for a close up.
Tap on that white circle on the left cabinet below the neon sign.
Once you have the jumping peg puzzle in close up, place the black balls you picked up from the bedroom on the puzzle. You should now have a mix of white and black balls.
Now what?
Remember the dominoes up in the loft?
Look at the picture of them, the black dots in the dominoes shows you the pattern to put the black balls in the puzzle.
Unfortunately, the pattern needs twelve balls, and you only have eleven.
You need a twelfth ball to complete the pattern.
Back up twice to the main cabin view, then tap on the center island.
Tap on the island counter for a close up, then tap on the pet rock.
Remember that the googly eye is loose?
Use the pliers on the eye to remove it.
Back up three times to the main view.
Tap on the bedroom door to enter.
Tap on the desk for a close up.
Use the googly eye on the ink pot on the desk. Voila, you have the last black ball you need!
Back up twice to the main cabin view.
Tap on the left corner for a close up, then again on the jumping peg puzzle.
Place the last black ball on the puzzle.
Now you can make your pattern.
Remember, the pattern is shown in the dominoes game in the loft.
Once you recreate the pattern, the drawer below the puzzle will open up, revealing a red plus-shaped object. Take it and back up twice.
The Fireplace and the Pretty Wood Box
Tap on the fireplace to face it.
You have paper in your inventory, and matches. Time to build a fire!
Why? Because you have flammable powders to investigate, or at least, you should if you picked them up from the safe in the bedroom.
Place the paper on the logs.
Now use the matches on the logs.
You should now have a nice roaring fire.
Time to check out the powders in your inventory.
Tap on each powder until you find the one labeled I.
Toss I onto the fire and see that the fire burns a nice cyan blue.
Toss powder II onto the fire and see it burn red.
Toss powder III onto the fire and see it burn green.
Toss powder IV onto the fire and see it burn purple.
You now have all the clues to open that pretty wooden box in the bedroom on the nightstand.
Back up, then tap on the bedroom door.
Once in the bedroom, tap on the nightstand for a close up.
Tap on the wooden box on the nightstand for a close up.
Time to solve this puzzle!
There are two clues to this puzzle, the magazine cover (the one about size matters) and the flammable powders.
Remember that the items on the magazine cover had Roman Numerals, as did the powders.
Burning the powders gave you the colors, I Blue, II Red, III Green and IV Purple.
The items on the cover were I Soccer Ball, II Earth, III Golf Ball, and IV Moon.
That means that the soccer ball is blue, the earth is red, the golf ball is green, and the moon is purple.
The relative sizes of the objects also determines which button they represent.
The smallest item on the cover is the golf ball, so that represents the smallest button.
The next largest is the soccer ball, which is the next largest button.
The next largest is the moon, which is the next largest button.
The largest item is the earth, which represents the largest button.
So the buttons should be: smallest - green (don't touch it, it starts at green), next largest - blue (1 tap), next largest - purple (4 taps), and the largest is red (5 taps).
If you enter the code correctly the box should open, giving you a black-light bulb and another red plus-shape. Take both and back up twice.
The Dark Room and the Slider Puzzle
Tap on the door on the far wall twice to enter the dark room.
Once inside, use the black-light bulb on the lamp on the table, then tap on the lamp to turn it on.
Note the lines that have appeared on the wall with the stars. Tap on the wall for a close up.
Take a picture of the pattern, then back up three times to the main bedroom view.
Now tap on the slider thing above the headboard of the bed.
Remember, one of the buttons is missing. You should have picked it up in the loft next to the dominoes game.
Place the button on the empty slot. Now you just need to place the sliders.
Note that each sliding button has six notches from top to bottom.
What you want to do is recreate the pattern you saw on the star wall once you turned on the black-light.
From left to right: the first slider should be on the third notch from the top, the second slider should be on the fourth notch from the top, the third slider should be all the way to the top, the fourth slider should be all the way to the bottom, the fifth slider should be on the second notch from the top, and the sixth slider should be the second notch from the bottom.
Once you recreate the pattern the panel will open up, revealing another red plus-shape. Take it and back up.
Now what?
The Island Drawer and the Happy Face Puzzle
Back up to the main cabin view.
Tap on the central island for a close up.
Tap on that middle drawer, the one with the four round buttons and the "start" button.
Once the drawer is in close up, tap on the "start" button.
Looks like the round buttons are actually lights.
This is a game of "Simon Says". The buttons will light up in a sequence of six. Recreate that sequence by tapping on the lights in the same order and the drawer will open, revealing a key.
Take the key and back up twice.
Now tap on the left corner cabinets for a close up.
Right underneath the window is a door with a keyhole, tap on it for a close up.
Use the key to open the door and you will find some sort of safe inside. Tap on it twice for a close up.
There are a bunch of buttons here, four yellow and eight red.
Note the clusters, there are two red buttons above one yellow button in each "corner" of the door.
The arrows on the red buttons move when you tap them, but the arrows on the yellow buttons do not move.
So what is the answer?
The answer is in those yellow happy face buttons you found all over the room.
In each button, the mouth is a triangular arrow, while the eyes are triangles with dots in them.
The dots indicate which "direction" they eyes would be pointing.
You need to match each yellow button with the mouth shape of a happy face button. Once you have, you need to turn the eyes to match the happy face button.
In the upper left, the yellow button is an arrow pointing upwards. That happy face had the eyes pointing inwards, the left eye pointing right and the right eye pointing left.
In the upper right, the yellow button is pointing to the right. That happy face had the left eye pointing up and the right eye pointing down.
In the lower left, the yellow button is pointing to the left. That happy face had both eyes pointing left as well.
In the lower right, the yellow button is pointing downwards. That happy face had the left eye pointing left, and the right eye pointing up.
Once you get all of the arrows on the red buttons in the proper direction, the safe will open up revealing another red plus. This should be your fourth.
Back up to the main cabin view.
Remember, that box on the wall had five plus-shaped indentations.
Have we seen another red plus?
Tap on the fireplace for a close up.
Tap on the box on the mantel for a close up.
Yep, there's the last red plus. The box says to use a hammer, but we don't have one.
Now what?
The Computer Password and Thinking Outside the Box
Let's see if we can get the computer password.
Back up to the main cabin view, then enter the bedroom.
Tap on the table with the laptop.
Tap on the laptop for a close up.
Note that below the space for typing in the password is a link that says "Forgotten Password?".
Tap on that link.
You will get to a Reset Password? screen.
Don't choose "Send Email", since you can't get into the computer.
Instead, choose "Security Questions".
The computer will ask you three security questions. Hope you can answer them!
Your husband's middle name is Anthony (seen on the typewriter).
The name of your first pet is Lucy (seen on the drawing in the loft).
Your favorite holiday location is Lake Solomon (the picture on the right wall of the cabin near the right set of windows.
If you enter all three correctly, your password will reset to "monkey".
Once you've reset the password, hit the back arrow then when you get to the login screen enter the new password.
Enter the password and you are in. You can read Jason's file (he does love his quotes, doesn't he?) and Alice's file (more back-story).
Note the box in the center of the screen with the word think...
Also note that the settings icon has a hammer in it.
Well, the box on the fireplace did say to use a hammer on the box. It didn't say you had to use a real hammer on the glass.
Drag the settings icon into the box, then back up three times to the main cabin view.
Tap on the fireplace for a close up.
Tap on the box above the mantel and you will see it is open. Take the last red plus and back up twice.
Getting Out
Tap on the left corner cabinet for a close up.
Tap on that box on the wall to the right of the neon sign.
Place all five pluses in the indentations.
The box will open up and give you a key. Back up twice.
Use the key on the door and tap on the door to go outside.
Congratulations! Now go play Forever Lost.
Posted by: grinnyp |
March 27, 2014 3:03 PM
|
March 27, 2014 3:03 PM