
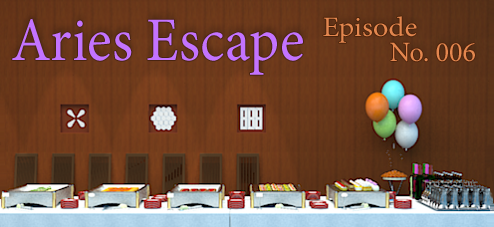
![]() You're invited to the birthday party of a dear friend and, as birthdays usually come on an annual basis, there is nothing unusual about this one...except, when you show up, it turns out to be a big set-up, getting you to partake in a surprise room escape game. So, Happy Birthday! Even if it's early or late or right on time, join the celebration in LiberTechno's festively made-up banquet hall replete with pretty balloons, scrumptious cake, chafers of fancy foods and clever puzzles in the form of wall decorations. What better way to escape the weekday than with a little party game called Aries Escape: Episode No.006?
You're invited to the birthday party of a dear friend and, as birthdays usually come on an annual basis, there is nothing unusual about this one...except, when you show up, it turns out to be a big set-up, getting you to partake in a surprise room escape game. So, Happy Birthday! Even if it's early or late or right on time, join the celebration in LiberTechno's festively made-up banquet hall replete with pretty balloons, scrumptious cake, chafers of fancy foods and clever puzzles in the form of wall decorations. What better way to escape the weekday than with a little party game called Aries Escape: Episode No.006?
 If you're familiar with LiberTechno's characteristic style, you should mostly feel right at home. In a large part, things work the same way here as in other episodes: a changing cursor will help you seek out active areas, inventory items are kept close at hand, and arrows indicate the directions you can turn so that all actions and navigation take no more effort than a simple click. In this case, though, a long banquet table in the center of the room makes getting around a little less simple, as it can be hard to change perspective and understand your movements. In some cases, this is helped along by arrows on the right and left so you can easily shift over even when in close view of the table. If you're able, keep an open document to make notes and paste in screenshots as this will aid your sleuthing quite a bit.
Not long into the shindig, perhaps you're feeling dizzy from navigating the long room or the sheer abundance of puzzles here—or maybe it's just a sugar hangover—but you'd like to get outside into that gloriously sunny day, wouldn't you? Then make a note to examine every ornament, every place setting, and every corner of this room as you can find. Don't think that, just because you don't see an easy way to reach a particular spot, that it isn't worth a look (sometimes you need to see its clue first, sometimes you need to try a new approach to get there).
Once you click around enough, you'll get a sense of where you're going. What's more challenging is determining which clues will lead to answers to which puzzles and codes; so many details abound just for the stubborness of existing, to divert your attention away from the real solutions. In this way, clues are hidden in plain sight, calling on your detective skills to uncover them. Great fun for those who are looking for more challenge and content in their escape, leading up to a giant feeling of satisfaction once you solve your way out. Now isn't that the best way to leave a party?
Play Aries Escape: Episode No.006
Note: To adjust the sound, select the tool icon and move the bottom slider to the left. Keep the top slider, which controls click sensitivity toward the right.


Walkthrough Guide
(Please allow page to fully load for spoiler tags to be functional.)
Walkthrough: Aries Escape Episode No.006
Getting Started: Exploring the Banquet Hall
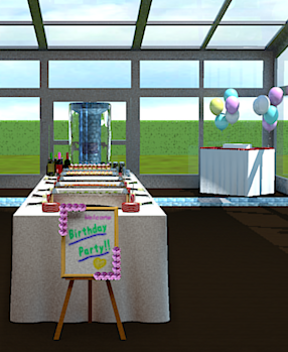
You begin with your back to the entrance doors, facing the end of a long banquet table. On your left is a wall with four pictures (puzzles) and a row of chairs. On your right is a large window. At the far end of the room is a fountain and glass doors.
Navigation is made tricky by this lay-out, so take your time to scan each scene with your cursor: this way you'll find arrows and active areas to guide you.
If you'd like, it helps to draw your own map or take screenshots, or both.
I recommend taking some time to just randomly wander around, to get a sense of how you can move about, not worrying about clues or puzzles, so you'll feel better oriented with the layout. It makes sense once you get used to it.
If you're taken a tour of the room, and found your way back to where you've started, now...
Zoom in to read the sign:
"Welcome. Birthday Party!!" Make note of the Yellow Heart.
Back out.
Hover your cursor to the right side of the table to move that direction.
Here the banquet table is on your left, you have a closer view of the fountain and cake stand ahead, and so the large windows are at your right.
Turn right to look out the glass windows and see the pretty balloons:
Zoom in on the balloons teethered to the pink stand on the right, note their number and colors, then back out.
Now, zoom in on the balloons teethered to the yellow stand on the left...
Then click above these balloons to get a closer look at the Green Spade.
Back up twice.
Turn left from the large window looking out on the lawn to face the fountain area again.
Click the little stone bridge on the waterway to zoom in on it.
Then, click the side of the stone to find a number:
822
Back out twice.
Zoom in on the cake in the corner (to the right of the glass doors).
Make note of the Red Diamond.
Back out from the cake and turn left to face the glass doors. To the left of the doors is a little panel...
Zoom in on the panel and open it to see you need a code to unlock the door.
Back up.
Turn left while in close view of the glass doors to see an urn of flowers...
Zoom in on the note card on the flowers to see a clue:
22:30
+
15:00
Back up from the urn of flowers and turn left to face the back side of the fountain. Click the center of the screen to move back toward the banquet table.
Now, turn right to face the banquet table. Let's see what's being served:
Zoom in on the leftmost tray of food: some cheese and cold cuts.
There is a lot to see here, take a screenshot or make a note of it so you can sort out the information later.
*While in close view of the table, you can use the arrows on the side to move down the table to the next tray.
Move right to the next tray of food: breaded orange sauce something....
Also make a note of the card suits along the side of this tray.
Go right again to the sausages in red sauce.
Then right to the crackers with toppings...
Hmmm. The plates are in two half stacks...
Keep clicking the plates until a number is revealed underneath:
08**
Lastly, go right to the tray of petite fours.
Back up from the table.All that food make you thirsty? Have a look at the wine, beer and glasses...Go forward to directly face the fountain (it's all wet, so you can't get closer). From here, turn left twice and you'll be facing the drinks of the table:
Examine the "Special Hint Rose Wine" for a clue:
oxo
oxox
xoooo
xoox
xoo
Hover your cursor to the right of the banquet table and click the arrow to move forward.Then, turn left to face the other side of the banquet table. Let's see what's this side of the food trays looks like:
Zoom in on the tray of petite fours on the left end of the table: note what you see.
Move right* to the second tray of food: some crackers with colorful toppings.
Move right again to the third tray of food: sausages with red sauce?
Besides noting what's here, you should also notice you can move the plates.
Click on the plates and keep clicking until you reveal a number underneath them:
**18
Move right to the fourth tray of food: some breaded orange sauce stuff.
Lastly, move right to the fifth tray of food on the end of the table: some cheese and cold cuts.
Leave the table close-up and turn left twice to face the wall of pictures and chairs...
You can only zoom in on the pictures/puzzles if you've viewed their clues. At this point, you've seen clues for all the puzzles except the second on the left.
You can also move aside the chairs. Behind the chair third from the right, there is a panel...
behind the panel are five rows of levels below a design that kind of looks familiar.
Back up.
While facing the chair wall, turn right to see the glass doors and fountain. On the left should be a glass case with your first puzzle of the day...
The Glass-Cased Book and the Levers Puzzle
If you're facing the fountain from the chairs side of the banquet table, you should see a gold-trimmed glass case housing a book. Take a closer look at it:
Inside is a book with a Blue Club on the cover.
The case is locked with a 4-digit code.
SOLUTION:
The code is found in two parts, under the plates on the banquet table. Look on each side for half-stacks that can be clicked through to reveal the numbers underneath...
08**
**18
0818
Enter the correct code into the lock to release it, then step back.
With the lock off, you can open the door to the glass case and peruse the book:
On page 1, notice how the circle with the two lines on either side probably refers to the fountain. The rows of tongs below probably refers to the tongs on the table.
Page 2 tells you that the water can be turned off and on.
Page 3 shows a grid (probably the panel under the fountain) and the order of the five colors: pink, yellow, orange, blue and green.
Page 4 sends you toward the little stone footbridge on the right side of the fountain.
Back up from the case and go back to the row of chairs by clicking on them.
You're now ready to solve the levers puzzle. Click on the third chair from the right then zoom in on the panel and open it up.
The book told you to look at the tongs on the table for your answers.
SOLUTION:
The clue in the blue clover book indicates to look at the tongs (as you stand at the door and look at the table, you can see the resemblance to the diagram, too). Pay no attention to the ends of the tongs, just the angle they're at.
\ \ (up/down)
\ / (up/up)
/ \ (down/down)
\ \ (up/down)
/ / (down/up)
Click the levers until they're either up or down.
When all levers are in the correct positions, the panel automatically opens, revealing an On/Off switch.
Flip the switch to "Off" and the water stops flowing from the fountain.
Back up.
Circle "Star" Picture
While facing the chairs, zoom in on the picture on the far left, the one that looks like a compass star:
You can click along the edge of the circle to make the points of the "star" turn red.
If you click to the left of a point, it will move to the left.
Click to the right of a point, it will move right.
To make another pair of points, just click in an area between two un-lit points.
Your goal here is to light up the correct number of points and arrange them to point in the right directions.
Use the clue found on the note card in the urn of flowers.
SOLUTION:
Go over to the area by the glass doors, behind the fountain, and find an urn of flowers. The hint you need is there. More specifically:
22:30 + 15:00
Set the design to read those two times, 10:30 and 3:00, so you'll have four points going these directions on the star...
Northwest
South
North
East
When you've solved this puzzle, the panel opens, giving you another clue:
circle = add up the oval-shaped signs on the table.
Back up.
4-Color "X" Picture
While facing the chairs, examine the second picture from the left.
If you click each of the four buttons, you'll see they light up a different color:
TOP LEFT = Yellow
TOP RIGHT = Red
BOTTOM RIGHT = Green
BOTTOM LEFT = Blue
Use the clues scattered around the room to determine which order to click each button.
HINT:
You're looking for four cards suits as well as some indication of the order they go in.
SOLUTION:
The white-board sign, window behind the balloons, cake and book have the colors.
The right side of the breaded orange sauced rolls' tray has a series of card suit symbols, giving you the correct order for each color.
yellow-yellow-red-blue-green-blue-red
-OR-
top left, top left, top right, bottom left, bottom right, bottom left, top right.
Colorblind Help:
Heart is Yellow.
Diamond is Red.
Spade is Green.
Club is Blue.
Click the colored buttons of the "X" in the correct order.
When you solve the puzzle, the panel automatically opens, giving you another clue:
triangle = (8x4)-3
Order of operations means you multiple first, then subject.
Back up.
"Honeycomb" Picture
Zoom in on the second picture on the right, the one that looks like a cross-section of a honeycomb.
If you click on any hexagon within the design, it will light up pink.
The clue for this one is found on the table (think: thirsty).
Create the correct pattern of red hexagons to solve this puzzle.
SOLUTION:
Zoom in on wine bottles at the end of the table as you're directly facing that end of the table. On the label is the pattern you need to emulate.
For each row, "x" represents a red hexagon:
oxo
oxox
xoooo
xoox
xoo
When you've turned the correct spots on the honey-comb pink, the panel opens automatically to reveal the next hint:
Pentagon = 1+1+1
Back up from the wall again.
"Digital" Picture
While facing the wall of chairs, zoom in on the picture on the right:
It looks kind of like a digital read out, with three numbers smooshed up together.
If you click on different segments of this design, they'll turn pink. You can create patterns of numbers this way.
Enter the correct number to solve this puzzle.
To find the clue, you need to examine every angle, the side of every object, even something that's right under your feet.
SOLUTION:
A number's written on the edge of the little stone footbridge that goes across the stream.
822
When you get the panel open, you'll find the fourth clue:
square = all the square table signs multiplied
Back away from the wall.
The Fountain Keypad
While facing the wall of chairs, turn right. Then, click on the fountain to move closer to it.
With the water off, you can now access the door on the fountain's column. So click on it to zoom in and click again to open it.
Here is a typical number keypad. You can input five numbers on it.
Enter the correct number and press the enter button.
HINT:
A balloon on the read-out above is your first clue.
Page three in the book is the other clue.
SOLUTION:
You need to go around the room and count the colored balloons. There are...
7 Pink
2 Yellow
4 Orange
5 Blue
1 Green
So put them in that order, as shown in the book, to get the code:
72451
When you have entered the correct code, the side of the fountain slides down, emptying the fountain's pool.
With the fountain empty, back up and then click on the edge of the pool to look inside:
A fifth and final math clue is revealed:
(triangle+circle+square) x pentagon
Back up twice from the fountain.
The Exit Code and "Normal" Ending
To reach the glass doors and enter the exit code, first you need to turn on the fountain again so you can raise the bridge back up (yes, your legs are too short and your high heels too fancy to try to jump the stream.)
While facing the fountain, turn left. Then, go forward toward the chairs.
Move aside the third chair on the right and open the panel behind it.
Flip the switch to "On."
Back up and make your way around this big ol' table...
The easiest way to explain it is to turn left while facing the chairs, go toward the door, turn left again, then go forward.
While standing on the right side of the table facing the fountain, move forward toward the cake stand then turn left.
Now you're at the double glass doors. On the left is a panel; zoom in on it:
Here you need another 5-digit code to unlock the glass doors.
Use the information earned by solving the other puzzles to determine the code (math skill needed).
SOLUTION:
Remember to complete the math inside the parantheses before doing the rest of the problem. Also remember to multiply before you subtract or add.
The equation you need to solve is in the fountain's pool when the water is drained:
(triangle+circle+square)xpentagon
The numbers you need to fill in those shapes are behind each of the four pictures as well as on the table signs....
Triangle=29; circle=30; square=1008; pentagon=3
Doing the math, you end up with this code:
90807
After inputing the number, click "open". It'll turn green if the answer is correct.
Back up to face the now unlocked glass doors.
At this point, if you want to experience the perfect ending, "SAVE" your game by clicking the blue file icon in the bottom right of the game screen.
Click the doors and they'll open, giving you the "normal ending."
"Perfect Ending"
After experiencing the normal ending, click "replay" to return to the start screen."
Choose "Load" to start from where you left off—at the doors if you saved right before exiting.
This time, don't go out the door after entering the exit code. Instead, turn left to face the flowers.
Move aside the urn of flowers and look at the floor:
orange-green-yellow-red-blue
Back out and turn left. Go forward, then turn toward the chairs...
Move aside the third chair on the right, open the panel, and turn the water "Off" again. Then back up.
Turn around and go over to the fountain:
Look behind the panel, now the clue indicates the candles.
Now go check out the cake.
Count the candles:
Orange=2
Green=3
Yellow=4
Red=1
Blue=2
Go back to the fountain and open up its panel door:
Input the new code...
SOLUTION:
Count the colors to get this code, using the order from under the urn of flowers:
23412
If the code is correct, the panel will open and you can get:
The "Perfect" Token.
Now exit the glass doors to get the perfect ending!
Congratulations! Have some birthday cake, calorie free!
Posted by: elle |
February 6, 2013 1:31 PM
|
February 6, 2013 1:31 PM