
Hood: Episode 4
Come one last time to Hyptosis' fairy tale world of magic and arcane science for the final installment of the atmospheric point-and-click adventure saga as you search for the girl with the read cloak in Hood: Episode 4. Solid plotting and programming uphold a equally eerie and humorous finale, albeit one with some obtuse puzzles.
Read More32 Comments
The second puzzle where you get to the old box has me compleatly stumped! Can somebody, ANYBODY, tell me how to solve this thing?!

Are you talking about the Sun to Soil thing? I'm there too. Definitely stumped.
second puzzle? still trying to get past the wall!
Any clues on even the first puzzle???
The number of words as the message on the wall have something to do with it?
To solve the first puzzle
you just look at the symbol on the right and click the symbols to make it so when the spaces are aligned just right the symbol would fit in the spaces
The solution to the first puzzle has to do with the lined figure on the right. I had to play around with it quite a bit before figuring out exactly what they were wanting me to do.
Hint:
Move the horizontal lines to where the spaces reflect the picture on the right. You don't count the dots at the beginning and end.
Solution:
it ends up being: left, center, two, center, two, if I remember correctly
Second wall (runes, "Sun to Soil"):
As I remember it (I might be completely wrong) �
If we number the runes, from left to right �
1, 2, 3, 4 and 5
� the sequence is:
3, 4, 2, 5, 1
i.e. from the lowest placed rune to the topmost (relative to an imagined y-axis).
Hood Episode 4 Walkthrough
The Series: If you haven't played them yet, I recommend going back and enjoying the first three episodes before continuing into this one, the final installment of the Hood series.
Narrative: Most the story in this narrative adventure develops through the conversations. So click around everywhere, use your inventory on everything, and talk to everyone as much as possible. To avoid missing parts of a conversation, take care that you do not have an item highlighted in your inventory for use when you first click on someone to talk to them. To see all parts of the conversation, you'll need to replay the game.
Walkthrough:
-
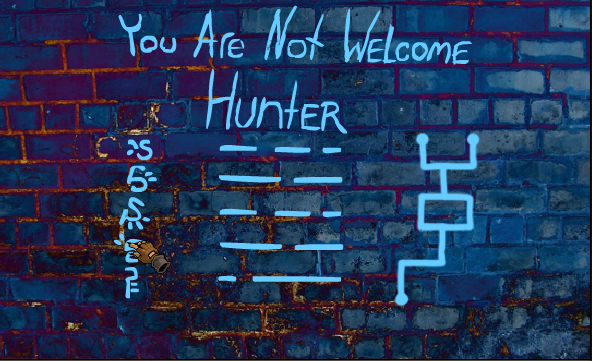
"You Are Not Welcome, Hunter." (The First Puzzle.)
-
You begin the game at a brick wall and have four things in your inventory from the previous installment:
-
PUMPKIN (looking rather rotted).
-
RUNED DRILL.
-
SHOVEL.
-
FLUTE.
-
You'll need to solve a puzzle to continue.
-
Solve the puzzle by clicking the symbols on the left until you've changed the lines in the middle to the proper arrangement.
-
Each line has a corresponding symbol/button and each time you click on the button, the lines change.
-
The design on the right side of the wall is your main clue.
-
When you have changed each line correctly, the wall dissolves away and you'll be facing a new scene.
-
At the Gate, Elder Shade "...to the side of Them."
-
Talk to the Elder Shade, clicking through the entire conversation.
-
When you're given a choice what to say, pick the one you want.
-
After going through the full conversation, the Elder Shade leaves.
-
Pick up the STICKS OF WOOD from the pile on the left side of the screen.
-
Click the red arrow to move forward.
-
One of the Dead Race: "You are now in Gorsus, the spirit world."
-
Talk to the dead ancient to learn more about this world and the girl with the auburn hair.
-
Click the vase next to the far right spirit to get...
-
A TARNISHED SAPPHIRE LOCKET.
-
There appears to be a path to the left but there is no option to go that way.
-
So, follow the arrow leading forward and to the right.
-
"You seem new here!" The Wild Bard and a Familiar Place
-
Talk to the Wild Bard.
-
After getting his full story, give your FLUTE to the bard and he'll play a tune, causing the path ahead to open up.
-
Talk to the bard again to receive his gratitude.
-
Follow the red arrow forward.
-
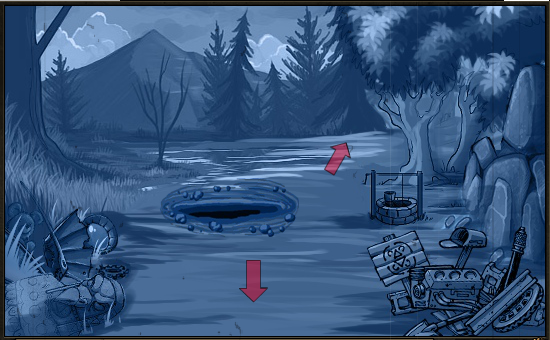
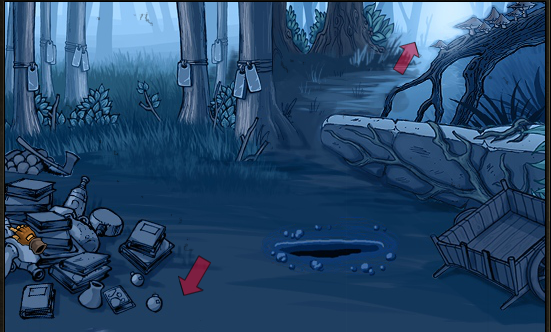
After leaving the bard, you come to a clearing along the path. To the right is a well, a mailbox, and other assorted junk while to the left is a fallen statue and such things.
-
For now, just continue forward.
-
Here you'll see the smooth stones tied to the trees and a cart from Shadetale.
-
Follow the red arrow to continue forward and slightly to the right.
-
The Fire Spirit, The Garden of Blades and the Cauldron
-
In this scene you can see the Shrines for Lethea and piles of more memories/objects.
-
At the moment, all the fire spirit wants to do is talk about what a nice day it is.
-
Take the right path (your only option forward).
-
At this juncture, you see several swords stuck in the ground in front of a tree that has runes skittered across its trunk. There is a path to the right and a path to the left.
-
Take the path to the left. You'll arrive at a large cauldron.
-
Put your STICKS OF WOOD under the cauldron.
-
Go right to the garden of blades.
-
Go down, back to the fire spirit/junk pile. Talk to the Little Fire Spirit again (don't give him anything yet). You'll get two choices:
-
Give the LOCKET to the fire spirit, he'll take it and give you back a...
-
STICK OF FIRE.
-
Take the "fire by force," in which case you...
-
...end up with a FIERY ARM (which should start a fire all the same).
-
Go forward then take the right path to the Old Shack.
-
Simms, the Runeseeker. "You! You're not dead!?"
-
When you arrive at the old shack, you meet Simms. Talk to him to find out what he believes he knows the way out of here, but he needs a musket ball.
-
Inside the trunk is a green copper box, but so far you don't know how to work it.
-
Go back to the garden of blades then take the left path back to the Cauldron:
-
Use your FIRE to light the wood under the cauldron.
-
Put the LOCKET into the cauldron to melt it.
-
Click the smelter ladle and you'll automatically get...
-
A handful of SILVER SHOT.
-
Go right twice to return to Simms.
-
Give Simms the SILVER SHOT.
-
Go back to the garden of blades.
-
The Demon, The Box (Runes Puzzle), and onward through the spikes
-
After Simms shoots himself, when you go back to the garden of blades, a demon is there. Talk to him.
-
When you get a choice of response, choose whichever one you prefer.
-
If you choose to lie rather than attack, the demon explains a bit more about what the box is but, in the end, the result is the same: at the end of the discussion, the demon leaves.
-
Take the right path, back to the old shack.
-
Pick up the strange box and click on it to begin another puzzle:
-
Hover over the rightmost symbol to see the clue: "from sun to soil."
-
Then, click the runes in the the proper order.
-
When you've correctly input the runes, the wall will dissolve away.
-
The spiked ceiling is rather quickly descending on you and you need to act fast to stop it.
-
Merappi the Seer and Moving Forward through the Enchanted Door
-
After passing safely through the spiked ceiling room, you come to a hallway. Talk to multi-eyed man, Merappi.
-
Then, start gathering anything that looks worth gathering...
-
Take the SMALL BLUE GEM from by the goat head in the left corner of the screen.
-
Move forward.
-
Get the SMALL BLUE GEM from the top of the door frame.
-
Use your GUN to blast off the first lock on the door.
-
Then, use the DRILL to drill through the second lock.
-
Move forward by clicking the upwards pointing red arrow.
-
At this wall, take the SMALL BLUE GEM from the right edge of the support beam.
-
Now you have another puzzle to solve...
-
"They walked in the mountains..." (the Door Riddle)
-
Your goal here is to change each of the six symbols to match the poem pinned to the door.
-
On the panel to the right of the door, there is a square with two narrow rectangles along its bottom and right edge.
-
You can click those "slender metal buttons" to change the symbols on the door:
-
The bottom slender metal button designates which symbol you're adjusting. Click it to move from first, second, third, and so on. It goes from left to right: the first= 1 dot, the second= 2 dots, etc..
-
The button to the right of the square will then change that part of the symbol on the door.
-
When you have the correct set of symbols, an arrow will appear to indicate you can go forward. Go forward through the door, into the cell rooms.
-
The Cell Room, the Far Wall and the Archdemon
-
When you pass the "they walked in the mountains" door, you'll see a room with trees and two more doors.
-
Pick up three more SMALL BLUE GEMs here:
-
one by two rocks at the base of the middle tree.
-
another up in the left branch of that same tree.
-
an the third is in the roots of the tree on the right.
-
Go left to look at the far wall.
-
Insert each of the six gems into the sockets:
-
...when you do, the lock comes off.
-
Go back to the cell room. Here you can see the fiends are escaping.
-
Go through the left door to meet the archdemon and enjoy the rest of the story.
HINT:
Pay attention to the spaces.
SOLUTION:
Imagine placing the design on the right over the lines in the middle, where would they intersect?
-OR-
HINT:
Don't let the design throw you off.
SOLUTION:
Click the runes according to height, from highest to lowest. Then click the "from sun to soil" (rightmost button) last.
Wedge the SHOVEL into the hole in the upper right corner.
SOLUTION:
Screenshot: Solution to Door Riddle
Screenshot: Blue gems in far wall
I have 5 symbols and some sort of chart and something about sun to soil but I've got nothing! HELP!!!
Hmmm, that's not working for me.
I've tried from top to bottom and from bottom to top. :-/
Ok, so you click
the triangle on the right AFTER you put in the sequence. I'm an idiot.
Don't forget to
click the big rune-button-thingy :)
Artifacts
As with many of your inventory items, you can use your shovel on everything just for kicks. But dig in the right spot and you'll uncover some artifacts (a little side quest mainly for the fun of it).
Here are the locations of three artifacts needed to become an "archaeologist":
but what doing to activate second puzzle?
or tell me, where is musket ball?
Please remember to use spoiler tags, folks. Thanks!
Hi Akrim,
Maybe you can make the musket ball by doing some smelting?
i have wood, i have necklace, i think for melting, but.. still missing fire... and that wood is unflamable
...so still dont know, what now?
[Try peeking at the walkthrough, above these comments. -elle]
Did Dora get stuck inside this game?
now i realize, that im to dumb... so now forward and go to second puzzle
I'm stuck just like Akrim but also
I've been digging around and found some objects, but I can't use them ��
Ah, not at all! It's just a very different kind of game. Trust me, we here at JiG got stumped by some of these puzzles, too.
thank y o u for help
I did not have any problems with sun to soil, I found it even easier than the first rune puzzle, but the poem door stumped me. I was trying to display "two" as a symbol until I checked out the walkthrough here :B
Eh, new comment system? Why did I reply to another comment?
Nathanyel, there's a checkbox underneath the sign in for leaving a comment that you need to uncheck to not reply.
@Nanthanyel and hopbitters: I've disabled the comment reply checkbox for now. Reply commenting isn't quite ready for prime time here yet. I apologize for the confusion/issues.
I wasn't aware of this series. How convenient it is to discover something nice and have three more games to play!
including the conclusion!
Let's try power of posting here. I can't get that From sun to soil puzzle to work and yes,
I am clicking the triangle button after the runes. Is there going to be any indication that I've input the right code?
Hi, I just double-checked the walkthrough's "From sun to soil" puzzle solution by playing it again...
If you are clicking the correct code, then click the triangle symbol last, you'll know it because the wall dissolves away and you can move forward.
Hey! Thanks for the brilliant walkthrough! It was perfect for when I was stuck nearer to the end. Thank youu!!
[You are so welcome! Thank you for letting me know it helped! -elle]
There seems to be quite a few re-imagined fairytales in games and media these days, and I'm enjoying the twists on the traditional story. Kudos to Hyptosis, and hope to see more in the future.
The series was very well done. The art style was unique and lent well to the atmosphere of the game. Puzzles were just right. Gameplay was a bit linear, but excusable in light of the fact that this is a very story and text-driven game.
All in all, loved it.
"I don't know who Dora is..."
"But she must be pretty great!"
Leave a comment [top of page]

Game of the week

Walkthrough Guide
(Please allow page to fully load for spoiler tags to be functional.)
Hood Episode 4 Walkthrough
The Series: If you haven't played them yet, I recommend going back and enjoying the first three episodes before continuing into this one, the final installment of the Hood series.
Narrative: Most the story in this narrative adventure develops through the conversations. So click around everywhere, use your inventory on everything, and talk to everyone as much as possible. To avoid missing parts of a conversation, take care that you do not have an item highlighted in your inventory for use when you first click on someone to talk to them. To see all parts of the conversation, you'll need to replay the game.
Walkthrough:
"You Are Not Welcome, Hunter." (The First Puzzle.)
You begin the game at a brick wall and have four things in your inventory from the previous installment:
PUMPKIN (looking rather rotted).
RUNED DRILL.
SHOVEL.
FLUTE.
You'll need to solve a puzzle to continue.
Solve the puzzle by clicking the symbols on the left until you've changed the lines in the middle to the proper arrangement.
Each line has a corresponding symbol/button and each time you click on the button, the lines change.
The design on the right side of the wall is your main clue.
HINT:
Pay attention to the spaces.
SOLUTION:
Imagine placing the design on the right over the lines in the middle, where would they intersect?
Screenshot: Solution to first puzzle
When you have changed each line correctly, the wall dissolves away and you'll be facing a new scene.
At the Gate, Elder Shade "...to the side of Them."
Talk to the Elder Shade, clicking through the entire conversation.
When you're given a choice what to say, pick the one you want.
After going through the full conversation, the Elder Shade leaves.
Pick up the STICKS OF WOOD from the pile on the left side of the screen.
Click the red arrow to move forward.
One of the Dead Race: "You are now in Gorsus, the spirit world."
Talk to the dead ancient to learn more about this world and the girl with the auburn hair.
Click the vase next to the far right spirit to get...
A TARNISHED SAPPHIRE LOCKET.
There appears to be a path to the left but there is no option to go that way.
So, follow the arrow leading forward and to the right.
"You seem new here!" The Wild Bard and a Familiar Place
Talk to the Wild Bard.
After getting his full story, give your FLUTE to the bard and he'll play a tune, causing the path ahead to open up.
Talk to the bard again to receive his gratitude.
Follow the red arrow forward.
After leaving the bard, you come to a clearing along the path. To the right is a well, a mailbox, and other assorted junk while to the left is a fallen statue and such things.
For now, just continue forward.
Here you'll see the smooth stones tied to the trees and a cart from Shadetale.
Follow the red arrow to continue forward and slightly to the right.
The Fire Spirit, The Garden of Blades and the Cauldron
In this scene you can see the Shrines for Lethea and piles of more memories/objects.
At the moment, all the fire spirit wants to do is talk about what a nice day it is.
Take the right path (your only option forward).
At this juncture, you see several swords stuck in the ground in front of a tree that has runes skittered across its trunk. There is a path to the right and a path to the left.
Take the path to the left. You'll arrive at a large cauldron.
Put your STICKS OF WOOD under the cauldron.
Go right to the garden of blades.
Go down, back to the fire spirit/junk pile. Talk to the Little Fire Spirit again (don't give him anything yet). You'll get two choices:
Give the LOCKET to the fire spirit, he'll take it and give you back a...
STICK OF FIRE.
-OR-
Take the "fire by force," in which case you...
...end up with a FIERY ARM (which should start a fire all the same).
Go forward then take the right path to the Old Shack.
Simms, the Runeseeker. "You! You're not dead!?"
When you arrive at the old shack, you meet Simms. Talk to him to find out what he believes he knows the way out of here, but he needs a musket ball.
Inside the trunk is a green copper box, but so far you don't know how to work it.
Go back to the garden of blades then take the left path back to the Cauldron:
Use your FIRE to light the wood under the cauldron.
Put the LOCKET into the cauldron to melt it.
Click the smelter ladle and you'll automatically get...
A handful of SILVER SHOT.
Go right twice to return to Simms.
Give Simms the SILVER SHOT.
Go back to the garden of blades.
The Demon, The Box (Runes Puzzle), and onward through the spikes
After Simms shoots himself, when you go back to the garden of blades, a demon is there. Talk to him.
When you get a choice of response, choose whichever one you prefer.
If you choose to lie rather than attack, the demon explains a bit more about what the box is but, in the end, the result is the same: at the end of the discussion, the demon leaves.
Take the right path, back to the old shack.
Pick up the strange box and click on it to begin another puzzle:
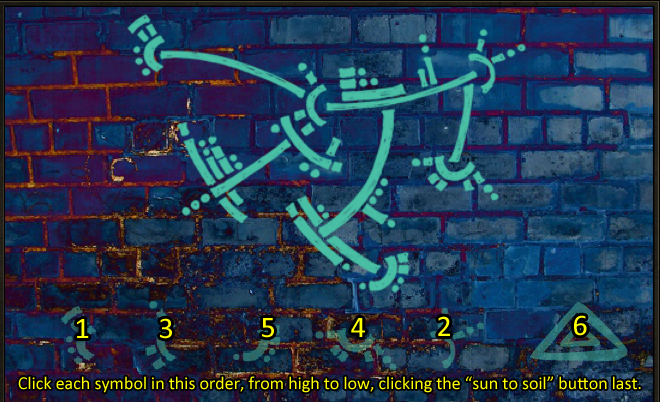
Hover over the rightmost symbol to see the clue: "from sun to soil."
Then, click the runes in the the proper order.
HINT:
Don't let the design throw you off.
SOLUTION:
Click the runes according to height, from highest to lowest. Then click the "from sun to soil" (rightmost button) last.
Screenshot: Solution to "Sun to Soil" puzzle
When you've correctly input the runes, the wall will dissolve away.
The spiked ceiling is rather quickly descending on you and you need to act fast to stop it.
Wedge the SHOVEL into the hole in the upper right corner.
Merappi the Seer and Moving Forward through the Enchanted Door
After passing safely through the spiked ceiling room, you come to a hallway. Talk to multi-eyed man, Merappi.
Then, start gathering anything that looks worth gathering...
Take the SMALL BLUE GEM from by the goat head in the left corner of the screen.
Move forward.
Get the SMALL BLUE GEM from the top of the door frame.
Use your GUN to blast off the first lock on the door.
Then, use the DRILL to drill through the second lock.
Move forward by clicking the upwards pointing red arrow.
At this wall, take the SMALL BLUE GEM from the right edge of the support beam.
Now you have another puzzle to solve...
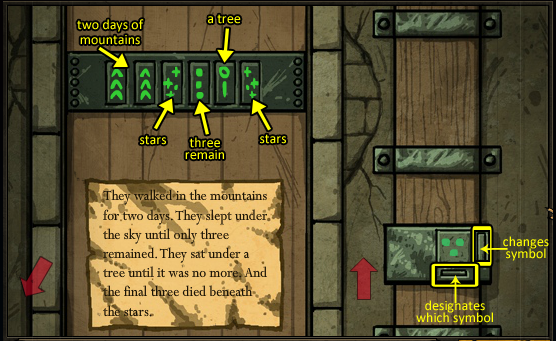
"They walked in the mountains..." (the Door Riddle)
Your goal here is to change each of the six symbols to match the poem pinned to the door.
On the panel to the right of the door, there is a square with two narrow rectangles along its bottom and right edge.
You can click those "slender metal buttons" to change the symbols on the door:
The bottom slender metal button designates which symbol you're adjusting. Click it to move from first, second, third, and so on. It goes from left to right: the first= 1 dot, the second= 2 dots, etc..
The button to the right of the square will then change that part of the symbol on the door.
SOLUTION:
Screenshot: Solution to Door Riddle
When you have the correct set of symbols, an arrow will appear to indicate you can go forward. Go forward through the door, into the cell rooms.
The Cell Room, the Far Wall and the Archdemon
When you pass the "they walked in the mountains" door, you'll see a room with trees and two more doors.
Pick up three more SMALL BLUE GEMs here:
one by two rocks at the base of the middle tree.
another up in the left branch of that same tree.
an the third is in the roots of the tree on the right.
Go left to look at the far wall.
Insert each of the six gems into the sockets:
Screenshot: Blue gems in far wall
...when you do, the lock comes off.
Go back to the cell room. Here you can see the fiends are escaping.
Go through the left door to meet the archdemon and enjoy the rest of the story.
Posted by: elle |
November 7, 2012 11:36 AM
|
November 7, 2012 11:36 AM
Artifacts
As with many of your inventory items, you can use your shovel on everything just for kicks. But dig in the right spot and you'll uncover some artifacts (a little side quest mainly for the fun of it).
Here are the locations of three artifacts needed to become an "archaeologist":
Screenshot: artifact 1
Screenshot: artifact 2
Screenshot: artifact 3
Posted by: elle |
November 7, 2012 11:39 AM
|
November 7, 2012 11:39 AM