

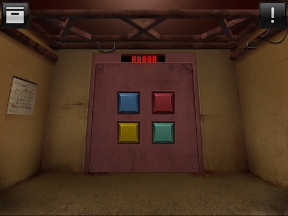
![]() Hey, you're trapped in a room! Where's that Nelson guy to laugh at you when you need him? You're not going to sit around and get mocked, though. You're clever, you're resourceful, and even though every time you leave the room you end up in an almost identical location, you're determined to get out. Doors&Rooms is a single-room point and click escape game by Gameday, creator of Escape the Room: Limited Time, that plays like a graphically-improved version of 100 Floors or DOOORS. Ready to get the heck outta here?!
Hey, you're trapped in a room! Where's that Nelson guy to laugh at you when you need him? You're not going to sit around and get mocked, though. You're clever, you're resourceful, and even though every time you leave the room you end up in an almost identical location, you're determined to get out. Doors&Rooms is a single-room point and click escape game by Gameday, creator of Escape the Room: Limited Time, that plays like a graphically-improved version of 100 Floors or DOOORS. Ready to get the heck outta here?!
 Doors&Rooms doesn't go the route of getting you to shake your mobile device all over the place. Instead, its puzzles are more traditional in style, requiring old fashioned deduction, logic, memory, and in some cases, quick thinking. The more details you pay attention to the better, keep that in mind while working through the few dozen levels currently available to play. In a fun twist, you can actually die in this game, so don't dawdle if you hear a suspiciously bomb-like ticking in the background!
The interface is entirely touch-driven and works just like you would expect. Tap an item to pick it up, then open your inventory to see what you've got. From here you can often examine, dismantle, combine or simply use items by tapping on the icons at the bottom of the screen. It's a bit of a hassle to go through several tap motions in order to use a key on a door, but when you have this much detail in the handling of inventory stock, it's worth a bit of awkwardness from time to time.
 Analysis: Doors&Rooms sets itself up in a long line of puzzle games that have been recently populating the iOS and Android marketplaces. The difference, though, is that there are no weird gimmicks or awkward ideas thrown in to make Doors&Rooms "stand out". Instead, it's just a good game with good puzzles that looks fantastic. It's nice to have a one-room escape game look great for a change, and Doors&Rooms does not disappoint. Most of the visuals look like they were ripped from a graphic novel, right down to the textures and shading.
An in-game hint system gives you three levels of purchasable tips each time you get stuck. Depending on how many coins you spend, the hints themselves are often like riddles, not necessarily giving you the answer outright but teasing you with new information that may or may not be inspirational. You start with a handful of coins and can earn more over time, but if you happen to run out, an in-app purchasing system can give you a quick refill.
High production values and smart puzzles that force you to think, not just parrot back information or go into a point and click-induced trance from all your years of playing these sorts of games. Multiple locations to play through, each with several chapters to complete, and more content in the pipeline. Doors&Rooms is a great mobile escape game you would do well to snatch up right away!
NOTE: This game was played and reviewed on an iPad. Game was available in the North American market at the time of publication, but may not be available in other territories. Please see individual app market pages for purchasing info.


Walkthrough Guide
(Please allow page to fully load for spoiler tags to be functional.)
Doors & Rooms Walkthrough
Chapter 1: Rusty Key
Level 1-1
Tap the door to open it.
Tap the doorway to escape.
Level 1-2
Tap the latch at the bottom of the door to zoom in.
Move the latch to unblock the door.
Tap the door to open it and tap the doorway to escape.
Level 1-3
Pick up the HAMMER on the floor.
Use the HAMMER to break the glass case.
Take the SPADE KEY at the bottom of the broken case.
Inspect the SPADE KEY in your inventory.
Note the spade symbol and the number 7 on the tag attached to the key.
Use the SPADE KEY to unlock the exit door.
Tap the door to open it and tap the doorway to escape.
Level 1-4
Open the top drawer of the cabinet.
Take the CAPSULE from the opened drawer, then inspect it in your inventory.
Select the CAPSULE and use "Dismantle" to take it apart, which will reveal the HEART KEY.
Note the heart symbol and the number 3 on the key's tag.
Use the HEART KEY to unlock the door.
Tap the door to open it and tap the doorway to escape.
Level 1-5
Pick up the BATTERIES on the floor.
Take the EMPTY REMOTE on the ground at the left side of the room, partially blocked by the pipes in the foreground.
Go into the Inventory, then select the BATTERIES and the EMPTY REMOTE and "Combine" them to complete the REMOTE.
Use the REMOTE on the hole at the bottom of the wall.
Take the CLUB key that the small robot carries out of the hole.
Inspect the CLUB KEY in your inventory.
Note the club symbol and the number 2 on the tag attached to the key.
Use the CLUB KEY to unlock the exit door.
Tap the door to open it and tap the doorway to escape.
Level 1-6
Pick up the NOTE on the floor.
Inspect the NOTE in your inventory.
Memorize the 4-digit combination written on the paper.
Tap the wall safe to zoom in.
Enter the combination from the note to open the safe.
Tap the buttons 2-5-3-1 to open the lock.
Screenshot
Take the DIAMOND KEY from the opened safe.
Inspect the DIAMOND KEY in your inventory.
Note the diamond symbol and the number 9 on the tag attached to the key.
Use the DIAMOND KEY to unlock the exit door.
Tap the door to open it and tap the doorway to escape.
Level 1-7
Take the PRESENT that is ticking on the floor.
Inspect the PRESENT in your inventory.
Dismantle the "PRESENT" to find the NOTE and the DYNAMITE.
Read the NOTE to learn that the door will open in 30 seconds.
Quickly open the top freezer door of the refrigerator.
Place the DYNAMITE into the freezer and close the door before the bomb explodes.
Tap the door to open it and tap the doorway to escape.
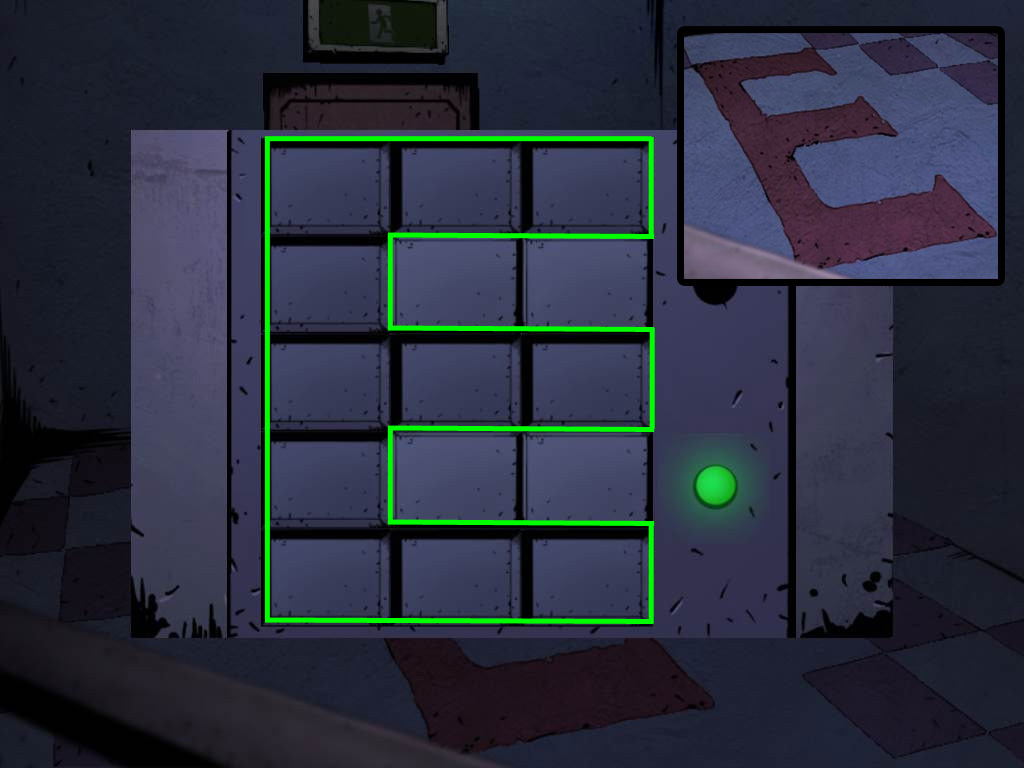
Level 1-8
Note the large "E" at the middle of the floor.
Tap the electric lock beside the door to zoom in.
Press the buttons to recreate the shape of the "E".
Screenshot
Tap the door to open it and tap the doorway to escape.
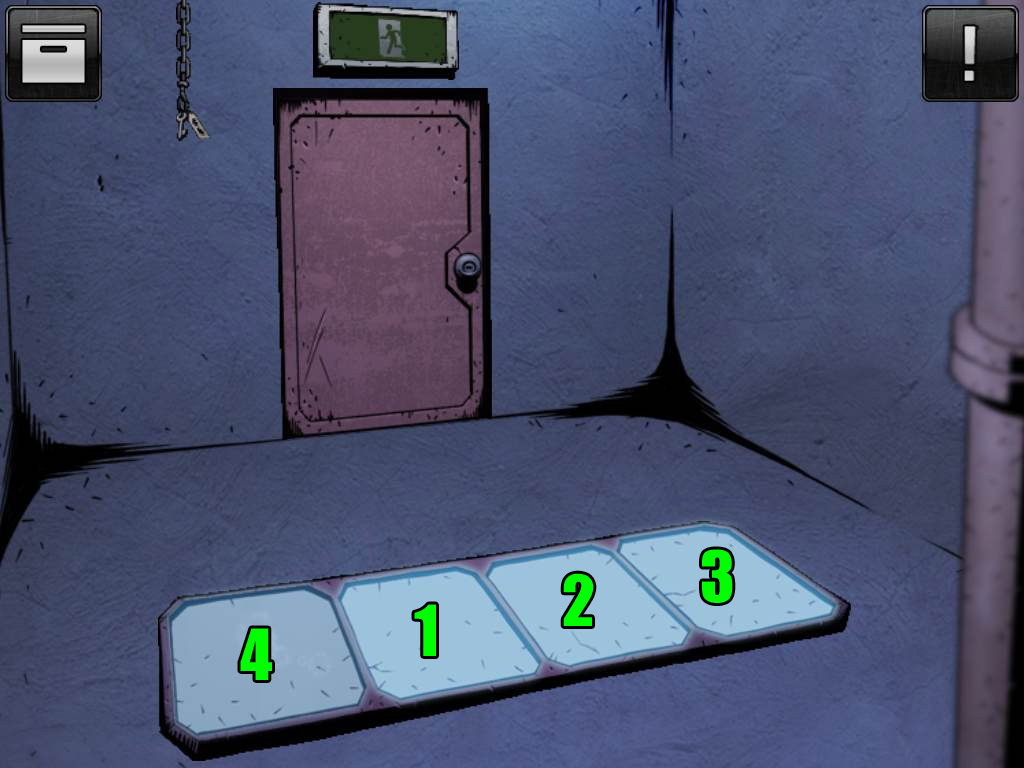
Level 1-9
Tap the squares on the floor in the correct order to light all of them simultaneously.
Use trial and erorr to find the solution; when the right square is tapped it will stay lit, but the wrong square will reset all of the lights.
The solution is randomized each game, so the following example is from my playthrough.
First, tap the middle left square.
Then tap the middle right square.
Next, tap the far right square.
Lastly, tap the far left square.
Screenshot
Take the SKULL KEY hanging from the chain.
Inspect the SKULL KEY in your Inventory.
Note the skull symbol and the number 4 on the tag attached to the key.
Use the SKULL KEY to unlock the exit door.
Tap the door to open it and tap the doorway to escape.
Level 1-10
Read the clue written on the right wall.
Tap the lock beside the door to zoom in.
On the lock you'll three important things: a blank combination in the middle, a key symbol at the top, and four playing card symbols at the bottom.
If you've been paying attention for the last few levels, these symbols should look very familiar.
Each of the four symbols is found with a corresponding number on the tags for the keys used to unlock the doors in the previous levels.
The SPADE KEY is found on Level 1-3, and its tag has the number 7.
The HEART KEY is found on Level 1-4, and its tag has the number 3.
The CLUB KEY is found on Level 1-5, and its tag has the number 2.
The DIAMOND KEY is found on level 1-6, and its tag has the number 9.
Enter the value of each key by pressing their matching symbol on the combination lock.
The solution is 7-2-3-9.
Screenshot
Tap the door to open it and tap the doorway to escape.
Chapter 2: Secret Door
Level 2-1
Tap the buttons in the correct order to open the panels at the top of the door and reveal the word "OPEN".
First press the farthest left button.
Next press the farthest right button.
Lastly, press the middle right button.
Screenshot
Tap the doorway to escape.
Level 2-2
Tap the calendar hanging on the left wall to zoom in.
Note the date "24" circled in red at the bottom left corner.
If you take a look at the door, you'll see it has four colored buttons in the middle and a sign that reads "CLOSE" at the top.
Press only the red button (it's the top right button) 24 times until the sign changes to "OPEN".
Tap the doorway to escape.
Level 2-3
Pull the lever on the right side of the door to play the slot machine.
Keep on pulling until you get 3 red keys in a row; it can take several tries before it lands on the right one.
Tap the doorway to escape.
Level 2-4
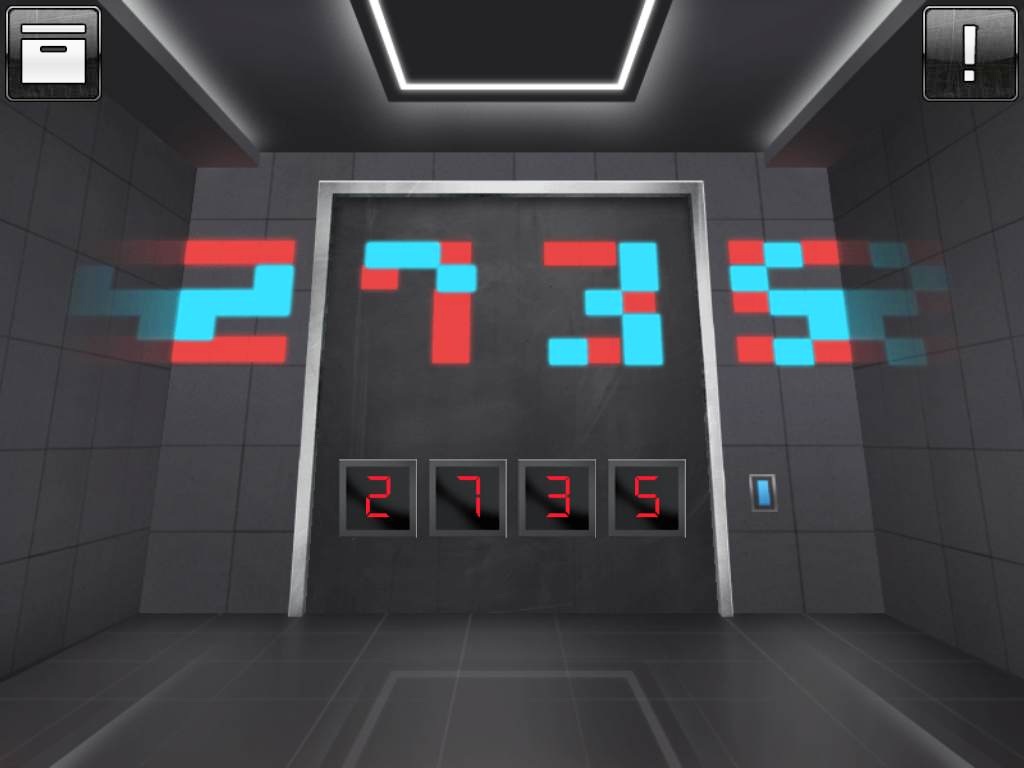
Note the red pattern on the wall above the combination lock.
Tap the blue button to switch off the lights.
You'll find that the red pattern has been replaced with bright blue patterns.
Combine the shapes of the red and blue patterns to find four numbers.
Ignore the reflections at the sides of the wall.
Enter the numbers into the combination lock to open the door.
Screenshot
Tap the doorway to escape.
Level 2-5
Look in your inventory to find a SILVER KEY.
Use the SILVER KEY to unlock the gate.
Tap the doorway to escape.
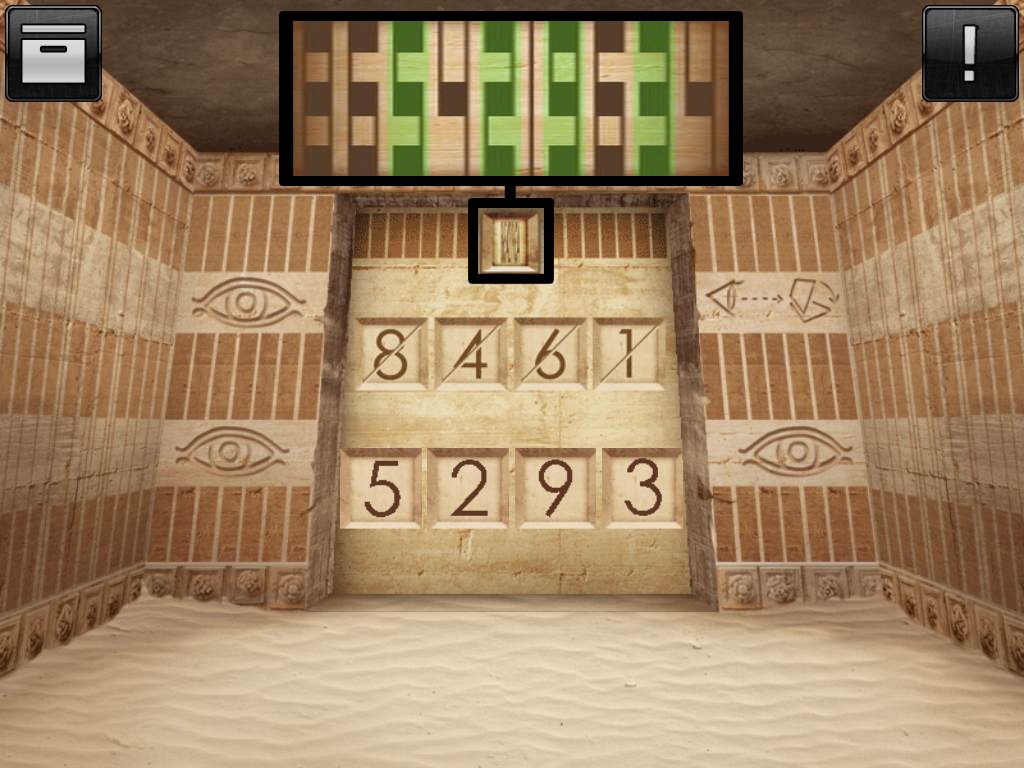
Level 2-6
Note the image at the upper right side of the door that depicts an eyeball looking at a device turned completely flat and face-up.
Tap the small panel at the top of the door to zoom in.
Tilt your device the same way depicted in the diagram; the rows of lines and blocks will now look like stretched-out numbers.
From left to right, the numbers read: 8-6-5-4-2-1-9-6-3-4
Note that there are four crossed-out numbers above the combination lock on the door: 8, 4, 6, and 1.
Remove those numbers from the list you viewed earlier to find the final combination.
After taking out all the crossed numbers, the remaining digits are: 5-2-9-3.
Screenshot
Tap the doorway to escape.
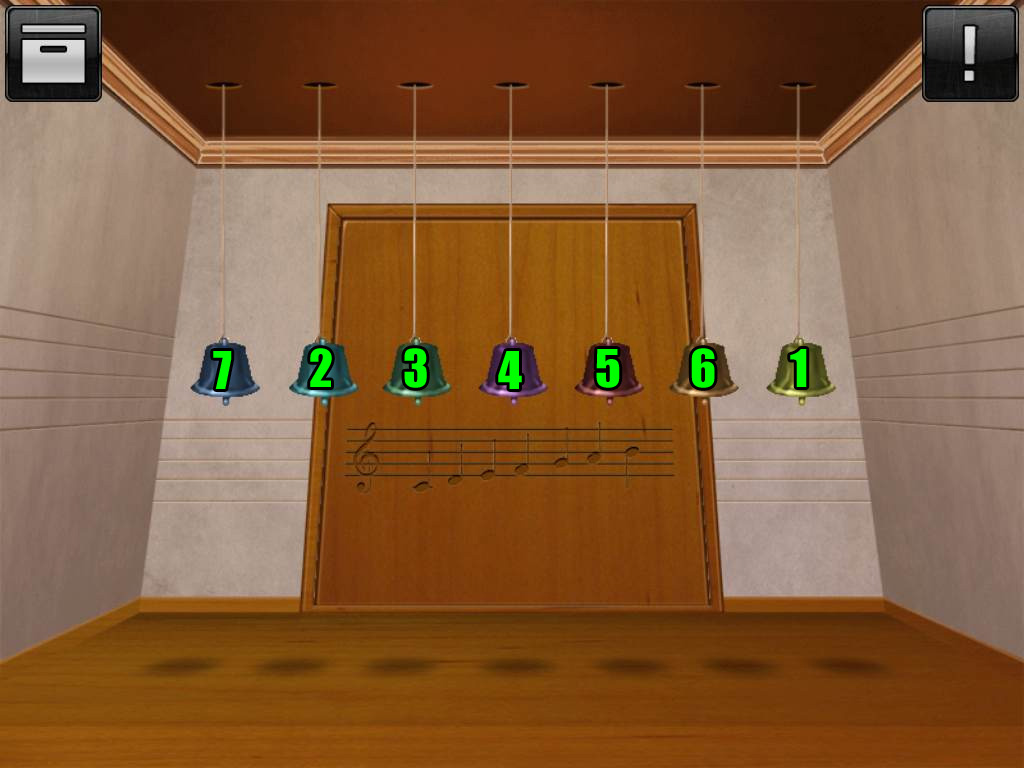
Level 2-7
You will need to enable sound effects to complete this level.
Note the scale carved on the door.
Tap the bells to hear the note that each of them plays.
Play the bells in order of lowest to highest to open the door.
Tap the colored bells in the following order: Yellow - Teal - Green - Purple - Red - Orange - Blue
Screenshot
Tap the doorway to escape.
Level 2-8
Tap all around the piles of treasure to find the GOLD COINS.
Note the eagle relief on the door.
Inspect the GOLD COINS in your inventory and find the coin that is identical to the eagle on the door.
Pay attention to details like the direction the head is facing, the wings, the talons, and the crest at the middle.
Enter the 4 digit number on the matching coin into the combination lock at the bottom of the door.
Screenshot
Tap the doorway to escape.
Level 2-9
Note the timer at the top of the track.
Press the "START" button in the middle of the track.
Wait exactly three seconds, then press the "STOP" button to pause the timer.
If you stopped precisely at the correct time, the exit door will open.
Tap the doorway to escape.
Level 2-10
Set each square to the correct value to balance the scale.
Each number (from 1-5) is only used once.
The solution takes a bit of a leap of logic: "Weight '1, 2, 3' doubles each time you are away from the center of the balance by 1.
In the top row, set the left square to 3 and the right square to 5.
In the bottom row, set the left square to 1, the middle square to 2, and the right square to 4.
Screenshot
Chapter 3: Silent Hospital
Level 3-1
Open the box on the ground to find the AIR CANISTER.
Tap the license plate at the back of the ambulance to zoom in.
Use the AIR CANISTER on the grime covering the plate to clean off the last four numbers.
Inspect the padlock chained to the back doors of the ambulance.
Enter the combination found on the license plate to open the lock: 5-7-2-8.
Screenshot
Open the ambulance back doors and take the CROWBAR on top of the stretcher.
Use the CROWBAR to open the passenger door at the front of the ambulance.
Tap the steering wheel inside the car to zoom in.
Switch the ignition to the "ON" position.
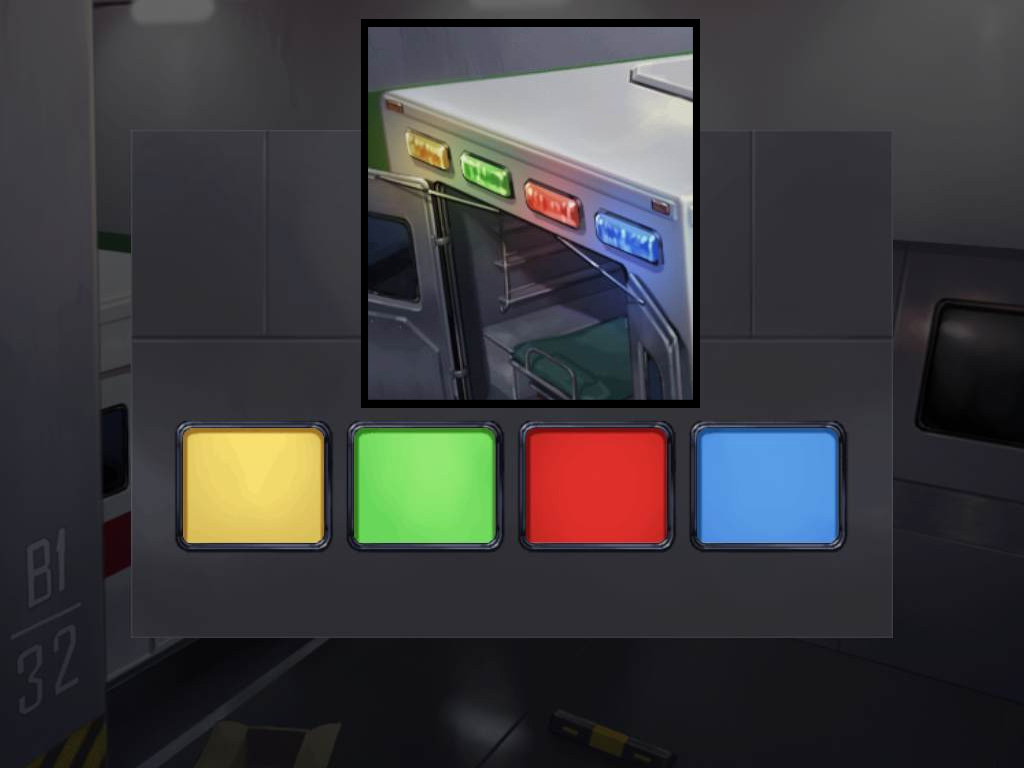
Note the order of the four colored lights at the top of the ambulance's rear section.
Tap the electric lock next to the doors to zoom in.
Press the buttons to change their colors and match the pattern seen at the back of the ambulance.
From left to right the order is Yellow - Green - Red - Blue.
Screenshot
Tap the door to open it and tap the doorway to escape.
Level 3-2
Take the CD CASE from the lower left compartment.
Select the CD CASE in your Inventory.
"Dismantle" the case to extract the PASSWORD CD.
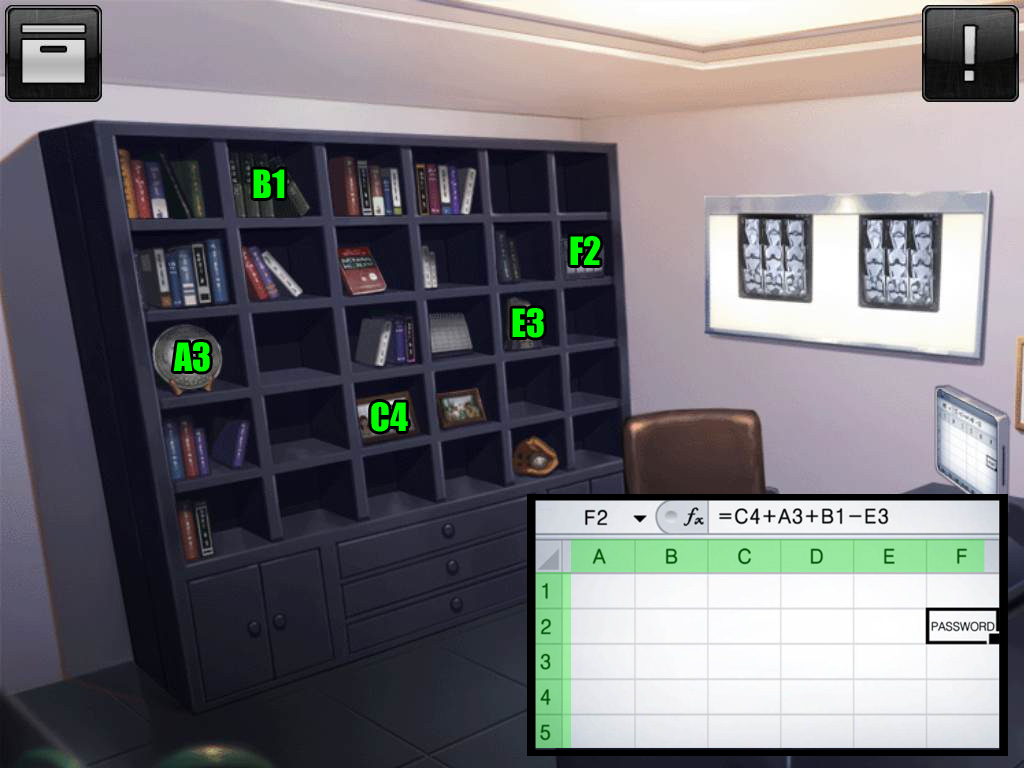
Use the PASSWORD CD on the monitor, then tap the screen to view the spreadsheet.
Note the equation in the top bar: "fx = C4 + A3 + B1 - E3" and the "PASSWORD" square at F2.
Each coordinate on the spreadsheet correlates to one of the compartments in the rows of shelves.
First find the C4 cubby.
Locate the 3rd column from the left and the 4th row down.
Tap the framed picture to zoom in.
Note the four digit number at the lower right corner: 1221
Next find the A3 cubby.
Locate the first column on the left and the 3rd row down.
Tap the commemorative plate to zoom in.
Note the date at the bottom of the plate: 1983
Thirdly, find the B1 cubby.
Locate the second column from the left and the top row.
Tap the four green books to zoom in.
Note the numbers on the spine of each book: 2485
Then find the E3 cubby.
Locate the 5th column from the left and the 3rd row down.
Tap the small stone award to zoom in.
Note the date at the bottom of the award: 2012
Lastly, find the F2 cubby.
Locate the far right column and the second row down.
Screenshot
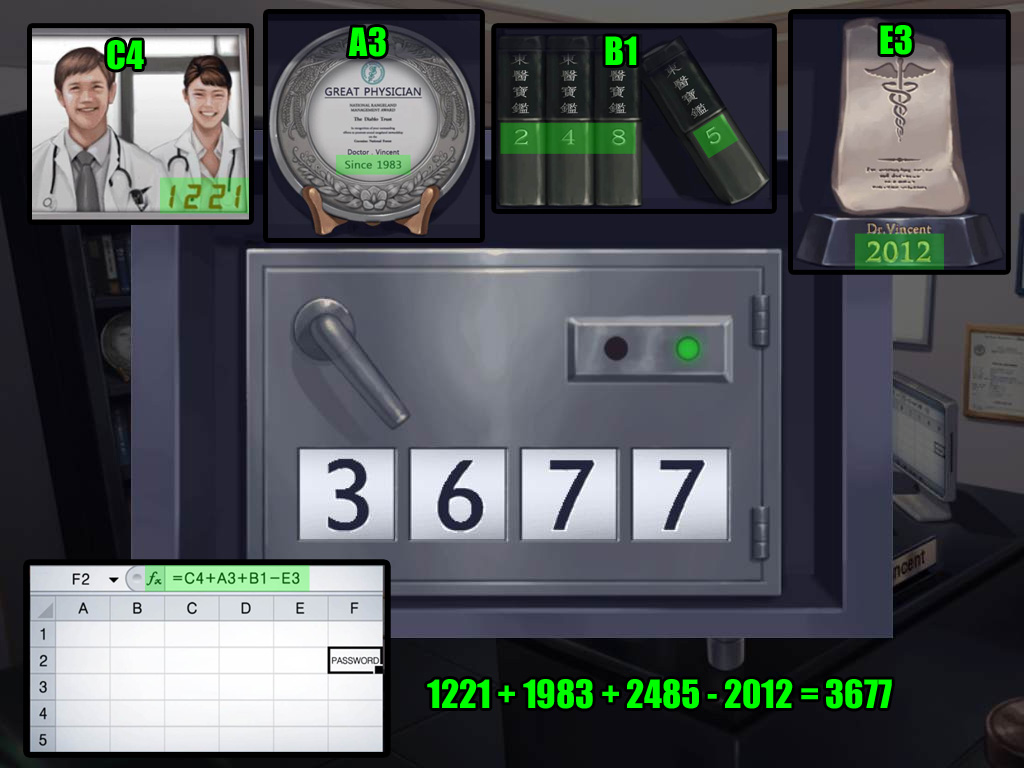
Tap the safe to zoom in.
Substitute the values of the objects in each cubby into the equation found on the monitor.
fx = C4 + A3 + B1 - E3 becomes fx = 1221 + 1983 + 2485 - 2012
fx = 3677
Enter the solution into the combination lock to open the box.
Screenshot
Take the KEY from the opened safe.
Use the KEY to unlock the door.
Tap the door to open it and tap the doorway to escape.
Level 3-3
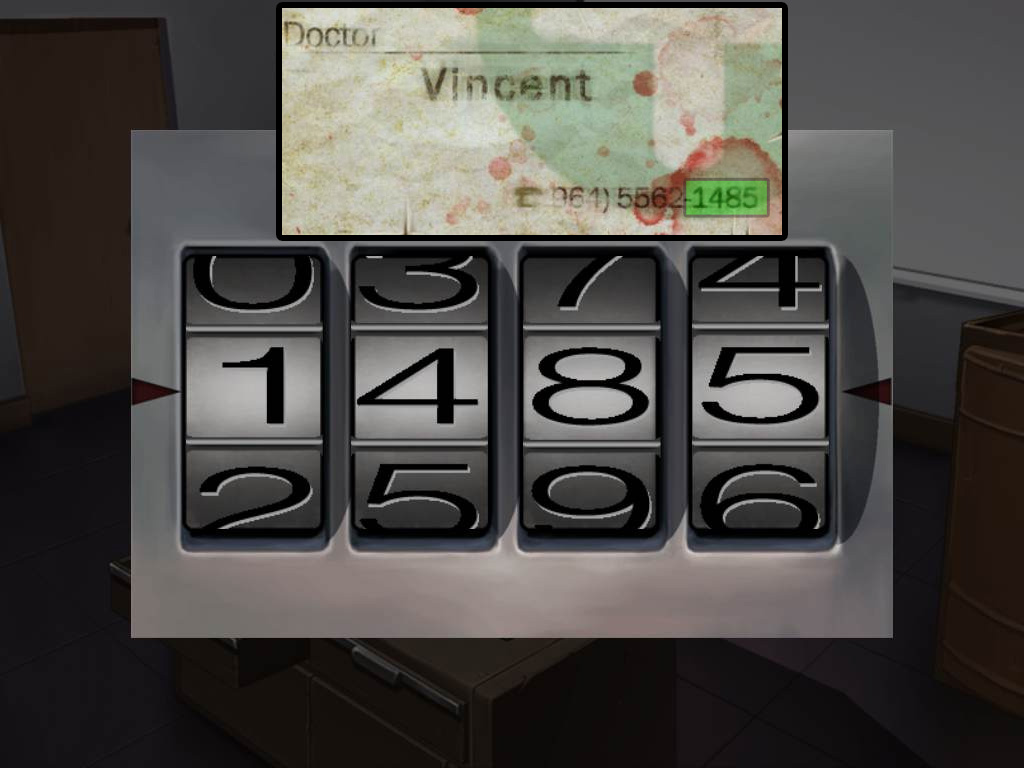
Take the PATIENT CHART tucked under the lockbox.
Open the left drawer under the projector to find the BUSINESS CARD.
Observe the business card in your Inventory.
Note the telephone number at the bottom right corner: (961)5562-1485
Tap the lockbox to zoom in.
Enter the last four digits of the phone number into the combination lock.
Screenshot
Take the FLASH DRIVE from the opened lockbox.
Tap the top of the projector to zoom in.
Insert the FLASH DRIVE into the right socket at the corner.
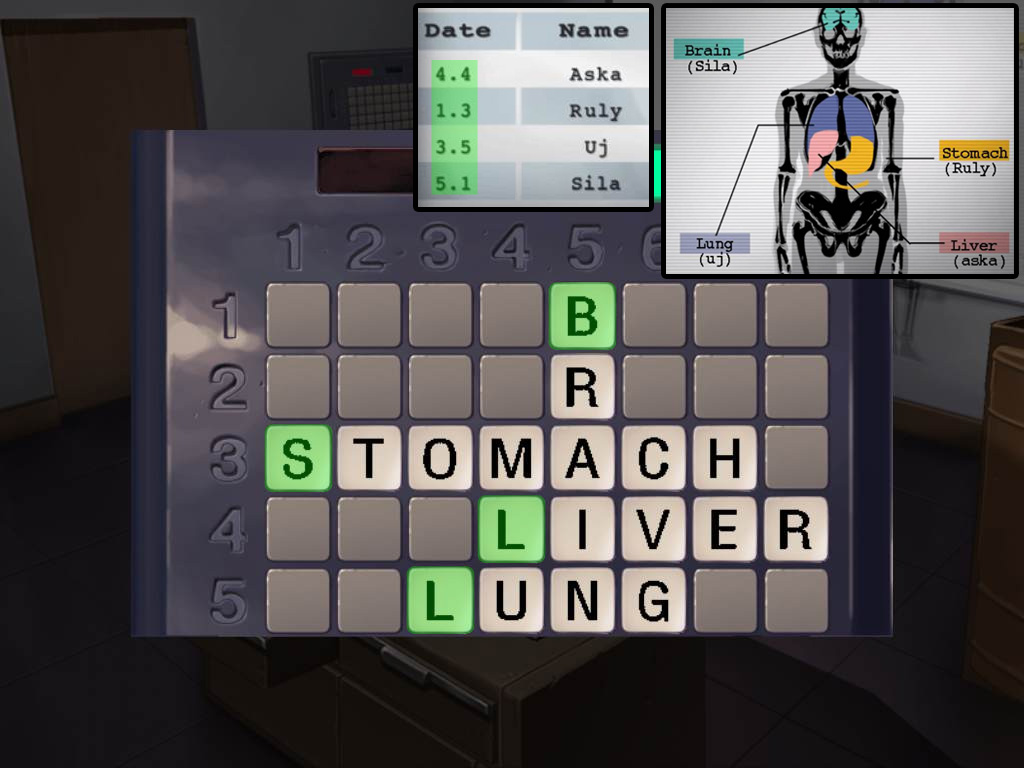
Inspect the projected image on the screen.
Note the four body parts indicated in the diagram: Brain (Sila), Stomach (Ruly), Lung (Uj), and Liver (Aska).
Observe the PATIENT CHART in your Inventory.
You'll find that the names of the patients on the chart are identical to the words beside the body parts on the projected diagram.
Take note of the date beside each name.
Aska: 4.4
Ruly: 1.3
Uj: 3.5
Sila: 5.1
Tap the large grid on the left wall for a closer look.
Using the dates from the patient list as a set of coordinates, find the correct starting points for each name.
The first number indicates the column and the second number indicates the row.
At 4,4 you'll find the letter L.
At 1,3 you'll find the letter S.
At 3,5 you'll find the letter L.
At 5,1 you'll find the letter B.
Combine that information with what you know from the projected body diagram and how the names relate to the organs.
Thus, you can infer that each letter is the first in the words: Liver, Stomach, Lung, and Brain.
Tap the squares around those starting letters on the grid to spell out each of the key words.
Screenshot
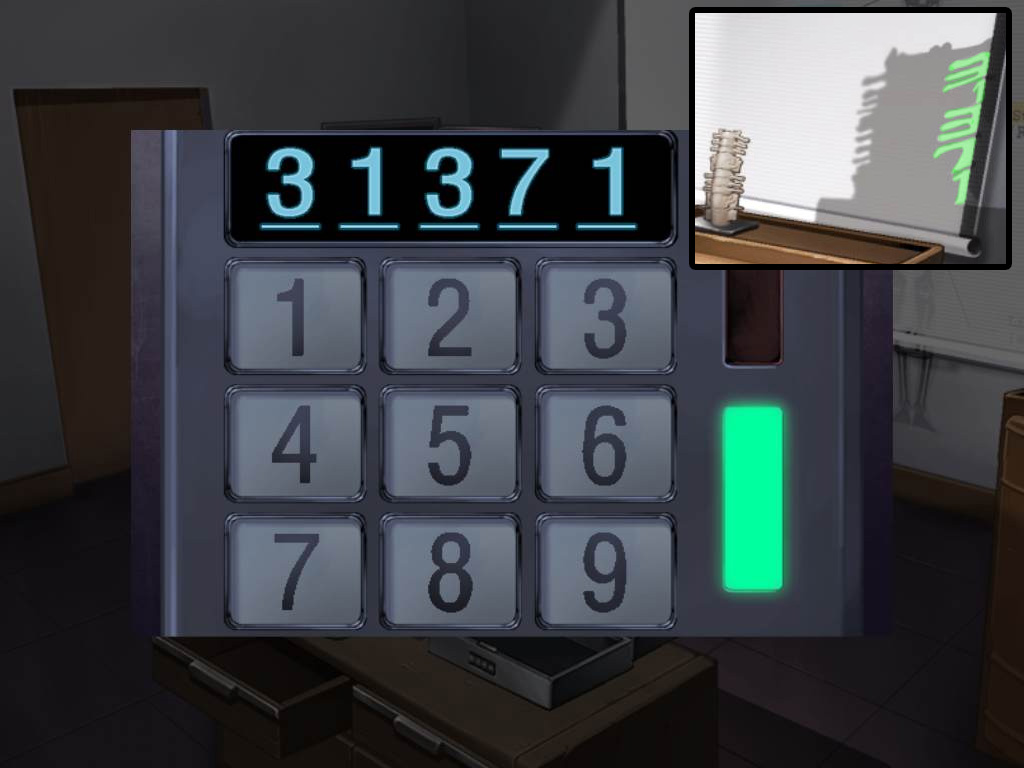
Take the MODEL SPINE from the revealed cache.
Inspect the MODEL SPINE in your inventory and note the word "SHADOW" written on the bottom.
Place the MODEL SPINE on top of the podium in front of the projector screen.
Look at the right side of the spine's shadow to find a 5-digit code.
Tap the combination lock beside the exit door to zoom in.
Enter the code found from the spine's shadow into the lock: 31371.
Screenshot
Tap the door to open it and tap the doorway to escape.
Level 3-4
Pick up CUBE A on top of the sofa cushion.
Tap the microwave to open the door and find CUBE C.
Take CUBE D from the corner pocket of the billiard table.
Pick up CUBE B on the floor in front of the exit door.
Take the CRUMPLED PAPER at the top of the garbage pile in the wastebin.
Select the CRUMPLED PAPER in your Inventory.
"Dismantle" the paper to separate the CUBE E and the COLORED NUMBERS PAGE.
Take the CUE HANDLE on top of the billiard table.
Pick up the CUE SHAFT on the floor to the left of the sofa.
Select the CUE HANDLE and CUE SHAFT in your Inventory.
"Combine" the two pieces to complete the POOL CUE.
Use the POOL CUE on the vent in the ceiling to drop a coin on the floor.
Tap the COIN where it lands to add it to your inventory.
Use the COIN on the coin slot in the vending machine.
Take the SODA CAN from the dispenser at the bottom of the vending machine.
Tap the small metal door on the wall to open it, then click the revealed circuit panel to zooom in.
Use the clues from the CUBES and the SODA CAN to arrange the wires in the correct order.
Tap a wire from the numbered side on the left or the alphabetized side on the right to select it, then tap the correct colored square at the middle to connect the circuit.
Start by inspecting the CUBE in your inventory.
CUBE A has an orange band, so attach the A wire to the orange square.
CUBE B has a red band, so attach the B wire to the red square.
CUBE C has a purple band, so attach the C wire to the purple square.
CUBE D has a white band, so attach the D wire to the white square.
CUBE E has a blue band, so attach the E wire to the blue square.
Next, observe the details at the side of the SODA CAN.
There is 1 white dot, so attach the 1 wire to the white square.
There are 2 orange dots, so attach the 2 wire to the orange square.
There are 3 blue dots, so attach the 3 wire to the blue square.
There are 4 purple dots, so attach the 4 wire to the purple square.
There are 5 red dots, so attach the 5 wire to the red square.
Screenshot
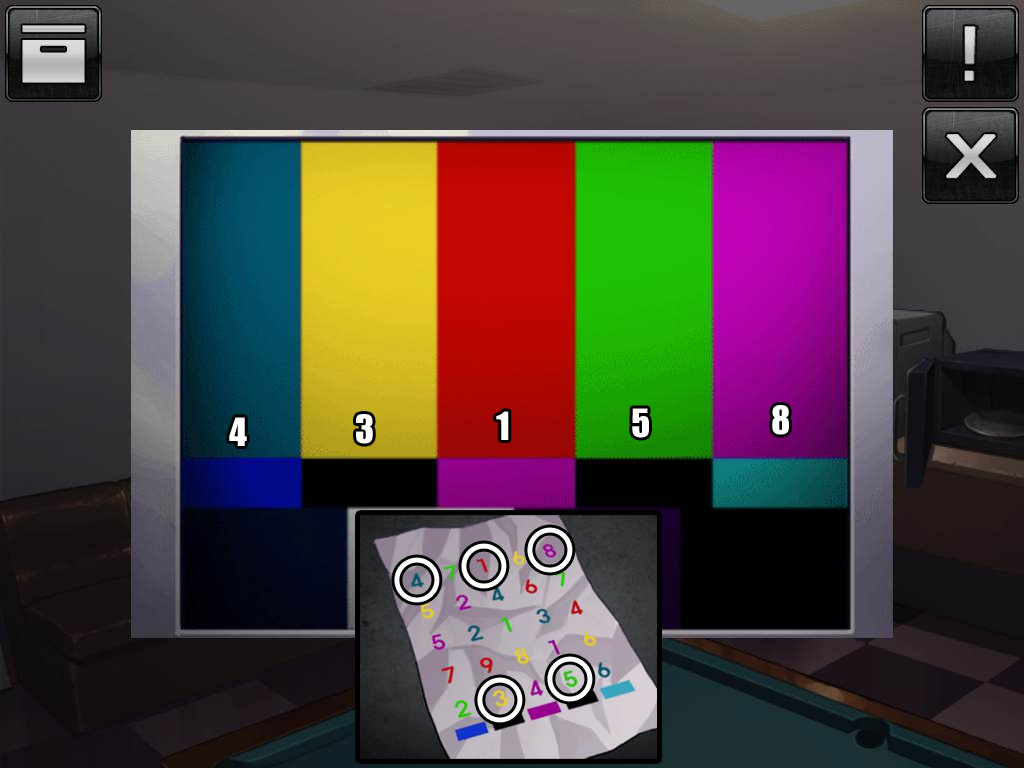
Tap the television screen to zoom in. Note the pattern of colors above the row of thin rectangles.
Combine that pattern of colors with the COLORED NUMBERS PAGE in your inventory to find a 5 digit number.
Above the thin blue rectangle is a teal bar.
The teal number over the thin blue rectangle on the paper is 4.
Above the left thin black rectangle is a yellow bar.
The yellow number over the black rectangle on the paper is 3.
Above the thin purple rectangle is a red bar.
The red number over the purple rectangle on the paper is 1.
Above the right thin black rectangle is a green bar.
The green number over the black rectangle on the paper is 5.
Above the thin turquoise rectangle is a purple bar.
The purple number over the turquoise rectangle on the paper is an 8.
Combine all of the numbers from left to right: 4-3-1-5-8.
Screenshot
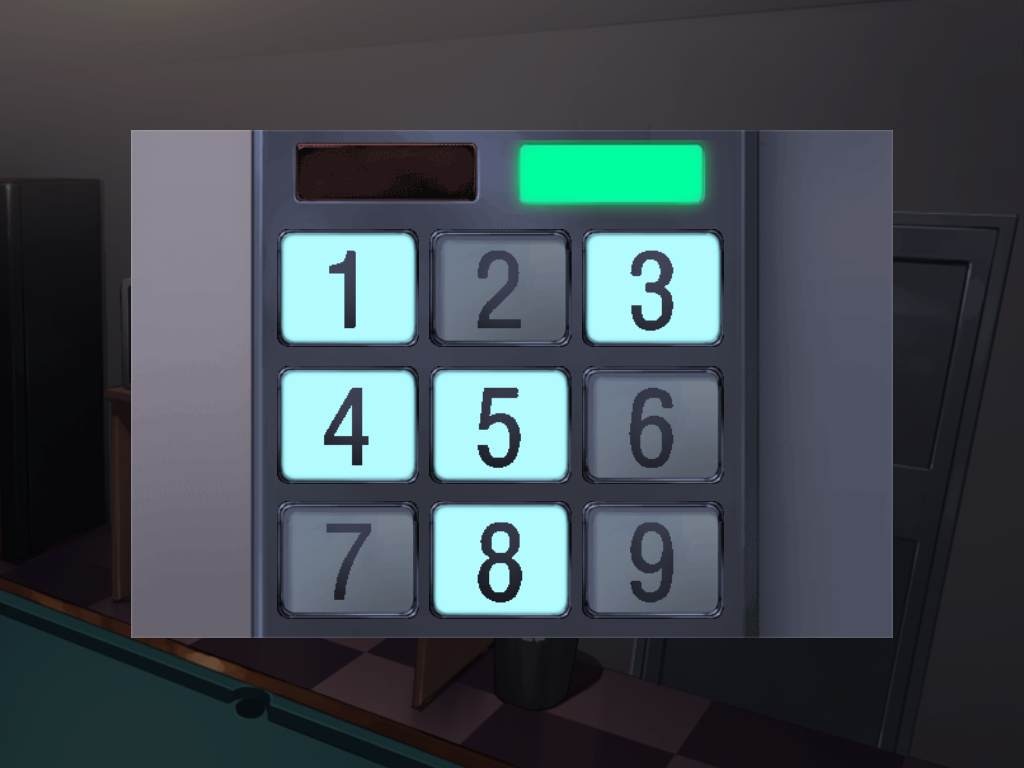
Tap the electric lock on the wall beside the exit door to zoom in.
Press the buttons to enter the combination found using the television clue.
Screenshot
Tap the door to open it and tap the doorway to escape.
Level 3-5
Take the SCALPEL from the tray of surgeon's tools on top of the cart at the lower left corner of the room.
Remove the shroud on the operating table to reveal the teddy bear.
Use the SCALPEL to cut through the teddy bear's body.
Tap the hole in the bear to zoom in.
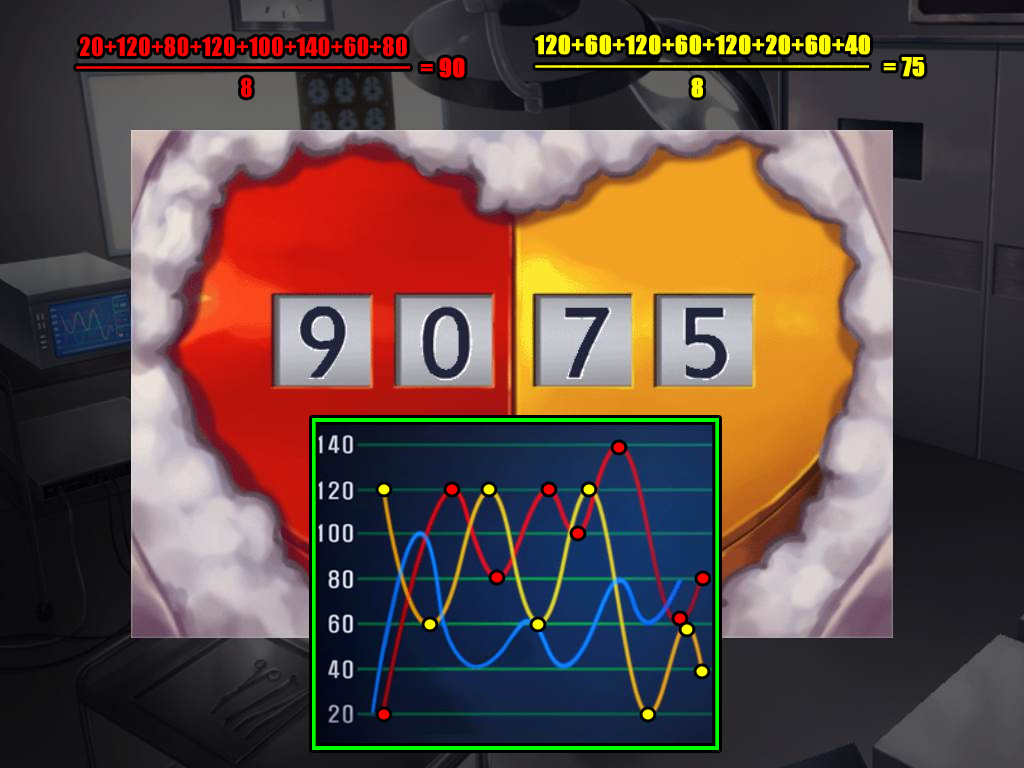
You'll see a heart split into a red half and yellow half with a pair of two digit numbers on each side.
Inspect the screen of the heart monitor.
Note the blue frequency pattern on the meter and the average heart rate in the top box.
Find the blue and yellow heart rates by calculating their average frequencies on the meter.
The points of the yellow line are: 120, 60, 120, 60, 120, 20, 60, 40.
Add all of the numbers together and divide them by 8 to find the average yellow heart rate.
The points of the red line are 20, 120, 80, 120, 100, 140, 60, 80.
Again, calculate the sum of all numbers and divide that total by 8 to find the average red heart rate.
Tap the bear's chest again for a closer look.
Enter the average red heart rate on the left side: 90
Enter the average yellow heart rate on the right side: 75
Screenshot
Take the CARD KEY from the opened heart.
Take the X-RAY from the side of the sink beside the door.
Hang the X-RAY on the light screen under the clock, then tap it to zoom in.
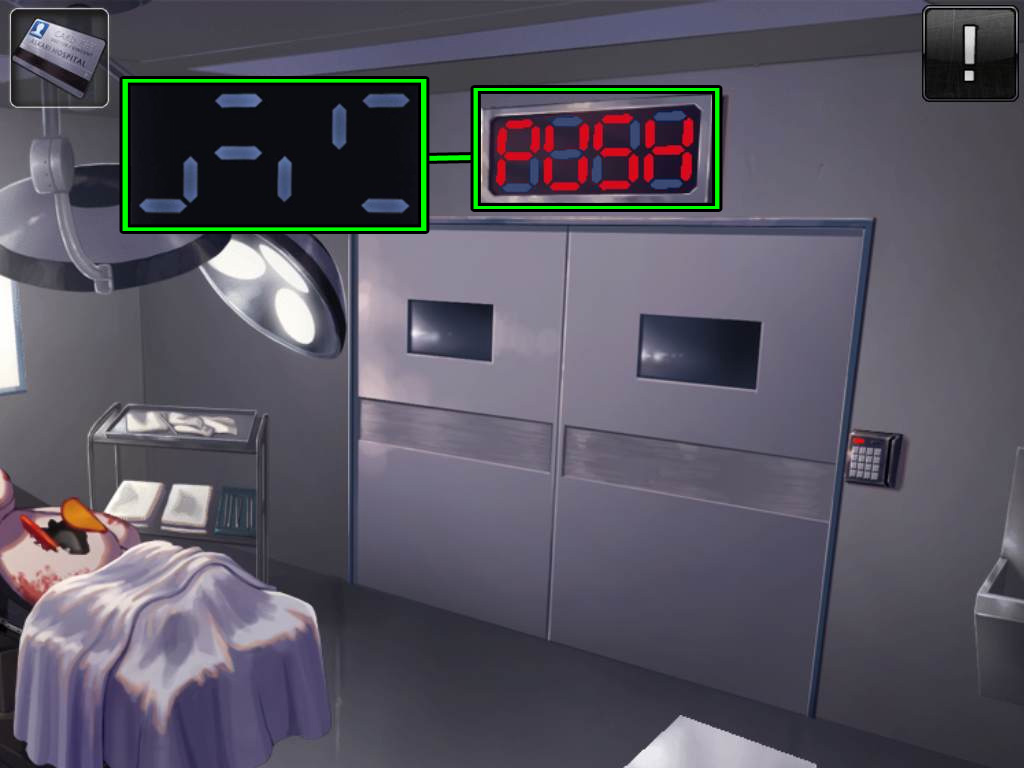
Note the pattern of lines at the middle of the picture.
Use the CARD KEY on the electric lock next to the exit door.
A red sign above the door will illuminate, showing the number 8 four times.
Combine the clue from the x-ray image to the red sign.
Remove the indicated segments from their corresponding 8 symbol to find the hidden message.
Screenshot
Tap the lock beside the exit door to zoom in.
Enter the 4 letter word "PUSH" from the red sign to open the lock.
Screenshot
Tap the doorway to escape.
Level 3-6
Move the pillow on the left bed aside to find the PAPER, then observe it in your Inventory.
Note the triangular shape with Red on top, Green on the left, Blue on the right, and an X in the middle.
Also take note of the instructions "ERASE & CUT" at the bottom of the paper.
Pick up the BOTTLE OF PAINT CLEANER on the floor in front of the radiator.
Take the CLOTH on top of the right bed.
Select the CLOTH and the BOTTLE OF PAINT CLEANER in your Inventory.
"Combine" the two items together to complete the WET CLOTH.
Open the drawer in the end table between the two beds to find the BOX CUTTER.
Tap the laptop on the left bed to zoom in.
You'll find that it's password protected with a hint: "OPEN WINDOW".
Take the PULL STRING hanging over the side of the IV stand.
Use the PULL STRING on the right side of the blinds to add them to the window.
Tap the string to lift the blinds and uncover the windows.
Study the symbols on each side of the window.
Combine the two halves to find the hidden message.
From top to bottom, it spells P-L-E-D-G-E.
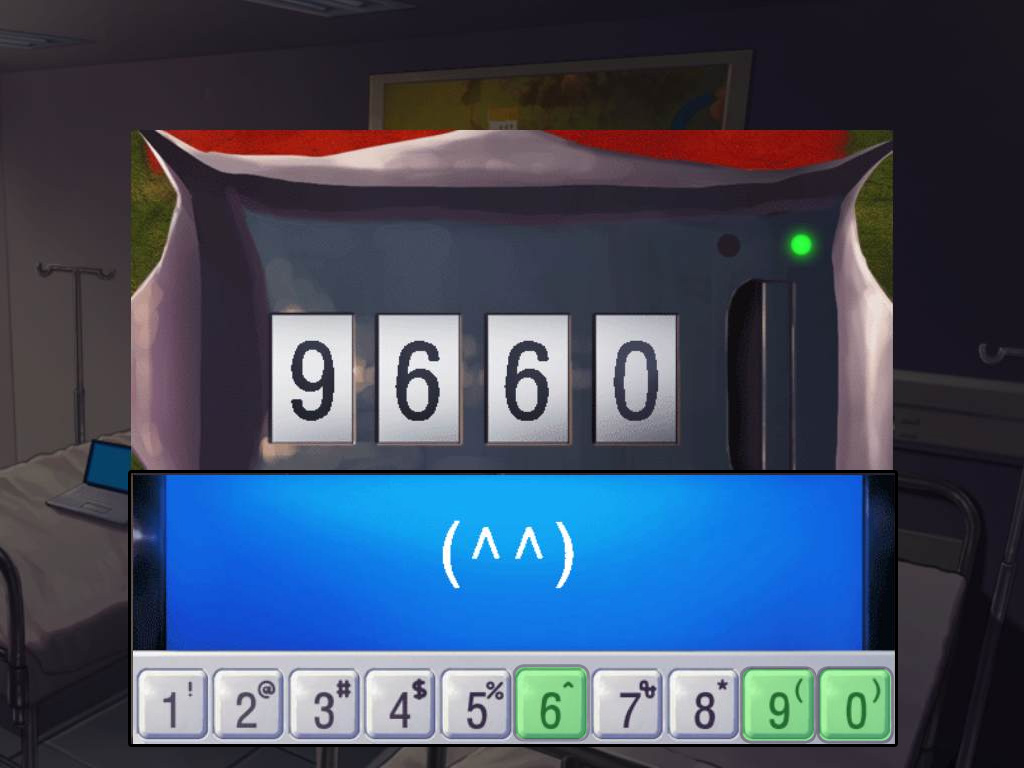
Tap the laptop on the bed to zoom in.
Enter the password you found on the window: PLEDGE
Screenshot
After you've entered the laptop password, note the four symbols that appear on the screen.
Find the four symbols on the keyboard, then identify their corresponding numbers.
The left parenthesis is on the 9 key.
The caret symbol is on the 6 key.
The right parenthesis is on the 0 key.
Tap the painting on the wall to zoom in.
Use the clue from the PAPER to find the correct location.
Look for an area that has red at the top, green at the left, and blue at the bottom.
Use the WET CLOTH on the red-roofed house between the garden and the river to uncover the hidden spot.
Use the BOX CUTTER on the revealed X mark to cut through the painting and uncover a safe lock.
Refer to the clue from the laptop and enter the correct combination into the lock.
Enter the four numbers found on the laptop keyboard on the same keys as the symbols that make the emoticon on the laptop screen: 9-6-6-0.
Screenshot
Take the KEY from the opened safe.
Use the KEY to unlock the window.
Tap the left windowpane to open the window.
Take the ROPE on the floor underneath the right bed.
Use the ROPE on the radiator to tie it together.
Tap the open window to escape.
Level 3-7
Take the blue bottle of ANTI-A SOLUTION on the wall shelf between the two cabinets.
Open the left cabinet door to find the white bottle of ANTI-D SOLUTION.
Open the middle shelf on the far right side under the counter to find the yellow bottle of ANTI-B SOLUTION.
Tap the blood slides on the counter to zoom in.
Use all the SOLUTIONS in your Inventory on the blood samples to test their results.
Note whether the blood sample results under each column change to brown or yellow.
Next, refer to the chart on the wall beside the exit door.
Compare the results of the blood samples with the examples on the chart to find the blood type of each patient.
Sila is Type AB.
Uj is Type RH-O.
Ruly is Type A.
Aska is Type RH-A.
Miro is Type B.
Max is Type O.
Open the cooler under the right cabinet to find the BLOOD SLIDE.
Open the bottom drawer of the left row under the counter and take the OBJECTIVE LENSES.
Open the middle drawer in the middle row under the counter to find the MIRROR.
Add the BLOOD SLIDE, OBJECTIVE LENSES, and the MIRROR to the microscope on the table.
Take the PAPER wedged between the black canisters on the storage shelf.
Observe the PAPER in your inventory.
You'll see three samples each containing three different kinds of cells: dark cells, light cells, and mutated cells.
Under each sample is a value; the left sample is 12, the middle sample is 14, and the right sample is 10.
Using the sum of each sample, solve to find the value of each different type of cell.
Imagine the Dark Cells = X, Light Cells = Y, and Mutated Cells = Z.
The first sample equation would therefore be 2x + 2y + 2z = 12.
The second sample equation would be 2x + 2y + 4z = 14.
The third sample equation would be 3x + y + z = 10.
X(dark) = 2
Y(light) = 3
Z(mutated) = 1
Tap the microscope to view the cells in each patient's blood slide sample.
Using the cell values you just found on the paper, calculate the total amount of each patient's blood.
Aska has 2 dark, 1 light, and 2 mutated cells for a total value of 9.
Uj has 2 dark and 2 mutated cells for a total value of 6.
Sila has 1 dark, 1 light, and 1 mutated cells for a total value of 6.
Ruly has 3 light cells for a total of 9.
Miro has 3 dark and 1 distorted cells for a total of 7.
Max has 1 dark and 3 distorted cells for a total of 5.
Tap the lock on the exit door to zoom in.
Note the list of blood types at the top of the lock.
From left to right, enter the value of each blood type.
Use the clues from the blood type samples and the microscope cell samples to find the solution.
Remember that Uj is Type RH-O with a value of 6. Press the 6 button first.
Ruly is Type A with a value of 9, so press the 9 button next.
Miro is Type B with a value of 7, so press the 7 button next.
Aska is Type RH-A with a value of 9, so press the 9 button again.
Max is Type 0 with a value of 5, so press the 5 button next.
Sila is Type AB with a value of 6, so press the 6 button lastly.
The final combination should be: 6-9-7-9-5-6.
Tap the door to open it and tap the doorway to escape.
Thanks to Trinn for the walkthrough!
Posted by: Mike |
November 23, 2012 2:13 PM
|
November 23, 2012 2:13 PM