JayisGames.com is now available ad-free!
Jay is Games recommends Cheat Happens with 8,000+ games and 35,000+ trainers!

Triangle


  • Currently 3.8/5
  • 1
  • 2
  • 3
  • 4
  • 5
Rating: 3.8/5 (93 votes)
Comments (79) | Views (14,199)

Weekday Escape

SonicLoverOkay, Triangle probably isn't actually the name of this escape game by SuzumeDr. Its actual name, as far as I can tell, is "?" (a solid black equilateral triangle), but I'll be darned if I can figure out how to type that into the title box, so let's settle for the word the symbol represents: Triangle.

soniclover_triangle_screenshot.gifIt's played just like most escape games. Explore the room, pick up various items, solve various puzzles, and eventually regain your freedom. To use an item, click it once and then click the environment; to examine it closer, double-click.

So what's different about this one? The atmosphere. Triangle is absolutely charming. Its atmosphere is decidedly different from practically every escape game I've ever played before, and for someone who's played as many as I have that's a feat.

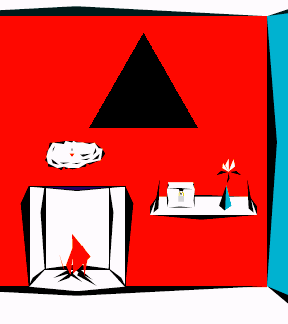
The graphics are almost entirely made out of triangles (hence the name, I presume), and 90% of it is either black, white, or red. Most of the sound effects seem to have been recorded using percussion instruments, which has a charm all to itself (my personal favorite is the "dee-dee dee-dah" that means "you try to open this thing, but it's locked").

But the meat of an escape game is its puzzles, and Triangle is strong here as well. Every puzzle is fairly intuitive, but still a bit challenging. There are touches of originality, but also a few samples of the familiar, including the mandatory arithmetic puzzle that will send you rushing for a calculator. The little extra touches, like how used items show up on the nightstand next to the door, don't go unappreciated either.

Triangle is not a game to be missed, unless you're a square. Or a circle, or a pentagon.

Play Triangle

Walkthrough Guide


(Please allow page to fully load for spoiler tags to be functional.)

Walkthrough

1. Turn right. Look on top of the dresser, for the rosette puzzle.
Rosette Puzzle:

The outer layer has 12 numbers, the middle layer 6 numbers, and the inner layer asks you for 3 numbers. Compare the middle layer to the outer layer: the sum of the two numbers that lay on top of each number of the middle layer equals that number. So, 5 and 8 on the top layer will overlap 3 on the middle layer (5 + 8 = 13 => 3). That's the pattern, repeat it to get the numbers for the code. Because many numbers are symmetrical, make sure you read the number from the vantage point of the center of the circle. The numbers change between games.

2. Open the top drawer, get the magnet, and note the number in the white triangle with the black border.

3. Take the magnet, and attach it to the "NS" on the compartment to the left of the fireplace. It becomes a handle. Open and solve the puzzle inside.

As you click the pieces, you hear "twinkle twinkle little star." That's the clue: arrange the red pieces so that they outline a star (i.e., the star is white, made of negative space).

4. The compartment below unlocks. Open it and take the tongs from inside.

5. Use the tongs to get the can from the fireplace.

6. Go above the fireplace, and click the red triangle. Take the note. Look at it; notice that it is "Morning" and "Night" except with one letter missing from each word. The missing letter changes between each game.

7. Turn left to face the door. Look in the top right drawer of the bureau there. Get the triangle piece.

8. Turn left, and go to the panel on the wall. Install the triangle piece below the large rectangle. It becomes a button. Click once. Solve the owl/rooster puzzle.
Owl/Rooster puzzle:

Check the note from step 6. The missing letter from "Night" is the letter you input beneath the owl, and the missing letter from "Morning" is the letter you input beneath the rooster.

9. You will hear a ding. Press the triangle button twice (ignore the pig/dog/cat puzzle for now), and then click the left compartment. Take the Swiss Army Knife.

10. Open the swiss army knife to the can opener, then double-click on the can in your inventory, and use the can opener on it. Note the "X" underneath the lid of the can. Click on the can to shake it out, a key comes out marked with a cross.

11. Use this key on the bottom drawer of the bureau to the left of the door. Note the number in the white triangle, and take the remote. Press the remote button, and a red string comes down from the ceiling.

12. Open the Swiss Army Knife to the key. Notice that the symbol on the tool is the same as the symbol on the lock on the shelf to the right of the fireplace. Use the key on this lock. Open the box and take the half-teardrop shape. Turn over the object, and take out the key embedded there. Note the sun-shaped symbol on the key.

13. Go to the sofa. Click on its ride side (a hidden hotspot). Use the key there. Open the drawer beneath the sofa, take the sun-shaped object, and look inside the notebook. The notebook is a clue for the combination to the safe to the left of the door.
Safe puzzle:

The symbols in the notebook are:
-white triangle with a red border
-white triangle with a blue border
-blue triangle
-white triangle
-white triangle with a black border
Note that some triangles may be inverted.
Match these symbols around the room, making sure to match the orientation of the triangle in the book. To find the five symbols:
-Look at the triangular shelf in the corner to the right of the sofa. On it is an E, which, flipped around, is a "3" (this seems to be the same for every game).
-Look on the left side of the couch (another hidden hotspot). Use the magnifying glass in the Swiss Army Knife on the small blue triangle to see the number.
-Look on the inside of the can's lid. It's an "X".
-Look in the bottom drawer of the bureau to the left of the door. Make sure
-In the dresser beneath the rosette puzzle, open the top drawer, then click it again to pull it out.
You get two two-digit numbers multiplied together. The product is the combination for the safe to the left of the door.

14. Open the safe, take the odd mechanical-hand device inside. Go to the remote, turn it over, take out the battery, and put the battery inside the odd device. Put the odd device on the red string that came down from the ceiling. The device crawls up the string and pushes a button, which turns on a projector.

15. Go to the wall with the door. To the left of the door, there are three triangles on the wall, encircled by projected letters. Place the sun-shaped object you picked up earlier the middle.

16. The sun-clock cycles through the letters, HINTFORBOX.
HINTFORBOX puzzle:

Rotate the sun-clock such that its three arms are pointing to PIG. Note the letter in the center. Repeat for the word DOG and CAT. Then, enter this combination on the wall panel on the wall between the sofa and the door.

17. You'll hear a ding. Press the triangle button once, then open the right compartment. Take the half-teardrop object, and combine it with the other half you already have.

18. Go above the fireplace and click the red triangle. Place the teardrop inside the box. Back up and watch as the fire is put out.

19. Clicl the black triangle in the fireplace now that the fire is out. Take the superglue.

20. Go to the door. Put the Swiss Army Knife on the screwdriver attachment, and try to unscrew the door's hinges. The screwdriver breaks. Look at the top of the bureau to the left of the door, and use the superglue to put the screwdriver back together. Try the screws again. The door comes off and you are out!

Here's one from me, too:

A couple things lying around:

First, there's

a note

found in

The box on the shelf above the fireplace

and there's also

a triangle piece

which is in

the top drawer of the cabinet next to the door.

I'm also going to assume you've looked around a little and seen all the obvious stuff.

First puzzle (Birds):

Set-up:
First, make sure you picked up the items above.
If you have, then

the triangle piece goes

on the second orange wall (not the wall with the couch, the other one). More specifically,

Click on the white rectangles on the left. The triangle piece goes below them, where there's a triangular hole for it.

Solving the puzzle:
Once it's in place,

press it once to get the birds. Looks like we're going to need two letters.

Hints:
Hmm, wasn't there

a bird-related clue somewhere?

Like maybe

a feather?

The clue is on

the note.

But what do the words

"morning" and "night" have to do with an owl and a rooster?

The answer is that

the letter missing from "morning" goes with the rooster and the letter missing from "night" goes with the owl. (Note that the specific letters missing changes each game.)

Okay, once you've put in the right letters,

click the triangle twice to get the original rectangles (looks like two balance sales, maybe).

and then

click the one on the left

to get

the multipurpose knife!

Second puzzle (Unfolding number circle):

So, this is the circle (well, dodecagon) on top of the two drawers. If it's not obvious, the goal for this puzzle is just to find

the three numbers to enter once it's all unfolded. You don't have to click specific triangles in opening it, or anything.

Okay, the first big hint for this puzzle is that the colors

are irrelevant. Just for show. You can ignore them.

This means that what we should be paying attention to is

placement of the numbers only.

The trick in solving this puzzle is to look at

how the first layer relates to the second

and then

use that same strategy to go from the second to the third.

If you're really stuck, the answer is

each number in the inner two levels is reached by summing the numbers in the triangles directly above it (and then subtracting 10 if it's a 2-digit number). Unfortunately I can't just tell you the answer because the numbers change each time, but I think if you look at how the top two levels work you can see it. So, for example, the number that goes in the innermost orange triangle is the ones digit of the sum of the upper black and white triangles on the hexagon.

Once you've put in the right numbers,

zoom out, then open the top drawer to get

the magnet

If you think it's not working, make sure you didn't mix up any 6 and 9 anywhere.

Third puzzle (what to do with the magnet):

Ok, what can you do with a magnet? And before you ask, no, you can't use it to

get the can out of the fire. I guess it's not that strong, ok? But good job noticing the can. Don't forget it.

All right, let's look at the magnet. It has

two ends! Well, that's not really a spoiler, but it is when you remember that for magnets the two ends are called

the north and south poles.

If you've looked around, that should remind you of something. Specifically,

The letters "N" and "S" on those doors to the left of the fireplace. Place the magnet on them.

Cool, magnet has been placed. But now what to do? There's a hint for this somewhere in the room, and you probably found it if you looked around. The hint is

That sign above the bed that says "STAR" and points to this location.

(Actually, if you have the sound on, there's another hint:)

When you click on the triangles, it plays the first line of "Twinkle, Twinkle, Little Star." Cute.

So, in case it's still unclear, the goal is

to rotate these triangles to make a star.

Having trouble? maybe you should try

making a white star out of the negative space around the triangles.

I'm not going to post detailed directions on this, but am confident you can do it if you keep playing around. As an opening hint, I'll say that

the top skinny triangle should have its long side vertical on the left.

If you've done this correctly, then you can

zoom out and open the bottom to get

the tongs.

which you can use to

get the can! Finally.

Multiple uses for a multipurpose tool:

You have the pocketknife from the circle/number puzzle, right? Here are some of the things to do with it.
Screwdriver end:

The only screws are

on the hinges for the door.

Well, crap.

Don't worry, it's cool.

File end:

No use that I found.

Magnifying end:

Look at something small, duh. The small thing in question is

The small blue dot on the left side of the sofa. It's part of a code you may or may not be ready for yet, but go ahead and write it down.

I-would-really-be-giving-it-away-if-I-named-it-correctly end:

It's a can opener. Open the can. Note the symbol, and

click on it again to get the cross key.

Key end:

Unlock the box between the vase and the fireplace and get the blue piece. Then

click on it again to get the sun key.

Knife end:

No use that I found.

Fun with diamond-shaped keys:

The cross key unlocks

the bottom drawer next to the door. Take

the remote

and

press the button. Cool!

The sun key goes

in the keyhole on the right side of the sofa. Then

zoom out, and click on the drawer below the sofa

and take

the sun piece

and check out

the book. All the pages. Even

the last page, which actually after escaping I still don't understand? Is there another ending, or are these just clues to things like "Press the triangle switch on the remote" and... I have no idea, actually.

So many triangles, one code to break:

You've looked at the book, right? Then you've probably realized you're looking for

all the triangles of the appropriate colors, filled in or bordered as appropriate, and put them in the indicated order.

Here they are:

Blue outline:

Left side of the couch. Use

the magnifying glass, from the knife.

Orange outline:

Triangular shelf

Solid blue:

Inside of can lid

Black outline:

Go over to the desk with two drawers an open the top one. Then

Click on it again to remove it and look at the bottom drawer.

Solid white:

Inside the bottom locked drawer by the door.

Okay, now put them in order to get:

a multiplication problem.

Problems? Pay close attention to

the orientation of the triangles in the book. Some of them are given to you upside-down.

Once you know the answer (and, btw, it is different every time), enter it in

the keypad on the cabinet

and then

zoom out, and open the cabinet, and take

the mysterious hand.

The last puzzle: What to do with that sun piece

You should have found by now,

the large sun piece

and

the mysterious hand

and have above the sofa a

long orange cord.

Then

First, put the sun piece in the wall left of the door. If you turn it it reads

HINT FOR BOX

which isn't that helpful, actually. Let's leave the sun for now.

Next, look at the mysterious hand. Click on it. You'll notice it needs

a battery

which you can get from

the remote.

Fun time! Put the hand

on the cord.

Whoa.
Ok, now

turn around and look at the sun piece again. Notice the letters around the sides.

You need to

turn it to the right places to get a clue. But where?
Remember (or check out, if you haven't)

the animals in the rectangle area where the owl/rooster was.

So you need to

turn the sun so that the three arrows are pointing to

the letters in one of the animals. Then the code for that animal is

the letter in the middle when the arrows are at the right place.

Repeat for the other two animals.

Enter the letters in the appropriate places, then

click to get back to the rectangles and open the right side to get

the other mysterious blue piece

Almost out: Two blue pieces

Put them together. Hmm, it looks like

a drop of water

which is very useful for

putting out fires.

It doesn't go in the most obvious place, but instead

back in that box above the fireplace.

Cool! Take

the glue

which you can finally use to fix

the broken screwdriver. If it isn't broken, go break it by

trying to unscrew the hinges of the door.

The missing piece is currently

on the cabinet by the door.

The sequence to glue it is

open the knife to the right side, add the glue, add the piece.

Now you can

unscrew the hinges (top and bottom)

and leave!

WALKTHROUGH

NOTE: This game relies heavily on colors, namely blue and red. People who are colorblind may have serious trouble completing it.

Click the big black triangle, then New Game, to begin.

Investigating the Sofa Wall

You start off facing a sofa. The sofa has a drawer set into it. If you click to the right of the sofa, you see a keyhole in the sofa itself. Clicking to the left of the sofa reveals a triangle with something else that's too small to see.

The paper taped above the sofa shows you the location of a star in relation to your current position. Keep that in mind.

To the right of the sofa, in the corner, is a shelf. On this shelf is a triangle with a letter in it. Note the number, color of the triangle (red), and direction of the triangle.

Click on the ceiling above the sofa. Up there you see a couple of mysterious triangles, and a square of enigma.

Investigating the Fireplace Wall

Zoom in on the fireplace. There's something in there which you can't get yet. Above the fireplace is a white patch of... something, in the middle of which is a red triangle. Click the triangle and take the paper that is revealed.

To the right of the fireplace is a shelf with a box on it. Notice the symbol on the padlock.

To the left of the fireplace is a locked door, above which you see a panel with the letters "N" and "S" on it.

Investigating the Door Wall

The door is, of course, locked. If you examine the door's hinges, you see that there are screws.

To the door's left is a cabinet and some drawers. The cabinet needs a 4-digit code to unlock it, and the bottom drawer needs a key (again note that symbol). The top drawer is unlocked. Take the triangle button from inside.

On the wall above the cabinet there are three triangular holes.

Investigating the Big White Box Wall

On the last wall you see a big white box, divided into two halves. There's a triangular hole underneath it, and three spots where it looks like you should enter a number or letter, but you can't do anything there yet.

To the right of the big white box is a set of drawers. These are locked, however on top is a circle with numbers in it. You can open the circle, revealing more numbers, and open it again, revealing three spots to enter numbers.

The Number Circle Puzzle

Go to the number circle on top of those drawers. Notice that two small triangles on the top layer correspond with one bigger triangle in the layer below. Also, two bigger triangles in the second layer correspond with an even bigger triangle in the last layer.

What does this mean?

Let's say two of the smaller triangles touching each other on the top layer have the numbers 2 and 1. That means the bigger triangle in the layer right below them will say 3. 2+1=3.

However, if the smaller triangles are, say, 8 and 5, then the bigger triangle will say 3. 5+8=13.

This pattern applies to the second and third levels, as well. Combine two triangles on the second level to get the bigger triangle on the third level, then enter that number in the squares on the third level.

NOTE: The bottom of the number will be facing the center of the circle. Don't be mixing up those sixes and nines.

After you've figured out that circle puzzle, you should be able to open the top drawer. Get the magnet.

Click the drawer again to pull it out, revealing another triangle. Note the number, as well as the color (black) and direction of the triangle.

The "Star"

Remember that piece of paper on the wall, the one that showed you the location of a star? It was indicating that little door to the left of the fireplace. Go there now.

See that panel above the door that says "N" and "S"? Those are poles. Put the magnet on the letters. Now click the magnet to open the panel.

This mess of triangles is supposed to look like a five-pointed star. Click the triangles to rotate them until the white space in the middle forms a star. You might have to do some twiddling; you'll know you're finished when the word "OPEN" appears inside the star.

You can now open the door below the star. Get the tongs.

Use those tongs to get the item from the fireplace. Lots of people seem to think this is a barrel; it's actually a tin can, like for peas.

The White Box on the Wall

Go back to the white box on the wall. Remember that triangular hole? Put the triangular button in that hole, then push it. You should now see an owl and a rooster. Now might be a good time to look at that piece of paper you got from above the fireplace.

Double click the piece of paper to bring it up in your inventory, then unfold it. Notice the feather? This relates to the birds on the wall.

Below you see two words, "MORNING" and "NIGHT". Or, almost. Both the words have a missing letter. Those two missing letters are the letters you put into the boxes below the owl and rooster. But which letter goes with which animal?

Well, which animal is awake at night? And which animal crows in the morning? The missing letter from "MORNING" goes under the rooster, and the missing letter from "NIGHT" goes under the owl.

After you've correctly entered the code, hit the triangle button a few times to cycle it around to the owl and rooster. It should say "OK". Switch to the blank view and click the left-hand box. It opens, revealing a swiss-army knife.

Opening things

You now have a tin can, and a swiss-army knife that can do just about anything. What to do...?

Bring the knife up in your inventory and click it until you get the can opener (sort of a hooky thing). Now bring up the can and use the knife on it. Click the can to turn it over, revealing a key with a symbol on it.

Also notice on the lid of the can, another triangle. Note the letter inside, the color (blue) and the direction.

Now you have a key. Go to the drawers to the left of the door. The can key opens the bottom drawer. Get the remote, and note the triangle (white).

Inspect the swiss-army knife. One of the little gadgets in there is a key. Notice the symbol on the knife?

The knife key opens the padlock on the box to the right of the fireplace. Open that box and get half a teardrop. Flip the teardrop over to get another key.

Go to the left side of the couch. There's a triangle here, with something too small to read. Good thing your knife had a magnifying glass in it! Use the magnifying glass to expose the hidden number. Also note the color (blue) and direction of the triangle.

The teardrop key goes with the keyhole on the right side of the sofa. Use the key there, then open the drawer in front of the sofa. Take the sun, then open the book. Here's where the triangles with numbers in them come into play.

Remember all the triangles you found around the room? Put the numbers into the order in the book, taking into account the direction of the triangles (at least one will be flipped), and you get the equation:

_ _ x _ _ =_ _ _ _

In case you don't know what colors go with which triangles:

side of the couch - blue
shelf to the right of the couch - red
drawer in the circle table - black
drawer in the code cabinet - white
can lid - blue filled-in

Put that code into the cabinet to the left of the door. Get the weird hand thing.

The Remote and the Other Animals

Face the sofa. Bring up the remote in your inventory and hit the button. A string is lowered from the ceiling. But what the heck is it for?

Open the book in the sofa again. Flip the pages until you reach a diagram at the very end. It looks like the hand thing is supposed to climb up the string and push the switch on the ceiling.

Inspect the hand thing in your inventory. If you click the white box on top, you can see that it needs a battery.

Bring up the remote. Click the edge to flip it over, then open the hatch to remove the battery. Put the battery in the top of the hand thing.

Now put the hand thing on the string. It crawls up, pushes the switch, and reveals a projector.

Turn to the door view. The projector is projecting some letters onto the wall, but it doesn't make much sense.

Notice that in the middle of those letters are three triangular holes. Bring up the sun in your inventory. If you flip it over, you see that it has three triangles on the back. Put the sun on the holes in the wall. Aha!

Now think back to the animals on the big white box. There were three that came after the owl and rooster, right? A pig, a dog, and a cat.

Notice also that the letters in the middle of the sun say "HINT FOR BOX".

There are three arrows pointing from the sun towards three letters. These letters mostly spell nothing. But sometimes they spell the names of the animals in the box.

Click the sun until the letters it points to spell out "PIG". Now, what's the letter in the middle of the sun? This is the letter that goes under the pig on the wall. Do this for the other two animals as well.

Enter the above code into the spots under the respective animals, then click the triangle button until you get the blank spots. You can now open the right-hand door. Get the other half of the tear drop.

End Game

Now how do you get out? Oh wait! Your knife has a screwdriver, and the door's hinges have screws! Use the screwdriver on the screws.

Uh-oh.

Now what to do? How about combining the two teardrop halves to make a whole teardrop. But what next?

Maybe you should put out that fire?

Go to the drawer above the fireplace where you got the piece of paper. Put the teardrop in there.

The teardrop puts out the fire, revealing a triangle. Click it, and a drawer opens. Take the super glue.

Click on top of the table to the left of the door to get the piece of broken screwdriver.

Put superglue on the broken piece of screwdriver, then attach that to the rest of the screwdriver on the knife.

Now use the screwdriver on the screws once again. (Superglue: stronger than steel!) The door falls off its hinges.

Click the doorway, and you're out!

79 Comments

Oops! Comments were turned off initially, sorry folks. :(

Reply

Star puzzle is nice. But what to do with barrel?

Reply

What a wonderful escape game! Beautiful art style and very clever, but nothing impossible, puzzles.

Reply

Many of the codes change every time you play...so notetaking is important!

Reply

Alt 30 to enter a triangle!
▲▲▲▲▲▲▲▲▲▲▲▲▲▲▲▲▲▲▲▲▲▲▲▲▲▲▲

Reply

btw, that is from the write-up: "...but I'll be darned if I can figure out how to type that into the title box..."

[But there's no [ALT] key on a Mac! So now what, smartypants? :p -Jay]

Reply

My intuition must be broken. The HINT FOR BOX doesn't make any sense to me. The unfolding red, white, and black design with numbers on top of that dresser thing doesn't make any sense. The screwdriver attachment of the knife broke.

Reply

Can anyone give me a hint for the letters underneath the painting? I've got the barrel and the note with the feather on top.

Reply

Voqo: that barrel ...

is a tin can, like the ones you get food in. You will eventually find something you can use with it.

Reply
binmania March 16, 2011 9:09 AM

Totally stuck.

All I have are a

tin can taken from fire with tongs

and a

piece of paper with a feather and morn ng ight written on it

Please help.

Reply

Ah, I knew my stupid intuition wasn't working. I think I was too focussed on the color/number relationship and thus missed the actual solution. After that, everything fell into place.

Reply
monkeybelly March 16, 2011 9:19 AM

Wow.. seems like everyone is finding this one easy. Having trouble with the tin can as well and the note.

Can't figure out the animal code with the pig dog and cat.

Any hints?

Reply
monkeybelly March 16, 2011 9:26 AM

Can't figure out the animal puzzle - Figured out the Owl and Rooster part, but not the pig / dog / cat part. Any hints?

Reply

Tenzhi: the numbers in the rosette of triangles ...

as you fold and unfold the first layer, compare the numbers with the numbers on the layer below them.

Reply

I'm stuck, I have the can and the yellow note. And I can see two numbers in triangles.

On the wall, with the picture with the owl, hen and pig, dog and cat. I've tried the first letter from each and middle and last and 'on pot'. What am I missing? Is it something to do with the note?

Reply

Is the 'hand' model meant to have a battery in ? In which case, where do I find the battery ?

Reply

Ugh, triangles! I'm much more of a trapezoid person, myself.

Seriously, I find it difficult to even look at this game let alone attempt some of the ambiguous puzzles.

Reply
monkeybelly March 16, 2011 9:31 AM

ah.. well, figured out that I didn't check something after I solved the Owl / Rooster puzzle, so now I got more items to explore.

Reply

monkeybell, did you solve 3 picture animals?
i think we must use HINT FOR BOX mechanism, i have already tried several combinations, but no result.

Reply
hothotpot March 16, 2011 9:47 AM

Well I'm stuck. I've figured out the rosette puzzle on top of the little table, the owl and rooster part of the animal puzzle, and the star puzzle. I have the tin can and the hint for the owl and rooster and nothing else. I have no idea what to do next. Anyone care to nudge me in the right direction? I'd appreciate it!

Reply
monkeybelly March 16, 2011 9:54 AM

@hothotpot

If you solve the Owl / Rooster puzzle, one of the drawers in that puzzle when you press the triangle to rotate will unlock and give you a crucial item to move forward.

To solve the Owl / Rooster puzzle:

The note is very helpful in solving the Owl / Rooster puzzle... what letters are missing in the words and how do they relate to the sleeping habits of the birds?

Reply
hothotpot March 16, 2011 9:57 AM

Power of the post, I just discovered that I had missed the drawer being unlocked, so I had a short little burst of doing a bunch of stuff but now I'm right stuck again. I'm having a lot of trouble trying to figure out if those are supposed to be letters or numbers inside those triangles, and what they relate to. Still haven't figured out the Pig Dog Cat puzzle yet.

I lowered some kind of string from the ceiling, took the battery out of the remote control, broke the screw driver on my pocket knife, opened the little box next to the flower and got the tear drop thing and the key from inside it, and opened the tin can. So now I have a key with a sun (used the one with the star), a pocket knife with a broken screw driver, a battery, a remote control, half a blue tear drop thing, and an open tin can. And I'm stuck. Again. Hah.

Reply
monkeybelly March 16, 2011 10:05 AM

well, I can't help any more hototspot as I am at the same spot you are.

Reply

finished.
i can help anyone.

Reply

Hotspot:

Have you checked on either side of the couch?

Reply
monkeybelly March 16, 2011 10:08 AM

Hot it - the book in the bed drawer is a clue to the traingle numbers you see.

Reply

hotspot: the book in the drawer with a triangle per page ...

The triangles each represent a digit or symbol. Each one has one colour for the border and another colour for the inside. You find decodes for each colour triangle spread around the room.

Reply

Yeah! Out with no walkthrough! I think I'm startin to get better at these things.

Reply
monkeybelly March 16, 2011 10:12 AM

still having trouble with the HINT FOR BOX

Saw all combinations and thought it was the only other animal not listed, but it didn't work

Reply
monkeybelly March 16, 2011 10:16 AM

PoP - Looking at the wrong letters that matter for the puzzle! Got it now...

Reply

for HINT FOR BOX;

There is nothing to do unless you have 'a thing' that you could place the battery. 'The thing' is in the electronic safe.

Reply

monkeybelly: the HINTFORBOX thing ...

makes a lot more sense when you've done something else. It becomes really obvious. Work hard on getting the four digit numeric lock open.

Reply

Out. I really like the ending music.

If you're puzzling over the blue teardrop, consider ...

there are two things in the room that water might interact with ...

both on the same wall ...

including one you've already interacted with

Reply
monkeybelly March 16, 2011 10:21 AM

Thanks everyone - already had the letters appear, I was just not looking in the middle of things!

But I got the full tear drop and have no lcue what to do - I am sure I am almost out.

Reply
monkeybelly March 16, 2011 10:22 AM

PoP - nevermind - found the spot for the teardrop and now I am out.

Reply
hothotpot March 16, 2011 10:26 AM

Out! I missed the stuff on the sides of the couch initially, and the stuff on top of the cabinet, but once I figured out those two things, it was actually pretty easy! Thanks for the help, everyone!

Reply

Oh good, comments are enabled. Thanks Jay!

Something I wanted to say to SonicLover last night after finishing this:

"Triangle is not a game to be missed, unless you're a square. Or a circle, or a pentagon."

Really, SL? You, of all people....a shapist? I'm appalled.

Reply

Oh man... I was giving dumb a run for its money today...
I was about to post that I needed help...

I was pretty sure that my next puzzle was the safe, but I just couldn't find all the numbers. I was almost positive that I had clicked all over looking for the fifth number for the triangles, and I didn't see anything about much pixel hunting here (though I'm just REALLY bad at that) but I was getting frustrated.

So I come here thinking, OK, I'll ask about which number I'm missing. So let me mark the ones I've found. I've got the one on top of the triangle shelf in the corner, the one in the locked drawer, the one underneath the removable drawer, the tiny one on the left side of the couch and the "X" under the can lid. So what am I missing?

I hit "preview" to make sure I made the spoiler tags right. Then I read over it. Then I read over it again. This time I count what I wrote down.

...

Yeah, it was pretty easy after that point.

In any case, that was a pretty neat one! No ridiculous leaps of logic, but some clever stuff. The 1990 sound effects just add to the charm!

Reply
Fishinear March 16, 2011 12:11 PM

OK, ik must be missing something obvious here. I have solved all the puzzles, but fail to see how to get out of the room.

I have got:

A pocket knive, superglue, an open can, and a note.

I have tried the glue and the knive on everything in the room, as far as I know. I have also tried combining the objects together, with no avail.

The only things in the room that have not reacted to anything yet, are the door and the flower.

I must be very close, but how do I get out?

Reply

@Fishinear
There's something broken in the pocket knife that could use some glue...

Reply

Ok, I feel so dumb, but I'm stuck with the closed tin can and the note for the rooster/owl puzzle...I've tried all the drawers, gotten stuff out of the open ones, but now I'm at a loss. Anyone?

Reply
DuncmanG March 16, 2011 1:50 PM

@Fishinear

You use superglue to fix things - do you have something that's broken?

If not, there's a part of the pocket knife that you can use to try to open the door.

Once you've done that, fix it up! If you don't know where the broken piece is...

... check on top of the dresser next to the door.

@Jess

The note should help you with the owl/rooster puzzle.

What are the full words? Which word would you associate with which animal?

The owl is active at night, the rooster in the morning.

Now that you've associated the words, associate the missing letters with the animals as well. The letters are different in different games, so I can't tell you for sure what the code will end up being.

Reply

I can't find the tongs for the fire or how to reach the ceiling... help?

Reply

Anyone have a walkthrough yet?

Reply

Thanks Duncman, but I've actually already solved the Rooster/Owl puzzle (should have made that clear); basically, I:

Have solved the owl/rooster puzzle, the folding triangle puzzle as well as the star puzzle, got the tongs and took the tin can out of the fireplace, and now I'm stuck.

Any guidance on where to go next? Thanks!!

Reply

Where's the tongs? I've done the

Owl/Rooster puzzle, broken my Pocketknife and attached the Sunclock(if that's what it is)

and now I find myself stuck. I'm pretty sure

the clock has something to do with the pig/dog/cat picture

but I can't get my head around it.

Reply

This was pretty good! What does the Japanese text at the very end say?

Reply

owl/rooster:

My note says: "orning n ght", so my missing letters are m and i. So my code should be w r, right? Not working. What am i missing?

Reply

@Bug:

No, you aren't cross-referencing the nth letter, it's just the missing letter. Your code is i for the owl and and m for the rooster.

Can anybody give a walkthrough please??? Or at least say where the tongs are, many people seem to have gotten them but not I…

Reply

n/m, I found the tongs:

Use the magnet on the "NS" on the door of the compartment to the left of the fireplace; it becomes a handle, and you can open the compartment. Then solve the puzzle inside, and the compartment below opens and gives you the tongs.

Reply

Walkthrough on its way!

Reply

"[But there's no [ALT] key on a Mac! So now what, smartypants? :p -Jay]"

Easy: buy a PC :P :P :P

bio

Reply

Walkthrough

1. Turn right. Look on top of the dresser, for the rosette puzzle.
Rosette Puzzle:

The outer layer has 12 numbers, the middle layer 6 numbers, and the inner layer asks you for 3 numbers. Compare the middle layer to the outer layer: the sum of the two numbers that lay on top of each number of the middle layer equals that number. So, 5 and 8 on the top layer will overlap 3 on the middle layer (5 + 8 = 13 => 3). That's the pattern, repeat it to get the numbers for the code. Because many numbers are symmetrical, make sure you read the number from the vantage point of the center of the circle. The numbers change between games.

2. Open the top drawer, get the magnet, and note the number in the white triangle with the black border.

3. Take the magnet, and attach it to the "NS" on the compartment to the left of the fireplace. It becomes a handle. Open and solve the puzzle inside.

As you click the pieces, you hear "twinkle twinkle little star." That's the clue: arrange the red pieces so that they outline a star (i.e., the star is white, made of negative space).

4. The compartment below unlocks. Open it and take the tongs from inside.

5. Use the tongs to get the can from the fireplace.

6. Go above the fireplace, and click the red triangle. Take the note. Look at it; notice that it is "Morning" and "Night" except with one letter missing from each word. The missing letter changes between each game.

7. Turn left to face the door. Look in the top right drawer of the bureau there. Get the triangle piece.

8. Turn left, and go to the panel on the wall. Install the triangle piece below the large rectangle. It becomes a button. Click once. Solve the owl/rooster puzzle.
Owl/Rooster puzzle:

Check the note from step 6. The missing letter from "Night" is the letter you input beneath the owl, and the missing letter from "Morning" is the letter you input beneath the rooster.

9. You will hear a ding. Press the triangle button twice (ignore the pig/dog/cat puzzle for now), and then click the left compartment. Take the Swiss Army Knife.

10. Open the swiss army knife to the can opener, then double-click on the can in your inventory, and use the can opener on it. Note the "X" underneath the lid of the can. Click on the can to shake it out, a key comes out marked with a cross.

11. Use this key on the bottom drawer of the bureau to the left of the door. Note the number in the white triangle, and take the remote. Press the remote button, and a red string comes down from the ceiling.

12. Open the Swiss Army Knife to the key. Notice that the symbol on the tool is the same as the symbol on the lock on the shelf to the right of the fireplace. Use the key on this lock. Open the box and take the half-teardrop shape. Turn over the object, and take out the key embedded there. Note the sun-shaped symbol on the key.

13. Go to the sofa. Click on its ride side (a hidden hotspot). Use the key there. Open the drawer beneath the sofa, take the sun-shaped object, and look inside the notebook. The notebook is a clue for the combination to the safe to the left of the door.
Safe puzzle:

The symbols in the notebook are:
-white triangle with a red border
-white triangle with a blue border
-blue triangle
-white triangle
-white triangle with a black border
Note that some triangles may be inverted.
Match these symbols around the room, making sure to match the orientation of the triangle in the book. To find the five symbols:
-Look at the triangular shelf in the corner to the right of the sofa. On it is an E, which, flipped around, is a "3" (this seems to be the same for every game).
-Look on the left side of the couch (another hidden hotspot). Use the magnifying glass in the Swiss Army Knife on the small blue triangle to see the number.
-Look on the inside of the can's lid. It's an "X".
-Look in the bottom drawer of the bureau to the left of the door. Make sure
-In the dresser beneath the rosette puzzle, open the top drawer, then click it again to pull it out.
You get two two-digit numbers multiplied together. The product is the combination for the safe to the left of the door.

14. Open the safe, take the odd mechanical-hand device inside. Go to the remote, turn it over, take out the battery, and put the battery inside the odd device. Put the odd device on the red string that came down from the ceiling. The device crawls up the string and pushes a button, which turns on a projector.

15. Go to the wall with the door. To the left of the door, there are three triangles on the wall, encircled by projected letters. Place the sun-shaped object you picked up earlier the middle.

16. The sun-clock cycles through the letters, HINTFORBOX.
HINTFORBOX puzzle:

Rotate the sun-clock such that its three arms are pointing to PIG. Note the letter in the center. Repeat for the word DOG and CAT. Then, enter this combination on the wall panel on the wall between the sofa and the door.

17. You'll hear a ding. Press the triangle button once, then open the right compartment. Take the half-teardrop object, and combine it with the other half you already have.

18. Go above the fireplace and click the red triangle. Place the teardrop inside the box. Back up and watch as the fire is put out.

19. Clicl the black triangle in the fireplace now that the fire is out. Take the superglue.

20. Go to the door. Put the Swiss Army Knife on the screwdriver attachment, and try to unscrew the door's hinges. The screwdriver breaks. Look at the top of the bureau to the left of the door, and use the superglue to put the screwdriver back together. Try the screws again. The door comes off and you are out!

Reply

Um, @bioLarzen, Macs have an alt/option key. It's incredibly versatile. You can't get a solid black triangle, but you can get delta, ∆, with alt+j. Plus you get get ellipses, …, en dashes and em dashes, - and -, diacriticals like ü and é, smart quotes, ""‘', and many more fun things.

Reply
Username March 16, 2011 5:04 PM

This game is stumping me, I can only find a note and the thing that activates the pictures of the rooster, pig, etc. No idea what to do with that puzzle, and can't find a single other item. I've found clues on the couch and ceiling, but no idea what to do to move forward in the game.

Reply

I'm genuinely stumped. I don't know if it's the abstraction, the pointy corners and the stark colors... or if it's just a rough week for me. Was looking forward to the midweek escape here to unwind my mind but now I'm more jumbled than ever... Beyond picking up a triangular knob and a piece of paper, I've gotten nowhere. Boo.

Reply

Ooops, spoke too soon... Helps to read paper a little more closely.

Reply

Username,

Getting beyond the first two items:

The note indicates which letter to enter under the owl and which letter to enter under the rooster.

I'm headed for a nap... will finish game later. Too tired to think and boy is this a thinker :)

Reply
Username March 16, 2011 6:31 PM

Update, got the tin can and still holding onto the note, stuck again. I really do like walkthrough's sometimes.....

Reply

Hi folks,

Glad I made it before the walkthrough was published... which means with a litle help of you all, guys !

Animal box :

Once you have sorted out the first part of it, don't waste time on the second one, several steps are to be climbed before.

Star :

That is the step after which all goes quick and easy.

Enjoy yourselves !
Greetings from Paris
François

Reply

About halfway through a walkthrough; will post it soon.

Reply

@mp3si what magnet? i can't find the tongs, either!

Reply

huh? I submitted a walkthrough a few hours ago… @Jay? @SonicLover? what's up?

Reply

mp3si,how much longer until the walkthrough?

Reply

Alternate option for Mac users wanting to get non-keyboardy symbols into documents:

Open TextEdit, and under Edit, click "Special Characters..." to bring up a whole window of them.

I punched "Triangle" into the description & code box, and ▲ was an easy find, 7th on the list that popped up. (Oddly enough, "Black Triangle" didn't show it at all.)

Reply

@m3psi: I'm asking the editors if they have any trace of your walkthrough, but it's possible we had a hiccup and lost it utterly. Whenabouts did you submit it?

Reply

Here's one from me, too:

A couple things lying around:

First, there's

a note

found in

The box on the shelf above the fireplace

and there's also

a triangle piece

which is in

the top drawer of the cabinet next to the door.

I'm also going to assume you've looked around a little and seen all the obvious stuff.

First puzzle (Birds):

Set-up:
First, make sure you picked up the items above.
If you have, then

the triangle piece goes

on the second orange wall (not the wall with the couch, the other one). More specifically,

Click on the white rectangles on the left. The triangle piece goes below them, where there's a triangular hole for it.

Solving the puzzle:
Once it's in place,

press it once to get the birds. Looks like we're going to need two letters.

Hints:
Hmm, wasn't there

a bird-related clue somewhere?

Like maybe

a feather?

The clue is on

the note.

But what do the words

"morning" and "night" have to do with an owl and a rooster?

The answer is that

the letter missing from "morning" goes with the rooster and the letter missing from "night" goes with the owl. (Note that the specific letters missing changes each game.)

Okay, once you've put in the right letters,

click the triangle twice to get the original rectangles (looks like two balance sales, maybe).

and then

click the one on the left

to get

the multipurpose knife!

Second puzzle (Unfolding number circle):

So, this is the circle (well, dodecagon) on top of the two drawers. If it's not obvious, the goal for this puzzle is just to find

the three numbers to enter once it's all unfolded. You don't have to click specific triangles in opening it, or anything.

Okay, the first big hint for this puzzle is that the colors

are irrelevant. Just for show. You can ignore them.

This means that what we should be paying attention to is

placement of the numbers only.

The trick in solving this puzzle is to look at

how the first layer relates to the second

and then

use that same strategy to go from the second to the third.

If you're really stuck, the answer is

each number in the inner two levels is reached by summing the numbers in the triangles directly above it (and then subtracting 10 if it's a 2-digit number). Unfortunately I can't just tell you the answer because the numbers change each time, but I think if you look at how the top two levels work you can see it. So, for example, the number that goes in the innermost orange triangle is the ones digit of the sum of the upper black and white triangles on the hexagon.

Once you've put in the right numbers,

zoom out, then open the top drawer to get

the magnet

If you think it's not working, make sure you didn't mix up any 6 and 9 anywhere.

Third puzzle (what to do with the magnet):

Ok, what can you do with a magnet? And before you ask, no, you can't use it to

get the can out of the fire. I guess it's not that strong, ok? But good job noticing the can. Don't forget it.

All right, let's look at the magnet. It has

two ends! Well, that's not really a spoiler, but it is when you remember that for magnets the two ends are called

the north and south poles.

If you've looked around, that should remind you of something. Specifically,

The letters "N" and "S" on those doors to the left of the fireplace. Place the magnet on them.

Cool, magnet has been placed. But now what to do? There's a hint for this somewhere in the room, and you probably found it if you looked around. The hint is

That sign above the bed that says "STAR" and points to this location.

(Actually, if you have the sound on, there's another hint:)

When you click on the triangles, it plays the first line of "Twinkle, Twinkle, Little Star." Cute.

So, in case it's still unclear, the goal is

to rotate these triangles to make a star.

Having trouble? maybe you should try

making a white star out of the negative space around the triangles.

I'm not going to post detailed directions on this, but am confident you can do it if you keep playing around. As an opening hint, I'll say that

the top skinny triangle should have its long side vertical on the left.

If you've done this correctly, then you can

zoom out and open the bottom to get

the tongs.

which you can use to

get the can! Finally.

Multiple uses for a multipurpose tool:

You have the pocketknife from the circle/number puzzle, right? Here are some of the things to do with it.
Screwdriver end:

The only screws are

on the hinges for the door.

Well, crap.

Don't worry, it's cool.

File end:

No use that I found.

Magnifying end:

Look at something small, duh. The small thing in question is

The small blue dot on the left side of the sofa. It's part of a code you may or may not be ready for yet, but go ahead and write it down.

I-would-really-be-giving-it-away-if-I-named-it-correctly end:

It's a can opener. Open the can. Note the symbol, and

click on it again to get the cross key.

Key end:

Unlock the box between the vase and the fireplace and get the blue piece. Then

click on it again to get the sun key.

Knife end:

No use that I found.

Fun with diamond-shaped keys:

The cross key unlocks

the bottom drawer next to the door. Take

the remote

and

press the button. Cool!

The sun key goes

in the keyhole on the right side of the sofa. Then

zoom out, and click on the drawer below the sofa

and take

the sun piece

and check out

the book. All the pages. Even

the last page, which actually after escaping I still don't understand? Is there another ending, or are these just clues to things like "Press the triangle switch on the remote" and... I have no idea, actually.

So many triangles, one code to break:

You've looked at the book, right? Then you've probably realized you're looking for

all the triangles of the appropriate colors, filled in or bordered as appropriate, and put them in the indicated order.

Here they are:

Blue outline:

Left side of the couch. Use

the magnifying glass, from the knife.

Orange outline:

Triangular shelf

Solid blue:

Inside of can lid

Black outline:

Go over to the desk with two drawers an open the top one. Then

Click on it again to remove it and look at the bottom drawer.

Solid white:

Inside the bottom locked drawer by the door.

Okay, now put them in order to get:

a multiplication problem.

Problems? Pay close attention to

the orientation of the triangles in the book. Some of them are given to you upside-down.

Once you know the answer (and, btw, it is different every time), enter it in

the keypad on the cabinet

and then

zoom out, and open the cabinet, and take

the mysterious hand.

The last puzzle: What to do with that sun piece

You should have found by now,

the large sun piece

and

the mysterious hand

and have above the sofa a

long orange cord.

Then

First, put the sun piece in the wall left of the door. If you turn it it reads

HINT FOR BOX

which isn't that helpful, actually. Let's leave the sun for now.

Next, look at the mysterious hand. Click on it. You'll notice it needs

a battery

which you can get from

the remote.

Fun time! Put the hand

on the cord.

Whoa.
Ok, now

turn around and look at the sun piece again. Notice the letters around the sides.

You need to

turn it to the right places to get a clue. But where?
Remember (or check out, if you haven't)

the animals in the rectangle area where the owl/rooster was.

So you need to

turn the sun so that the three arrows are pointing to

the letters in one of the animals. Then the code for that animal is

the letter in the middle when the arrows are at the right place.

Repeat for the other two animals.

Enter the letters in the appropriate places, then

click to get back to the rectangles and open the right side to get

the other mysterious blue piece

Almost out: Two blue pieces

Put them together. Hmm, it looks like

a drop of water

which is very useful for

putting out fires.

It doesn't go in the most obvious place, but instead

back in that box above the fireplace.

Cool! Take

the glue

which you can finally use to fix

the broken screwdriver. If it isn't broken, go break it by

trying to unscrew the hinges of the door.

The missing piece is currently

on the cabinet by the door.

The sequence to glue it is

open the knife to the right side, add the glue, add the piece.

Now you can

unscrew the hinges (top and bottom)

and leave!

Reply

I loved this game. Finished without any hints. Great fun!

Reply
Username March 16, 2011 9:30 PM

How about just telling me what happened after I solved the bird puzzle? As far as I can tell, nothing changed.

Reply

Sorry, our spam filter went a little crazy today, I found 2 walkthroughs for the game in it that I just published.

Sorry to m3psi and ore, and thank you, too! :)

Reply

Anonymous, that threw me for a bit too. But check around that area. The change might not be visible.

Reply
nerdypants March 16, 2011 10:58 PM

WALKTHROUGH

NOTE: This game relies heavily on colors, namely blue and red. People who are colorblind may have serious trouble completing it.

Click the big black triangle, then New Game, to begin.

Investigating the Sofa Wall

You start off facing a sofa. The sofa has a drawer set into it. If you click to the right of the sofa, you see a keyhole in the sofa itself. Clicking to the left of the sofa reveals a triangle with something else that's too small to see.

The paper taped above the sofa shows you the location of a star in relation to your current position. Keep that in mind.

To the right of the sofa, in the corner, is a shelf. On this shelf is a triangle with a letter in it. Note the number, color of the triangle (red), and direction of the triangle.

Click on the ceiling above the sofa. Up there you see a couple of mysterious triangles, and a square of enigma.

Investigating the Fireplace Wall

Zoom in on the fireplace. There's something in there which you can't get yet. Above the fireplace is a white patch of... something, in the middle of which is a red triangle. Click the triangle and take the paper that is revealed.

To the right of the fireplace is a shelf with a box on it. Notice the symbol on the padlock.

To the left of the fireplace is a locked door, above which you see a panel with the letters "N" and "S" on it.

Investigating the Door Wall

The door is, of course, locked. If you examine the door's hinges, you see that there are screws.

To the door's left is a cabinet and some drawers. The cabinet needs a 4-digit code to unlock it, and the bottom drawer needs a key (again note that symbol). The top drawer is unlocked. Take the triangle button from inside.

On the wall above the cabinet there are three triangular holes.

Investigating the Big White Box Wall

On the last wall you see a big white box, divided into two halves. There's a triangular hole underneath it, and three spots where it looks like you should enter a number or letter, but you can't do anything there yet.

To the right of the big white box is a set of drawers. These are locked, however on top is a circle with numbers in it. You can open the circle, revealing more numbers, and open it again, revealing three spots to enter numbers.

The Number Circle Puzzle

Go to the number circle on top of those drawers. Notice that two small triangles on the top layer correspond with one bigger triangle in the layer below. Also, two bigger triangles in the second layer correspond with an even bigger triangle in the last layer.

What does this mean?

Let's say two of the smaller triangles touching each other on the top layer have the numbers 2 and 1. That means the bigger triangle in the layer right below them will say 3. 2+1=3.

However, if the smaller triangles are, say, 8 and 5, then the bigger triangle will say 3. 5+8=13.

This pattern applies to the second and third levels, as well. Combine two triangles on the second level to get the bigger triangle on the third level, then enter that number in the squares on the third level.

NOTE: The bottom of the number will be facing the center of the circle. Don't be mixing up those sixes and nines.

After you've figured out that circle puzzle, you should be able to open the top drawer. Get the magnet.

Click the drawer again to pull it out, revealing another triangle. Note the number, as well as the color (black) and direction of the triangle.

The "Star"

Remember that piece of paper on the wall, the one that showed you the location of a star? It was indicating that little door to the left of the fireplace. Go there now.

See that panel above the door that says "N" and "S"? Those are poles. Put the magnet on the letters. Now click the magnet to open the panel.

This mess of triangles is supposed to look like a five-pointed star. Click the triangles to rotate them until the white space in the middle forms a star. You might have to do some twiddling; you'll know you're finished when the word "OPEN" appears inside the star.

You can now open the door below the star. Get the tongs.

Use those tongs to get the item from the fireplace. Lots of people seem to think this is a barrel; it's actually a tin can, like for peas.

The White Box on the Wall

Go back to the white box on the wall. Remember that triangular hole? Put the triangular button in that hole, then push it. You should now see an owl and a rooster. Now might be a good time to look at that piece of paper you got from above the fireplace.

Double click the piece of paper to bring it up in your inventory, then unfold it. Notice the feather? This relates to the birds on the wall.

Below you see two words, "MORNING" and "NIGHT". Or, almost. Both the words have a missing letter. Those two missing letters are the letters you put into the boxes below the owl and rooster. But which letter goes with which animal?

Well, which animal is awake at night? And which animal crows in the morning? The missing letter from "MORNING" goes under the rooster, and the missing letter from "NIGHT" goes under the owl.

After you've correctly entered the code, hit the triangle button a few times to cycle it around to the owl and rooster. It should say "OK". Switch to the blank view and click the left-hand box. It opens, revealing a swiss-army knife.

Opening things

You now have a tin can, and a swiss-army knife that can do just about anything. What to do...?

Bring the knife up in your inventory and click it until you get the can opener (sort of a hooky thing). Now bring up the can and use the knife on it. Click the can to turn it over, revealing a key with a symbol on it.

Also notice on the lid of the can, another triangle. Note the letter inside, the color (blue) and the direction.

Now you have a key. Go to the drawers to the left of the door. The can key opens the bottom drawer. Get the remote, and note the triangle (white).

Inspect the swiss-army knife. One of the little gadgets in there is a key. Notice the symbol on the knife?

The knife key opens the padlock on the box to the right of the fireplace. Open that box and get half a teardrop. Flip the teardrop over to get another key.

Go to the left side of the couch. There's a triangle here, with something too small to read. Good thing your knife had a magnifying glass in it! Use the magnifying glass to expose the hidden number. Also note the color (blue) and direction of the triangle.

The teardrop key goes with the keyhole on the right side of the sofa. Use the key there, then open the drawer in front of the sofa. Take the sun, then open the book. Here's where the triangles with numbers in them come into play.

Remember all the triangles you found around the room? Put the numbers into the order in the book, taking into account the direction of the triangles (at least one will be flipped), and you get the equation:

_ _ x _ _ =_ _ _ _

In case you don't know what colors go with which triangles:

side of the couch - blue
shelf to the right of the couch - red
drawer in the circle table - black
drawer in the code cabinet - white
can lid - blue filled-in

Put that code into the cabinet to the left of the door. Get the weird hand thing.

The Remote and the Other Animals

Face the sofa. Bring up the remote in your inventory and hit the button. A string is lowered from the ceiling. But what the heck is it for?

Open the book in the sofa again. Flip the pages until you reach a diagram at the very end. It looks like the hand thing is supposed to climb up the string and push the switch on the ceiling.

Inspect the hand thing in your inventory. If you click the white box on top, you can see that it needs a battery.

Bring up the remote. Click the edge to flip it over, then open the hatch to remove the battery. Put the battery in the top of the hand thing.

Now put the hand thing on the string. It crawls up, pushes the switch, and reveals a projector.

Turn to the door view. The projector is projecting some letters onto the wall, but it doesn't make much sense.

Notice that in the middle of those letters are three triangular holes. Bring up the sun in your inventory. If you flip it over, you see that it has three triangles on the back. Put the sun on the holes in the wall. Aha!

Now think back to the animals on the big white box. There were three that came after the owl and rooster, right? A pig, a dog, and a cat.

Notice also that the letters in the middle of the sun say "HINT FOR BOX".

There are three arrows pointing from the sun towards three letters. These letters mostly spell nothing. But sometimes they spell the names of the animals in the box.

Click the sun until the letters it points to spell out "PIG". Now, what's the letter in the middle of the sun? This is the letter that goes under the pig on the wall. Do this for the other two animals as well.

Enter the above code into the spots under the respective animals, then click the triangle button until you get the blank spots. You can now open the right-hand door. Get the other half of the tear drop.

End Game

Now how do you get out? Oh wait! Your knife has a screwdriver, and the door's hinges have screws! Use the screwdriver on the screws.

Uh-oh.

Now what to do? How about combining the two teardrop halves to make a whole teardrop. But what next?

Maybe you should put out that fire?

Go to the drawer above the fireplace where you got the piece of paper. Put the teardrop in there.

The teardrop puts out the fire, revealing a triangle. Click it, and a drawer opens. Take the super glue.

Click on top of the table to the left of the door to get the piece of broken screwdriver.

Put superglue on the broken piece of screwdriver, then attach that to the rest of the screwdriver on the knife.

Now use the screwdriver on the screws once again. (Superglue: stronger than steel!) The door falls off its hinges.

Click the doorway, and you're out!

Reply

I am a little embarrased how long I spent trying to figure out what

3.X95

meant.

Reply

If you have Japanese input, you can get a triangle by typing "sankaku" (the Japanese word for triangle) and selecting a triangle from the list.

▲△▽▼

[Thanks for pointing that out. I know there's a way to get the special characters on a Mac keyboard (I use the Keyboard Viewer), I was just slamming Windows because I hate it so much while backing up our reviewer SonicLover who also uses a Mac, and I didn't want to rewrite his intro paragraph. -Jay]

Reply
Anonymous March 17, 2011 8:03 AM

Does anyone have a translation for the text that pops up when you click the end screen?

Reply
Littleghost March 19, 2011 1:43 AM

I think that's the first time I've ever

forced a door off the hinges

in an escape game! Congratulations on the originality!

Reply

hi...i'm doing an assignment on room escape games and i need 30 players of room escape games as respondents to answer a simple questionnaire. please contact me if any of you are interested. thanks so much.

Reply
nerdypants March 19, 2011 10:13 PM

I didn't mention this before but... this game was ugly. Some of the stuff in the game I couldn't even identify, like that white splotch above the fireplace. What the heck was that? I think I'd have enjoyed the game much more if it didn't look like bad clipart.

Just had to get that off my chest.

Reply

^ Scroll Up | Homepage >

Leave a comment [top of page]

Please consider creating a Casual Gameplay account if you're a regular visitor here, as it will allow us to create an even better experience for you. Sign-up here!
  • PLEASE UNDERSTAND SITE POLICIES BEFORE POSTING COMMENTS
  • You may use limited HTML tags for style:
    (a href, b, br/, strong, em, ul, ol, li, code, spoiler)
    HTML tags begin with a less-than sign: < and end with a greater-than sign: >. Always. No exceptions.
  • To post spoilers, please use spoiler tags: <spoiler> example </spoiler>
    If you need help understanding spoiler tags, read the spoiler help.
  • Please Preview your comment before posting, especially when using spoilers!
  • No link dropping, no domains as names; do not spam, and do not advertise! (rel="nofollow" in use)
chrpa Jayisgames needs your help to continue providing quality content. Click for details Welcome to the Roundup 66 - Retro with four games! After you find the ten monkeys in the chapter, look in the inventory. You will find a...  ...
chrpa Jayisgames needs your help to continue providing quality content. Click for details Welcome to the Roundup 65 with three games! As mentioned in the previous roundups, only odd-numbered episodes are featured since even-numbered are for Robin Vencel's patrons (the...  ...
chrpa Jayisgames needs your help to continue providing quality content. Click for details Hi! Weekday Escape and Weekday Puzzle are here! First we have two new cans from tomoLaSiDo and then two small rooms from isotronic. That's all for this...  ...
6,365 Views
0 Comments
chrpa Jayisgames needs your help to continue providing quality content. Click for details Welcome to Mobile Monday! We have another beautiful game from Nicolet and it's a winter game as it should be. Tasuku Yahiro have released another of their...  ...

HELP Jayisgames.com

Recent Comments


Display 5 more comments
Limit to the last 5 comments

Game of the week


Dark Romance: Vampire Origins Collector's Edition

Your Favorite Games edit

add
Save links to your favorite games here. Use the Favorites editor.

Monthly Archives