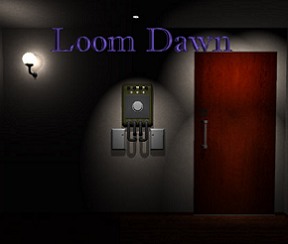
JayisGames.com is now available ad-free!
Jay is Games recommends Cheat Happens with 8,000+ games and 35,000+ trainers!

Loom Dawn


  • Currently 4.6/5
  • 1
  • 2
  • 3
  • 4
  • 5
Rating: 4.6/5 (253 votes)
Comments (146) | Views (16,224)

Weekday Escape

GrinnypDawn is a wonderful time of day. The first hint of light after the darkest night, it banishes nightmares and vampires alike. Odes have been composed to it, many pagan religions anthropomorphized it into various goddesses, and quotes abound, like "It's always darkest before the dawn." But what about that period before dawn, when it is indeed the darkest hour? No light, no hope, smothering all in a blanket of black velvet. Okay, that's a bit poetic, but not a bad intro for Place of Light's latest room escape, Loom Dawn.

Loom DawnYou begin in an absolutely dark room, and the dynamic is more about lighting the space inch by laborious inch than it is escaping the room. Look around carefully, because you might miss the tiniest glimmers of light in this stifling, gloomy space. Bit by bit you uncover small light sources, which lead to more light sources, which lead to...well, one heck of a cool game and one of the neatest fake-out endings ever. The object, you see, is not to escape so much as to turn on the lights.

Navigation is through gray bars which appear at the sides and bottom of the screen when hovered over with the cursor. Inventory (what there is of it) appears in the right hand side of the screen. Not that you will have much to carry, since most of this little gem involves pure brain-stretching, puzzle solving goodness. Unfortunately, however, there is no changing cursor to be had, so brace yourself; pixel-hunting ahead! The game is Japanese, but no knowledge of the language is needed. This is all pure logic.

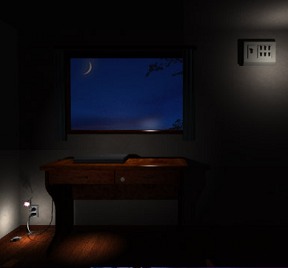
The space, well... since you see so little of it, small bits here and there highlighted by faint lights, there's not a lot to say about the space, other than it is competently rendered in 3D. However, the persistent gloom definitely adds atmosphere, making you wonder, exactly what kind of room you are wandering around in. There's no music, but frankly that might be a distraction from the puzzles, and what a bunch of brain twisting puzzles are there to be had! This room escape is not for the faint of heart, nor is it something that you might clear in 5 or 10 minutes. Be prepared to spend some time, perhaps a lot of time, fumbling around in the dark. Fortunately, there's a save button if you need to take a break.

Loom DawnAnalysis: Place of Light, creator of such classics as Loom Above and Room Fake has knocked this one right out of the park. Seriously absorbing, tricky, mind-bending, and a joy to play, Loom Dawn is one of the best room escape games to come out in a long time. Be warned, there are some wicked difficult puzzles enclosed in this elegant little room escape. Some sort of headgear or other protection might be advisable, due to the head banging that is sure to occur.

Loom Dawn may be the best of the Loom series of games, and that is saying something considering the quality of anything produced by Place of Light. Challenging, fun, mysterious, the puzzles flow from one to another in a beautiful logical procession. Most of the enjoyment is in that wonderful feeling and happy sigh as you unveil one more tiny point of light, pointing to yet another puzzle and another point of light. If there is a downside, the final reveal is a bit of a letdown. After you (spoiler!) get out of the room and go back to light everything up, it would have been nice to have a second ending, or at least a more interesting space to reveal. This is, however, a minor quibble in what is otherwise elegant, challenging casual gameplay.

Pencil and paper? Check. Tasty beverage and salty snack for endurance? Check. Thinking cap on? Check! Convenient soft surface to slam your head against? You're ready to go! Let there be light.

Play Loom Dawn

Walkthrough Guide


(Please allow page to fully load for spoiler tags to be functional.)

Loom Dawn Walkthrough

General Information

  • Look very closely, the lighting is dim and it is easy to miss some of the more subtle cues.

  • Warning: one of the puzzles has a really tricky way to determine the outcome, but I lucked out and found the easy way. In this walkthrough, you're getting the easy way.

  • Once you've done something that involves a sound effect chime, back up and turn around several times, the area affected may be elsewhere.

  • Write down (or screenshot) everything, you're going to need it for the solutions.

  • Remember, making it out of the room is only half of the battle.

  • Good Luck!

Start

  • You are in complete darkness, you might get eaten by a grue.

  • Hover your cursor either to the left or right to find the navigation bars.

  • Keep turning in one direction (left or right, doesn't matter) until you see a tiny green speck.

  • Click on the speck, it is the cord pull for some blinds. Once the speck is in close up, click on it again. Light!

  • Back up and turn left. You will notice the faint light hitting the floor in front of you. Click on the light for a close up.

  • You should see a small area of what looks like wood floor lit up. In the lower left corner of the patch of light is a key. Take it.

  • In the upper right of the patch of light is a mysterious mechanism with a button. Click the button.

  • More light! Look carefully at the lights, there are 7 of them in a particular pattern of yellow and white (yellow, white, yellow, white, yellow, yellow, white). This may be important later. Back up.

  • Notice that you've turned on a small bank of lights and have lit a section of the wall. Click on the wall for a close up.

  • Okay, there are some numbers on the wall, some of them upright, and some of them upside down.

  • It would be good to remember the numbers, just in case.

    • Top row: 5, 2, 6.

    • Middle row: 7, 9, 4.

    • Bottom row: 3, 8, 1.

  • The word on the wall is "pazzled?" backwards. I think they meant puzzled.

  • Click on each number. Hey, the 7 lights up!

  • Back up and turn right. More light! And a telephone!

Telephone (1)

  • Click on the telephone for a close up.

  • Just to the right of the telephone is a blue battery. Take the battery.

  • Click on the receiver to pick it up.

  • Click on the grey button (switch hook) revealed when the handset is up.

  • A light just came on underneath the telephone table.

  • Before you do anything, though, look closely at the wall to the right of the telephone table.

  • There's a symbol there on the wall, it may be important.

    • It looks like a column of three squares, black on top, white in the middle, and black on the bottom. Make a note.

  • Back up.

  • Yes, there's a light underneath the table, and it is highlighting a pink box. Click on the box for a close up.

  • Looks like we need a key. Fortunately, we just found one on the floor. Hope it's the right one.

  • Use the key on the box.

  • When you hear the click, click on the box again. A blue sphere! Take the blue sphere.

  • Or not, it's a slippery little devil.

  • Click on the box to close it, then click again to move the box.

  • There's a note underneath! Click on the note to open it.

  • Okay, there's a diagram that looks like a standard keypad, and the numbers 1, 7, 4, 3, 2. Wonder why the 7 is backwards?

  • Click on the note to see the back. There appears to be a ladder-like diagram and some directions. Is that called a ghost ladder?

  • Back up.

  • See the little light on the floor to the left of the telephone table? That's the slippery blue sphere. Click on it for a close up.

  • The ball appears to be resting against some buttons. Click on the ball to take it.

  • Or not, still slippery. Well, at least you can see the buttons now.

  • Okay, there are 7 buttons there, and when you click on them they turn yellow.

  • Where have we seen 7 things that may or may not be yellow?

  • That's right, the lights on the floor by the wall!

    • Click on the lights to reproduce the pattern of the small lights on the wall, from the left, yellow, blank, yellow, blank, yellow, yellow, blank.

  • If you put the buttons in the right order, they should turn solid.

  • Back up and turn left.

Wall Keypad (1)

  • You will notice that the bank of lights has moved, and is now illuminating a keypad on the wall.

  • Hope you remembered the numbers on the wall, you can't see them anymore.

  • Click on the illuminated keypad for a close up.

  • Well, it looks like a standard 3 x 3 keypad.

  • The note had the numbers 1 7 4 3 2 on it, let's try that.

  • Well, that didn't work.

  • Hmmm, the number 7 on the note was backwards, where have we seen that before?

    • The numbers on the wall were in a 3 x 3 pattern, and the 7 was backward.

    • Maybe the numbered keys on the keypad correspond to the numbers on the wall, not a standard keypad.

    • The top row of numbers was 5, 2, 6, the middle row was 7, 9, 4, and the bottom row was 3, 8, 1.

    • Click 1, 7, 4, 3, 2, but using the position of the wall numbers as the keypad.

    • That would be: right column bottom, left column middle, right column middle, left column bottom, middle column top.

  • If you push the buttons correctly, a light comes on beneath the keypad.

  • Back up.

  • Before we go looking to see what was illuminated, let's check the patch of light on the floor where the lights used to be. Click on the patch of light on the floor for a close up.

  • Hmmm, where the lights were, there are now numbers on the wall: -2619-.

  • Back up.

  • Turn right twice.

Desk (1)

  • Hey, there's now a faint light in this direction that looks like a desk with curtains above it.

  • Click on the curtains to open them.

  • Yay, more light! What is that on the desk?

  • Click on the top of the desk for a close up.

  • Okay, looks like a laptop on the desk, and two drawers, the right one locked.

  • Click on the left drawer to open it.

  • Looks like slots for two batteries, and we only have one.

  • Close the drawer and click on the laptop for a close up.

  • Click on the laptop screen for an even closer close up.

  • That looks like a diagram on the screen for a 3 x 4 grid.

  • In fact, that looks like a telephone keypad.

  • It would probably be for the best if we remembered that pattern.

  • Click on the white power button on the laptop. Hmmm, nothing happens.

  • Back up three times and turn left once.

Telephone (2)

  • Click on the telephone for a close up.

  • Let's try dialing.

  • Pick up the receiver.

  • Now, dial the numbers in the order of the diagram from the laptop screen.

    • If you follow the laptop screen diagram, you will dial 1, 5, 6, 9, 8, 3, 2, 4, 0, 7, then the green phone key.

  • If you dialed correctly, the numbers will scroll off to the left of the screen.

  • Back up and turn right twice.

Power Box (1)

  • Yay, a new area is lit up! Looks like a fuse box.

  • Click on the box for a close up.

  • Okay, there are some colored lights above with different star symbols on them. Click the buttons underneath and you will discover that the buttons shuffle the colored stars.

  • Below that is a box with a large button, which doesn't appear to do anything yet.

  • Below that are two boxes, the left one has a green light and the right one has a red light.

  • You can't open the one with the red light yet, so let's click on the box with a green light (left).

  • Once the box is in close up click on it again to open it. Hey, a switch!

  • Click the switch to turn it on.

  • Hey, there's another one of those strange symbols on the inside of the box cover.

    • This one looks like (from top to bottom) white square, white square, black square.

  • Back up.

  • Hey, a wall sconce to the left is lit up! What is that in the upper left corner that it is illuminating?

  • Turn left.

Desk (2)

  • Click on that switch box in the upper right of the computer desk wall.

  • Okay, there is a large switch on the left, six switches on the right, and the number -1734 underneath the large switch.

  • One of the six switches is in the down position. Let's see what happens when we move it up like the rest.

  • Back up and look! Another light to the lower left of the desk. Click on the new light for a close up.

  • How sweet, a night light. Hey look, in the very corner by the floor, there's something there! Looks like another battery.

  • Take the battery.

  • You can try to take the night light, but it won't let you.

  • You can also click on the power plug to put it in the socket, if you like.

  • Back up.

  • Now where did we see a place for two batteries?

  • That's right, the left drawer of the desk. Click on the left drawer for a close up.

  • Put the batteries in the slots and close the drawer.

  • Hey, that turned on a light underneath the desk!

  • There's a pattern down there!

  • Looks like a regular 5 point star, a 6 point star of David, an asterisk-type star, and a four point (diamond shaped) star.

  • Where have we seen stars like this?

  • Back up and turn right.

Power Box (2)

  • Click on the power box for a close up.

  • Yep, there are the stars. Notice the three buttons underneath the stars.

  • You can use those buttons to switch the stars around.

  • Use the buttons and put the stars in the order you saw under the desk: 5 point (yellow), 6 point (red), asterisk (green), and 4 point (blue).

  • Now push the big button underneath.

  • Cool, it opens to reveal another night light, a flower shaped one!

  • Take the night light and close the box.

  • Okay, there is now a pyramid type symbol on the button.

  • Back up and turn left.

Desk (3)

  • Click on the night light in the lower left for a close up.

  • Remove the mysterious plug from the socket and replace it with the flower night light.

  • Whoah, way more light!

  • Notice two things, the mysterious plug didn't go to anything (oops!) and another symbol on the wall.

    • This symbol is, from top to bottom, black square, black square, white square.

  • There's another, larger plug on the floor, maybe we need to use that.

  • Click on the small night light (the first one) to remove it from the socket.

  • Click on the yellow tip of the removed night light. Hey, a key! Take the key.

  • Now put the large electrical plug into the open socket.

  • Back up.

  • Click on the desk for a close up.

  • Let's try the key on the locked right drawer.

  • Open the drawer and there's something red inside. Take the object.

  • Look, a red pyramid!

  • Click on the laptop for a close up.

  • Click on the laptop again for the extreme close up. The telephone keypad pattern is still on the screen.

  • Click on the white button below the screen.

  • Yay, power!

  • The mailbox is empty, so ignore it for now.

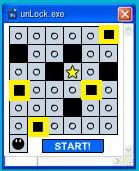
  • Click on the unLock.exe file.

  • Welcome to the toughest puzzle in the game.

    • The object is to get the ball to the star.

    • To accomplish this you need to add a few more black spaces to the grid.

    • Remember, the ball will turn right when it encounters a black space.

      • Here's a screenshot of the solution with the added squares highlighted in yellow. Once the squares are in place click the start button and watch the circle go.

      • Once it hits the star you will be treated to an animation. Enjoy.

      • When the animation is over, there will be a little star at the bottom right of the game screen. Click on it.

      • This pulls up another puzzle, but you don't have the information to solve it yet.

  • Once the first part of the maze is solved, back up three times.

  • Turn right once.

Power Box (3)

  • Click on the power box for a close up.

  • Place the red pyramid into the center button. Cool, lines of force!

  • Hey, notice that the lower right box now shows green.

  • Click on the lower right box for a close up and open it.

  • Pull the red switch down. Hey, more numbers! 060- is showing.

  • This is the third set of numbers and dashes we've seen in the room.

  • Maybe this is another code?

  • Back up and turn right twice.

Telephone (3)

  • Let's think on this a minute.

  • We've found three groups of numbers with dashes: -2619-, -1734, and 060-.

  • How about we connect that by the dashes? That makes 060-2619-1734.

  • Looks a bit like a phone number, doesn't it?

  • Click on the phone for a close up.

  • Dial 060-2619-1734 and push the green phone button.

  • Back up and turn right twice.

Power Box (4)

  • Hey, there's a phone ringing!

  • See the little flash at the lower left of the scene?

  • Click on the flash for a close up.

  • Click on the little green light and you've opened up a cell phone.

  • Click on the cell phone for a super close up.

  • According to the screen there's an incoming call.

  • Click on the phone symbol to take the call.

  • Click on the "unsent message" icon to send the message.

  • Back up from the phone.

  • Turn left.

Desk (4)

  • Let's click on the laptop several times until we are in extreme close up.

  • Click the white button to turn the screen on.

  • Now click on the mail.exe icon.

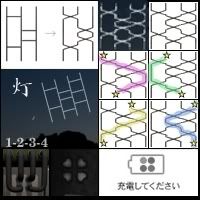
  • Nice, we sent ourselves a picture with another one of those mysterious ladders on it.

  • Back up twice.

  • If you look closely, there's something on the wall to the right, above the desk and below the windowsill.

  • Click on that area of the wall for a close up.

  • Okay, we have an equal sign, a flower, a telephone, and a shape of four hearts, with columns of three squares underneath. I'm sure that's important, so remember it.

  • Back up twice and turn right.

Power Box (5)

  • Hey look, a door!

  • Click on the door for a close up.

  • Click above the door handle for a closer close up.

  • Okay, there are some colors here, and a fourth mysterious symbol on the door handle.

    • This time around, the symbol is, from top to bottom, white square, black square, white square.

  • This is getting us nowhere.

  • Where have we seen these colors before?

  • That's right, the power box colored star buttons!

  • But we don't know what order they should be in.

  • Oh, we forgot to pick up the cell phone. Let's go back and do that at least.

  • Back up twice.

  • Click on the cell phone on the floor twice for an extreme close up.

  • Well, we can't take the cell phone, but look, the battery is empty.

  • Hey, there are four colors on the battery empty symbol: top row, blue and green, bottom row yellow and red.

  • Maybe that's the order the colors should be on the door.

  • Back up twice.

  • Click on the Power Box for a close up.

    • Okay, here's where it gets a little strange.

    • I think that all those ladder symbols were a way of decoding which colored button should be placed where to light up the door correctly.

    • However, I just switched the buttons around so that the read, from left to right, blue, green, yellow, and red, just like on the cell phone.

    • For those who are color blind, the buttons should be: 4 point star, asterisk, 5 point star, 6 point star.

  • Once you have the buttons in the proper order, back up.

  • Click on the door for a close up, then click on the handle.

  • The door opens!

  • But you're not done yet, the room isn't lit up!

  • Don't go through that door!

  • You went through the door, didn't you?

  • If you go through the door before lighting up the entire room, don't panic.

  • Look closely at the lower right of the screen, there are a couple of Japanese characters in faint pink.

  • Hover the mouse over those characters, and a bunch of text comes up.

  • Most of it is in Japanese, but at the bottom you can clearly see "Go back to the room".

  • Click on that phrase and you're back in the room.

  • You should now be staring at the open door.

  • Look closely at the doorway, there's a white symbol or something above the open door.

  • Click on that small white area for a close up.

  • Yay, more symbols to interpret.

  • This looks like a diagram for switches.

  • We've seen 6 switches before.

    • The diagram seems to indicate the switch positions, top row: down, up, down, bottom row: down, down, up.

  • Back up twice and turn left.

End Game

  • You are now facing the computer desk.

  • Click on the switch box on the upper right of the wall for a close up.

    • Set the switches as indicated by the door diagram. Top row: down, up, down. Bottom row: down, down, up.

  • Once the switches are set click on the large switch.

  • Back up and turn right twice.

  • Hey, there's something different about that number keypad on the wall.

  • Click on the keypad for a close up.

  • The keypad has moved!

  • That now looks like a charger. And the symbols for the circles on either side look like the red pyramid and the slippery blue sphere.

  • What could need to be charged?

  • Oh yeah, the cell phone.

  • Back up and turn right.

  • Click on the blue sphere on the lower left of the telephone wall and take the sphere.

  • Turn right twice.

  • Click on the power box for a close up and take the red pyramid.

  • Back up.

  • Now click on the cell phone on the floor and take the cell phone.

  • Okay, that didn't work.

  • Back up and turn right once.

  • Click on the wall keypad for a close up.

  • Place the pyramid on the right circle and the sphere on the left.

  • Okay, the charger lit up. Now let's go back and get the cell phone.

  • Back up and turn left once.

  • Click on the cell phone for a close up and take the cell phone.

  • Turn right.

  • Click on the keypad for a close up and place the cell phone in the center charger.

  • Okay, that was freaky.

  • Now we're looking at a 4 x 3 grid. Great.

  • Well, we've seen 4 areas where there are symbols of three squares.

  • The problem is in what order they should be put in.

    • Remember the code above the computer desk?

    • The code showed an equal sign, a flower, a telephone, and the four hearts symbol.

    • If you consider that the equal sign is the power box, that indicates the four areas where we found the three square symbols.

    • So let's put them in this order: power box first (from top to bottom, white, white, black), flower (from top to bottom black, black, white), telephone (from top to bottom black, white, black), and door handle (from top to bottom, white, black, white).

    • That creates a grid that looks something like this, where X is black: top row, 0 X X 0, middle row, 0 X 0 X, and bottom row, X 0 X 0.

    • Input that into the cell phone.

  • If you input the code into the charging cell phone correctly, a purple light should shoot out towards the door.

  • Open the door but do not go out.

  • Look closely at the bottom of the door. There's a little purple circle down there.

  • Click on the purple circle.

  • Hey, it's a door stop!

  • Back up and turn right twice.

  • The light from the door now illuminates the small window with the shades.

  • Click on that window for a close up.

  • Notice the cord that controls the shades.

  • Click and hold on the cord handle and you will see a diagram of a star on the closed shades.

  • Doesn't that look like the star on the computer?

    • Remember that the black dots are in the top point, the upper right point, and the lower left point.

  • Back up and turn right.

  • Click on the laptop until you are in extreme close up.

  • Turn on the laptop and click on unLock.exe.

  • Click on the little star and when it comes up click on the dots that match the window shade (see spoiler above).

  • Once the proper dots are black, click the larger dot in the middle.

  • Enjoy the animation.

  • Once the animation reaches "the end", notice that there is a small star twinkling in the black area of the program, above the "the end" text.

  • Click on that flashing star.

  • The night is over! You can now see the room lit in all its glory.

  • Leave through the door. The end.

146 Comments

This is a good game! I'm already stuck, I've only managed to turn on two lights and I have a key, hmmm. Letters and numbers?

Reply

i'm in the same place sveeds! i could find nothing else i could interact with except the switch to the blinds which still makes them open and close but wont hold them shut again.

Reply

I was stuck in the same place as both of you but

Try clicking the the letters/numbers

Reply

Try clicking the numbers to figure out the order. See where that gets you.

Reply

yes i did... i got pretty far... now i'm stuck

where you have only a battery and u can interact with the 3x3 puzzle on the wall with the circles on either side... i've also found the scrap piece of paper that seems to show how to solve it but i can't seem to figure out how

Reply
ShaggyMonk January 20, 2010 12:47 AM

Hi, look at the numbers on the wall, and try ...

Clicking them in sequence

Reply

YAYiza...I've tried holding a mirror up to the screen and can't figure out the code.

Reply

yeah crank i have no idea why only the 7 is backwards and also

if you look down at the light cast by the open blinds you see another set of 4 numbers off to the right... and its still possible to turn that light off (thats on the 3x3 panel) and see the scattered numbers on the wall again... i thought that had sumthing to do with the 3x3 panel of buttons but it doesn't at least not in the obvious way that i tried :(... tough game lolz

Reply

YAYiza:

Try clicking around.

Specifically, check carefully under the telephone box.

Reply
Markonite2 January 20, 2010 12:58 AM

I beat it without help!
First one of these I can say that about.

Reply
CrankitUp January 20, 2010 1:04 AM

I've never posted before tonight so I want to test the whole "spoiler" thing.

Boom Sha Lack Lack Boom

Reply
infeliciter January 20, 2010 1:07 AM

im stuck on the computer.

Reply

Dang, I got out of the room, but

I didn't get nearly all the room lit up. And I still hadn't used all the clues I had.

Don't click on the door too soon. I had clicked on it earlier without leaving the room, but I must have enabled something new. Double dang.

Reply

i don't understand what to do with

the numbers on the wall, i clicked everywhere and only been able to "activate" the number 7. now what????

Reply
Anonymous January 20, 2010 1:12 AM

I'm stuck on

unLock.exe on the computer

Reply
CrankitUp January 20, 2010 1:12 AM

I can't get passed this 3x3 grid. I hope I'm not over thinking it.

Reply

grinny- it wasn't backwards, it was upside down... *sigh* i'm very stuck

Reply
Jim_in_Oz January 20, 2010 1:13 AM

Aaargh. That little spinning man is driving me insane with his infinite loops. Help!

Reply

i feel u crank... i've tried inputting the numbers as if it were like an inverted number pad like on a keyboard... no luck... sumone give us a clue lolz

Reply

Aha, I had hit Save fairly recently, and was able to get back almost to where I was.

Where is the clue to

solving the star puzzle in the unlock.exe application?

Reply
Jim_in_Oz January 20, 2010 1:16 AM

Long time player, first time poster and I just discovered what everybody talks about when they say "the power of posting". I should have done this long ago.

Reply

OMG i over thought that... way too much. ugh...

Reply
CrankitUp January 20, 2010 1:26 AM

Glad you got it YAYiza. I'll just sit here and bang my head some more. Don't look back.

Reply

I must be playing a different game than you guys because I can't click on the numbers on the wall. Only the number 7 lights up and nothing else happens. As for the keypad, I can't figure out the combination. It doesn't seem to be the sequence shown in the lights.

Reply
waycooler January 20, 2010 1:33 AM

Oh. I was stuck at the 3x3 grid as was almost everyone else, but... I figured it out. Crank, and whoever else is stuck there, you're probably overthinking it wayyyyyy too much.

Stop rotating and/or flipping the grid of numbers. Ignore the fact that the numbers on the wall are funky-looking. Just click the spot on the pad that each number corresponds to without rotating it or flipping it. And of course, click the numbers in the order that the paper gives you.

I hope that clears it up for everyone. Now, on to escape!

Reply
CrankitUp January 20, 2010 1:34 AM

Alright I can't get this 3x3 deal. I feel like I have tired every keypad layout possible. I need some help on this one.

Reply
CrankitUp January 20, 2010 1:37 AM

Seriously. That was it?

Reply
Jim_in_Oz January 20, 2010 1:37 AM

This little man on the computer has it in for me. I can't get

the star puzzle after the spinning maze.

Reply

wait...

what paper?

Reply

yeah...just stopped clicking for some strange reason. Rookie mistake!!

Reply
Redhairsword January 20, 2010 1:45 AM

I finally got an account on Jayisgames! ^_^ Now I need help. I'm at the computer and I can't get anything to work. What is up with the screen?

And I'm pretty sure

that thing in the drawer is a battery charger, but I can't put the battery in there. Not even for safe keeping. Don't tell me I need both batteries before I can put them in!

Reply

The maze puzzle was fun. What I can't get is the

second star puzzle that comes up afterwards. When I got the ball to reach the star in the maze puzzle, after things settled down, I had a sort of robot shape with a little star in the bottom right corner. When I click on the star, it expands, and I can click buttons on the 5 points, or the button in the centre. I assume there is a correct order for the buttons on the 5 points so that the button in the centre will do more than just minimize the star again.

Reply
infeliciter January 20, 2010 1:55 AM

I cant seem to get past the maze. i need help.

Reply

Worked out a decent chunk of the alternative ending...

Once you open the door look up. You will see alternative switches for the big switch block. Once you flip those correctly you will then get access to the keypad area. Inside it has 2 holes for a red diamond and blue circle. Grab those 2 items and put them in. Then grab the phone and put it into the slot to recharge it. A grid appears. Seems to require the correct order of the markings around the room. Stuck here…

Reply
Redhairsword January 20, 2010 1:56 AM

OH praise all that is good I FINALLY figured out what was up with the computer screen!!

Reply

what should i do with the cell phone?

Reply

Finally finished, excellent game. There are 2 endings. You can choose not to go out the door............

After you open the door If you look up there is a white diagram for the switch board.

The star in the computer, the symbols on the right side of the computer and the circles next to the keypad are a part of the second ending.

Super Spoiler for the guy that only makes right turns:

Label the columns A-F and rows 1-6, places blocks in F1,A4,E4,B6

Reply
waycooler January 20, 2010 2:00 AM

Whew figured out the maze! Image that from top left to top right, it is numbered A B C D E F. And from top left to bottom right it is 1 2 3 4 5 6. These are the spots you need to put the blocks, for those of you who are incredibly frustrated:

A4, B6, E4, F1.

Reply

Dense:

Push the purple button in the door and pull the blinds, if you have finished the blue ball and red diamond with cell phone.

Reply
waycooler January 20, 2010 2:06 AM

Oh dang it, Sveeds beat me to it. And I was so happy to figure it out too... :(

Reply
Redhairsword January 20, 2010 2:14 AM

Is there a reason I can't pull the red switch?

Reply
ShaggyMonk January 20, 2010 2:19 AM

Redhairsword:

For the red handle...

I placed the red paper / diamond in the top slot of the 'fuse box', and then the red handle started working

Reply
snickerbar January 20, 2010 2:28 AM

Help! I STILL don't get the 3x3 grid/telephone puzzle. I've tried using the numbers from the paper two ways:

(1) taking the numbers from the telephone pad according to the corresponding numbers from the wall (in the order from the paper) (i.e. 94672) as well as (2) taking the numbers from the wall according to the corresponding numbers from the telephone pad (in the order from the paper) (i.e. 53762) AND tried these combinations on the telephone and the wall

and nothing is working!

What am I not getting?

Reply
infeliciter January 20, 2010 2:32 AM

so lost...

i've pulled the handle and can see the door but cant open it. and what are all the unused numbers for or the backside of the note under the red box? i was doing so good and now... not so much.

Reply

@infeliciter

for backside of the note,

have you found the mobile/cell phone? If yes, then you should have emailed a message.

for the unused numbers,

have you joined them together?

Reply
crashlanding January 20, 2010 2:43 AM

Snickerbar:
the phone

the numbers on the wall have nothing to do with the phone. total red herring. you'll get the number you have to dial for that elsewhere...

on the computer screen

I'm totally stuck in a similar place to infeliciter

I've solved the turny man maze, but not the star puzzle, I've got the light on over the door, but can't open it, I've got two unused number fragments from the red switch and the fuse box thing in the corner (I'm assuming I need another number sequence to make 10 numbers for the phone), and I've got the code made of 4 columns with 3 squares each figured out, but nowhere to input it. HALP.

Reply
snickerbar January 20, 2010 2:44 AM

grinnyp, thanks for trying to help me... but isn't this the same as what I've tried?

right column bottom (=9), left column middle (=4), right column middle (=6), left column bottom (=7), middle column top (=2) which is 94672 on the telephone keypad

What's supposed to happen when I press the right numbers in the right order?

Thank you for helping me! This is driving me crazy! :S

Reply

Okay, I put in the code on the telephone, but nothing happens. Is something supposed to happen?

Reply

Yea what snicker said, I tried the same thing and nothing.

Reply
crashlanding January 20, 2010 2:49 AM

snickerbar,

there are two keypads. the phone is one, the other has no numbers on it. don't look for the other keypad directly, look for other buttons (or button-like things) you haven't pressed, and the keypad will be made obvious.
Or, if you want a more direct hint

there's a button on the telephone that's NOT part of the keypad

Reply
Anonymous January 20, 2010 2:51 AM

I'm confused about the alternate ending. I stuffed the jewels into their respective sockets, charged the phone up, completed the phone's puzzle (I wasn't given a second chance, so does that mean I got it right?) and I saw a purple line trace along the wall and out of the door. Now I can't open the door.

Reply
snickerbar January 20, 2010 2:51 AM

Okay! I just realized I was trying the combination on the wrong thing! I was trying it on the

telephone

instead of

the square pad on the wall that I hadn't found yet (I just found it!)

Thanks for the help, all!

Reply

Phew! Got out the door, but still have to work out how to ge tthe "alternate" ending using the 4 different bars printed around the room, and use the star on the computer.

Tough!

Reply
infeliciter January 20, 2010 2:52 AM

still lost.

can seem to get past the big star. on the computer.

i must be missing some clues.

Reply
matchhead January 20, 2010 2:52 AM

Snickerbar

im also stuck at the same location as you except i found the other 4 digits

you are missing the 4 digits form where you got the first key

Reply

Okay, I give, how do you reveal

the pad on the wall

I have clicked EVERYWHERE on and near the telephone.

Reply
crashlanding January 20, 2010 2:59 AM

OH! duh! thanks grinny.

Katarth:

pick up the handset, and hit the hangy-uppy button thing (dunno what else to call it) on the phone. all will be made clear

Reply

Wait, I did that and that

lit up under the table that had the box

I guess what I'm stuck on then is

what to do with the pegs near the ball of light from the box

Reply

Nevermind!!! I just figured it out

Reply

Hello everyone,

I have just managed to find three columns of black and white. Can I know where is the fourth one?

Thank you very much.

Reply
Anonymous January 20, 2010 3:10 AM

where is the code for the star puzzle on the computer??????????????

Reply
infeliciter January 20, 2010 3:19 AM

ok all done. lit the room up.

Reply
wickedcherub January 20, 2010 3:19 AM

I've lit up the door,
but apparently

there's a cellphone?
I don't know where that is, and I've got pages full of clues I haven't used yet.

Reply
snickerbar January 20, 2010 3:20 AM

Okay, I have the

red crystal in the grey/green utility box type thing and put the coloured buttons/stars in the right order and now I have red lines. I know somehow these lines are connected to the lines on the back of the paper under the box, but I don't know how/where the horizontal lines are.

I currently have nothing in my inventory since I put

both batteries in the charger in the desk

but I don't know what they are for.

I also found two codes

-2619- and -1734

and I've tried them in the phone but nothing happens.

And I've found the

picture symbols under the window

and noticed the same 3-block symbols around the room near other items.

What is next?

Reply
Anonymous January 20, 2010 3:28 AM

Okay, I have finished the maze, found the red handle that I can't pull. Where is the door everyone is talking about?

Reply

Okay, now I'm stuck...again

Found the cell phone, but I don't know how to prop open the door or do the star puzzle

Reply
wickedcherub January 20, 2010 3:43 AM

Thanks grinnyp!
I got to use numbers. :)
Now what?

my clue notepad is still left with the code with the rectangles, a colour code, the clue I got from my email, along with the clue I got on the back of the bit of paper.
I'm assuming it all has to do with that fuseboxy thing on the wall, but I need more red lines! What am I missing now?

Reply

Anyone care to drop a hint about

the correct order of the triple-sectioned boxes to enter into the cell phone once it's hooked up into the wall? I'm not sure if there's any rhyme or reason to how we're supposed to enter them...

Reply
wickedcherub January 20, 2010 4:13 AM

what purple button? I've put the cellphone in the hole and saw the purple line head to the door but now i'm stuck :(

Reply

What do I do with the

Cellphone now that its in the keypad with the purple screen

Reply
sgtdroopy January 20, 2010 4:24 AM

I have solved the puzzle with the guy that only turns right, but I cannot see that any new light has turned on. Could someone please tell me what new place should be lit now?

Reply

Okay, actually figured out what goes in

the cellphone when it turns purple

Just dont know what order to do it

Reply
sgtdroopy January 20, 2010 4:32 AM

grinnyp
No, I have been unable to find the key that opens it. Any hints? :)

Reply
sgtdroopy January 20, 2010 4:34 AM

Nevermind! I believe I have it now. ^_^

Reply

Hrm...is there a

light that needs to be light up next to the computer desk to get the code?

Reply

I didn't use

the picture that I sent to the computer

Where was that used?

Reply

I feel like I missed something, what with the unused stuff. I got

the room lit up.

But there was nothing different in the ending.

I kinda feel let down, since it was quite a bit of work after the first ending. :-(

Good escape game otherwise!

Reply
Anonymous January 20, 2010 6:55 AM

First time posting. Could someone please direct me as to how

to turn on the computer screen?

I'm sure I'm missing something easy.

Reply

Very good escape game. Thanks for the post.
ciao

Reply

You know, I came here because I thought I was doing the phone puzzle wrong, but it looks like I'm doing it correctly. I'm entering

94672, which translates 17432 based on the grid on the wall.

But nothing is happening. I tried

pressing the green phone button, dialing before picking up

but it's not doing anything and nothing in the room has changed. Am I missing something stupid?

Thanks,

-Joe

Reply
Tea Break January 20, 2010 9:02 AM

Brilliant game, definately one of my all time favourites. All the puzzles were logical and satisfying to solve.

Reply

@Nostalgia:

The 17432 clue on the paper is associated with a 3x3 grid. The phone keypad is a 3x4 grid. Perhaps this code is useful somewhere else instead.

Reply

I don't get the maze puzzle..
You're talking about blocks, which blocks? O.o

Reply

What did I do wrong?

I've entered the three number segments (in my case they are 960-2619-1734, don't know if those change) on the blue phone. Tried with and without dialing the little phone symbol first, as well as other iterations. But I'm not hearing/seeing the cell phone. Help me grinnyp, you're my only hope!

Reply

@noaaah: The maze puzzle...

Before you hit start you can select/deselect blocks in the maze game by clicking on them. When you click a block it blacks it out and turns it into a wall the little guy can't pass through. Then hit start to watch him go. Hope that helps!

Reply

Walkthrough


1. turn around
2. press small green button
3. turn left
4. press on window light on the floor.
5. pickup key
6. press button on the light
7. go back. click on light area
8. press on 7
9. back and right. see the phone
10. click on phone. pick up battery
11. click on reciever. click on button uder reciever. turned on light under the cabinet.
12. go back, click on cabinet bottom.
13. use key on box. open it. click on sphere.
14. click on box. see on note under the box. on both sides.
15. go back click on sphere. click on sphere again to put it left.
16. click on pins (y,w,y,w,y,y,w). like lamp colors.
17. back, left. lamp was moved to the right.
18. using code from undebox note. and numbers order from the wall. enter code in wall device - light turned on.
19. go back and turn around. click on blind.
20 click on laptop. note circles on screen dust. it's a way on phone keyboard.
21. return to phone. enter 1569832407 and 'call' button.
22. turn around. open left white box. turn on switch.
23. turn left. turn on bottom right switch on fuse(?) box.
24. go back. look at left. click on new lamp left of the table. pick up second battery.
25. open left table drawer. put batteries. close drawer. note sequence on the floor. 5-pointed, 6, 8, 4 start.
26. go left. enter star sequence, cliuck on center door. get the night lamp.
27. back to table. plug the bar into outlet. unplug small lamp. plug the right cable. click twice on small lamp to retrieve key.
28. use key on right drawer. get gem.
29. turn on laptop. open unlock.exe. Label the columns A-F and rows 1-6, places blocks in F1,A4,E4,B6.
30. go back and right. note right white bow now green. open it. turn off switch.
31. note numbers on switch, fuse box and window lights on the floor. 060-1734-2619. dial it.
32. turn around. see the cell phone. open it. click on send message.
33. go back. click cell phone again. note colored circles BGYR. Enter this code into device on the wall( buttons with stars).
34. open the door. do not exit. click on the ceiling. note the fuce box code.
35. back to fuce box. turn switches. top line: down,up,down, bottom line:down,down,up. turn on main switch.
36. remove gem. pick up sphere. back to wall with window light. note new slots. insert gem and shere.
37. back to cell phone pickup it and install between gem and sphere.
38. back to table. right to laptop there is code on the wall: equals, flower, phone, clover.
39. find labels near thse things: 0,0,0;1,1,0;1,0,1;0,1,0; Enter it in cell phone.
40. back to door. open it, click on pink pin. return to the window, clise blind. note star code.
41. back to laptop. open unlock.exe enter star code.
42. The Night Is Over.

Reply

@swooning

I think you have the first part of the number wrong.

Reply

Thank you Tea Break!

I have got to find a hobby where being blind as a bat is not such a liability :-(

Reply

Nice walkthrough JIGuest, but the room is still dark, and when I exit the door I get the same "well done but you might want to go back and turn on the lights" type of message. I 've done everything, I even put the correct input on the pink cellphone screen by myself, but the room is still dark.

Am I missing something?

Reply

I'm going to attempt my first walkthrough ever! (This is part one because I'm worried my computer is about to shut down) ok here goes

Clicking the sides of the screen to turn the room reveals

a small glowie thing on the wall. click on it

The curtains opened and more light is in the room

If you click on the glowey thing again (the curtain opener) you will see them flash closed again.
this isn't important yet

zoom out and turn left

the light from the window reveals a space on the wall
click on it

look, a key! any escaper knows that keys=good so take it
there is also a blue box thing with a silver button. push the button
lights come on
Note the colors of the lights

zoom out then in on the wall.
there are a bunch of numbers on it with pazzled? spelled mirrored below. I don't know what this is for.

why not try clicking the numbers.

looks like the 7 did something. remember the positions of the numbers and zoom out. (not which direction they are facing but how they are arranged. ex 1 is in the bottom right corner)

turn right and see a telephone. click on the phone
take the battery next to it.

Now for something that I love doing XD
Pick up the phone and press the call end button.

more light appeared. look at the wall. there is a symbol that appeared. remember that and zoom out

zoom in on the red thing underneath the phone.
Looks like a locked box. well we do have a key. use it

oooh a pretty blue thing! try to take it

hey! the ball rolled away T.T let's go chase it. but first let's close the box.
But wait! let's look UNDER the box. after you close it click it again.

there should be a sheet of paper that you can look at (but cannot take)
note the numbers on it and the diagram next to it then click it again to turn it over.

I'll write the next part in a sec...

Reply

okay JIGuest made a walkthrough so I won't finish mine

Reply

The link won't work anymore, apparently due to capacity problems (that's what happens when an escape game appears on JIG!) - is there a mirror anywhere?

[Edit: It's loading fine for me, perhaps it's only a temporary, intermittent issue? Try it again. -Jay]

Reply

I can't get the phone puzzle to work. I've got the info from the phone, flower, and door but when I input it, nothing happens.

Reply

This was great! I love Place of Light's escape games, they might be favourite featured on this site. Anyway, I'm also confused about the ladder clues, as I got the "good" ending, but don't think I ever used them. Maybe they were just there as red herrings?

The only thing I could think that is they relate to the final puzzle with the cell phone, but I don't see how and ultimately you don't need them to solve it so yeah. I have no idea!

But besides that, really fun game! And not TOO hard...I had to use spoilers a couple of times, but not too many.

Reply
organikshadow January 20, 2010 12:55 PM

I can't figure out the star puzzle to save my life, and the screenshot in the walkthrough is coming up 'page not found'...

Reply

Wow! What a great game - fun to look at, hard puzzles, etc. Thanks to all for the hints.

Reply

Am I the only one putting in the 'correct'

maze

solution and still not getting the star?

Reply
Markonite2 January 20, 2010 1:50 PM

Not that it matters now, but that win I posted at the very top was a full win.
I went outside the first time,
then I used the "return to room" option,
and went back to complete the puzzles.
(Which were a lot easier than the puzzles before)

Reply
vederblich January 20, 2010 2:07 PM

Finally out, after half a day and lots&lots of help from these here hints, sad to say. My god, that was hard. But sooo good!
It must be the coolest idea for a room escape in a long long time, and I don't think I've seen such a goodlooking and intriguing game since Neutral's latest...

Reply

Very Nice work on the walkthrough, Grinnyp

Reply

the

link to the abswer to the computer puzzle

is down. anyone?

Reply

Completed without walkthrough, yay me! The only thing I got really stuck with was:

finding the key to the right drawer

I think this is some kind of red herring, or perhaps a puzzle that finally didn't make it to the final version of the game:

The diagrams at the back of the note and in the email message. They seem related.

I see four vertical lines going to the four pipes below the diamond panel, perhaps the message was the clue for a puzzle that should have gone there, that was I least what I thought. ?:-/

Reply

Alright. Excellent, excellent game from Az. Really hearkens back to Room Bath, one of my all-time favorites.

I was wondering about the

ladder notes. Then I worked out the picture and applied it to the power box. Went back through again, and it worked! Both times.

Here's a fairly non-spoiler screenshot.

http://img.photobucket.com/albums/v126/shusu/play/aeb8e858.jpg

So that's how it works... there are no clues left over.

Reply

@vederblich
It's dark and light! Hee hee.

By the way, my graphic / screenshot is colored arbitrarily; they have no meaning in the game.

Reply
nerdypants January 20, 2010 5:13 PM

Awesome game! The only part I got stuck on was the maze puzzle, and then I REALLY got stuck. Thanks grinnyp for that screenshot, I was totally lost.

Reply

Am I the only one who thought the title of this was 'Doom Lawn' at first? Anyway, it was a great, fairly difficult, but certainly fun, game.

Reply

Best. Escape Game. Ever.

Reply

Shudog, great job unraveling the ladder clue!

It is not really a very useful clue, since it is easy to realize that:

1234

is

12
34

just by looking at the colors, but your explanation is spot on.

Reply

That was super. I did need the walkthrough but I managed to do most of it myself. My problem was mostly not noticing a couple of important places to click

(the one between the desk and computer, and the door stop).

Thanks for this one, Grinny, and thanks for your great walkthrough.

Reply

what about the reverse of pazzled? clues for? I dont use it at all....anybody knows? thx...^^

Reply
ChrisForsyth January 21, 2010 2:43 AM

One thing I'm wondering--is there *supposed* to be a difference between the second ending and the first one? I did the second set of puzzles, lit up the room...and the ending was exactly the same, including the message to go back and turn the light on to get the other ending.

Reply

I noticed this as early as Loom Custody... Az seems to have borrowed a key concept from another game.

eskkapee 2 did the cell phone trick.

(Rougoku by Bianco-Bianco is the one that preceded Loom Custody. Not precisely the same, but the water made it stand out from all the other cell escapes at the time.)

Execution was much better here, just a tidbit re: some of the clever clues.

Reply
Anonymous January 21, 2010 6:01 PM

Best escape game I've seen in a while. Great opening, great puzzles!

Reply

AWESOME GAME!!! I really enjoyed it, even though I did have to resort to the walkthrough near the end. I was also a little disappointed at the second ending, for the reasons stated in the review. Still, if more of these type come out, it will be a great year for escape games!

Jay, have you ever thought about implementing a button to reveal all spoiler tags in a thread at once?

Reply
wildflower12 January 24, 2010 11:55 PM

I was doing really well until we got to the computer games. That maze puzzle was REALLY hard! Cool concept for an escape game though.

Reply
defenseof January 25, 2010 4:33 PM

Had to use the walkthrough on this on, but still a really fun game. I really like the unique bit of structure of having to get more and more light as you go. At first this was a bit annoying (I like the horror ones that do this but guess wasn't expecting that type of theme so it was like I couldn't really wrap my head around it at first), but really warmed up to it.

Recommended (for what that is worth! :) )

Reply

Not sure if anyone's mentioned this, but since the current walkthrough has no explanation for the color puzzle, I'll take a stab:

The colored squares on the cell phone correspond to the pipes on the power box. Bottom left pipe connects to the first (left-most) position, top left to the second, top right to the third, bottom right to the last. Essentially it reads clockwise from the bottom left. Looking at the phone, we get: yellow, blue, green, red.

Of course, we're not quite finished yet. Following the ladder diagram from bottom to top, the colors rearrange to: blue, green, yellow, red.

Hope that makes more sense!

Reply

Fantastic game, really one of the best room escapes ever. The level of difficulty is just right. Thanks

Reply

A quality escape game. But it didn't seem to have a very good "flow."

Maybe I'm just sore because I like to do them on my own, and I had to resort to the walkthrough more than once. LOL.

Figuring out the little Pac Man maze game through trial and error was fun.

Overall, not an easy game. Definitely a challenge with lots to do.

Reply

Exactly what a room escape should be about; smart puzzles with intelligent use of backtracking and nothing about pixel hunting. Never too easy, never illogical. The fascinating ambientation is another nice touch. Loved it.

Reply
Anonymous June 24, 2011 11:01 AM

The ladder clue is a game from some country: you start at the bottom of one rail and whenever you encounter a rung you move over it, then go up that rail until you again encounter a rung, then move over that one, and so on. In this game they line up perfectly to figure out the door hearts. Pretty cool now that I understand it... a year later...

Reply

I don't understand the batteries.

What were they used for???

Reply
eddiemonster July 10, 2012 9:26 PM

lovely!

Reply

^ Scroll Up | Homepage >

Leave a comment [top of page]

Please consider creating a Casual Gameplay account if you're a regular visitor here, as it will allow us to create an even better experience for you. Sign-up here!
  • PLEASE UNDERSTAND SITE POLICIES BEFORE POSTING COMMENTS
  • You may use limited HTML tags for style:
    (a href, b, br/, strong, em, ul, ol, li, code, spoiler)
    HTML tags begin with a less-than sign: < and end with a greater-than sign: >. Always. No exceptions.
  • To post spoilers, please use spoiler tags: <spoiler> example </spoiler>
    If you need help understanding spoiler tags, read the spoiler help.
  • Please Preview your comment before posting, especially when using spoilers!
  • No link dropping, no domains as names; do not spam, and do not advertise! (rel="nofollow" in use)
chrpa Jayisgames needs your help to continue providing quality content. Click for details Welcome to the Roundup 66 - Retro with four games! After you find the ten monkeys in the chapter, look in the inventory. You will find a...  ...
chrpa Jayisgames needs your help to continue providing quality content. Click for details Welcome to the Roundup 65 with three games! As mentioned in the previous roundups, only odd-numbered episodes are featured since even-numbered are for Robin Vencel's patrons (the...  ...
chrpa Jayisgames needs your help to continue providing quality content. Click for details Hi! Weekday Escape and Weekday Puzzle are here! First we have two new cans from tomoLaSiDo and then two small rooms from isotronic. That's all for this...  ...
6,365 Views
0 Comments
chrpa Jayisgames needs your help to continue providing quality content. Click for details Welcome to Mobile Monday! We have another beautiful game from Nicolet and it's a winter game as it should be. Tasuku Yahiro have released another of their...  ...

HELP Jayisgames.com

Recent Comments


Display 5 more comments
Limit to the last 5 comments

Game of the week


Dark Romance: Vampire Origins Collector's Edition

Your Favorite Games edit

add
Save links to your favorite games here. Use the Favorites editor.

Monthly Archives